Like any part, the generator sooner or later becomes unusable. However, the breakdown of some parts does not interfere with the operation of the car, provided that the broken element is promptly replaced and repaired. And a failed car generator will not allow you to drive even 50-400 kilometers (depending on the battery and working devices) - the car will no longer drive. An injection engine will immediately start to malfunction and eventually stall; with carburetor cars, things are a little easier. Monitor the condition of the generator and, as necessary, either replace it with a new one or repair the installed one.
Note! You will need the following tools: a good set of wrenches, including wrenches, sockets, etc., two types of screwdrivers, a multimeter with an ohmmeter function, a special puller to remove the bearing from the shaft, a hammer and tubular mandrels (socket heads are suitable).
When to repair a generator?
A generator that has become unusable begins to supply current poorly and incorrectly to the vehicle’s on-board network, which causes problems with the electronics:
- at low speeds, the car's headlights shine dimly;
- Increasing speeds bring the light back to normal.
These symptoms indicate a malfunction of the generator or voltage regulator.
Another sign is that the generator is making noise: the generator bearings are out of order, they are not very difficult to replace and are inexpensive. We recommend disassembling and replacing the bearings as quickly as possible, otherwise it is possible that other parts will have to be changed due to bearings, for example, the stator suffers.
The indicator on the dashboard does not light up
Regardless of which VAZ-2115 generator is used in the car, the symptoms of breakdowns will be the same. If, when you turn on the ignition, the lamp indicating the presence of charging does not light up, the following breakdowns are possible:
- The lamp burned out. Remove the instrument panel and replace the light bulb with a similar one.
- Oxidation of the slip rings on the rotor has occurred. You will need to completely disassemble the VAZ-2115 generator and clean the slip rings or replace them.
- The power supply circuit of the excitation winding is broken. Check all wires and replace the fuse.
- Severe brush wear or breakdown in the voltage regulator.
- Sometimes breakdown occurs in semiconductor diodes. The best repair method is to replace the rectifier bridge.
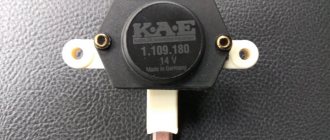
The indicator lights up constantly if the voltage regulator is faulty. If it is faulty, then it is better to completely replace it - its cost is low (about 200-300 rubles).
Connection diagram for the VAZ 2114 (2113, 2115) generator
Several generators of both domestic and foreign production are installed on VAZ 2113, 2114, 2115 cars. In addition, generators from other models of front-wheel drive VAZ cars are suitable for installation on 2113, 2114, 2115.
The electrical connection diagram for these generators is almost the same. Using the 5102.3771 generator as an example, let’s see how it can be connected to the on-board network.
Connection diagram for the generator of VAZ 2113, 2114, 2115 cars
Connection diagram for a generator on a VAZ 2114 (2113, 2115) car
Extraneous noise when the generator is running
If you hear extraneous sounds from the generator while the engine is running, this may be caused by the following breakdowns:
- Short circuit of semiconductor diodes. The rectifier unit will need to be completely replaced.
- Short circuit of the stator winding to the housing. It is useless to rewind; it is too tedious and difficult to do at home. And if you order rewinding in a workshop, this service will cost more than the entire assembled VAZ-2115 generator costs.
- Bearing failure is a common failure of generators.
The most common “disease” is the destruction of the bearing in the front cover. To change it, you will have to completely disassemble the generator. To increase the bearing life, it is enough to follow one requirement - do not overtighten the belt. It is due to excessive tension that the load on the bearing and front cover increases.
How to diagnose?
You can check it yourself with just a multimeter. To do this, follow a few simple steps:
- Start the engine and let it warm up to 90 degrees.
- Turn on everything you can - the heater and radiator fan, tape recorder, high beams, heated rear window, heated seats. In other words, you need to load the electrics as much as possible.
- Set the multimeter to voltage measurement mode, limit 20 Volts. It is best to use a measuring device with an extended scale.
- Set the crankshaft speed to 3200 rpm.
- Check the voltage at the battery terminals. It should be above 13 V.
- If the voltage is too low, then look for a fault in the belt - increase its tension. The voltage regulator may not be working properly. Check its operation and replace if necessary.
Afterwards, it is necessary to turn off the power to all consumers and measure the voltage again. It should be at a level of 14.2..14.7 V, no more and no less. Only in this case can one judge the normal operation of the VAZ-2115 generator.
Removing the generator
To replace the brushes of the VAZ-2115 generator, you do not need to remove the entire unit - everything can be done with just one screwdriver, turning off the power to all electrics. But if you need to replace the diode bridge or bearings, the generator must be removed. The work algorithm is as follows:
- Disconnect the negative terminal from the battery, thereby de-energizing the car.
- Unscrew the nut from the contact bolt “30” and remove the power wire from it.
- Unscrew the screw securing the belt tensioner.
- Unscrew the two screws securing the tension frame.
- Pre-treat all threaded connections with a penetrating lubricant such as WD-40.
- Unscrew the top and bottom fasteners completely. Remove the pin from below.
Disassembling the unit
Unscrew the bolts that secure the covers of the VAZ-2115 generator. After this, carefully unscrew the bolts securing the phase winding and capacitor to the rear cover of the unit. If necessary, the capacitor is disconnected from the rectifier. After that, do not forget about the four bolts, remove the back cover along with the rotor and stator.
The rotor is clamped in a vice and completely disassembled by unscrewing the nuts and removing the pulley. All elements that have failed must be replaced - bearings, capacitor, diode bridge of the VAZ-2115 generator, brushes and voltage regulator. After replacing faulty components, the entire unit is assembled in the reverse order.
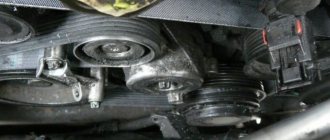
Belt tension
Make sure that the VAZ-2115 alternator belt is installed correctly. If a whistle appears when you turn on the light, this indicates that the tension is insufficient.
To get rid of this problem, you need to follow these steps:
- Using a 17mm wrench, unscrew the nut that secures the generator to the top bar.
- Place the mounting blade between the generator housing and the engine block.
- Pull the blade towards the radiator, increasing the tension.
- Tighten the nut after tensioning the belt.
If the belt tension is insufficient, the charge control lamp on the dashboard will dimly glow when the engine is running. It also happens that the lamp either lights up or goes out. Check the condition of the wiring, brushes and voltage regulator.
Source
Originals, analogues, prices, articles
| Catalog item | Serial number | Price | |
| KATEK ELD-A-2114-90A (original) | BOSCH (9402.3701) (original) | From 3500 – 4000 | |
| 9402.3701 | FINWHALE 6РК-698-05 | 6202 2RS / 180202 | From 3500 – 4000 |
| KZATE 9427.3749 | Electromash 977.3701 | SKL 2114-6202 2RS | From 3500 – 4000 |
| 2114-3701010 (HORT) | KATEK 2114-3701010 | Contitech 6PK-1115 | From 3500 – 4000 |
| PRAMO-Electro 2114-3701984 | PRAMO- 3701953 | PRAMO-Electro 2114-3701747 | From 3500 – 4000 |
| *prices are as of July 2022 |
Operating principle of the electrical energy source
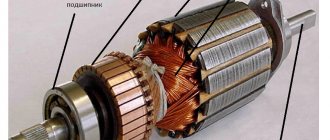
There are 8 coils installed in the GU housing. The material is copper, the connection method is “star”. The rotor is a steel shaft, on the back surface of which magnetic circuits are pressed, between which a winding is installed.
Excitation winding wires and copper-graphite brushes are soldered to the shaft rings. After the ignition is activated, the current from the battery passes through the brushes and winding, forming a magnetic field.
Thus, the rotor is driven, and the alternating current is converted into direct current through the coils.
On the back side of the GU there are two terminals marked “+” and “–”. Accordingly, the terminals with the indicated polarity are connected to the battery.
To rotate the PG you need a battery. When the actual voltage during operation of the unit is higher than the battery voltage, the generator will begin to supply power to the battery consumers. Thanks to this, the on-board network current is maintained within a specified range.
Characteristic reasons for the failure of the main control unit on the VAZ 2114 (2115)
- insufficient tension of the drive belt;
- contamination of contacts on rings;
- mechanical damage to the rectifier unit;
- excessive wear of brushes;
- jamming (freezing) of brushes;
- short circuit in the winding;
- power supply interruption;
- the voltage regulator is faulty;
- roller bearing wear;
- pulley fixation is loose;
- Fan blades are damaged.
Methods for troubleshooting generator VAZ 2114 (2115)
- carrying out preventive measures;
- replacement of the PG assembly (in a comprehensive manner);
- drive belt tension;
- centering the fan blades;
- installation of new brushes;
- replacement of the rectifier bridge;
- voltage regulator prevention;
- inserting a new roller bearing;
- replacing the fuse in the mounting block.
Typical signs of a faulty control unit on a VAZ 2114 (2115)
- the battery charge lamp on the dashboard flashes periodically (systematically);
- indication of battery overcharging, GU does not charge the battery;
- dim headlights;
- weakened sound of the horn, as there is little current, the reason is low voltage;
- the appearance of extraneous noise when the power source is running.
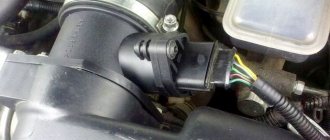
Electrical circuit diagram
Below is a diagram of the generator electrical circuit:
How to check the generator
A malfunctioning generator has serious consequences. It’s okay if the charge from the generator is low, and you just drain the battery and stall on the highway. But if the generator produces a very high voltage, then problems with the car’s electrical system may occur.
I hope you have realized the importance of this article and will read it carefully. To test the generator we need an assistant and a regular tester.
- First of all, turn on the ignition key and make sure that all the lights on the dashboard are on (alternator (battery), oil, brakes, handbrake, check engine, etc.). Next, we start the engine and look at the dashboard: A burning or dimly flashing “battery” light indicates a malfunction in the generator circuit. List of possible faults.
- We warm up the engine to operating temperature (90 degrees) and turn on all energy consumers of your car. These are high beams, fog lights, heater at full power, heated rear window).
- We connect the tester in voltmeter mode to the battery and ask a partner to show and keep the engine speed in the region of 3200-3500 rpm. A working generator at full load should show at least a voltage of at least 13V. Conclusion: If the voltage is less than 13V, the generator belt may be loose (How to tighten the belt?), the generator circuit is faulty (mass oxidized, etc.), the voltage regulator is faulty, the brushes are worn out (How to replace the brushes?), or the generator itself is faulty.
- We turn off all our energy consumers and re-measure the readings with a tester on the battery (We do all this at 3200-3500 engine speeds). The voltmeter readings should not exceed 14.7 V in this case. Conclusion: If the voltage exceeds 14.7V, then the voltage regulator is most likely faulty (How to replace the voltage regulator?).
We also listen to the noise of the generator - a strong hum indicates wear of the bearing, which needs to be replaced.
I can advise you one solution that will help you avoid large voltage drops under load. I myself used this method, and my father did the same. If the generator is working properly, but voltage drops are still present, then most likely the “mass” has oxidized both on the generator itself and on the engine. Therefore, I suggest you install additional “ground” from the battery to the body (more details).
How to measure generator voltage?
In order to notice changes in the readings on your car’s generator in time, you need to learn how to measure them.
There are two ways. The first one is quite easy, but not very accurate. You can view the voltage readings on the on-board computer. However, they cannot be called reliable, since they are often underestimated. Or the voltage may jump from the load. And this does not always mean a malfunction. The reason may be that some consumer is too powerful or is not connected as needed. Or maybe it’s all about the error of the device.
The second method requires more time and effort, but it allows you to determine the data more accurately. To perform this you will need a multimeter and an assistant.
You need to do the following:
- Turn on the ignition and wait until all warning lights on the instrument panel light up normally.
- Start the car and make sure the battery light goes out. If not, then you need to look for a breakdown - the generator or battery may be faulty, or there may be problems with the wiring.
- The car must warm up to operating temperature, and all existing electrical consumers must be turned on.
- The multimeter is set to voltmeter mode.
- An assistant is involved in the work: he must maintain the engine speed within 3500.
- Connect the multimeter to the battery.
- Take measurements. Normally, a reading of 13-13.2 V or a little more should appear on the multimeter. If the number is lower, this is a sign of a faulty generator or battery.
The same sequence of actions should be carried out with switched off consumers. If the generator is working properly, the multimeter will show approximately 14.5-14.7 V.
When connecting a multimeter to the generator terminals, the readings should be within 14-14.3 V. When the assistant increases the engine speed, the voltage should change by no more than 0.5 V. If its value fluctuates greatly, this is a sign of a malfunction in the device.
How to check the VAZ 2115 generator
The consequences of a generator failure are the lack of charging of the battery, which carries the entire load of the on-board network. However, that’s not all: high voltage can damage all of the car’s electronics. How to check the VAZ 2115 generator and there is no need to rush into purchasing a new device. In many cases, you only need to replace some of its components, which will be much cheaper.
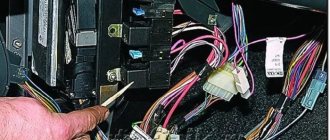
We started checking the car’s electrics, we recommend checking the VAZ fuse box https://avtozap63.ru/avtozap_vaz/Bloki_predohranitelej/ for functionality. If there are problems with the fuse box, it should be replaced with a new one.
How to check the VAZ 2115 generator
To check the regulator, call an assistant. He needs to start the engine, bringing the speed up to 3000. At the same time, turn on the high beams, the rear window defroster and the heater. Measure the voltage on the battery with a tester, the value of which should be more than 13.2 V (for generator 9402.3701), or 13.6 V (for generator 37.3701).
If the voltage is much lower than this value, this may be due to a malfunction of the generator windings (open circuit, short circuit), relay regulator, or lack of contact due to oxidation on the excitation winding rings.
Indirectly, the malfunction of the relay regulator can be determined by turning on the high beams and turning off other consumers. For this purpose, you should measure the voltage, the readings of which should be 13.2 or 13.6 V.
A more reliable way to determine the performance of the regulator is with the generator or relay regulator removed. You will need a 12V test lamp, which should be connected between the brushes. Next, you should simultaneously apply direct current with a voltage of 12 V from the power supply that is suitable for it, connecting the plus to the “D+” terminal, and the minus to the ground of the car.
After this, the lamp should light up. If you smoothly increase the voltage to 16 V, it should go out. Otherwise, the regulator will need to be replaced. If the brand of your generator is 37.3701, connect the plus from a constant voltage source to contacts “B” and “C”, the minus to ground.
Generator valves (rectifier unit)
To check it, you just need to use the battery and a control light. You need to connect the plus of the battery using a test light to the generator contact “B+” (for the generator 37.3701, to contact “30”), and the minus to the housing. If the lamp is on, it means there is a short circuit or breakdown in the valve block (positive and negative).
To make sure that the block of positive valves is working properly, use a test lamp to connect the positive battery to the contacts (“B” or “30”), and the negative to any phase winding. If the light comes on, it means one of the valves is broken.
Negative valves (diodes) can be checked by connecting any phase winding to ground (generator housing) through a lamp. If the lamp is on, it means that there is a short circuit between the generator housing and the stator winding or one of the valves is broken. You can use an ohmmeter to check, but to do this you need to disconnect any diode contact.
We advised how to check the VAZ 2115 generator.
It is better to replace the rectifier unit assembled and in a workshop.
Source
Replacement and repair of generator on VAZ 2114 (2115)
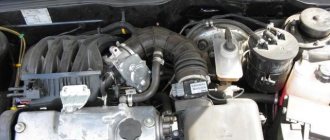
Location: engine compartment, to the left of the power unit, at the end.
Preparatory stage:
- a set of keys, heads, cranks;
- a torque wrench to check the tension of the drive belt;
- mounting spatula to remove the belt;
- flat head screwdriver
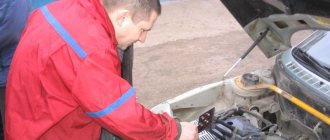
Step-by-step replacement instructions:
- We fix the vehicle on a level platform.
- Squeeze the parking brake.
- Turn off the ignition.
- Open the hood.
- Disconnect the terminals from the battery.
- Unscrew the fastening of the “+” and “-” terminals from the generator set.
- We turn out the coupling bolt of the support bracket.
- We lower the unit down and remove the drive belt from the groove.
- We unscrew the studs and turn out the coupling bolt.
- To change the GU, we remove it from its regular place.
Do-it-yourself dismantling of the control unit on the VAZ 2114 (VAZ 2115) is completed. We carry out comprehensive preventative maintenance of the equipment, clean the housing and elements from dirt and dust, blow through the windings with a stream of compressed air, and dry the contacts.
We replace worn parts and components with new ones as necessary, if defects are detected. The generator must be completely replaced if cracks are detected in its housing.
In this case, further use of the equipment is strictly prohibited.
We measure the resistance of the excitation winding with a multimeter and check the diode bridge for operability. We also inspect the fuse for integrity and replace it with a new one if damage is detected.
DIY generator installation:
- We fix the GU on the support brackets, put on a pin and a spring washer.
- Place the belt in the groove.
- We screw in the fastening bolts.
- We move the GU body up, tighten the mounting bolts of the bar.
- We tighten the generator fasteners with a torque wrench with a force of 28.0 Nm.
- We check the belt deflection; the range should not exceed 12 mm. tighten as needed.
- We clamp the power cables on the installation.
- We put on the battery terminals.
To reduce the frequency of replacing power units, some car owners install generators from Priora (injector, 8 valves). The equipment is more powerful in terms of technical characteristics, which means it ensures stability in the generation and supply of current to the motor.
A new generator set is 500 - 750 rubles more expensive than a standard one. The holes for fasteners completely coincide with the factory ones on the VAZ 2114 (VAZ 2115).
Recommendations for care and maintenance of PG on VAZ 2114
- strictly adhere to the technical inspection deadlines;
- when purchasing consumables and spare parts, check the correspondence of catalog articles;
- give preference to original parts where the manufacturer guarantees quality;
- in the absence of experience, carry out prevention in certified workshops;
- when purchasing components, require the manager to provide documents for the products he sells;
- Always use the vehicle’s operating manual and consult with car service specialists.
Control checks of the VAZ 2115 generator
Checking the generator on the stand
Testing at the stand allows you to determine the serviceability of the generator and whether its characteristics correspond to the nominal ones. The brushes of the generator being tested should be well ground to the contact rings of the commutator, and the rings themselves should be clean.
Rice. 7.7. Connection diagram for testing the generator on the stand: 1 – test lamp 12 V, 3 W; 2 – generator; 3 – voltmeter; 4 – rheostat; 5 – ammeter; 6 – switch; 7 – battery
Which generator is installed on the VAZ 2114 and VAZ 2115
The standard AC power source has the following characteristics:
| Name | Indicators |
| Maximum voltage | 13.18 V - 14.70 V |
| Maximum current | 80 Amps |
| Belt drive deflection | 0.8 cm per 10 kg |
| Weight | 5.0 kg |
| Electrical energy source | KATEK 2114 / 15 |
| Rated voltage | 12 Volt |
| Power | 450 W |