Purpose
To control the engine and supply a spark at a certain moment and to the desired cylinder, a crankshaft position sensor is used. It detects the TDC position of the engine and then sends signals to the engine control unit, which sends a signal to the ignition module to supply a spark to the cylinder in which the compression stroke occurs.
The sensor is a rather important element and if it fails, the ECU will not be able to determine which cylinder needs to be supplied with spark and fuel.
Design
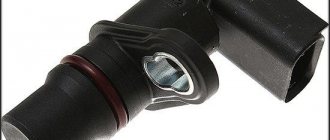
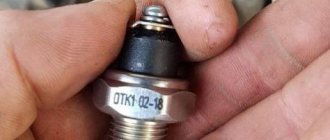
The sensor is a plastic part inside of which there is an electromagnetic element that operates on the Hall effect. A sensitive part protrudes from the sensor, which directly works with the master disk. The VAZ 2115 uses a generator drive pulley as a master disk, which has teeth for determining the position of the crankshaft by a sensor. The sensor is attached to the engine housing through an eyelet, which is pressed against the ebb on the engine using an M6 bolt. The sensor's power supply is shielded; this is necessary so that the signal reaches the control unit without interference.
Types of installed meters
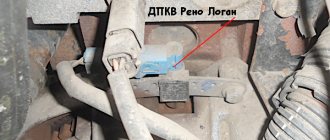
Replacing a speed sensor with your own hands for a VAZ 2115 is not much different from replacing it on any car of the “tenth series” (for example VAZ 2110-2112), as well as the Samara series (VAZ 2113-2115), and new products such as Lada Kalina , Grant or Priora. The sensor itself is located on the rear side on top of the gearbox (when viewed from the radiator) directly above the differential, where the wires come out (in the photo below it is shown by an arrow, look under the pipes).
At different times, three types of sensors (meters) were installed on VAZ models. The first of them is no longer used on new cars.
Type No. 1
Installed on the first Samaras with an injector with a cable-driven speedometer:
- It was installed as an “intermediate insert” between the speedometer cable and the gear output to the gearbox.
- Wires with a connector extend from it to the side.
- Its malfunction can only be determined with a special diagnostic tool at the same speed at idle. And also when the car is coasting and when stopping.
Sometimes, when such a breakdown occurs, the car begins to stall immediately after engaging the “neutral” (neutral gear) while driving. This happens due to the fact that the car, when driving, maintains a slightly higher idle speed initially (1000 instead of 850 if the car is stopped). This is designed for smooth shifting when coasting from neutral to gear.
Attention: Before replacing, it is recommended to check the drive mechanism (on which the meter sensor is screwed)
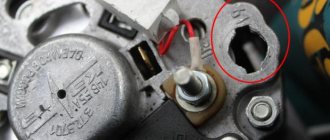
You can do this by trying to turn the drive using any available means. Carefully! So as not to break the square window.
Type No. 2
A newer model of the meter is installed on subsequent models of injection vases. Its main difference is an electronic speedometer and the complete absence of a cable. It is screwed directly onto the output of the drive gear.
If it breaks down, the speed of the car stops being displayed on the instrument panel. The rest of the symptoms are the same as those of the first model.
Type No. 3
The newest version in which the unreliable drive mechanism (in the event of a breakdown, the box had to be removed and disassembled) has been replaced with a modern electronic one (which is based on the Hall effect).
The consequences of failure of such a meter are exactly the same as those considered in the previous analogue. However, on cars with this type of sensor, electric power steering (abbreviated as EPS) is installed. If the meter fails, the force when turning the steering wheel changes, and in some cases the EUR winding burns out. This is especially unpleasant if there is a “floating” defect in the speed meter. When turning, the force on the steering wheel begins to change. This scares some drivers. Now the EUR has been abandoned.
Attention: Such meters have completely different markings for Priora and Kalina and are not interchangeable!
Before buying a new one, you need to check which meter is installed on your machine. The marking of the meter is written on its side belt.
Symptoms of a problem
The crankshaft sensor has several characteristic signs of failure that clearly indicate its malfunction, but at the same time there are also signs that can be confused with other parts of the car engine.
If the DPKV is faulty, the car will show the following signs of breakdown:
- There is no spark;
- The engine does not start;
- One of the cylinders does not work;
- The car jerks when driving;
- Poor dynamics;
- Loss of power;
- Increased fuel consumption;
- The engine starts and immediately stalls;
- Doesn't start hot;
If there is no spark on the engine, this indicates a malfunction in the DPKV.
Sensor overview
What the controller is responsible for:
- Fuel injection phase synchronization;
- Timely supply of an impulse to ignite the fuel in the cavity of the combustion chamber.
The serviceability of the controller determines the timeliness and completeness of supply of the fuel mixture to the cylinders and combustion chamber.
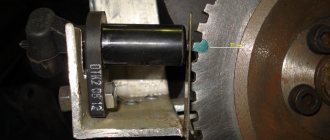
The angle of inclination of the teeth is 6°. During the passage of each of them, the sensor counts the quantity and sends the data to the electronic control unit of the ECU.
The ECU analyzes the received data, reduces or increases the crankshaft speed in order to maintain the ignition timing within the permissible range.
The crankshaft teeth are equidistant from each other. The last two teeth are removed from centering the pulley at the top dead center (TDC) position.
Where is the controller located: on the oil pump cover in the engine compartment. Access to equipment for preventive maintenance from under the bottom of the machine.
Note to the driver. Some motorists practice installing a sensor from a VAZ 2107 due to its low cost. The automaker strongly recommends purchasing and installing original parts with factory catalog numbers. External similarity and identity of parts does not guarantee full functionality.
Signs of a faulty crankshaft sensor:
- The engine does not start;
- Starting the engine is difficult;
- Idle speed is unstable;
- Sudden drop in engine power;
- Detonation;
- Passive acceleration dynamics;
- Increased fuel consumption;
- Under light loads, systematic shifts to a lower range of gears.
These symptoms are signs of a number of other malfunctions. Carry out comprehensive diagnostics using digital equipment for data objectivity.
| Name / catalog item | Price in rubles |
| Injector 351.3847 ROMB | From 170 – 200 |
| 402.3837 AutoTrade | From 170 – 200 |
| 191.3847 (8 valves) | From 170 – 200 |
| 2112-3847010-04 | From 170 – 200 |
| EMZ 'Pegasus' 191.3847 | From 170 – 200 |
| Astro 27.3847 (8 valves) | From 170 – 200 |
| StartVolt VS-CS 0112 | From 170 – 200 |
| CTR Cartronic 2112-3847010-04 | From 170 – 200 |
| RepCom RK02004 (8 valves) | From 170 – 200 |
| Schetmash 2112-3847010 (8 valves) | From 170 – 200 |
Technical characteristics of DPKV:
- Winding resistance range: 570 – 750 Ohm;
- Winding inductance: 250 MHz;
- Minimum sensor voltage amplitude: 0.3V;
- Maximum sensor voltage amplitude: 225V;
- Dimensions: 30x45x69 mm;
- Weight: 52 grams.
Step-by-step instructions for self-diagnosis
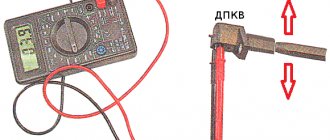
To check the DPKV you will need a multimeter.
- We dismantle the metal protection of the oil pan, provided that it is installed. Fastening with six screws around the perimeter.
- From under the bottom of the car, disconnect the terminals from the sensor.
- We bring the limit switches of the multimeter to the contacts;
- Turn on the multimeter, set the position of the regulator to “resistance”;
- We carry out actual measurements;
- We compare the obtained data with standards. If the arrow tends to infinity, the controller is working. If it goes to “zero”, it’s a breakdown. Average readings are 550-750 Ohms.
Depending on the diagnostic results, the technician makes a decision on the advisability of further operation of the equipment.
Causes of premature wear of the DPKV
- long-term operation without prevention;
- manufacturing defects;
- third-party mechanical damage;
- getting sand, dirt, or metal shavings inside the controller;
- sensor breakage due to crankshaft teeth;
- damage to the DPKV during repair work;
- short circuit in the on-board circuit.
Examination
You can check the DPKV using diagnostic equipment using the ADC and multimeter channels. As a diagnostic device, you can use the ELM327 with the OpenDiag smartphone application; this assembly of the device and application allows you to determine faults in the car quite simply and is in no way inferior to professional diagnostic equipment.
Checking with a multimeter
Testing with this method consists of measuring the resistance of the inductor, which is located inside the sensor; most often it is the cause of sensor failure.
To carry out the check you must:
- Set the resistance measurement limit on the multimeter to 2 kOhm;
- Next, connect the multimeter probes to the terminals on the sensor;
- The readings on the multimeter should be in the range from 500 to 800 Ohms, if the readings agree, then the sensor is working;
- If the readings have a different range or the tester even shows 1, then this indicates a break in the inductor inside the sensor;
- In case of such a breakdown, the sensor must be replaced with a new one;
Reasons for failure of the DPKV
If a malfunction occurs, it is recommended to replace the crankshaft sensor with a new one.
Its cost is not so high - from 200 to 400 rubles, depending on the manufacturer and region. In addition, it is best to change the DPKV yourself, since a trip to a car service center is comparable in price to the cost of several sensors, while the procedure itself, as mentioned above, is quite simple. We can name several of the most common reasons why the DPKV fails. Most often, a banal mechanical deformation of the body occurs. It is made of plastic, so this problem may occur most often. In addition, the sensor fails as a result of a short circuit that occurs between the turns of the winding. As a result, the generation frequency transmitted to the ECU changes. Most often, this type of breakdown occurs in frequency-type sensors. Well, another fairly common problem is breakage of pulley teeth or wear.
Source
Replacement
To independently replace the DPKV on a VAZ 2115, you do not need to have great skills in car repair. You just need to prepare the necessary tools.
To replace you will need:
- Pliers;
- 10 mm wrench;
Replacement process
It is most convenient to carry out work from an inspection hole or overpass, but if one is not available, you can remove the right front wheel and unscrew the engine mudguard, after which free access to the sensor will open.
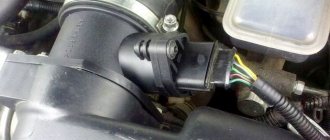
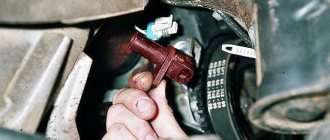
- Remove the connector from the sensor;
- Unscrew the bolt with a 10mm wrench;
- Quite often, the sensor turns sour in its seat, after which it is difficult to get it out of there; to do this, you can use pliers and rotate the sensor to remove it;
- Before installing a new sensor, you need to clean the seat for easier installation;
- We assemble in the reverse order;
How to replace the crankshaft position sensor on a VAZ 2113-VAZ 2115
Note! Before replacing, we recommend that you remove the minus terminal from the battery; after all, you will be working with electronics, and if water or something like it gets on the sensor (Wires), then problems may begin in the future, for more details on how to remove the terminal from the battery, read the article: “Replacing the battery” point 1!
Removal: The sensor is removed very easily, firstly, the block with wires is disconnected from it, which is also indicated by a red arrow, and it is disconnected by bending the clamp that secures the block, after this operation is performed, unscrew the bolt securing the sensor as shown in the small photo shown and then completely remove it from the car, only when you pull it out, do everything carefully, do not break off anything.
Note! As for checking the sensor for functionality, this is all done in the following way: buy a voltmeter at a car store or take a multi-meter and turn on the voltmeter function on it (Turn on the function with a measurement limit of up to 200 mV), after which the contacts (probes) coming from the multi-meter are connected to the sensor terminals and after that take a screwdriver with a thick metal blade and quickly sweep it in the place where the end of the sensor is located (For you to understand, the sensor is still pointed at the crankshaft pulley) and when you carry it, monitor the voltage shown by the voltmeter (It should not be equal to approximately 0.3 Volts), it will have to jump and change while carrying the blade near the end of the sensor!
Installation: The new sensor is installed in its place in the reverse order of removal, while the gap between it and between the crankshaft pulley (This pulley is indicated by a red arrow) should be within 1±0.41 mm, if something does not add up (Gap will be too large), then first try to remove all the dirt from under the crankshaft sensor in the place where it is attached (This is if you are going to install the old sensor, if the new one and the gap is too large, then immediately go to the auto store for a new one), but if the gap is too large will be small, or if you can’t wrap the sensor at all, then again, go to the auto store for a new one or change the existing one, because most likely they sold you the wrong sensor, and all sensors have different lengths, so ask (If possible) for Auto shop to replace this sensor with the one you need.
Additional video clip: Watch another video clip below, which shows an example of replacing just this sensor with a new one on a car of the tenth family, but in principle everything is done absolutely identically on Samara 2.
Note! And how to check the sensor, see the second video, which is also posted below, everything is described in great detail and you most likely won’t even have any additional questions about checking this sensor!
Status:
In stock
Status:
In stock
Installed on VAZ cars with an engine injection system.
In honor of the May holidays, when purchasing a set of front struts for Vesta and Vesta Cross before May 10, a gift from ASOMI is a set of compression buffers with protective covers as a gift.