Sometimes car enthusiasts are faced with the fact that the VAZ 2114 washer does not work. This seemingly harmless problem can actually lead to very serious consequences. After all, the washer is designed to clean the windshield from dirt and various debris that gets on it, which is sometimes impossible to remove with the help of wipers alone.
Such pollution significantly impairs visibility through the windshield, and this, in turn, can make driving on the road unsafe.
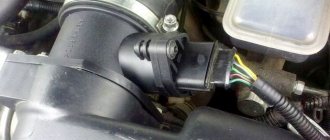
Washer VAZ 2114
It should be remembered that according to the law, driving a car whose washer has failed is strictly prohibited. It will also not be possible to pass a technical inspection with a faulty washer.
The washer itself is quite simple, and its most important components are:
- tank;
- pump with motor;
- hose;
- nozzles;
- washer fluid level sensor.
Window washer diagram for VAZ 2114
We’ll tell you below why breakdowns happen even in such a simple unit and how to fix them yourself.
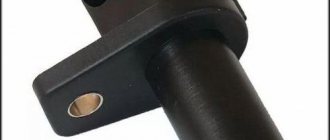
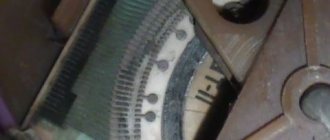
Liquid level sensor in the washer reservoir on a VAZ 2115
Hello.
I have a problem. On the on-board computer the light on the insufficient water level in the washer is on, but it is full. What can be wrong? just don't mock me.
no, honestly, without mockery. I didn't have this option on any machine.
I wonder what kind of bad person thought of sticking it in. I only filled it with water once in 1.5 years. Is there such a need for it?
what kind of bad person thought of sticking it in
yeah it’s not that good. if there is one, let it work
There’s one more thing that confuses me: when I turn on the ignition, all the lights on the computer light up, when the pump pumps gasoline, it turns off and the lights go out at that moment. and then recently such crap began that they did not go out immediately. 20 seconds after I start the car
Yes. this is really a jamb (I’m still not good with wires, so I won’t answer)). It’s better to ask about this on a forum or from an electrician than to ask about the soda sensor))
I don’t want to drive it away under warranty anymore. The mechanic at the car dealership told me on ICQ just now the reason for the breakdown
I have the same problem with the sensor, so I’m tired of it, it’s constantly on, and I turned it off right at the washer chip, but you can look at the water in the tank and add it if necessary.
Source
Stories from our readers
“Fucking basin. "
Hi all! My name is Mikhail, now I’ll tell you a story about how I managed to exchange my two-wheeler for a 2010 Camry. It all started with the fact that I began to be wildly irritated by the breakdowns of the two-wheeler, it seemed like nothing serious was broken, but damn it, there were so many little things that really started to irritate me. This is where the idea arose that it was time to change the car to a foreign car. The choice fell on the melting Camry of the tenth years.
Yes, I had matured morally, but financially I just couldn’t handle it. I’ll say right away that I am against loans and taking a car, especially not a new one, on credit is unreasonable. My salary is 24k a month, so collecting 600-700 thousand is almost impossible for me. I started looking for different ways to make money on the Internet. You can’t imagine how many scams there are, what I haven’t tried: sports betting, network marketing, and even the volcano casino, where I successfully lost about 10 thousand ((The only direction in which it seemed to me that I could make money was currency trading on the stock exchange, they call it Forex. But when I started delving into it, I realized that it was very difficult for me. I continued to dig further and came across binary options. The essence is the same as in Forex, but it’s much easier to understand. I started reading forums, studying trading strategies. I tried it on a demo account, then opened a real account. To be honest, I didn’t manage to start earning money right away, until I understood all the mechanics of options, I lost about 3,000 rubles, but as it turned out, it was a precious experience. Now I earn 5-7 thousand rubles a day. I managed to get the car buy after half a year, but in my opinion this is a good result, and it’s not about the car, my life has changed, I naturally quit my job, I have more free time for myself and my family. You’ll laugh, but I work directly on the phone)) If If you want to change your life like me, then here’s what I advise you to do right now: 1. Register on the site 2. Practice on a Demo account (it’s free). 3. As soon as you get something on the Demo account, top up your REAL ACCOUNT and go to REAL MONEY! I also advise you to download the application to your phone, it’s much more convenient to work from your phone. Download here.
Source
How does a glass washer work?
A glass washer, both windshield and rear, is an indispensable item, without which it is prohibited to operate a car according to traffic regulations.
The safety and ease of movement of the driver depends on the performance of the washer and wipers.
VAZ 2114, 2113 are equipped with both front and rear window washers; VAZ 2115 is equipped with only a front windshield washer.
The glass washer is a water jet directed at the glass, which is supplied synchronously with the operation of the wipers and is designed to clean the glass from dirt and dust.
conclusions
If the rear or windshield washer fails, any problem can be quickly resolved, the main thing is to find the cause of the malfunction. In case of problems with nozzles and their complete replacement, it is better to choose these fan-type parts; they wet the glass better. Problems with the integrity or partial deformation of connecting tubes are best solved by connecting new cords. To avoid the listed problems with the washer system, you should use non-chlorinated water in warm weather, and “anti-freeze” water in cold weather.
Window washer malfunctions, causes and solutions
Although the circuit is quite simple, it does not inspire reliability. Therefore, malfunctions with the glass washer are possible (window washer does not work), solutions for which are found in the following articles:
- The washer pump does not work: how to check the electric glass washer pump; how to replace the windshield washer pump?
- The washer barrel is leaking (Repair).
- The pump pumps, but the washer does not spray.
- The injector is not adjustable. What to do?
- Fan-type windshield washer nozzles. Fan nozzles are highly popular and in demand, unlike conventional point nozzles.
- How to replace a windshield washer nozzle (with a fan type)? Replacing injectors is necessary when changing injectors to fan injectors or when old ones fail.
The database of articles is constantly growing. We hope we helped you solve the problem.
Frequently asked questions from car owners
How and where to add windshield washer water?
- In the cabin, open the hood handle
- Finally open and secure the hood
- Unscrew the large cap on the windshield wiper reservoir, the one without wires
- Pour liquid into the tank. Approximately five liters will fit in this canister
What liquid is recommended to be poured into the washer reservoir of the VAZ 2114?
Different times of the year require different windshield wipers to clean glass. In winter, at low temperatures, it is recommended to fill in an antifreeze additive. It will protect the tank from freezing, and with it the parts of the windshield wiper system will not burst from temperature overloads. In summer, it is recommended to add a cleaning additive to the water. During this period, abundant sediment of exhaust gases, oils, and car paint care products accumulates on the glass.
Advice: for the best effect, you should first pour the additive into the tank, and only then ordinary water. This will allow the liquids to mix better.
How can you heat the windshield wiper reservoir in winter?
Option one: homemade
Materials: 1 meter of 8 mm copper tube, 2 meters of 8 mm wrapped hose, 2 reservoir cuffs and 4 clamps.
Heating installation technology: two holes for cuffs are drilled in the tank lid. A copper tube is already inserted into them, which must be given the reliefs of the tank in advance. At the exit, the tube should be in a horizontal position. The hoses are connected to the throttle body and thermostat.
Option two: in the form of a coil
Technology: the same copper tube as in the first option. But here it is given the shape of a coil using a soldering iron. The resulting coil is not attached, as usual, to the tank instead of a lid. It is soldered to a textolite plate. Afterwards, the homemade coil is installed in the tank as low as possible so as not to interfere with the liquid level sensor.
Holes for the thermal device are cut using a soldering iron. This way they turn out neat. Their diameter is 3 millimeters. The edges should be lubricated with sealant. The best fastening for the device is stainless steel screws. When installing, they should be heated with a soldering iron - this way they will be better fixed in the windshield washer reservoir.
This is a ready-made heating system for the Geyser tank washer. Operating principle: as it passes through the coil, the temperature of the coolant begins to rise. Accordingly, the degree of liquid in the tank also increases.
Price is an issue
You can find out how much a VAZ 2114 washer reservoir costs in local stores in your city, or through an Internet search engine. The average price in online stores for a windshield washer reservoir is 250 rubles.
For what reasons does the windshield washer of the VAZ 2115 not work?
Greetings to everyone on the VAZ Repair website. Today we’ll talk about windshield washer. Let's figure out why the glass washer does not work, for what reasons it fails, and also how to prevent its breakdown in the future.
The windshield washer, in my opinion, needs no introduction. Every motorist knows what it is and what it is intended for. The benefits of this simple and at the same time effective device can hardly be overestimated; in the summer, it allows you to quickly and easily refresh your forehead from dust and insects. With the arrival of cold weather, two presses of the button are enough to remove dirt from the windshield, and in winter the washer allows you to quickly melt the ice and clear the windshield of ice crust.
Stories from our readers
“Fucking basin. "
Hi all! My name is Mikhail, now I’ll tell you a story about how I managed to exchange my two-wheeler for a 2010 Camry. It all started with the fact that I began to be wildly irritated by the breakdowns of the two-wheeler, it seemed like nothing serious was broken, but damn it, there were so many little things that really started to irritate me. This is where the idea arose that it was time to change the car to a foreign car. The choice fell on the melting Camry of the tenth years.
Yes, I had matured morally, but financially I just couldn’t handle it. I’ll say right away that I am against loans and taking a car, especially not a new one, on credit is unreasonable. My salary is 24k a month, so collecting 600-700 thousand is almost impossible for me. I started looking for different ways to make money on the Internet. You can’t imagine how many scams there are, what I haven’t tried: sports betting, network marketing, and even the volcano casino, where I successfully lost about 10 thousand ((The only direction in which it seemed to me that I could make money was currency trading on the stock exchange, they call it Forex. But when I started delving into it, I realized that it was very difficult for me. I continued to dig further and came across binary options. The essence is the same as in Forex, but it’s much easier to understand. I started reading forums, studying trading strategies. I tried it on a demo account, then opened a real account. To be honest, I didn’t manage to start earning money right away, until I understood all the mechanics of options, I lost about 3,000 rubles, but as it turned out, it was a precious experience. Now I earn 5-7 thousand rubles a day. I managed to get the car buy after half a year, but in my opinion this is a good result, and it’s not about the car, my life has changed, I naturally quit my job, I have more free time for myself and my family. You’ll laugh, but I work directly on the phone)) If If you want to change your life like me, then here’s what I advise you to do right now: 1. Register on the site 2. Practice on a Demo account (it’s free). 3. As soon as you get something on the Demo account, top up your REAL ACCOUNT and go to REAL MONEY! I also advise you to download the application to your phone, it’s much more convenient to work from your phone. Download here.
Source
So why isn't the washer working? Common Causes
- Washer fluid level. In this case, everything is quite simple, we check the level of washer fluid in the tank, and then add it to the level if it is low, or continue to look for the problem.
- The washer was frozen. With the arrival of cold weather, many people forget to replace the washer fluid, as a result of which it simply freezes in the tank. As a result, when you try to clean the windshield, nothing happens, the engine hums, and no fluid flows. In this situation, all the blame falls on you, since you did not timely replace the summer fluid with the winter one. You can correct the situation by heating it, or by adding 200 grams of alcohol or a special defroster to the tank.
- Hoses. Damage to the fluid supply hoses or a simple hose slipping off the fitting may result in the washer not being supplied when pressed. You can check what's wrong by looking under the hood or driving into the inspection hole. If the hose is damaged it should be replaced, I guess that makes sense!?
- Injectors. No, we are not talking about fuel injectors, but about those that spray washer onto the glass. Sometimes the washer nozzles become clogged or freeze, after which the operation of the system may be disrupted. It is quite simple to check whether the injectors are to blame for the fact that the glass washer does not work. We remove the supply hose from the washer nozzle fitting, then activate the washer and see if the fluid is supplied. If fluid flows through the hose, the injectors are most likely clogged. The “forces” get clogged with dirt, sand, rust, ice, whatever... The solution to the problem is the following - either we wash them or replace them.
- Fuse. Sometimes the washer motor does not work due to a blown fuse. In this case, your task is to find the appropriate fuse and check its integrity. We replace the failed fuse and check the operation of the washer.
- Wiring, terminals and contacts. Sometimes the washer motor (pump) does not work due to poor contact or a broken circuit. For example, the wiring may be damaged or the terminals of the motor itself may rust or oxidize, making it impossible to supply washer.
- Switch. It is rare, but it still happens that the glass washer does not work precisely due to the fault of the button (switch) itself that activates the device. A multimeter or an electrician will help you understand what’s going on; we connect the electrodes and “call” the wiring and the button itself.
- Motor (pump). If you do not hear any sound when you press the button, the washer pump may be faulty. This conclusion can only be made after you have ruled out all of the above options. The pump is checked using a multimeter or tester; for convenience, it is advisable to dismantle the device.
To prevent breakdowns, monitor the level and condition of the washer fluid in the future, and avoid oxidation of the terminals, as well as voltage surges in the vehicle’s on-board network. Change your summer washer fluid to an anti-freeze one in a timely manner, and choose only high-quality liquids, this is the only way you can avoid problems with the washer.
Removal
1. We prepare the car for work (see “Preparing the car for maintenance and repair”).
2. Disconnect the wiring harness block from the sensor.
3. Using a piece of wire or a metal clip, we close the terminals of the connecting block. If the warning lamp for insufficient fluid level in the windshield washer reservoir comes on, the sensor is faulty. If the lamp does not light, then with the ignition on, use a voltmeter to measure the voltage at the terminals of the connecting block. The voltage should be about 12 V. If voltage does not flow to the block, then there may be poor contact or a broken wire in the sensor circuit or the display unit is faulty.
4. Unscrew the sensor cover. By removing the sensor float from the tank, remove the sensor.
5. Connect the multimeter (in ohmmeter mode) to the sensor terminals.
6. By moving the float from one extreme position to another, we monitor the readings of the device. The electrical resistance of a working sensor in the upper position of the float should be infinitely large, and in others it should be close to zero.
Recommendation: Oxidized leads in the block should be cleaned with an awl or a thin file. Damaged sections of wires must be repaired. The faulty sensor and display unit are replaced (see “On-board monitoring system display unit - removal and installation”).
The windshield washer does not work, what should I do?
Using the example of the windshield washer of a VAZ 2109 (2108, 21099) car, we will analyze the reasons for its malfunction and what to do in each specific situation.
The windshield washer does not work, reasons
All causes of washer malfunction can be divided into two groups: mechanical and electrical.
Let's look at the mechanical ones first.
- Clogged washer nozzles
The windshield washer nozzles (sprays) on the VAZ 2109 are installed on the hood. The washer fluid outlet holes in them can become clogged both from the outside and from the supply pipes.
- Damage to washer tubes
The tubes may become pinched or twisted due to improper installation. Either it becomes leaky, and then the washer fluid will leak out or its pressure will decrease.
- The washer motor is burnt out or the solenoid valve is faulty
- The electrical circuit for turning on the washer motor and unlocking the solenoid valve is faulty
There may be a break in its connections or elements.
What to do if the washer does not work?
To start, just turn it on and listen to the whirring of the electric motor in the coolant reservoir. If it buzzes, it means the electrical circuit is OK. In this case, you need to check the cleanliness of the nozzles, the integrity and correctness of the tubes.
In the electrical circuit for turning on the windshield washer, the fault can most easily be found by looking at its operation diagram.
The voltage supply to the washer and valve is shown by red arrows
We turn on the purifier and sequentially check the presence of voltage at several control points. For example, on the tips of the “positive” wires to the washer motor and solenoid valve. So, if it is present there, we can say that they “burned out”. Or at terminal “53ah” of the steering column switch - check whether voltage is supplied from the ignition switch.
Special attention to the right steering column switch, since in many cases it is the culprit for the washer failure to work. Sometimes the cause of the malfunction is an oxidized contact in its chip. It is necessary to check whether there is voltage at its “W” output when the washer is turned on.
Along the way, you should pay attention to fuse F17 in the mounting block and the reliability of fastening the “mass” washer wire.
We replace or repair faulty sections and elements of the electrical circuit.
Notes and additions
A little information about how the windshield washer works on a VAZ 2109 car.
The windshield washer only works when the ignition is on. In this case, the contacts of the ignition relay “30” (plus from the generator) and “15/2” of the ignition switch (output to the washer) are closed. See diagram.
To turn on the windshield washer, the driver moves the lever of the right steering column switch towards himself to a non-locking position (in any other position of the lever - in any operating mode of the wipers).
In this case, contacts “53ah” (plus from the ignition switch) and “W” (output to the pump motor and washer valve) inside the switch are closed. Then, through the mounting block (red or pink wire), voltage is supplied to the washer pump electric motor located in the washer reservoir and the washer shut-off solenoid valve installed nearby. The valve opens, the washer pump motor pumps fluid, spraying the windshield through the nozzles (sprayers) on the hood.
Removal
2. Disconnect the wiring harness block from the sensor.
3. Using a piece of wire or a metal clip, we close the terminals of the connecting block. If the warning lamp for insufficient fluid level in the windshield washer reservoir comes on, the sensor is faulty. If the lamp does not light, then with the ignition on, use a voltmeter to measure the voltage at the terminals of the connecting block. The voltage should be about 12 V. If voltage does not flow to the block, then there may be poor contact or a broken wire in the sensor circuit or the display unit is faulty.
4. Unscrew the sensor cover. By removing the sensor float from the tank, remove the sensor.
5. Connect the multimeter (in ohmmeter mode) to the sensor terminals.
6. By moving the float from one extreme position to another, we monitor the readings of the device. The electrical resistance of a working sensor in the upper position of the float should be infinitely large, and in others it should be close to zero.
Recommendation: Oxidized leads in the block should be cleaned with an awl or a thin file. Damaged sections of wires must be repaired. The faulty sensor and display unit are replaced (see “On-board monitoring system display unit - removal and installation”).
Mechanical breakdowns
The most common reasons why the VAZ 2114 windshield washer does not work are mechanical damage.
The most common of them are:
- the washer fluid has run out in the tank;
- the pipeline leading to the windshield wiper is clogged;
- the windshield wiper nozzles are clogged;
- the water used as washer fluid froze;
- the hose fell off the pump;
- the hose going to the windshield wiper is pinched;
- The supply hose has ruptured.
Problems related to washer fluid can be solved almost instantly - if it runs out, it should be topped up; if it is frozen, take the expansion tank to a warm room, warm it up, then drain the water or liquid that is inappropriate for the season and fill it with non-freezing one.
If the hose becomes clogged, it should be cleaned (blown out) and then replaced. If the nozzles are clogged, they should also be carefully cleaned using a very thin needle. This operation should be done carefully, without unnecessary effort.
According to the recommendations of car manufacturers, washer fluid should be poured into the expansion tank through a special filter mesh, which will protect the hose and nozzles from possible clogging.
Sometimes it happens that during operation the hose becomes kinked, pinched, or even falls off the expansion tank. In such a situation, it is enough to straighten the hose and install it in its original place. If the hose ruptures (for example, when the coolant freezes), a new one should be installed instead.
Electrical damage
Another answer to the question - why the windshield washer does not work on the VAZ 2114, there may be damage to one or more elements of the electrical circuit of this device. They happen somewhat less frequently, but eliminating them can require significantly more effort.
The main electrical damages are:
- Fuse failure.
- Pump fault.
- A break in the electrical network.
- Faulty steering column switch.
The first reason can be solved simply - you just need to check fuse F7 in the common block and, if it is faulty, replace it with a new one.
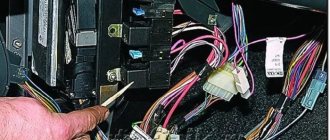
VAZ 2114 fuse box
If the fuse turns out to be serviceable, then the pump itself should be checked for functionality. To do this, connect it directly to the battery. If the pump motor turns on and the unit itself begins to pump water, then the cause of the malfunction lies somewhere else. If the windshield washer motor of the VAZ 2114 does not work (which can be indicated by complete silence when connecting it to the battery), then the pump should be replaced with a new one.
If it turns out that the fuse and the pump are working, then you should check the electrical system itself. This is best done by “dialing” with a multimeter (tester). If a break is found, the wire will need to be replaced.
Understeering's shifter
The final electrical cause of possible windshield wiper system failure is a damaged steering column switch. You can check this by directly connecting its contacts: 53ah to W or 53ah to 53H. If after this procedure the windshield washer works, then the switch is working. If not, it should be replaced with a new one.
Diagram of direction indicators and hazard warning lights
- Turn signal lamps;
- Mounting block;
- Ignition switch;
- Hazard switch;
- Side turn signal lamps;
- Turn signal lamps in the outer rear lights;
- Turn signal lamps in the instrument cluster;
- Turn signal switch; K2 - Relay interrupter for direction indicators and hazard warning lights; A - to power supplies
Engine control circuit for VAZ 2111 (January 5.1, Bosch M1.5.4N)
- Fragment of the mounting block;
- Electric engine cooling fan;
- Automotive anti-theft system status indicator;
- Automotive anti-theft system control unit;
- Coolant temperature sensor;
- Air flow sensor;
- Throttle pipe;
- Block connected to the throttle position sensor;
- Block attached to the idle speed control;
- Controller;
- A block connected to the air conditioner wiring harness;
- Oxygen sensor;
- Knock sensor;
- Crankshaft position sensor;
- Speed sensor;
- Adsorber;
- Accumulator battery;
- Main relay;
- A block connected to the anti-lock brake system wiring harness;
- Diagnostic block;
- Main relay circuit protection fuse;
- Controller protection fuse;
- Fuse for protecting the electric fuel pump and its relay;
- Relay for turning on the electric fuel pump;
- Electric fan switch relay;
- A block connected to the instrument panel wiring harness;
- A block connected to the instrument panel wiring harness;
- Ignition module;
- Electric fuel pump with fuel level sensor;
- Spark plug;
- Injectors;
- F — Front harness wire going to the “B+” terminal of the generator; G - Front wiring harness wires.
Diagram of low beam, high beam, rear fog lamps
- Headlights;
- Mounting block;
- Headlight switch;
- Ignition switch;
- External lighting switch (fragment);
- Fog lamps in the interior rear lights;
- Fog light switch with turn-on indicator lamp;
- Headlight high beam indicator lamp in the instrument cluster; K8 - High beam headlight relay; K9 - Relay for low beam headlights; A - The order of conditional numbering of plugs in the headlight block; B - to power supplies
Engine control diagram for VAZ 2111 - Euro-2 (Bosch MP7.0)
- Fragment of the mounting block;
- Electric engine cooling fan;
- Automotive anti-theft system status indicator;
- Automotive anti-theft system control unit;
- Coolant temperature sensor;
- Air flow sensor;
- Throttle pipe;
- Block connected to the throttle position sensor;
- Block attached to the idle speed control;
- Controller;
- A block connected to the air conditioner wiring harness;
- Oxygen sensor;
- Knock sensor;
- Crankshaft position sensor;
- Speed sensor;
- Adsorber;
- Accumulator battery;
- Main relay;
- A block connected to the anti-lock brake system wiring harness;
- Diagnostic block;
- Main relay circuit protection fuse;
- Controller protection fuse;
- Fuse for protecting the electric fuel pump and its relay;
- Relay for turning on the electric fuel pump;
- Electric fan switch relay;
- A block connected to the instrument panel wiring harness;
- A block connected to the instrument panel wiring harness;
- Ignition module;
- Electric fuel pump with fuel level sensor;
- Spark plug;
- Injectors.
- F — Front harness wire going to the “B+” terminal of the generator; G - Front wiring harness wires.
The order of conditional numbering of plugs in blocks:
- A - Controller; B — Control unit of the automobile anti-theft system; B — Indicator of the status of the automobile anti-theft system; G - Pads 26; D - Throttle pipe; E - Air flow sensor; F - Electric fuel pump and oxygen sensor; 3 — Speed sensor; And - Ignition module.
Purpose of plugs in block 26:
- To the low-voltage tachometer input in the instrument cluster;
- —
- To the engine management system control lamp in the instrument cluster (from the controller);
- To the dome light switch located on the driver's door pillar;
- To the engine control system control lamp in the instrument cluster (+ power supply);
- To the trip computer (fuel consumption signal);
- To the instrument cluster (vehicle speed signal);
- To terminal “15” of the ignition switch (plug 4 of the switch block)
Diagram of side lights, brake lights, interior lighting
- Side light bulbs in headlights;
- Engine compartment lamp;
- Mounting block;
- Engine compartment lamp switch;
- Ignition switch;
- External lighting switch (fragment);
- External lighting indicator lamp in the instrument cluster;
- Lamps for side lights and brake lights in the outer rear lights;
- License plate lights;
- Instrument lighting regulator;
- Brake light switch;
- On-board control system unit; K4 - Relay for monitoring the health of lamps (contact jumpers are shown inside the relay, which must be installed in the absence of a relay); A - to power supplies; B - to the backlight lamps of switches and devices; C - to additional brake signal
Mounting block connection diagram
The outer number in the designation of the wire tip is the number of the block, the inner number is the conventional number of the tip.
K1 - Relay for turning on headlight cleaners; K2 - Relay interrupter for direction indicators and hazard warning lights; Short circuit - Windshield wiper relay; K4 - Relay for monitoring the health of lamps; K5 - Relay for turning on power windows (in a variant version of the car); K6 - Relay for turning on sound signals; K7 - Relay for turning on the heated rear window; K8 - Headlight high beam relay; K9 - Relay for low beam headlights; F1-F16 - Fuses
Electrical circuit diagrams for VAZ 21140, 21144, 211440, 2113, 2115 cars with a 1.5L (VAZ-2111 and VAZ 21114) and 1.6L (VAZ-11183) injection engine, as well as a 1.5L carburetor engine - VAZ-21083 (Samara 2; 199 7 -2013)
Source