Over the several years of production of the 2114 model, two types of ignition were installed on the car - contactless and electronic. If there are no problems with the second type, then with a contactless system there are problems. When there are problems with starting the engine and the stability of its operation, it will be useful to know how to set the ignition on a VAZ 2114. First, you need to know the differences between the two spark supply systems, and then carry out the repair yourself.
Useful video:
We set the ignition correctly on the 8-valve injection VAZ-2114 (+video inside)
The second Samara became the first car among VAZ front-wheel drive vehicles with an injection power system initially. The first copies of the VAZ-2114 were still going on sale with an eight-cylinder injection engine and a contactless ignition system, and the following engines already had a fully electronic system with the same 8 valves. Before you set the ignition, you need to find out what system is installed on the engine, which is what we will do now.
Checking completed actions
To diagnose the actions performed, you will need pliers, a standard tool and a tester (multimeter). High voltage wires can be checked with a multimeter. Normal wire resistance is from 5 kOhm to 12 kOhm.
At this stage, we will perform diagnostics of circuits, and not microprocessor elements. To check the latter, you will need specialized equipment and experience, which we do not have.
So, how is the check done:
- First you need to turn off the ignition and diagnose the contacts on all plugs and pads. It is also necessary to diagnose the tightness of the fit, as well as the contact of the high voltages in the module.
- Next, remove the block from the module and diagnose the voltage at terminals C and B. In this case, the tester must be configured in the mode for measuring low alternating current.
- Check the high voltages. To do this, you need to install a working spark plug in the cap and attach it to the block head. At this point, your assistant should try to start the engine by turning the starter. If the wire is working, then a spark will jump between the spark plug and the block head. Thus, it is necessary to diagnose all wires.
- In the event that there is no spark on only one cable, it is necessary to thoroughly diagnose the module itself, but in most cases the device must be replaced. If everything works correctly, the spark plugs are working properly, but there are still problems with the engine, you need to check the power system.
Ignition systems of the 8-valve injection VAZ-2114
It is quite simple to calculate the cost of the ignition system on a VAZ-2114 - if a breaker is installed, an analogue of the distributor of a contact ignition system, this means that the system is non-contact, but with a breaker-distributor. In this case, the ignition timing is set by turning the distributor to a certain degree . The accuracy of the adjustment depends on the experience of the technician, as well as the equipment used. Nevertheless, such a system will allow you to flexibly and accurately set the ignition using a strobe light.
Contactless electronic ignition system
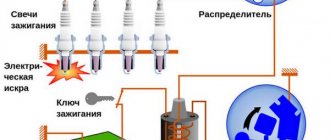
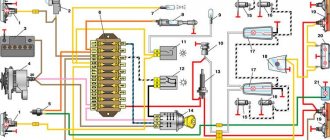
On most engines that were installed on the second Samara and VAZ of the tenth family, the ignition system is contactless electronic. There is no distributor here, so the ignition timing is adjusted automatically in real time and exclusively by means of the engine control system and electronics. The system does not require maintenance, and its diagram is shown in the photo below.
How to check the ignition coil?
Before diagnosing the ignition coil (SC) on an 8-valve engine, you should check whether there is voltage on the coil. To do this, you need to disconnect the wire block and check it with a tester. The voltage should be 12V.
VAZ short circuit diagram
Typical unit malfunctions
Signs of a faulty short circuit in VAZ engines with 8 valves, UAZs and other cars are similar:
- power is lost, it seems that the engine does not pull;
- the appearance of failures in engine operation;
- unstable operation at idle;
- Cylinders 2-3 and 1-4 do not function in pairs, there is no spark.
If the listed symptoms appear, you first need to check the spark plugs and crankshaft position sensor. Fuel injection into the injectors is regulated based on sensor readings, so if there is excessive fuel consumption, they require checking. The short circuit should be checked last.
You can check the ignition module (IM) on an 8-valve engine in one of three ways:
- The easiest way is to replace the module being tested with a known-good device. True, you need to find a suitable module. Before checking, be sure to make sure that the high-voltage wires are in good condition.
- The second method is to move the module. If, when you move it and the wire block, changes in the operation of the motor are noticeable, then there is a problem with the contacts. In this case, you can do the repair yourself. If repair is not possible, the device should be replaced.
- The third method is to check using a multimeter set to ohmmeter mode. It is necessary to measure resistance at the paired terminals of coils 2-3 and 1-4. It should be the same and be about 5.4 kOhm.
Setting the ignition on an injection engine
As can be seen from the above diagram, which is implemented in eight-valve injection engines, for the correct operation of the ignition system, the electronic engine control unit must be supplied with the necessary information from the sensors. The main sensor for system operation is the crankshaft position sensor . It is located on the ebb of the cylinder block next to the generator drive pulley, to the left of it, when looking at the end of the crankshaft.
Crankshaft position sensor
A timing gear disk is installed on the crankshaft pulley, which generates electromagnetic oscillations, and the sensor converts them into a pulse, this pulse is supplied to the computer. The control unit, based on the position of the crankshaft, sends a signal to the ignition module, which distributes the spark between the spark plugs.
In addition, the crankshaft position sensor sets the timing of fuel injection, so first of all we will check its condition.
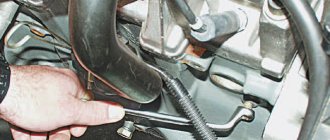
Removing the timing belt protective cover
Scheme of signal receipt from the crankshaft sensor: 1 – crankshaft master disk; 2 – crankshaft position sensor; 3 – angle of rotation of the crankshaft; 4 – output signal of the crankshaft position sensor
Align the mark on the flywheel with the mark on the gearbox housing
We check the coincidence of the marks on the oil pump pulley and the tide on the cylinder block
We check the coincidence of the marks on the camshaft drive toothed pulley and the timing belt cover
If the three marks coincide, it means that at this moment the pistons of the first and fourth cylinders are at top dead center. It is at this moment that the gap between the teeth on the drive disk should coincide with the tide on the cylinder block, and the 20th tooth from the gap should coincide with the crankshaft position sensor. It is at this moment that the sensor sends an impulse to the engine control unit, indicating to it that the piston of the first cylinder is at the top dead center of the compression stroke.
We check the completed work. Step-by-step instruction
As can be seen from the diagram above, the ignition system consists of high-voltage and low-voltage circuits. In this regard, there are several points that you need to know when checking the system.
High-voltage wires operate at a voltage of about forty thousand volts. In our case, such a voltage is not dangerous for life, but receiving a discharge even with a low current strength and such a voltage is unlikely to be beneficial for health and mood. Therefore, it is advisable to work in rubberized gloves and use tools with insulated handles.
To check the condition of the system, you will need pliers with insulated handles, a standard set of tools and a multimeter. Please note that we only check the operation of the circuits, and not the operation of the microprocessor part. This requires computer equipment and special training.
- With the ignition off, we check the contacts on all connectors in the system. First of all, the tightness of fit and contact of high-voltage wires in the ignition module.
- We remove the block from the module and check the voltage at terminals C and B. The multimeter is set to low AC current control mode. For more details, see “checking the ignition module“.
Check the voltage at terminals C and B of the ignition module
Checking ignition coil contacts 2 and 4 with a multimeter
Checking high voltage wires
This way you can check and set the ignition on a VAZ-2114 with an injection 8-valve engine with your own hands. Good luck to everyone!
Source
The procedure for connecting high-voltage wires VAZ
Diagram, procedure for connecting VAZ high-voltage wires.
First, let's decide which of the four cylinders is first?
The first cylinder in front-wheel drive VAZs is located closer to the timing belt. If you look at the engine from the front, the first cylinder is the leftmost). And then everything is simple - from left to right - 1, 2, 3, 4.
In rear-wheel drive VAZ Classic and Niva, the first cylinder is located closer to the front bumper of the car.
General tips for connecting high-voltage wires.
Checking high-voltage wires. To check the wires, you will need a multimeter tester. Check the resistance of the wires - it should be no more than 20 KOhms (in practice, the longest wire of cylinder 1 has a resistance of up to 10 KOhms). If the wire resistance is more than 20 Kom, it must be replaced. Carefully inspect the wires for chafing on parts of the motor or other wires. In case of significant abrasion, replace the wire. In case of minor abrasion, it is possible to lay the wire so that it does not rub and fix it in this position.
Laying wires. Do not try to connect the wires in a bundle. Disassemble the wiring harnesses, release the wires from the plastic holders. Connect the high-voltage leads to the corresponding cylinder spark plugs. Lay the wires so that they do not rub against each other, engine parts, or hoses. Avoid sharp bends and tension on the wires. After connecting all the wires, secure them into the bundle with special comb holders included in the delivery kit.
The procedure for connecting I/O wires to a VAZ carburetor (2108, 2109, 21099)
The central wire from the distributor cover always goes to the ignition coil (bobbin).
The outlet of the distributor cover, which faces towards the front of the car, is connected to the first cylinder.
The outlet of the distributor cap, looking down, is connected to the third cylinder.
The outlet of the distributor cap, looking rearward, is connected to the fourth cylinder.
The outlet of the distributor cap, looking up, is connected to the second cylinder.
The procedure for connecting high-voltage wires to a VAZ Classic, Niva with a carburetor and distributor.
Central wire from the ignition coil (bobbin)
1 cylinder - above the vacuum corrector. Next, clockwise, the order is 1-3-4-2.
Injection VAZ produced before 2004 with an old-style ignition module (4-pin low-voltage connector)
Actually, on the module body it is already indicated which cylinder the pins correspond to - but we duplicated them in red in case the module gets completely dirty, and you might not be able to see it in the photo.
Injection VAZ produced after 2004 with a new ignition coil (3-pin low-voltage connector)
As with the old-style ignition modules, the new coils are also marked with pins corresponding to the cylinders. But the connection order is different from the order on the old-style ignition module. Be careful.
Signs of an incorrectly set ignition on a VAZ 2114
Depending on the type of spark supply system, various problems may arise. The following malfunctions are typical for contactless ignition:
- The operation of the switch is disrupted;
- Malfunction of the “slider”;
- Cracks in the distributor body;
- Distributor settings are out of order.
For a more advanced electronic system, the following points are signs of malfunction:
- Incorrect reading of information transmitted from sensors to the ECU;
- Voltage problems leading to incorrect calculations by sensors;
- Damage to the electronic control unit.
Violations in the operation of each of the systems manifest themselves in the same way:
- Floating idle speed due to improper detonation of the fuel-air mixture;
- Dips when the engine gains power (especially when the gas pedal is sharply pressed);
- Interruptions in the operation of paired cylinders (first and fourth or second and third). This sign indicates not so much a faulty ignition as a faulty coil.
All of the listed symptoms are similar to the situation when armored wires or spark plugs fail, so check them. If this does not help, you need to set the ignition on the VAZ 2114.
Consequences of incorrectly setting timing marks
If the ignition is set incorrectly, the following negative aspects are possible:
- If the engine has 16 valves, then they become deformed or bent during operation, accumulating damage.
- The previous problem causes damage to the cylinder head.
- The guide bushings may also become unusable.
- Cracks may appear in other engine components.
Crack in the cylinder block
- The motor overheats.
- The engine piston mechanism can burn out.
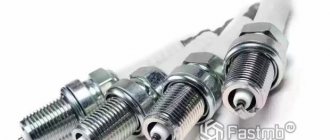
- Oil residue may appear on the spark plugs.
Oil deposits on spark plugs
- The fuel mixture loses its ignition moment.
Note! If the engine has 8 valves, then the consequences are not so critical - traction disappears, the belt quickly wears out and breaks.
After repairs, the following factors most often indicate an incorrectly set ignition:
- The car accelerates worse.
- Frequent overheating of the motor.
- The craving became much worse.
Necessary tool
To set the ignition on cars with an electronic system, you will need the following tool:
- Keys for unscrewing the bolts securing the timing belt casing;
- Ratchet with extension for cranking;
- A valve feeler gauge that can be used to check the distance from the crankshaft position sensor to the drive disc;
- A rag for cleaning the sensors from dirt.
If desired, you can replace the sensors with new ones (the cost of which is low). For example, the crankshaft position sensor rarely fails, but always at the wrong time.
Using a metal plate
Another fairly simple way to solve the problem is to use a metal plate. The idea is to use a record instead of a key.
It is necessary to select a piece of plate similar in length and insert it into the keyhole. Next, just insert a flat-tip screwdriver and turn it with a little force. Most often, with this procedure, the lock requires replacement.
Important! The length of the plate should be such that its end protrudes slightly from the well.
After starting the motor using the plate, you should contact service or replace the device yourself with a new one. If it is impossible to remove the metal plate yourself, you should dismantle the lock completely.
Useful : Ignition switch pinout
Setting the ignition
If the fuel supply is correct, but there is no spark, you should check the condition of the system as a whole. Depending on the injection system (injection or carburetor), the methods for producing a spark also differ. Setting the correct ignition on later versions of the 2114 models does not require serious skills. In general, if the machine is properly maintained, problems with this unit do not arise. The entire spark supply process is controlled by an electronic control unit. It is impossible to penetrate into it without special software. When trying to increase engine performance, craftsmen are allowed to correct some system parameters. If you lack the skills, you should not change the ECU settings yourself. Also, when setting up a contactless system, you need to know the required crankshaft rotation angle. Let's take a step-by-step look at how to correctly set the ignition on a VAZ 2114 on your own:
- We remove the protective hatch in the gearbox and check the markings of the flywheel and gearbox housing. This mark is set by turning the crankshaft with a key;
- We carry out this procedure for checking the marks on the oil pump pulley. If necessary, we set them in the correct position;
- The last stage is to check the mark on the crankshaft pulley and the ebb on the block.
To carry out tuning work in road conditions, save a photo of the timing marks on the VAZ 2114 in your phone.
The entire procedure for setting up the ignition in cars with an ECU consists of setting marks. In this it is similar to the process when you need to install a belt on a gas distribution mechanism. Because all actions to supply a spark are carried out according to readings from the sensors; when operating the machine, special attention should be paid to their performance. To consolidate the result of placing the marks, you can check their position again. After the marks are set, you can try to start the engine.
As a recommendation, to identify the exact problem with the spark supply system, it is worth contacting professional electricians. Lack of power, problems with wiring, sensor failure - identifying all this without special devices is problematic, and changing everything is costly.
Reasons for belt breakage:
- 1. Careless operation of the vehicle. The product has a certain resource, after which it requires replacement;
- 2. Crankshaft jamming. At speed the crankshaft may suddenly jam. In this case, the camshaft will continue to rotate and the element will break;
- 3. Oil gets on the belt. When oil gets on the working surface, the belt begins to scroll and slide off the pulley;
- 4. Savings on purchasing the product. Many car enthusiasts are trying to save money on purchasing a product. This should not be done, as further repairs can be much more expensive;
- 5. External defects (cracks and peeling). If the quality is poor, the product begins to lose its properties and external signs of wear appear;
- 6. Cutting teeth. The belt clings to the pulleys using teeth. When they are cut, it begins to scroll and eventually breaks off.
Deteriorated
voice
Article rating
Error codes for incorrect ignition
If you have a special tester or a standard dashboard capability, some problems with the spark supply system can be pinpointed. To do this, you need to know the decoding of error codes:
- 300 – presence of misfires;
- 301-302-303-304 – detection of leakage for each individual cylinder;
- 335-336-337-358 – malfunction in the crankshaft position sensor wiring circuit;
- 342/343/346 – problems with phase distribution sensors;
- 363 – no ignition of the fuel-air mixture.
After eliminating the cause of the failure, you can reset the errors. In the absence of an on-board computer, identifying the problem using codes is only possible with a special scanner. To avoid erroneous self-diagnosis, periodically check all sensor connectors for integrity.
Source
Recommendations
To avoid problems with the system, it is not recommended to carry out the following manipulations:
- As a “spark” test, do not unscrew the wires with the spark plug onto the working engine;
- To protect the switch from burning out, do not disconnect the battery terminals on the working motor;
- Change “consumables” – spark plugs and high-voltage wires – in a timely manner.
Ignition systems of the 8-valve injection VAZ-2114
You can determine the type of ignition by looking under the hood:
- If you find a breaker near the “heart” of your car (analogous to a distributor installed on contact systems), then your car belongs to the first series, and the ignition of the VAZ 2114 injector on it is non-contact, based on the breaker-distributor assembly. The ignition in such systems is set by turning the distributor degree by degree, and the results of the work depend on the experience of the performer and the availability of special equipment. So, with the help of a strobe light, the system can be debugged exactly as desired by the car owner.
- If this part is not present, then your car belongs to the representatives of the tenth family, equipped with an electronic ignition system. It is impossible to set this manually, and its operation is completely controlled by the ECU. At the same time, it is not completely unadjustable, because by connecting to an on-board computer, some of its parameters can be reconfigured to your taste, but there are only a few specialists capable of doing this correctly.
IMPORTANT! The electronic system in the VAZ 2114 is designed so that the owner does not have to maintain it, so if you do not plan to participate in racing competitions with your car, it is better not to mess with the software.
Preparation
It is necessary to prepare spare parts and other equipment for work. A new ignition switch will be needed. It is quite easy to find original parts and analogues on the Internet, but it is worth considering that it is advisable to purchase the lock “assembled”.
Catalog number of the original VAZ 2114 ignition switch: 21103704010. Approximate price: 500 rubles for a used part and 1200 for a new one.
As a replacement, you can use analogues with numbers: 09401, 24370407. Approximate price: 1000 rubles (new part).
In addition to the lock itself, you will need the following tools:
- spanners;
- chisel;
- pliers;
- screwdriver.
Before you begin, you must also remove the steering column cover and steering column switches.
Causes of ignition problems
As mentioned earlier, in order to set the ignition in the electronic system you will have to go into the “brains”, there you can also check the functionality of the sensors, so they greatly influence the operation of the system, regardless of the type of ignition.
On the electronic type, the main causes of failures are:
- Incorrect information transmitted from sensors to the ECU. If the connection to the brain and diagnostics showed strange data coming from one or more control devices, it is necessary to use a “substitution”. The easiest way is to find a car with known good sensors, install them and double-check the results. Here you need to understand that you do not need a new one, but a working sensor, because factory defects are not excluded even on a new mechanism.
- The incoming voltage - correct from a technical point of view is 5V, but if due to a violation of the mechanical integrity of the wires or another problem with the car’s electronics, this voltage changes, the sensor readings will also change after it. If this happens, the ECU begins to adjust engine operation based on incorrect data, which leads to incorrect operation of the entire mechanism as a whole. To check this breakdown, you will need a known-good system of wires leading to the sensor or a donor car into which you can install your sensor and test the system for functionality.
- Broken ECU - if the previous two options did not give a visible result, and installing your sensor and wiring in a working machine does not change its performance, only this option remains. You can try to reflash the “brain” of the car, but due to its low cost, it is better to immediately buy a new ECU and install it on the car.
Before moving on to the radical measures proposed in the third option, it is worth additionally checking the correct location of the labels. In cars with contactless ignition, this is the ignition installation of the VAZ 2114, and for cars with an electronic system, debugging is important to check the synchronization of the injection system with the gas distribution mechanism.
Common faults
Diagnostic program There are several reasons why the phenomenon of misfires in the ignition system occurs on the VAZ 2114.
- Problem candles. If carbon deposits appear on them, the gap decreases or increases, they will not be able to work properly. As a result, there are misfires in the cylinders. Quite often, spark plugs do not work for the simple reason that the car owner decided to save money and buy spark plugs of dubious quality. You should not count on their long service life and reliable operation.
- Wiring problems. Here you most often have to deal with wire wear, chafing, and mechanical damage. Sometimes the problem is solved by replacing the wiring. But in some cases, wiring can negatively affect the functionality of the devices it goes to. As a result, both the wiring and the device must be replaced.
- Contacts. Contacts may burn out, become covered in oil, or rust. Cleaning them or completely replacing them may help. The second option is preferable in order to reduce the risk of omissions occurring after a short period of time.
- Damage to the ignition coil or module. If you have a VAZ 2114 with a 1.6-liter engine, you are dealing with a coil. Owners of the newer version with a 1.5-liter engine are already solving problems with the ignition module. Regardless of this, units often fail and cause leaks. There is no point in repairing them, so it is better to immediately replace them with new ones.
- Use of low-grade fuel. The problem for many owners of domestic cars is that they, sometimes unknowingly, doom themselves to constant repair work. A trivial example is the use of cheap gas stations. Low-quality gasoline produces a poor air-fuel mixture, clogs filters, and clogs injectors. This often causes misfires in the cylinders. The right solution is to fix the problem and start using good gas stations. Their gasoline is more expensive, but you will spend many times more money on repairs if you don’t stop refueling with God knows what.
- Omissions. They also often occur due to impaired compression in the cylinders. This fault should be checked almost first.
- The gas distribution mechanism is not adjusted correctly. Its adjustment will not take much time; the work can be done with your own hands.
- Excess air enters the fuel system. This may occur due to damage to the intake manifold, wear of the rings on the injectors and other defects. Therefore, you should check the system for leaks and find sources of air intake.
- The gap between the piston and cylinder has decreased. There may be many reasons for this, but you will definitely have to check them if this is the reason.
Getting ready to adjust the ignition
In order to correctly set the ignition timing of the VAZ 2114 and carry out debugging, you need to prepare. The method described below does not require acrobatic agility from the owner and is quite feasible both in the uncomfortable and cramped environment of a garage and if the car enthusiast has a tummy.
IMPORTANT! Thorough preparation always speeds up the process of technical work significantly, regardless of what exactly needs to be repaired.
Preparation for debugging ignition marks is carried out as follows:
- The car is placed on a flat surface and placed on the handbrake.
- The second step is to remove the front right wheel, which will subsequently allow you to gain access to the gas distribution mechanism itself, which will speed up the work, make it convenient and easy, for this: a. unscrew the fastenings of our wheel and place a wheel chock under the diagonally opposite wheel (rear left); b. We lift the car with a jack, twist the wheel mounts completely and remove it.
- Finally, we need to remove the timing belt splash guard (if there is one, of course). By the way, you can not remove it entirely, but just unscrew the two lower fasteners, then it can be moved away without damaging it.
Tips and tricks for starting the engine without a key
A key can be lost or broken at any time, so you need to be prepared to fix the problem on the spot. To quickly solve the problem, it is enough to carry with you several wires for powering the starter, a couple of screwdrivers and metal plates. It would also be a good idea to familiarize yourself with the following recommendations:
- Before starting work to fix the problem, deal with the steering lock. It is enough to apply force and sharply pull the steering wheel to break the lock;
- If there is an alarm, you must first turn it off using the secret “Valet” button or through the key fob (if it is not lost along with the key);
- When trying to start the motor through a wiring short, study the diagram in detail to understand which wire does what. If the connection is incorrect, there is a risk of failure of some electrical equipment.
The indicated short-circuit methods should be used on cars of early years of production. In versions of the “four” with an on-board computer, such fraud can end badly.
Minimal knowledge in the field of car design and the desire to fix the problem yourself make the procedure for starting the engine without a key quite simple. The knowledge of the design of domestic cars is such that any information about their design is available on forums and automotive resources.
Marks and direct adjustment
When the preparation is completed and the car is ready to work with it, you can begin to set the ignition marks of the VAZ 2114. The task of the procedure is to check the synchronism of the system (correlation of the camshaft, crankshaft and injection timing), with some nuances for the electronic system.
For electronic ignition systems, there is a small nuance - the need to check the distance from the master disk to the sensor. Normally, this distance should not exceed 0.7 mm, but should not be less than 0.5 mm. You can use a valve feeler gauge to check.
The further procedure for the electronic ignition system is as follows:
- We look into the mark hatch and align the gearbox housing mark with the flywheel mark by turning the crankshaft.
- The work is completed, to check the correct setting, check that the gap on the disk coincides with the tide of the cylinder block, and the twentieth tooth with the crankshaft position sensor. If everything matches, you have successfully completed the task.
What is ignition timing and what does it affect?
Ignition timing is an important parameter that determines the operation of the accounting ignition system. Here the concept assumes the time during which the ignition system ignites the compressed working mixture with a spark discharge. It is defined as the position of the crankshaft of the car engine at the moment the impulse is applied to the spark plug in advance relative to top dead center in degrees.
This is all connected because it takes several days for the working mixture to burn in the cylinder, because the speed of propagation of the flame front is approximately 20-30 m/s. If the mixture is ignited with the piston in the TDC position (i.e., top dead center), then its combustion occurs on the expansion stroke, also partly on the exhaust. As a result, effective pressure on the piston will not be provided. Therefore, the ignition moment, which is good, is selected so that the pressure of the burned gases.
Useful video
You can find interesting information by watching the additional video below: https://www.youtube.com/watch?v=pNyBny-_HoQ
On a car with contactless ignition, everything is even easier; you don’t have to remove the wheels, but you will need an assistant. It is necessary to find the compression stroke of the fourth cylinder. To do this, insert a rubber cone into the spark plug hole and turn the ratchet. Pushing out the cone will mean that the compression stroke has been found.
Having illuminated the spark plug hole, we align the longest mark of the cover with the mark of the pulley. We set the breaker to the appropriate clock and check the operation of the system according to the fourth point described above.
Source
How to set the ignition of a VAZ 2106 with your own hands - step-by-step instructions
1. Unscrew the spark plug of the 1st cylinder, then use a finger or a rubber plug to close the spark plug hole.
2. Using a special key, rotate the crankshaft until the compression stroke begins in the first cylinder, that is, when the piston begins to move upward. You can tell by the way the rubber plug flies out; if you hold it with your finger, you will feel it being squeezed out.
3. Turn until the mark on the crankshaft pulley matches the mark on the timing cover. If you drive on “92” or “95” gasoline, combine with the middle mark, but if on “72” or lower, combine with the long mark, which corresponds to the “0” advance angle.
4. Unfasten the latches, then remove the ignition distributor cap.
5. After turning the crankshaft, the distributor rotor should rotate to a position in which its outer contact will be directed towards the 1st cylinder on the distributor cap.
6
When the marks are aligned, pay attention to the distributor, try to draw an imaginary line through the cover latches, it should be parallel to the axis of the engine, if this is not the case for you, then do the following:. 7
Unscrew the distributor fastening nut, then turn the distributor upward. Rotating the rotor axis, align it parallel to the engine axis
7. Unscrew the distributor fastening nut, then turn the distributor up. Rotating the rotor axis, align it parallel to the engine axis.
8. Place the distributor, tighten the fastening nut without tightening it completely.
9. After this preparation, you can proceed directly to the ignition adjustment procedure.
10. Connect the “control” as follows: one end to the terminal of the ignition coil connected to the low-voltage wire of the distributor, the other end is connected to ground.
11. Turn on the ignition. Slowly turn the distributor clockwise until the control lamp goes out. If it doesn’t burn anyway, then you don’t need to do anything.
12. Next, you need to rotate the distributor counterclockwise, at the moment the control lamp lights up, fix the position of the distributor, then tighten its fastening nut.
13. Now you can turn off the ignition and put the distributor cap back in place.
After the ignition is set, it is necessary to check the correctness.
1. To do this, start the engine and start driving.
2. Accelerate the car to 45 km per hour, then turn on the fourth gear and sharply press the gas.
3. After this, after about 2-3 seconds, detonation will occur (popping, ringing of “fingers”), disappearing as the car accelerates.
4. If detonation occurs and does not disappear as the car accelerates, we can assume that the ignition is “early.” If you do not experience detonation at all, the ignition is “later”. In case of early ignition, turn the distributor clockwise by approximately 0.5-1 division. If you have the opposite later, turn it 0.5-1 division counterclockwise. When the ignition adjustment is completed, mark with paint on the distributor body the position of the middle mark of the scale relative to the block.
Now that the ignition timing of the VAZ 2106 has been set, you can collect everything and rejoice at the job successfully completed.
Starter problems
Many VAZ 2110 owners had a situation where the starter did not turn after inserting and turning the key. They heard characteristic clicks. This indicates that the solenoid relay is not working.
But the fact is that the “ten” does not have a starter relay, that is, an ignition relay as such. Instead, a solenoid relay works. It is supplied with a positive contact from the ignition switch. Mount this relay to the starter. It has a round shape and is approximately half the size of the starter itself.
ABOUT THE POSSIBILITIES OF MODULE REPAIR
Most breakdowns of this device lead to its replacement, but sometimes it is possible to repair the ignition coil to return it to service. This is especially true in cases where moving or tapping changes the behavior of the motor. If you have the ability to use a soldering iron and a multimeter, you can try to get it back into operation.
You need to remove the metal back cover, under which the electrical parts of the module are filled. You need to try to carefully get rid of the silicone and its “insides” will be revealed to your eyes. Find broken or “bad” contacts and solder them.
The conductors in the block are aluminum, so special solder is needed to solder them.
After this, close the back cover and check its functionality. If the repair result is positive, you need to open it again and fill the inside with silicone.
If the result is negative, then the block must be replaced. True, owners with extensive amateur radio experience continue to “dig” further. You can try replacing the electronic switches. Basically, these two elements become the culprits of failures of the engine starting system.
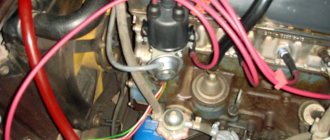
WHERE TO FIND THIS MODULE
It is hard to believe that the driver who undertakes to check or repair this device does not know where it is located. Well, for those who don’t know, we’ll tell you. It’s easy to find it, find at least one high voltage wire, and walk your hand along it from the spark plug to the plastic case that belongs to the module.
From the picture its location becomes clearer.