Every car owner wants his car not to fail at critical moments, to cause a minimum of problems and bring maximum benefit. But this directly depends on how the owner cares for, monitors, and repairs his car on time.
One of the most important components affecting safety is the steering. VAZ 2114 owners do not have to repair steering racks very often, since these units have a fairly long service life. But a number of factors and time lead to the fact that you have to pay direct attention to the helmsmen, diagnose the problem in a timely manner and promptly fix it.
Today we’ll talk about how to repair this unit yourself, as well as what measures will bring your slightly worn steering rack back to life.
Symptoms of a problem
To understand that the racks require repair, you need to monitor the behavior of the car and know the characteristic signs of a malfunction of this element.
Is it possible to determine whether the unit requires a complete replacement, or can you get by with simple repairs? We will tell you about this in the table below.
| Sign | Necessary actions |
| When turning the steering wheel, a knock is heard and play occurs | If the situation occurs while the car is moving, it is enough to carry out repair measures, use a repair kit |
| Knocking and play occurs when the steering wheel is turned when the car is stationary | This is clear evidence of the critical state of reiki. The problem can only be solved by completely replacing it. |
Let's summarize
As you can see, the work will require some skill. But, if desired, they can be performed by a beginner who knows how to handle the tool and has common sense. Repeating the operation no longer causes problems.
After repairs, you should perform a wheel alignment procedure or do a simple check. To do this, you need to start the car and drive at a slow speed. If, with the steering wheel in a straight position, the vehicle does not pull to the side, everything is in order.
To protect fasteners with threaded connections from dirt and water, experts recommend using lithol or graphite-based lubricants. Parts must be lubricated carefully. You can further enhance the protection with tubes. They are put on the joints of the steering tips and traction devices (heat shrink can also be used).
Tightening and adjustment
As the practice and experience of VAZ 2114 owners shows, if problems arise with the racks, they can most often be repaired. The only condition is that you have an inspection hole at your disposal.
Full analysis
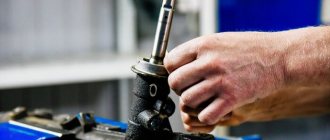
The first step is to tighten the rack. But how is this done? To do this, simply tighten the adjusting bolt. Adjustment is made with a 17 mm key.
After tightening the bolt, take your car out for a few kilometers to check whether the knocking or play remains. If these symptoms of the problem disappear after you have tightened and adjusted the steering rack, the repair can be considered complete.
But this doesn't always happen. The knock may remain, but the play may go away, or vice versa. In any case, if at least one sign still remains, you will have to begin a full-fledged repair with your own hands. Now you can find a number of useful videos that describe in detail the procedure for repairing this unit. Take a look, it will be useful for you.
Price issue
A new rail will cost you about 3 thousand rubles. The cost of service stations for replacing slats costs about 2 thousand rubles. That is, in total you will have to spend 5 thousand rubles if you entrust the work to the masters.
Repair kit
However, the rack is not difficult to repair. Most VAZ 2114 owners perform this event with their own hands. Plus a decent saving of money.
We repair it ourselves
To get started, you will need a set of tools and repair kits.
Replacement kit
Be sure to include the following in your list of tools and materials:
- Repair kit for one of three configurations (more about them below);
- Bearings;
- Lubrication;
- Set of keys and screwdrivers.
Selecting a repair kit
Spare parts
As for repair kits, the standard minimum set includes four elements:
- Washers;
- Nuts;
- Bearings;
- Bushings made of fluoroplastic.
But is it enough for your specific steering rack situation? Let's try to understand the purpose and configuration of each of the three types of repair kits.
- The cheapest repair kit, the contents of which you are already familiar with, allows you to solve the most minor problems that have arisen with your slats.
- The middle kit additionally includes other bearings and shafts. Designed for more serious repair work.
- The most expensive repair kit may consist of whole new slats, that is, it involves not a repair, but a simple replacement of units.
Essential elements
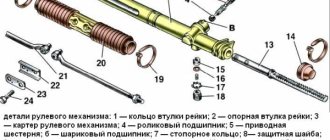
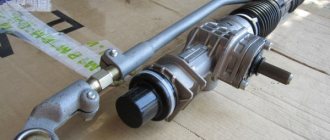
For a VAZ 2109, it is easier to repair the steering rack if you know the operating principle and purpose of each part. The design is very simple, consists of several basic elements:
- a gear rack with two threaded holes for attaching internal rod ends;
- drive gear with a splined shaft for connection to the steering clutch;
- support half rings ensuring smooth sliding;
- a stop mechanism that regulates the required design clearance of the gear pair;
- a crankcase into which the parts are assembled and fixedly attached to the car body;
- sealing elements and protection against dust and dirt.
The repair kit comes in two types: incomplete, which contains rubbing parts, rubber products that require periodic replacement, and disposable clamps. In case of breakage or wear of the teeth and ground surface, you will have to purchase a complete repair kit. It includes absolutely all parts except the crankcase, including a gear pair, needle and ball bearings, and a pressure spring.
Repair
To perform the repair, you will still have to disassemble the steering wheel. You can see detailed instructions in the material on replacing the steering rack.
Replacement process
Let's move on directly to the repair procedure.
- Remove the rail from its seat.
- Remove the thrust nut with a 17mm hexagon.
- Remove the thrust nut, remove the retaining ring, spring, and rack stop.
- First, the gear shaft boot is removed, after which you can easily get to the locking ring.
- Remove the nut that holds the gear bearing in place. Be prepared for the fact that it will be quite difficult to unscrew it; use some force. This is fine. It's worse if it practically doesn't hold on.
- The drive gear shaft is pressed out.
- The rail is removed from the housing.
- Next, remove the support sleeve, lubricate it and put it in place. It may take some effort to push it back.
- Replace all bearings present in the assembly. Some are difficult to extract, while others are almost impossible. But it needs to be done. If you cannot remove it at all, then cut the bearing with a chisel and remove it with pliers.
- Examine the condition of all surfaces, parts, and assemblies for any defects or damage.
- If you notice faulty elements, replace them using a repair kit.
- The design will have quite a lot of moving elements. Each of them must be lubricated with high-quality lubricant. Litol will perform well here.
- Reassemble by following the reverse disassembly sequence.
- You will definitely need help for reassembly. Therefore, agree in advance with a friend or someone else who can help you in this matter.
- Place the repaired rail in place and attach its fasteners.
- A rack is inserted into the spitz. This is where you will need an assistant. It is almost impossible to do this yourself.
- Use a chisel to loosen the clamps.
- Tighten all mounting bolts in place.
After assembling the unit, be sure to check it in action. Please note that after this you cannot operate the car in the previous mode. First, be sure to stop by a car service center where an alignment will be performed. Only after this can the repair of the unit be considered complete.
If you notice typical signs of a rack malfunction, do not delay repairing or replacing it. This can lead to tragic consequences when, at the most inopportune moment, the steering wheel stops responding to your efforts and you lose control of the situation. This is not an attempt to scare you, but a simple fact of life.
The steering rack in front-wheel drive cars is fully responsible for the functionality of the entire steering mechanism. The VAZ 2109 also belongs to this category of car. If it fails, appropriate action should be taken immediately.
The occurrence of signs of malfunction does not always indicate the need to completely replace the unit. Sometimes it is enough to repair the rack using a special repair kit.
Removing the steering wheel.
Probably one of the most significant elements in the steering circuit is the steering wheel. The steering wheel is usually removed to replace the shaft and contact ring of the horn switch.
Next, we will tell you how to remove the steering wheel and provide explanations with pictures. So, the tools you will need are a 24mm socket with an extension and a screwdriver. Before starting work, set the front wheels straight, and do not change position until the steering wheel is in its original place.
Pry up the decorative trim on the horn switch with your hand.
Take it off
I would like to draw your attention to the fact that when removing the lining you should be careful not to break it
The steering wheel hub and steering shaft should be marked so that their relative position can be determined in the future. The exception would be the case of a complete replacement of the steering wheel.
Attach the socket with extension and unscrew the steering wheel fastening nut
Disconnect the electrical wire to avoid damaging the steering wheel when removing it. Using a sharp blow from bottom to top, remove the steering wheel from the splines.
Unscrew the mounting screws and remove the horn contact ring.
Some batches of cars were produced with slight differences, such as a double cavity on the steering wheel hub, and a double spline at the upper end of the shaft. All this is to place the steering wheel in a strictly defined position.
After the steering wheel has been installed in place, you must ensure that it is in the correct position on the shaft. When the car is moving in a straight line, the steering arms must be in a strictly horizontal position. This is necessary for clear automatic switching off of the direction indicator.
When finally installing the steering wheel, tighten the steering wheel mounting nut in this position.
Hello, in this article you will learn how to replace the steering wheel on VAZ 2101, 2102, 2103, 2104, 2105, 2106, 2107 cars. Of course, removing the steering wheel is not a common operation, but it still happens that you have to remove the steering wheel to restore the audio signal wiring , or to replace the old steering wheel with a new one when it is very worn out, although now the steering wheel is more often changed to a “sports” one. To replace the steering wheel you will need a 24mm socket and a slotted screwdriver. Before you start replacing the steering wheel, you need to align the wheels and steering wheel straight, this is necessary so that when installing the steering wheel in place, you do not lose its normal position. Now take a slotted screwdriver and remove the plug in the center of the steering wheel
After this, use a 24mm socket to unscrew the nut securing the steering wheel to the steering shaft
But you shouldn’t completely unscrew the nut right away; first knock the steering wheel off the steering shaft, and then unscrew the nut completely, otherwise you can get injured when knocking the steering wheel out
Installing the steering wheel is done in the reverse order, the main thing is to make sure that the protrusions on the steering shaft lining align with the slots on the steering wheel
Avtochanel
From this article you will learn how to remove the steering wheel on a VAZ 2101-2107 car, what tools are required for this, and most importantly, how to avoid injury while carrying out this work.
Removing and installing the steering wheel can be done for several reasons:
- replacing a conventional steering wheel with a new or sports version
- After adjusting the wheel alignment angles (wheel alignment), you need to set the steering wheel to the correct position
- it is necessary to remove the steering wheel to gain access to replacing other parts, for example, steering column switches
The procedure for removing the steering wheel:
- Disconnect the negative terminal of the battery so that when working with the steering wheel you do not accidentally turn on the sound signal.
- Use a screwdriver to remove the plug in the center of the steering wheel. (Fig. 1)
- Using a 24mm socket wrench, unscrew the steering wheel mounting nut. (Fig. 2)
- Remove the steering wheel. (Fig. 3)
Signs of breakdown
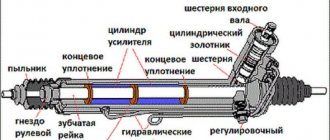
By means of steering racks, rotational movements from the steering wheel through a rack and pinion mechanism are transmitted to the rotary levers, which turn the front wheels with rods.
If you find one of the symptoms listed below on your car, be sure to conduct a full diagnosis of the condition of the unit, and then repair it.
Signs of a faulty steering rack include:
- A grinding noise is observed in the rack area when the steering wheel is rotated;
- The steering wheel periodically sticks;
- Lubricant begins to leak from the seals;
- The steering wheel has noticeable play.
Why should you order from us?
Experienced craftsmen
Diagnostics in just 1 hour
Repair in just 1 day
Hunter 3d stand
Guarantee on all work
Your own turning park
Dismantling
You will not be able to assess the current condition of the steering rack unless you dismantle the device.
There is no optimal way to dismantle the steering rack, since the process in any case involves quite labor-intensive, time-consuming work that involves disassembling many components.
- Suspend the front of the car with a jack to be able to remove the front wheels. Be sure to carefully consider safety measures, install wheel chocks and boots so that the machine does not move while the rack is being repaired.
- Disconnect the gas adsorber, disconnect the wires and take them to the side. This will give you full access to the steering rack.
- Unscrew the bolt from the spline connection. Before doing this, be sure to align the wheels using the steering wheel. The bolt is located near the pedals. To dismantle the fasteners, use a cardan head or a simple spanner.
- Clean the tie rod mounting nuts from accumulated dirt, then undo them using pliers. Unscrew the nuts using a spanner.
- Using a special puller, the rods are disconnected.
- Next, unscrew the rods from the steering rack housing. However, experts recommend dismantling the crankcase with the rods together, since in a vice the removal process is much easier.
- Once you have the rack free, remove it from under the car through the wheel arch. Clean, rinse and clamp in a regular vice.
Now you have a choice - completely replace the steering rack or try to repair it. The second option will take more time, but will save an impressive amount of money.
Steering rack repair
The car is secured against unexpected movement by installing stops under the rear wheels. Pull the handbrake and lock the steering wheel.
So:
The front wheels are removed. Using a puller, remove the fingers from the lever struts, having first unscrewed the tip nuts. After installing the puller, tighten the screw until it stops. When the key is in tension, the finger is knocked out of the lever with a hammer. The nuts securing the rack brackets are unscrewed. The bolt on the steering shaft is loosened from inside the passenger compartment. Having completed all preliminary operations carefully so as not to damage the splines, using oscillatory movements, the gear shank is disconnected from the steering shaft. The entire assembly is pulled out through the right hole in the car body.
Steering mechanism with tie rods
Next, the VAZ 2115 steering rack is directly repaired:
- The structure is clamped in a vice. Use a special brush or a cloth soaked in white spirit to clean all surfaces of the product.
- The steering rods are removed. To do this, unscrew the bolts on the bracket securing them, after bending the “antennae” of the locking plate, using a “22” key.
- The locking and connecting rod plates are removed.
- The tie rods are removed.
- On the right side, the support and retaining ring are removed from the steering gear housing.
- The clamps with which the protective cover is attached are cut off. Disposable parts are made of plastic.
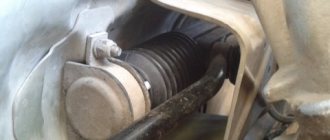
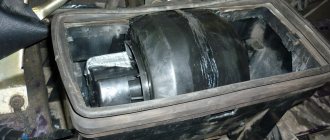
- The protective cover is removed.
- On the left side of the device, the support and protective cap are removed.
- Using a “17” wrench with an octagonal head, the rack stop nut is unscrewed, the part is removed, the spring and the retaining ring are removed.
Removing the nut, spring and retaining ring
The rack stop is knocked out of its socket. To do this, the crankcase hits a wooden stand. For sealing, a rubber ring is mounted in the groove of the stop.
- The seal is removed.
- The gear boot is removed by simply prying it off with a screwdriver.
- The lock washer is removed.
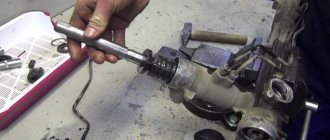
- Use a special 24mm wrench with an octagonal head to unscrew the nut that secures the gear bearing.
- The nut is removed from the shaft.
- Using a “14” wrench, the gear is removed from the crankcase along with the bearing.
Removing the gear with bearing from the housing
- The rack is removed.
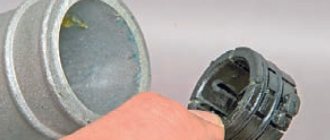
- The bushing is removed. To do this, use a screwdriver to pry up the support sleeve, its protrusions should fit into the crankcase holes and the part can be freely removed.
Removing the support sleeve
- A new bushing is installed. To do this, new damping rubber rings are put on it so that the thin parts of the ring are located opposite the cuts in the bushing. The protrusions of the bushing must fit freely into the holes in the crankcase.
- Along the edges of the bushing, the rubber rings are cut and the cut off parts are removed.
- The retaining ring is removed from the gear shaft.
- Using a two-jaw puller, the ball bearing is pressed.
Removing the ball bearing
Pressing out the needle bearing is done using a special puller. If it is not there: two holes with a diameter of two millimeters are drilled in the end of the crankcase to allow the needle bearing to exit onto the ring. Through it, the bearing is knocked out of the crankcase.
Pressing out the needle bearing
The crankcase cavity of the structure is washed. The needle bearing is pressed into place using a piece of pipe. After this, the hole is sealed with preparations similar to “cold welding”. Bearings, drive gear and teeth on the rack are generously lubricated with FIOL-1 lubricant.
UNIOL-1 lubricant is placed in the cavity, which is located above the nut holding the bearing of the drive gear. The steering rack assembly is assembled in the reverse order. The protective cover is attached and secured with clamps. The rack stop and nut are adjusted so that there is a gap of 0.12 millimeters between them. After adjusting the rack clearance, the stop nut is capped to prevent unwinding.
Repair
The first thing you will need to carry out your own repairs is a repair kit. They are available at almost any auto parts store. However, we strongly recommend that you buy only high-quality kits so that the result of your DIY repair lasts as long as possible.
What you need for work
The proposed kits are incomplete and complete. You will definitely need the following kit components:
- Needle bearing;
- A pair of rubber seals for the bushing;
- Support sleeve made of plastic;
- Set of gaskets;
- Spring;
- Retaining rings;
- Support bearing;
- Drive gear;
- Boot cover;
- Rail;
- Set of ties for the boot.
Repair kit
Now that the kit is ready, the tools are available, and there is also enough free time, you can get to work.
- First, remove the boot, end caps and stops. As you disassemble elements, even the smallest and insignificant at first glance, be sure to evaluate their current condition. If necessary, all worn-out elements will be replaced with new ones taken from the repair kit.
- Using an octagon, unscrew the screw plugs, which will allow you to remove the springs, retaining rings, and thrust bushings.
- Remove the bearing and check if it has any play. The repair kit includes a new bearing, so if the old component is in satisfactory condition, it is better to replace it immediately. It’s not for nothing that you took on such a complex process to get everything done 50%.
- Remove and inspect the drive gear. Next, you can completely remove the rail itself.
- Be sure to replace the support shaft bushing, not forgetting about the rubber bands. They are also included in the kit.
- Take your time to remove the rubber bands from the sleeve. First, insert the element into the crankcase, after which you can cut off the elastic with scissors or a sharp knife.
- The most difficult step is replacing the needle bearing. To remove it, you will need a special key. But you can do without it. In this case, arm yourself with a 1.5 mm drill bit and a drill. Using a drill, make a hole in such a way as to loosen the end of the bearing. Use a punch to knock out the old bearing from the crankcase.
- Before installing the new needle bearing, be sure to thoroughly clean the steering rack housing of accumulated debris and steel shavings from drilling.
- The hole made cannot be left. To eliminate it, you can mix metal filings with superglue. This mixture will harden quickly and give an excellent result.
- Lubricate literally everything that can be lubricated in the steering rack assembly. Experts advise using Litol 24 or other lubricants of similar quality. It wouldn't hurt to lubricate the CV joints.
- Reassemble the unit by following the reverse sequence of dismantling.
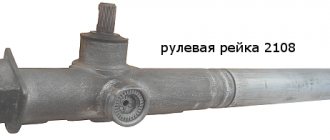
Lada 2109 Kolkhoz cramp › Logbook › Repair and modification of the steering rack.
The steering rack on my car began to knock, and I began to feel every pebble on the asphalt in my hands through the steering wheel, and it was shaking so much that it seemed like it wanted to break out of my tight embrace. Another 30 thousand/km ago, while doing the wheel alignment, the master said that the rack needs to be tightened, but there is nowhere to pull it, it is tightened all the way. In general, I bought what seemed to me everything necessary for self-repair of the rack: -Repair kit for the rack, (there are three types: No. 1 the most expensive half the cost of a new rack with a worm, shaft and bearings, No. 2 as 1, only without the shaft and worm. No. 3 as 2 only without bearings. I bought No. 3, I couldn’t find one with bearings, and it’s not practical to buy No. 1; it’s easier to just buy a new rack. - BRT boot and 3 cable ties. - Repair kit for rack plugs (I couldn’t find the BRT, I had to take RTIauto, also from Balakovo). - Salen blocks for steering rods BRT -Special key for adjusting the rack (in my case, the octagon on it turned out to be 1.5 mm smaller than necessary, I had to sharpen it with a grinder to the required size.) -Special key for disassembling the rack (I couldn’t find it, I made it from a piece of rusty pipes). -Sewer pipe 50mm 1m long (for future bushing)
I removed the rail, I won’t describe how to remove and disassemble it, in any book, and there is a lot of information on the Internet.
After disassembly, I saw that the rack worm and shaft were in excellent condition, without scoring or wear. But the rack stop had a hole in it, and the spring pressing it was sagging, 4 mm smaller than the new one, I replaced it with new ones from the repair kit. I installed everything that was in the repair kit instead of the old parts except the stop nut, because the old one had no hole, and the new one had a hole that should be closed with a plug, but it was not included in the kit. Now about the modification, the stock bushing is too small to hold the rack, and even with the new bushing it wobbles a lot, on the 10 the bushing in the rack is already the entire length of the stroke, some for this reason put it on the eighth family, although it is longer and the fasteners need to be digested . I saw the idea of making a solid bushing in the eighth rail in this video
Then, using a construction knife, we cut off the parts sticking out in the window of the case.
And so on with each next piece, until the rail moves closely, but without effort. After inserting all 4 pieces, I cut off the protruding edges from the end,
drilled through the body and plastic
and tightened the screw to secure the pieces of plastic.
I knocked out the steering rod sales blocks with a hammer and pressed in new ones using a bolt, washers and liquid soap as a lubricant.
I removed the washers from the old silent blocks using a pull rod puller.
The washers serve to fix the boot, thereby extending its service life. They didn’t fit any washers on the new salenblocks, didn’t heat them with a hairdryer, and walked in like they were coming home.
After all that was done, I decided that the capital rail should look the part, and painted it first with etching primer, then with acrylic.
I filled the body with “fiol” lubricant, and also lubricated the body itself so that the boot would slide over it better, put on the plugs and put it in place.
Since my wheels were removed and the car was standing on bricks, I made the adjustment immediately. I tightened it all the way, turned it back about 45 degrees, and then tightened it until the steering wheel rotated without biting or effort. The tie rod bolts were tightened when the car was standing on the ground, by analogy with the chassis, this was necessary to prevent the salen blocks from turning. After the repair, I drove more than 450 km, the beats disappeared, I am satisfied with the result of the work done.
How to determine that the rack needs to be replaced on a VAZ 2114
So there are several ways. The very first and simplest is to rotate the steering wheel. You just need to tug it from side to side. Ideally, the wheels should respond to the slightest rotation. In fact, many even new slats are not capable of this. That's the quality of the parts, you just have to live with it. Steering rack wear does not appear in any way in the form of knocks or vibrations, contrary to popular belief. If while driving the bumps are reflected into the steering wheel, most likely the steering tip needs to be replaced.
The second method is more accurate and complex at the same time. To carry out this check, it is necessary to jack up the front wheels one by one, and then swing them across the rotation in a horizontal plane. If there is a slight play, then it is somewhere in the steering, but not necessarily in the rack. There is no way to explain this; such a diagnosis can only be made by a specialist.
Before changing the rack, you can try tightening it. Thus, the gaps in the column are reduced. The main thing is not to overtighten, otherwise the steering wheel may jam. To tighten the steering rack on a VAZ 2114, you need a special multi-faceted wrench; it can be found in any auto store.
Video: replacing the rack on a VAZ 2114
Preparatory activities
Many experts advise taking certain steps to prepare for the replacement so that everything goes easier and faster. These actions include the following.
- Treat all nuts and fasteners with penetrating liquid. WD40 works great.
- If the tips last longer than one winter, to remove their fist you will need to use a 17 socket to unscrew the nuts.
- If the nuts stick, try heating them with a hair dryer. A gas burner is also suitable, but you need to be as careful as possible with it.
- Prepare tools for removing tips.
Today, two methods are used to dismantle steering tips - modern and traditional. The first involves the use of a special puller, and the second - a sledgehammer.
Jack and WD40 at the ready
The traditional dismantling method involves the following actions:
- The steering wheel is turned all the way;
- Several strong blows are applied to the steering knuckle;
- Vibration causes the tip to pop out.
But the method has two serious drawbacks.
- It will take special skill to deliver precise, but at the same time accurate and strong blows.
- This method can reduce the service life of steering racks.
Therefore, the best option is a puller. You can literally buy it for 200-300 rubles, but it will be useful in the future and will significantly preserve the integrity of the remaining parts when replacing the launch vehicle.
Dismantling works
Replacement
The replacement procedure is quite simple. Especially if you have prepared the connecting elements in advance and acquired a puller.
- Using a jack, lift one of the sides where you will begin to change the tips.
- Turn the steering wheel to such an extent that it is convenient for you to replace damaged elements.
- Treat the elements again with a penetrating liquid.
- Unscrew the fastening nut.
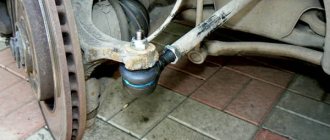
- Remove the tip from the steering knuckle hole. Here you just need a puller or the traditional old-fashioned method using a sledgehammer.
- Check the condition of the steering rods. Sometimes it is better to replace them in the first couple of wears. Besides, you still got into this knot.
- Replace damaged tips with new ones.
- Perform the reassembly procedure.
Assembly
- Do the same with the second wheel.
- We recommend that you think additionally about protecting threaded fasteners from moisture and dirt. To do this, the threads can be lubricated with lithol, graphite grease, a tube of a suitable diameter can be put on, or heat shrink can be used.
- After completing the replacement of the steering tips, visit a service station to adjust the wheel alignment.
- If you don’t want to go to a service station, then count in advance the number of revolutions when removing the old tip. The new one is twisted by the same number of revolutions.
- Drive onto a straight road and check whether the car does not skid to the sides when driving in a straight line.
One of the main conditions for a successful replacement is the choice of quality parts.
New part
What to choose
Finally, we will present several options for the most popular steering tips, which are used today when replacing a VAZ 2114. So you can decide for yourself what to choose and which ones are better.
| Manufacturer | Price |
| AvtoVAZ | 620 rubles |
| TRACK | 620 rubles |
| VIS | 730 rubles |
| Lemfoerder | 830 rubles |
| Finwhale | 860 rubles |
The last two tips are foreign made. This makes their price higher. But the quality is somewhat higher than AvtoVAZ products.
Replacing a LV is not so difficult that you need to go to a service station and pay 500-1000 rubles for the work of the craftsmen. You can easily cope with this task yourself, relying on the video and instructions provided.
VAZ 2114: adjustment and tightening of the steering rack. Replacing tie rod ends