Replacing a car's steering ends is a mandatory procedure that is performed when servicing a vehicle's suspension. These structural elements are responsible for turning the wheels.
Therefore, the condition of the tips must be constantly monitored to guarantee driving safety and decent maneuverability of the machine. Damage to the steering tips will result in a loss of connection between the wheels and the steering wheel, which can lead to irreparable consequences.
Structurally, the tips are hemispherical steel fingers, which are equipped with threaded connections for attachment to steering rods. These parts ensure a clear correspondence between the steering wheel turns and the front wheels of the vehicle.
Service life of tie rod ends
Despite the importance of tie rod ends as a part, their service life is very limited. Tips are not a technically complex part, but this does not reduce their importance in the steering of a car. The approximate service life for which the tips are designed is 10 times less compared to the same engine, and reaches 30,000 - 40,000 kilometers. At this point, many car enthusiasts may object, saying that according to the regulations, the tips are changed less often - on runs of 50,000 - 60,000 kilometers. And they will be right, but only partly.
The harsh reality and domestic roads literally leave a certain imprint on the car’s suspension. Poor quality road surfaces, high humidity, dust, dirt, chemicals - all this greatly affects the condition of the suspension and steering components. And the tips in this situation are no exception, so the problem of their breakdown on runs from 20,000 to 30,000 kilometers is quite common for many advanced car enthusiasts.
Some installation details
If both rods are changed, they must be tightened at the same time, making sure to fix the rack shaft. This will help prevent damage to the nut that holds the shaft inside the rack. During factory assembly, both rods are simultaneously screwed to the rack and tightened equally, without destroying the block or its stop.
If it is possible to use a vice when replacing, you must carefully clamp one of the rods in it and tighten the second. To do this, it is advisable to use a torque wrench. During tightening, the rack body will rotate slightly. It's not scary. After tightening the rod, you should process its hinge, since burrs may remain on its plane after clamping in a vice.
Important! When installing parts without dismantling the steering rack, they should be tightened extremely carefully and correctly in order to obtain the required tightening torque, while avoiding the occurrence of increased torque on the rack shaft. The shaft has special flats for which it is secured with a key. But this is not always possible, since not all shafts have them; in addition, due to the peculiarity of their location, a special key is needed. Please note that it is strictly forbidden to use pliers to fix the shaft, as their jaws will damage the polished surface.
As you can see, the procedure for replacing rods is not complicated. Difficulties can only arise with tightening them, which is why motorists prefer to carry out this procedure in a car service center.
Diagnosis of faulty steering tips
Diagnosing tie rod ends is quite simple; you only need a few tools, such as a jack and a wheel wrench.
First of all, you will need to jack up the car on one of the sides where the tips will be checked. After the car wheel is hung, it can be removed (optional) in order to facilitate the procedure for inspecting the tips.
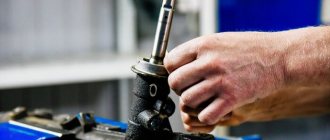
To check the tips and tie rods, set the wheels straight and apply force to the pre-hung wheel at points “3” and “9” (just like on a clock), as if rocking the wheel in each direction. Moreover, from the inside of the wheel, with your free hand it is necessary to hold the steering tip at the place of its attachment to the steering knuckle.
If play is detected during this check, the tip is worn out and will need to be replaced. However, if no play is observed, then we repeat the checking process, but this time with our free hand we control not the steering tip itself, but the lower ball joint. With such a check, parasitic backlash should definitely appear.
What's the result?
You should not debug repairs of the most important vehicle systems “for later”. It is not recommended to drive a car that has problems with the steering system until the breakdown is repaired. It is important to respond in a timely manner to the first manifestations of a malfunction: play, steering wheel wobble, and the occurrence of extraneous sounds while driving. The process of replacing a tie rod is not as complicated as it might seem. It is enough to stock up on free time and the necessary tools. After replacing the rod, it is imperative to adjust the wheel alignment. It is best to contact an experienced craftsman and do all the work correctly so that serious financial turmoil does not arise later.
Share with friends on social networks:
Telegram
The process of replacing tie rod ends. Introduction and instruments
It is necessary to approach the work of replacing steering tips responsibly, because driving with faulty tips can lead to dire consequences. You should also pay attention to the attachment of the tips themselves to the steering knuckles.
There are two types of attachment of tips to steering knuckles:
- installed with the pin down into the steering knuckle - closed type (with a closed outer casing and no nut on top);
- installed with a pin on top - open type (with an outer casing equipped with fixing nuts).
Depending on what type of tips are installed on the car, the set of necessary tools will also vary. So, for closed-type tips installed with the pin down into the steering knuckle, you will need a special puller, using which the tip can be easily “squeezed” out of the steering knuckle. Some craftsmen do without a puller, using a hammer, but it is better to refrain from such manipulations.
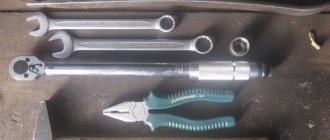
So, to replace the work you will need the following set of tools:
- jack;
- wheel wrench;
- a set of open-end wrenches and socket heads;
- WD-40 or other similar lubricant;
- brush;
- puller (for closed type tips);
- hammer (just in case).
Device
Essential elements:
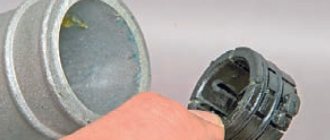
- Insert made of Teflon;
- Ball pin with threads cut on it;
- Housing with lid;
- Anther;
- Finger nut.
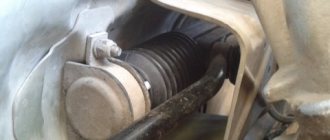
Over time, wear of the Teflon liners leads to increased play in the steering rods, which means the car's controllability decreases, and this, in turn, affects driving safety.
Therefore, it is necessary at least once every 10–50 thousand km. mileage (depending on what roads you drive), carry out diagnostics of the steering and, if play is detected in the tip, urgently take measures that include completely replacing it.
Also, such work is carried out when rust appears on the parts of the tips and when the pin is bent, which can be formed as a result of a powerful, unpleasant for the driver, impact of the wheel on an obstacle.
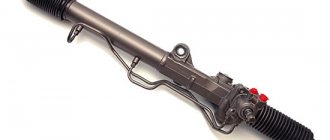
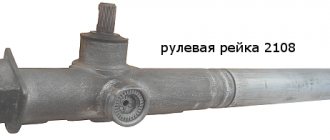
Removing the Steering Rack for Nissan Primera P12 – Auto news and car repair tips
The same manipulations are carried out if a hum or extraneous noise is heard.
Sometimes the problem lies in the power steering pump and is accompanied by an unpleasant buzzing noise. Nissan Primera steering rack price for adjustment, repair, replacement In some cases, there are no serious faults with the steering rack, but there is still a knock or play. Then it is necessary to make an adjustment, which is carried out exclusively by auto mechanics with experience in such work. To do this, special wrenches are used to tighten the adjusting nut-screw located in the steering shaft housing. In a situation where repairs are required, the rack is removed from the car and fixed in a special device.
The specialist disassembles the unit, inspecting and washing all removable parts.
Suitable oil seal 19 30 7 TC NBR company NAC NCBIt is a crankshaft oil seal for Piaggio scooter they are on the variator side 19x30x7, ignition side 18h28h7 scooter spare parts catalog number r, oil seal how to remove steering rack nissan primera p12 company Corteco number 30x19x7mm. Automatic transmission For those who wish. Nissan Primera P12 How to Replace the upper rack seal.
Detailed instructions for replacing the upper rack seal, a minimum of tools and a lot of saved money. Just like this oil seal box is found in Suzuki Seal Athena scooters, 19x30x7mm, DPH size 19.00x28.90x7.00mm from the Paraoli glands catalog here you can see the applicability on other cars.
How to Remove Steering Rack Nissan Primera P12
Side steering rack seal dimensions. Seinsa D; Febest. The rear and front stabilizer links are different. Such bearings have rubberized dust protection plates; they cover the bearing gaps from moisture and dust, which significantly extends their service life.
Dynamic 11.4 kN standard bearing 9.5 kN and static 5.4 kN standard bearing 4. RTS Replacing the timing chain drive on Nissan gasoline engines The timing chain drive is installed on many modern Nissan engines.
Unlike a timing belt, a chain has at least twice the lifespan of how to remove a steering rack for a Nissan example p12 chain engines are reliable and are popular. Replacing the Nissan chain is usually required after a run in the Basic assembly and disassembly of the front door of a VAZ Front door window lift 1 - window lifter handle 2 - trim 3 - socket 4 - gasket 5 - window lifter mechanism 6 - cable sheath 7 - roller 8 - glass 9 - seal 10 - outer seal 11 - inner seal 12 - holder 13 - op fastening plate It was presented in Paris in the year.
For a version of the system that has a hydraulic electric booster, which is attached specifically to the control rack, you need to keep in mind that removing the control rack becomes much more complicated. To remove it, it may be necessary to dismantle the car's subframe, which is a rather complex operation that is practically impossible to perform without outside help. In this case, it is recommended to contact a service center. Self-installation of the steering rack After the replacement, the steering rack is installed in the following sequence: It took about 5 minutes, no.
You just need to do it on both sides, with a small bend on one side, and a larger bend on the other side. After we have unscrewed both sprockets, we remove the hydraulic drive from the rack.
To do this, you need to pry the hydraulic drive and push it up a little, resting the mounting on the rack. There is a cork gasket between the hydraulic drive and the rack. Don't tear it! The drive sits in the rack on a helical gear, so we remove it by unscrewing it. And now - hydraulic drive in your hands! From below you get a large support bearing and a helical gear - all in lubricant.
Carefully, use the side of the hammer to knock out the drive shaft from top to bottom - you need to hit from the side of the plastic boot. The boot can be removed simply by pulling it up and removing it. The boot has slots for splines on the shaft.
It’s better to do this on a clean table. They knocked out the shaft and put it aside. We look inside the hydraulic drive housing and see a small bearing there. And on top of the body, where the plastic boot was located, there is our oil seal, which is leaking. We place the housing on the table and use a 17 or 19 head to knock it inside the hydraulic drive housing.
Steering rack Nissan Primera P12: signs of malfunction, diagnosis and repair
The size of the head should be selected so that it fits freely into the hole from the shaft - without clinging to the walls of the housing. Otherwise, you can make burrs on the body and the new oil seal will immediately be pierced!
Just in case, we use a caliper to measure the seating depth of the bearing before knocking out the seal. This is necessary, how to remove the steering rack of a Nissan example p12, to know the seating depth when you have to put it back. And also don’t forget to look at how the pincer stands inside, since it has a smooth frame on one side, and on the other there are 4 small protrusions, evenly distributed. We put all these spare parts in kerosene and wash them.
I advise you to do this for one simple reason - grains of sand still remain on the body, and if they get inside the drive - there are small holes for oil, you can get extra hemorrhoids.
REPORT: steering rack replacement
NEXT, take a piece of polypropylene water pipe of a suitable diameter and sharpen it to a diameter of 28 mm - this is a mandrel for seating the bearing in place. Remove the front exhaust pipe. Remove the boot from the lower steering column joint. Remove the joint.
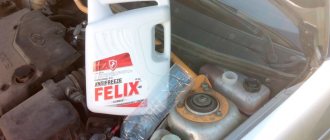
I used Motul. When everything is assembled and connected, you need to bleed the rack. You don’t put on the wheels, the front of the car is still hanging. To begin with, fill the power steering reservoir full and start the car for literally seconds and immediately turn it off.
Add fluid to the reservoir and... You do this until the liquid stops leaving the reservoir. Then you top it up again, start the engine and slowly turn the steering wheel in one direction until it stops. At this time, the second person adds slurry to the tank. Then twist in the other direction until it stops. You top it up to the level and turn the steering wheel from side to side until it stops until small bubbles stop appearing in the tank.
How to remove the EUR steering rack on a BMW E90 (Restyle)
Hello. I encountered a problem with the power steering; periodically, when turning the steering wheel to the far right or the opposite position, the steering wheel icon began to light up and the steering wheel itself became stone, because The electric amplifier failed. I had the same problem in the spring, then I contacted the service center, the service center removed the rack, they said that there was a problem with the cable, they said they did everything, put a new seal and put the rack back. But this kind of nonsense appeared again. In this service they also offered to remove the rail again and apparently get 8 kilo rubles again for this pleasure. Armed with knowledge and tools, I set out to solve this problem myself.
I drove into the garage into a pit, put the steering wheel in a straight position, and removed the engine compartment protection. Further
similarly the other side, then: unscrew the steering rods with a 38* open-end wrench from the rack splines, the rods at the end will rest against and will not come out of the rack, to do this you need to move the wheels to the side, unscrew the rod, slightly move the wheel and it is finally free from slats, for convenience you can slightly jack up the car.
Next, we need to free the steering cardan from the steering shaft of the rack, or simply unhook the steering wheel from the rack. To do this, use a short cap socket, sprocket E 12, and unscrew the clamping screw on the cardan. Be sure to pre-wet the seating area of the cardan and steering shaft with a WD pad, because there is a lot of dirt and the cardan is hard to come off.
After you have unscrewed the clamping screw and removed the steering rods, then unscrew the rack from the beam using the E14 sprocket head, not forgetting to disconnect the 3 electrical connectors. The connectors are latched, so remove them carefully.
And that’s it, basically nothing holds the rack, all that remains is to push it forward a little and pull the steering wheel driveshaft off its shaft. It will give in with difficulty, so you can slowly drive a flat-head screwdriver into the slot where the steering shaft guide is located and free the rack shaft from the steering shaft. Next, the rail is in your hands. You need to remove two covers, this is the top one, it is also the guide of the steering shaft and the cover itself of the steering shaft and the steering position sensor.
Then we see this picture:
To pull out the shaft, you need to unscrew the cover from the back, with a 24mm head, under it is the nut of the shaft itself, it is under the 17mm head, turn it counterclockwise, at this time your rack moves to the extreme right position of the steering wheel, screw it all the way, put it paint a mark, unscrew the worm shaft nut, and pull out the shaft with the sensor. It contains a 4-pin coiled cable, and 4 contacts on the sensor itself. Contacts can be checked by calling a tester. My cable turned out to be torn, it was bent in one position, it’s not clear how it happened, I gave it to a cell phone repairman for soldering, and he soldered it for me. I wound the cable back, put the shaft with the sensor and cable back into the steering rack. By the same marks.
If you are confused and cannot set the center of the steering rack, you can adjust the center by turning the shaft from one end to the other, I got about 2.8 turns of the steering wheel, the center is 1.4 turns. At least there are several videos on YouTube on how to set the rake to zero. Next, we close the cover of the shaft and sensor, put the second cover on top - the guide, there is also an important point with it, the center of the steering wheel is marked there, here is a photo:
The first time I installed it incorrectly, I had to pull out the rail again and put everything back in place. Therefore, be careful.
Then we assemble everything in the reverse order, throw the rack onto the beam, hook the steering cardan onto the rack shaft (the steering wheel in the cabin should be straight, the cardan should be on the guide so that it fits better, you can also spray WD, and tap a little from below with a hammer so that the cardan onto the shaft sat down clearly, and without deflections. Next, we fasten the rack to the beam using torx screws, jack up one side so that it is easy to hook the steering rods to the rack, then the other side. Then we tighten the clamping screw on the cardan to the steering shaft, then we tighten the steering rod boots, tighten the clamps, attach the electrical connectors and everything is ready. In terms of costs. I bought a key for 38 for 700 rubles, heads E14 and E12, 200 rubles per pair. Soldering the cable 500 rubles, a can of WD - 250 rubles, a total of 1650 rubles for repairing the electric rack. Plus After removing the rack, DTS errors popped up, they need to be cleared with a scanner. Ps: If you have any additional questions, write, I’ll be happy to help.