The electric drive of modern cars is an irreplaceable technology; today its use determines the safe and long-term operation of any vehicle. However, not every car is equipped with an electric drive and is equipped with a power lock properly. Is it possible to fix this or even install electrical equipment in your own car using improvised means? What is important to know about the electric drive system for this? To resolve such questions, it would be more correct to start with the mechanism of action of such a system.
Stories from our readers
“Fucking basin. "
Hi all! My name is Mikhail, now I’ll tell you a story about how I managed to exchange my two-wheeler for a 2010 Camry. It all started with the fact that I began to be wildly irritated by the breakdowns of the two-wheeler, it seemed like nothing serious was broken, but damn it, there were so many little things that really started to irritate me. This is where the idea arose that it was time to change the car to a foreign car. The choice fell on the melting Camry of the tenth years.
Yes, I had matured morally, but financially I just couldn’t handle it. I’ll say right away that I am against loans and taking a car, especially not a new one, on credit is unreasonable. My salary is 24k a month, so collecting 600-700 thousand is almost impossible for me. I started looking for different ways to make money on the Internet. You can’t imagine how many scams there are, what I haven’t tried: sports betting, network marketing, and even the volcano casino, where I successfully lost about 10 thousand ((The only direction in which it seemed to me that I could make money was currency trading on the stock exchange, they call it Forex. But when I started delving into it, I realized that it was very difficult for me. I continued to dig further and came across binary options. The essence is the same as in Forex, but it’s much easier to understand. I started reading forums, studying trading strategies. I tried it on a demo account, then opened a real account. To be honest, I didn’t manage to start earning money right away, until I understood all the mechanics of options, I lost about 3,000 rubles, but as it turned out, it was a precious experience. Now I earn 5-7 thousand rubles a day. I managed to get the car buy after half a year, but in my opinion this is a good result, and it’s not about the car, my life has changed, I naturally quit my job, I have more free time for myself and my family. You’ll laugh, but I work directly on the phone)) If If you want to change your life like me, then here’s what I advise you to do right now: 1. Register on the site 2. Practice on a Demo account (it’s free). 3. As soon as you get something on the Demo account, top up your REAL ACCOUNT and go to REAL MONEY! I also advise you to download the application to your phone, it’s much more convenient to work from your phone. Download here.
Trunk actuator control circuit board
If you have a regular car relay, then you can do everything on the wires and fuse holders. But I decided to do everything carefully and make a printed circuit board; my relay is small in size and is intended just for soldering onto the board.
I drew the board diagram in the Sprint-Layout 6 program specially designed for this. Macros (sketches) for my relay and fuse are in the program, so all that remains is to place it all and connect it in the required sequence. Here's what I got.
If anyone needs it, here is the layout of my drawn board:
Transferring the printed circuit board design to PCB
Next, we transfer the image to the textolite board; to do this, we print a board layout with a laser printer, with the toner saving mode turned off, on a glossy magazine or glossy photo paper. Don’t forget to check the mirror box in the program while printing, it’s more convenient than immediately drawing the board in a mirror image. We attach the printed image to the board and iron it.
Making a printed circuit board for trunk lock control
We carefully rub our layout on the board, then remove the paper, it is convenient to do this under running water, our print on the board will not go anywhere, unless you overdo it. There are, of course, better ways to transfer a layout image to a board, but I consider this method to be the simplest and most accessible, besides drawing the board manually with a permanent marker.
PCB etching
Next, on the prepared board, you need to remove the excess copper coating, lower the board for etching into a solution of ferric chloride FeCL3 with water (concentration by eye, or according to the instructions, 250 grams per 1 liter of water). Everything that was printed will remain, and the excess copper will dissolve. Don't forget to move the board from time to time. The etching speed depends on the concentration of ferric chloride and water temperature, as well as on the intensity of stirring, on average 30 minutes.
The printed circuit board is etched in a ferric chloride solution
Trunk actuator control board after etching
Next, we drill technological holes on the board, it’s convenient to drill with a screwdriver, in the future I want to buy a motor with a collet chuck on Aliexpress just for these purposes. By the way, here is a link to the section with mini drills, choose according to your taste and wallet, but in general you can buy a lot of useful things there, I recommend it.
Tinning and soldering electronic elements onto a printed circuit board
Next, you need to tin the board, especially the conductive paths, this will reduce the resistance of the conductor, protect it from corrosion and oxidation, and will make soldering much more convenient. We go over the board with fine sandpaper, degrease it if necessary, lubricate the tracks with soldering acid or flux, I recommend soldering acid. Using a very heated soldering iron, take a small amount of solder and move it along the tracks. All that remains is to solder the electronic components and wires onto the board.
Complete trunk lock control board
That's all for today, in the next article we will attach all this to the car to achieve our intended goal - to open the trunk using an alarm and a button in the cabin, so wait for the continuation.
Self-installation and connection
You will need : an actuator, 4 meters of wire, a fuse, a VAZ 2110 trunk release button, a 4-pin relay.
If you install it yourself, you can follow the example of the manufacturer by making a plate for mounting the actuator according to the following diagram:
Another method of installing the electric drive does not involve the use of a special fastening, but it will eliminate the possibility of opening the trunk from the outside.
- Loosen the lock drive rod screw.
- Remove the lock drive rod.
- Having attached the electric drive to the lock, mark the holes for its fastening on the trunk lid amplifier.
- Drill two holes with a diameter of 5 mm.
- Drill a hole in the lock drive boss to a diameter of 3 mm.
- Bend the rod as shown in the photo.
- Secure the electric drive with a bracket threaded from the inside into the cover reinforcement and with nuts screwed onto the threaded ends of the bracket. We connect the electric drive to the lock with a rod.
- We install the button in its normal place.
We stretch the wires under the headliner or under the plastic sills on the left side of the body. Connection diagram for the electric trunk drive using a relay:
This method of installing an electric trunk lock drive is also suitable not only for modern Lada cars (for example, Lada Granta, Lada Kalina, Lada Priora, etc.), and for foreign-made cars.
Let us remind you that there is another interesting way to place the button - instead of the trunk lock.
Install the electric trunk lock yourself..
Which actuator installation method did you choose?
Source
Installation of central locking
Installation of central locking
Usually VAZ cars are sold without an alarm system. Many people don’t even consider it necessary to install it, believing that no one will steal the car. However, you need to be vigilant, otherwise you may be left without your beloved swallow. To install central locking, you need:
- Buy a central lock. It is sold in any car store. The kit includes a control unit, wires, two key fobs, 4 activators for each door.
Note: it is better to buy new locks, otherwise there will be too much traction when opening the door.
- There are holes for wiring in the top ten only on the front doors, so in order to install it on the rear doors, additional ones must be made. To do this, you will have to drill both the door itself and the counter.
Note: if necessary, you can route wires to the rack using standard S-shaped tubes.
- At the same time, there are mounts for activators on each door, so they can be used without problems.
- Using old-style locks, you need to insert a plastic sleeve into the rod hole.
Note: All wires must be carefully insulated, otherwise a short circuit may occur in the circuit.
Problems with the central locking
Problems with the central locking
- The end cap is either not fully clamped or is pinched. Usually the limit switch sends a command to the central system, which causes all doors to also close. However, if there is any problem with the door, then this command does not work, so the door immediately opens back.
- The rod may not be fully retracted. Because of this, the door cannot close completely, which is why it opens.
To find out if your car has one of these problems:
- Turn on the alarm (see Alarm system for VAZ 2110 - choose and install it yourself) without leaving the car.
- Try pressing the lock button all the way down.
- If the door does not open, then one of these problems exists.
You can install an electric lock yourself. However, you need to be very careful in the process of such work. The price of home repairs is only about 600 rubles. Before proceeding with the replacement, it is worth reviewing the photos and videos on this topic. The instructions will also not be superfluous.
How it works
Many cars are not equipped with a trunk release button from the factory. The car owner has to do this with his own hands.
Even budget foreign cars, as well as domestic car models, can get this function. The cost of its implementation is small.
There are a number of modifications for the cargo compartment of passenger cars. Someone is soundproofing the trunk lid. Others completely insulate the trunk.
It will be convenient and correct to do automatic unlocking. In addition, the scheme for opening the trunk with a button is implemented without skill, as well as experience and special skills.
This is the meaning. A button is displayed in the interior. The driver presses it. The device operates on the principle of a push-pull mechanism. Springs will ensure the lid lifts. This way the driver won’t have to press a button on the trunk or fiddle with the key in the lock.
Another option is to display a button on the alarm remote control.
5 door or 3 door cars
Car owners of vehicles such as hatchbacks, SUVs and crossovers with an odd number of doors should not have any problems during an emergency opening of the luggage compartment.
Here the main task is to get from inside the car to the cargo compartment. To do this, you must first fold down the rear seats. After this, on the inside of the odd car door, you can see a special handle. After pressing it, you can open the trunk door and repair the lock.
But sometimes it happens that the handle on the inside is missing, and the lock drive is not accessible to the car owner. In this case, you will have to disassemble the door trim. You will need to remove the plastic panel from the cargo door. Under the panel there is a luggage lock, presented in the form of a steel mechanism.
To dismantle the luggage lock, you need a tool like a wrench with a set of sockets. Having selected the necessary head for the bolts, you can use the wrench to disassemble the luggage lock.
When fixing the lock, it is important to pay attention to the trunk door - you cannot allow the door to open sharply upward, so you need to hold it. A careful attitude to work will not allow the mechanisms to cause injury to your hands. If you need to close the trunk door, then after disassembling the device, you can try inserting a screwdriver into the lock, at the same time turning the hinge holding the car door
If you need to close the trunk door, then after disassembling the device, you can try inserting a screwdriver into the lock, at the same time turning the hinge holding the car door.
Self-installation and connection
You will need : an actuator, 4 meters of wire, a fuse, a VAZ 2110 trunk release button, a 4-pin relay.
If you install it yourself, you can follow the example of the manufacturer by making a plate for mounting the actuator according to the following diagram:
Another method of installing the electric drive does not involve the use of a special fastening, but it will eliminate the possibility of opening the trunk from the outside.
- Loosen the lock drive rod screw.
- Remove the lock drive rod.
- Having attached the electric drive to the lock, mark the holes for its fastening on the trunk lid amplifier.
- Drill two holes with a diameter of 5 mm.
- Drill a hole in the lock drive boss to a diameter of 3 mm.
- Bend the rod as shown in the photo.
- Secure the electric drive with a bracket threaded from the inside into the cover reinforcement and with nuts screwed onto the threaded ends of the bracket. We connect the electric drive to the lock with a rod.
- We install the button in its normal place.
We stretch the wires under the headliner or under the plastic sills on the left side of the body. Connection diagram for the electric trunk drive using a relay:
This method of installing an electric trunk lock drive is also suitable not only for modern Lada cars (for example, Lada Granta, Lada Kalina, Lada Priora, etc.), and for foreign-made cars.
Let us remind you that there is another interesting way to place the button - instead of the trunk lock.
Installing a trunk release button in the interior of any budget car is much simpler than it might seem at first glance.
The whole task is to slightly modify the lock, namely to supplement its mechanism with a special electric drive (activator).
When you press the button, it will operate on the principle of a retractor/extrusion device, opening the lock.
The springs will lift the trunk lid, providing quick and convenient access to the luggage compartment of the car. If the alarm key fob has a separate button for opening the trunk , then it will also perform its functions.
Benefits of this option
Many people do not find anything special in this option, but once you try the electric trunk drive, you immediately begin to appreciate all the advantages. The positive aspects of the option to automatically open the trunk on the VAZ-2107 include:
- Convenience. By the time the driver leaves the cabin, the trunk will already be open.
- Practicality. There is no need to remove the keys from the ignition switch to open the trunk with the key, especially if you have just started the engine and are warming it up.
- Fashion. Almost all modern cars are equipped with such an interesting option, so the “seven” with this function will look more interesting against their background, especially with tuning.
Next, we’ll look at what the procedure for installing an electric drive for opening the trunk on a VAZ 2107 is with your own hands.
What is required for the work
Before starting the work process, you should purchase the necessary equipment. To carry out the work you will need:
- A button that, when pressed, will activate the electric drive. The best option is a button from a VAZ-2110 car, the cost of which is about 50-80 rubles.
- The relay is four-pin and has a special terminal for it.
- Activator.
- Wires.
- Female and male connectors, as well as electrical tape and heat shrink.
You can easily find any of the components in any auto store, and then install and connect it to your car yourself.
Installation of the activator
Initially, it is necessary to install an activator, which is an electric drive that works to retract or repel, depending on the connection. The first step is to remove the lock and install the activator rod. To remove the lock, you will need to unscrew two nuts.
After this, you need to drill a hole in the side of the lock to insert the rod and connect it to the lock tongue. The rod will need to be bent (secured), it should look something like the one shown in the photo below.
After fixing the rod to the lock, the latter can be installed in place. It is advisable to remember the tilt level of the lock and install it as well, so that you do not have to adjust it during installation. Now you can attach the activator to the trunk. To do this, you will need 2 self-tapping screws and a special plate, which comes with the product. After this, you can manually try to see if the lock will work when opening. When the activator is installed on your VAZ 2107 car, you can proceed to the next stage - connection.
Connecting the product
Before carrying out connection work, be sure to disconnect the negative terminal from the battery. To begin with, we present the diagram according to which the product will function.
The electric lock will be supplied with 12V power directly from the battery, although you can also use a wire from the cigarette lighter. First, connect the wire to the “+” terminal of the battery.
The battery supplies power to the relay, which can be located both in the cabin and in the engine compartment, which will be much more rational. From terminal “86” the wire is fed to the trunk opening button, which can be located in any convenient place on the dashboard. To install the button that will open the trunk lid, you will need to drill a hole of the appropriate diameter in the dashboard.
The wire from the relay terminal “30” is laid through the cabin to the activator. Its length must be at least 5 meters. The wire can be laid together with the standard wiring. This wire must be connected to the green wire of the activator using female-male connectors. The blue wire must be short-circuited to vehicle ground. Now you can check how the electric trunk lock of the VAZ 2107 functions. It is enough to spend 2-3 hours so that the trunk will eventually open using the VAZ 2107 button. After completing the work, do not forget to connect the negative terminal to the battery.
What do you need for work?
A similar connection diagram for the trunk button attracts many.
To realize your idea, you need to prepare materials and tools.
- electric drive (activator) of the luggage compartment lock;
- universal 4-pin relay;
- fuse blocks;
- fuse;
- wires;
- female type terminals;
- trunk opening buttons;
- heat shrink tube;
- electrical tape;
- plastic clamps.
The block is placed for safety reasons. Mounted on the positive wire. The fuse can be taken as standard, 10 Ampere. Do not need anymore.
Determine the length of the wiring individually. But practice shows that 5-6 meters is enough with a margin.
Take the opening button from ten. It is considered the most reliable and also affordable. If you are tuning a domestic car, then it will definitely fit.
At any car market it will not be difficult to buy the entire set. It will cost 600-800 rubles. Maximum 1000 rubles.
Article: 2822.3710-02
Order code: 079976
150 ₽
Payment methods: Cash upon receipt VISA, MasterCard Payment through a bank
Purpose of the switch button: opening the trunk Manufacturer: AVAR You can get information about the product or place an order by calling 8-800-600-69-66 .
- All characteristics
- 2 reviews
In stock Available for order – >10 pcs. Data updated: 05/29/2021 at 15:30
Order code
079976 Articles 2822.3710-02 Manufacturer AVAR Catalog group: ..Electrical equipment Electrical equipment Width, m: 0.03 Height, m: 0.025 Length, m: 0.025 Weight, kg: 0.01 Purpose of the switch button: trunk opening
Reviews about the product
Certificates
Reviews
There are no reviews for this product yet.
Write a review
- Switch button VAZ-2110-2112 trunk opening AVAR Article: 2822.3710-02 Order code: 079976 150 ₽ or place an order by calling 8 800 6006 966
Availability of goods in warehouses and stores, as well as the price of the goods is indicated on
29.05.2021 15:30
.
Prices and availability of goods in all stores and warehouses are updated once an hour.
If there is a sufficient quantity of goods in the store you need, you can buy it without pre-ordering. Internet price
– valid when ordering on the website or through a call center operator by phone
8-800-600-69-66
. Subject to sufficient quantity of goods at the time of order.
Price in stores
– retail price of goods in store sales areas without pre-order.
The period for moving goods from a remote warehouse to the warehouse of an online store.
The parts data presented on this page is for informational purposes only.
9e966ec6fc803979895d7338ccad0276
Add to cart
Available to order:
Order quantity:
Product successfully added to cart
!
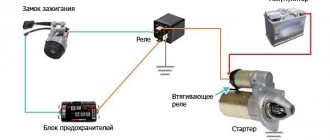
Electrical diagram for connecting the trunk lock drive.
Electrical diagram for connecting the solenoid (actuator) for unlocking the trunk I drew a standard car relay, 4 or 5 contacts does not matter, I later described the omron G5LB-1-25 10A relay from a broken washing machine, but in principle they are, in addition to size, winding resistance and the response volume is no different.
Let's describe the electrical circuit for connecting the trunk lock solenoid: we apply a constant plus to the 87 and 85 contacts of the relay, having first run it through a 5-10 ampere fuse, I took the constant plus from the car alarm power supply, I still pulled the wire from it. At pin 30 we hook the electric lock itself, a positive charge will run through it, we screw the second wire from the actuator onto some unpainted bolt of the car body, it will be negative. Contact 86 will receive a negative pulse either from the button or from an additional signaling channel.
The VAZ button 2822.3710-02 has three contacts, we connect the alarm to pin 3, pull the wire from pin 1 to pin 86 of the relay, and pin 2 to the car body. If the button is not needed, then we connect the wire from the alarm directly to pin 86. That’s basically the whole scheme, everything has been tested and everything works great.
How to properly connect the electric trunk lock
Many car enthusiasts who independently “pump” their cars are wondering: how to properly connect the electrics? This question arises in almost any installation. After all, simply screwing on the blocks, locks and strips is not difficult, but only properly connected electricians can make the system work. If we take into account one of the most pressing problems - the installation of remote control locks for the fifth door, then the correct wiring diagram for the electric trunk lock will help us here. You can find it either in the instructions that should be included with the device, or you can take it from a reliable source, but it is better to use proven options and ask friends and acquaintances what scheme they used.
Trunk release button for Priora station wagon
Ury
Apparently not, I removed the chip from the electric motor on the wiper. I'll try your advice! But how to open the trunk?
Take off the door trim and you'll see.
Ok, I'll climb tomorrow and have a report! Is the activator located next to the rear wiper gear motor?
In general, most likely your relay has failed. Located in the black box area. It can be found by the wires from the opening button (look where they go). So I found this bastard and replaced it.
pull out the trunk release button and connect the wires directly - the replacement button will work
Information on icons and features
can't start topics
reply to messages You
cannot
edit your messages You
cannot
delete your messages You
cannot
vote in polls You
can
attach files You
can
download files
Control button combination
If the power relay is not included in the kit, it can be purchased separately
It is important that the kit contains a special diode. The peculiarity of this part is that the diode passes a current of a certain charge only in one direction
Accordingly, its correct installation is required. The white strip on the part, indicating the positive side, should be turned towards the red wire, and the negative contact - towards the black and yellow negative cable. For correct connection, you must comply with the diagram below.
How to open the trunk using the StarLine A93 alarm key fob
After activating additional channel one, you can remotely open the luggage compartment. On the Starline A93 2Can 2Lin model and the Lada Granta car, this option is carried out as follows:
- on the key fob, press the second button for a long time until the corresponding melodic signal (at least 3 seconds);
- Then the first key is briefly clicked.
After this, the car blinks its dimensions three times and also gives an impulse to open the trunk. If the security mode is activated, all doors will remain locked, and only the shock sensor will be turned off (for closing the trunk). In this case, the open compartment door will be displayed on the key fob screen.
How to close the trunk using the Starline A93 remote control
The compartment is closed manually due to the fact that modern cars do not have closers. If the car is in security mode, then after five seconds the status will be updated and the compartment lock will be locked. In this case, the bullet will emit a sound signal, and the open door symbol will disappear from the key fob screen. You can open the trunk again either during this time, or after the next command (the second button is long, then the first is short).
Installation process
See also Where to dispose or sell old tires for money and for free
Many people are interested in how to make the trunk open with a button. Now you'll find out.
Using the example of the timeless classic VAZ 2107, the process looks like this:
- Install a relay under the hood. The best option for placing a four-pin relay. You don't have to run the positive wire to the button. Plus, the space under the dashboard is more difficult to find. A good option is to attach it to the windshield washer reservoir. Make sure that connections and contacts are tight and insulated;
- Pull 2 more wires through the standard hole of all wires. One will go to the button, and the second to the activator;
- The wiring needs to be routed throughout the cabin. It is better to do this on the roof. And to the trunk. Or use areas where standard wiring runs under a layer of carpet;
- Carefully pull the wire through the luggage compartment to the lid. The wiring is connected to the main bundle. Fixed with electrical tape or a plastic clamp;
- Now the activator is attached to the trunk door lock. Do not forget that the electric drive works by pushing and retracting. To change the direction of movement, it is enough to change the polarity;
- To connect the activator, you need to do the following. Unscrew a couple of nuts and remove the lock. Use a drill to make a hole in the side. Place the rod there and connect it to the tongue of the locking mechanism;
- It will be correct to close the installed activator, as well as the lock using the casing. This will prevent dust and dirt from entering. Plus it will protect against mechanical damage;
- Now select the place where the button will be located in the cabin. If this is a seven from AvtoVAZ, then they usually choose a plastic trim to the left of the driver’s seat. This will allow the button to always be at hand. He quickly pressed the button, left the cabin, and the trunk was already open;
- The button is easy to install. A hole is made in the cover. A button is inserted there, and terminals are also put on. The minus is attached here, on the plastic lining fixing bolt.
Broken wiring
This is perhaps the most common malfunction on self-installed electric locks. The reason is an unsuccessfully selected place for pulling the wires. As a result, they are damaged, which leads to a short circuit or complete breakage.
Diagnostics can be divided into 2 parts:
- Checking resistance. All sections of the chain are checked for damage. If this indicator is close to infinity, then somewhere the wire has broken off. You can also check this by measuring the voltage;
- Carefully inspect the wires for damage to the insulation. This usually leads to short circuits and current leakage to the housing, which makes the lock impossible to operate.
To check, you will need a multimeter or a tester made from a regular 12 V light bulb. Pay attention to the contacts. Often they oxidize, which does not allow current to flow normally. It is recommended to regularly check the status of the contacts. Be sure to clean them twice a year and lubricate them with a special compound. In many cases, it is poor contact that causes the lock to fail.
Why doesn't the trunk open from the button on the VAZ 2110 and 2112? 4 popular reasons
Car enthusiasts are often interested in why the trunk does not open with a button on the VAZ 2110 and 2112. For modern cars, opening the trunk with a button is quite common. Even on models that were not originally equipped with such an option, it can be found. Usually, the button is installed simultaneously with the installation of the central locking or alarm system. In the second case, the trunk lock is integrated with the security system. Failure of the trunk lock is quite an unpleasant phenomenon. For example, if necessary, you will not be able to get a spare tire. Therefore, it is important to fix the problem as quickly as possible.
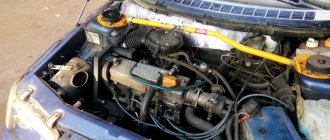
Repair of VAZ 2110 Lada Replacement of the fuel tank
- Repair manuals
- Repair manual for VAZ 2110 (Lada) 1996+.
- Replacing the fuel tank
2.17.1.5. Replacing the fuel tank
How to properly drain gasoline from the gas tank of a VAZ and foreign car
If the fuel pump screen frequently becomes clogged, the tank should be removed and washed.
If a leak is detected along the junction line of the upper and lower parts of the tank, you can solder these places (it is recommended to do this in specialized workshops). To do this, pour out the remaining gasoline, thoroughly rinse and dry the tank. Then seal the leak with soft solder.
You can solder only a thoroughly washed and dried tank that does not contain gasoline vapors, otherwise the vapors may ignite during soldering.
To wash the fuel tank, use detergents: Lobomid, MS or ML. Then, to remove any remaining detergent, rinse and steam the tank with hot water. Dry the tank thoroughly.
| EXECUTION ORDER |
↓ Comments ↓
1. General data 1.0 General data 1.1. Vehicle Specifications
2. Engine 2.0 Engine 2.1 Possible engine malfunctions. 2.2 Replacing the coolant 2.3 Replacing the engine oil and oil filter 2.4. Installing the piston of the first cylinder to the TDC position of the compression stroke 2.5 Replacing the camshaft drive belt and tension roller 2.6 Adjusting the camshaft drive belt tension 2.7 Removing, troubleshooting and installing the flywheel 2.8. Replacing engine seal parts 2.9 Cylinder head 2.10 Grinding in valves 2.11 Adjusting clearances in valve drive 2.12 Removing and installing engine 2.13. Engine repair 2.14. Lubrication system 2.15. Cooling system 2.16. Exhaust gas system 2.18. Features of VAZ-2112 engine repair
3. Transmission 3.0 Transmission 3.1. Clutch 3.2. Gearbox 3.3. Front wheel drives
4. Chassis 4.0 Chassis 4.1. Checking the technical condition of suspension parts on the car 4.2. Rear suspension
5. Steering 5.0 Steering 5.1 Inspection and check of the steering on the car 5.2. Steering column 5.4. Steering mechanism 5.5 Possible steering malfunctions.
6. Brake system 6.0 Brake system 6.1. Vacuum booster 6.2. Main brake cylinder 6.3. Pressure regulator 6.4. Brake hoses and tubes 6.5 Bleeding the brake system 6.6 Replacing brake fluid 6.7. Front wheel brakes 6.8. Braking mechanisms of the rear wheels 6.9. Parking brake 6.10 Possible malfunctions of the brake system.
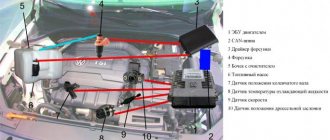
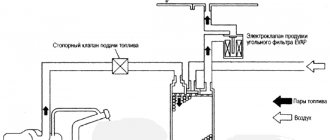
7. Electrical equipment 7.0 Electrical equipment 7.1. Mounting block 7.2. Generator 7.3. Starter 7.4. Ignition switch (lock) 7.5. Checking and replacing spark plugs 7.6. Integrated engine management system (fuel injection system) 7.7. Contactless ignition system 7.8. Lighting, light and sound signaling 7.9. Windshield wiper 7.10 Replacing the electric motor of the radiator fan of the cooling system 7.11. Heater electric motor 7.12. Cigarette lighter 7.13. Instrument cluster 7.14 Checking the carburetor solenoid valve control unit 7.15 Possible malfunctions of the EPHH control unit. 7.16 Electrical diagram of a VAZ-21102 car 7.17 Electrical diagram of a car with a carburetor engine 2110 7.18 Engine control diagram 2111 (pin M1.5.4) 7.19 Engine control diagram 2111 (pin MP7.0) 7.20 Control diagram for engines 2111 and 2112 (pin M1) .5.4N, "January-5.1")
8. Body 8.0 Body 8.1 Possible body malfunctions. 8.2. Replacing the buffers 8.3 Removing and installing the radiator trim 8.4 Removing and installing the locker 8.5 Removing and installing the wing 8.6. Hood 8.7 Removing and installing upholstery, trim and windshield frame lining 8.8. Trunk lid 8.9. Side doors 8.10 Removing and installing the front seat 8.11 Removing and installing the upper and lower lining of the floor tunnel 8.12. Seat belts 8.13. Rear view mirrors 8.14. Instrument panel 8.15. Heater 8.16 Anti-corrosion compounds for body treatment 8.17. Features of body repair of models 2111 and 2112 8.18. Body care
9. Appendices 9.0 Appendices 9.1 Fuels, lubricants and operating fluids 9.2 Basic data for adjustments and control 9.3 Filling volumes 9.4 Lamps used in the car
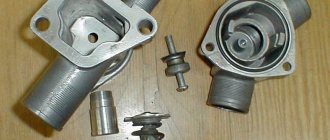
Installing an electric trunk drive
In the latch it is necessary to drill several technological holes with threads intended for fastening screws under points 3 and 4. With such screws you can secure the end of the cable. One question remains unresolved: how to get rid of the lock latch from the trunk lid? This can be realized by making a hole in the trunk lid, the diameter of which will be 1.15 cm. To knock out the axle in it, you need to insert a dense drift into it and remove the rod. It is necessary to ensure that the roller recess and the two screws are located symmetrically to each other. When removing the axle, the plate moves and the inside is removed along with the pusher. To make it impossible to open the lock with a key, it is enough to reduce the size of the end of the pusher by approximately 10 millimeters.
Review of Manufacturer Prices
| Name/article | Price, rub.) |
| electric lock 2191-5606010-10 | from 1500 |
| 2191-5606452 | |
| 2191-5605789-00 | —/— |
| 2191-5603652 | —/— |
| 2191-5604521 | —/— |
| Vartex 56526454 | from 1700 |
| Apollo 54654 | —/— |
| FX-F 82665/22 | —/— |
| Monado fd515545 | —/— |
*prices are current as of 10/09/18.
The opinions of the service station masters agreed on the choice of manufacturer - there is not much difference. When purchasing original products, the service life of the equipment exceeds 5 years. Installation in “makeshift” conditions and poor-quality manufacturing only shorten the period of use of the equipment. Often the owner is to blame for the breakdown, violating the vehicle maintenance regulations.
Faulty key fob or button
The problem is often hidden in the control panel. If the lock is activated using a remote control, then diagnosing the problem is as easy as possible. In this case, not only the trunk drive will fail, but also the central locking system. Try replacing the battery in the key fob; if this does not help, it makes sense to replace the remote control.
The control button located in the cabin rarely fails. Most often the reason is in contacts. To check, remove it from the car. Then check in the simplest circuit together with the lamp. In case of malfunction, you will have to buy a new button.
- Relay. Check the trunk release relay. To do this, while being next to it, you need to press the key fob button (an assistant will be required when installing the button in the cabin). A working relay should make a click. If there is no click, then most likely the reason is in the relay, replace it.
- Battery. Sometimes the trunk lock does not work only when the engine is running. The reason for this is a weak battery. When the engine is running, the motor is started from the generator. In its absence, the battery simply does not have enough energy. This usually happens with expired batteries.
Conclusion. As a rule, the trunk lock was not standardly installed in the “tenth” family. All available options are installed by the owners themselves. In this regard, the official manuals do not contain information on repairing this element. Why the trunk does not open from the button on the VAZ 2110 and 2112 is a question often asked by car enthusiasts. There are quite a few reasons for this problem. To troubleshoot and fix the problem, you will have to go through all the elements of the electric drive of the lock.
If you find an error, please select a piece of text and press Ctrl+Enter.
Frequent problems when activating a button
Even after a good installation, many owners of VAZ 2110-2112 series cars encounter fleeting failures when pressing the trunk opening/closing button. A common reason is communication problems between parts of electrical equipment: it is electrical appliances that will serve as a serious target for the occurrence of basic, but not obvious to the average user, problems. Among them:
- broken electrical wiring;
- problems with gear motors;
- weak battery.
In the video below, the owner of a VAZ 2110 clearly shows the action plan in case of problems with the trunk open button:
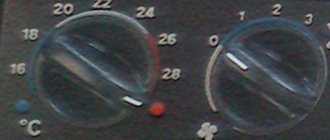
Failure of gear motors is most often associated with a defect in the ACU (autonomous control unit) of the heater, but it can be safely fixed at home. When you remove the frill, VUT and pedal assembly, the working area of the motor with two points will open - red and blue. There is also a micromotor gearbox responsible for supplying cold air; The easiest way to manipulate it is to turn the motor flap counterclockwise, so that the nearby ACS sensor is exactly opposite the red dot. This will ensure air exchange at the desired temperature, so that the autonomous heater control unit will work correctly.
Source
DIY installation
We adjust the cable tension for proper unlocking and locking of the trunk.
After that, we connect the button itself; for this purpose, there is a special place in the car panel under the instrument panel on the driver’s side.
It would be wrong to place a button near the cigarette lighter or a drawer for small items when there is a regular place for this in the car.
Rice. The simplest connection diagram for the electric drive of the trunk lock.
If you don’t have an additional brake signal, or for some reason you want to use it, then, as mentioned above, we pull a new wire to the bottom of the instrument panel on the driver’s side and connect it to the closer and to the battery through the fuse.
Checking for correct installation
To check the installation is correct, perform the following steps:
- They connect the battery and give a command from the remote control to lock the central locking. To be on the safe side, leave one of the door windows open. This will allow you to open the car manually if for some reason the unlock command does not work.
- After locking the central locking system, a command is given from the remote control to unlock it.
- After correct execution of the commands, the wire connections are insulated with heat-shrinkable tubing or electrical tape.
If at any stage of the test the system does not receive a signal and operate, you should once again check that the wires are connected correctly. If they are connected correctly, there may be damage somewhere.
It takes two people to determine the malfunction - one will send signals from the remote control to lock and unlock the central locking system. At this time, another, using a tester, will check the voltage at the power outputs of the security system and at the fuse contacts. You also need to check the voltage at the contacts of the central locking button.
Where to begin
Now to the question of how to connect the trunk release button.
You need to start by studying the instructions from the alarm. An option for those who are going to connect a button to the remote control of the car’s security system.
In the connection diagram you need to find the wire of the desired color that goes to opening the tailgate. This is usually a yellow-red wire.
If you have figured this out, then select a location for installation, and also begin the installation process itself.