Signs of a faulty fuel pump:
- You may have a fuel pump failure problem if your car jerks at high speeds
- The fuel pump may be faulty if you lose power when accelerating
- Loss of power when lifting or towing a load
- Failure of the fuel pump may cause the engine to not start.
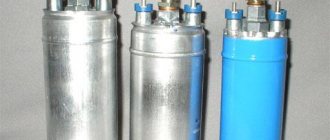
In mechanical pumps, a diaphragm mounted on the outside of the fuel tank expands and contracts, creating a low-pressure system that forces fuel out of the tank and into the engine.
Electronic pumps are typically located inside the fuel tank and use electromagnetic motors to force fuel into the engine at high pressure. Mechanical pumps are typically found in cars that use carburetors, while electronic pumps are typically used with fuel injection systems.
Because mechanical pumps are controlled directly by the movement of the motor and have few moving parts, they are generally reliable and relatively easy to diagnose and fix. Most problems with mechanical pumps occur when the diaphragm is damaged.
Electronic pumps are connected to electronic control systems and contain several moving parts. Because of this increased complexity, these types of pumps are more prone to failure. Any of the parts can malfunction and cause problems with the fuel pump.
The principle of operation of the fuel pump
Schematic diagram of a fuel pump
The main function of a fuel pump is to transfer fuel from the tank to the engine. In injection engines, the fuel pump is connected to the fuel rail, and in carburetor engines - to the carburetor. In this case, it is necessary not only to pump fuel, but also to provide a certain pressure. Too high pressure leads to increased richness of the mixture and high fuel consumption. Too low pressure leads to a lean mixture and a drop in power. Both the first and second cases negatively affect the engine life. That is, the fact that the gas pump pumps fuel does not indicate its full serviceability.
Gasoline supply problems - common symptoms
Malfunctions of the fuel supply system are conventionally divided into 2 categories:
- The combustible mixture is not supplied to the cylinders at all.
- Gasoline is supplied intermittently or under insufficient pressure.
In the first case, the engine does not start and does not engage the starter during rotation, that is, it does not show signs of life. In such a situation, it is always easier to determine the cause of the breakdown.
When insufficient fuel enters the cylinders, the following symptoms appear:
- starting the power unit “from cold” is very difficult, the engine seizes and “sneezes”, it starts in 3–10 attempts;
- idling is unstable, the engine “troubles”;
- dynamic acceleration becomes impossible - a sharp opening of the throttle causes a long dip and deceleration;
- when the driver releases the accelerator pedal, the engine often stalls;
- The car has difficulty climbing hills and accelerates slowly when fully loaded.
The cause of the above phenomena may be a malfunction of the fuel pump or other elements of the system, and the primary symptoms are almost the same. To carry out an accurate diagnosis, you need to understand how the car's power system works.
Similar symptoms not related to the fuel pump
The symptoms that appear due to a lack of fuel in the supply line are quite typical and are very similar to problems with other systems. How to eliminate possible problems using the elimination method:
- Unscrew and inspect the spark plug skirts. When there is not enough fuel, the electrodes remain clean or become covered with a white coating. This is further evidence of a malfunction in the power system.
- Replace spark plugs. If they wear out, they create a similar effect - failures, difficult starting, and a drop in engine power.
- Check the functionality of the throttle position sensor (TPS) and idle air control.
- Measure the compression in all engine cylinders. Due to excessive wear, the naturally aspirated engine is unable to create the required pressure and vacuum; the mixture burns poorly, which is why identical symptoms occur.
When troubleshooting, take into account one important factor - the service life of the fuel pump, which is at least 100 thousand kilometers. The longer the operating period of the unit, the lower the fuel pressure it creates at the outlet. The reason is wear of the membrane and other internal parts. If the pump has served 150 thousand km or more, you should think about purchasing and installing a new spare part.
How to check the operation of the fuel pump?
First, you should check the fuse. To do this, check the instructions for its location. Next, you should check the voltage at the pump. Before doing this, be sure to check if everything is in order with the battery. The voltage at the fuel pump terminal must be checked using a multimeter or tester. The instruction manual always indicates the required voltage.
Using a tester, check the voltage supply to the fuse. Often this is where the electrical circuit breaks.
If the search does not yield results, then the voltage should be checked on the contacts themselves. All contacts must be in place and connected to ground. A broken contact or its oxidation leads to failure of the fuel pump system. If no broken contacts are detected, but the voltage drops by more than 1 volt, then the problem is in the wiring or oxidation of the contacts. There should be no short circuit in the wiring.
If, after checking the voltage, contacts and fuse, you do not find any problems, then the problem lies in the fuel pump itself. In this case, the fuel pump will most likely require replacement. In practice, it most often turns out that replacement is a last resort. First, you should try to restore and test the fuel pump again.
Recommend: Top 10 Brake Pads
Before you check the fuel pump, you need to remember that, as mentioned above, pressure is the most important characteristic of the fuel pump, so it is worth measuring its level.
How to check the pressure in the fuel rail?
You will need a pressure gauge that measures pressure in the range from 7 to 10 atmospheres. If you choose a pressure gauge with a large margin, you risk getting less accurate measurement results. Specialized stores sell a kit for measuring pressure, but you can also design your own device.
If you want to assemble the device yourself, you will also need a hose with an internal diameter of 9 millimeters. You will also need plumbing tow, with which you can seal the connection between the pressure gauge and the tube. All parts are connected and tightened using a clamp. You will also need a car spool. Next you need to perform a series of actions:
- Place the car on a level surface that is prevented from rolling, turn off the ignition and open the hood.
- Check that the injection nozzles have access to the fuel rail.
- Find the fuel pressure plug and remove it. Then you should unscrew the nipple using the spool.
- Prepare an empty container (a regular bucket will do) and a clean rag. This is necessary to collect residual fuel, which under pressure can splash out in different directions. Therefore, take care of the safety of your skin (especially your face and eyes).
- Connect the device to the fitting and begin checking the mechanism.
Checking the pressure in the fuel rail should occur in four operating modes of the power unit:
- when the ignition is on;
- at idle engine speed;
- code the fuel pressure regulator tube is reset;
- when the drain tube is compressed.
Fuel rail pressure measurement results
The results may vary slightly for different car models, but in general they should be as follows:
- when the ignition is turned on, the pressure must be at least 3 atmospheres,
- at idle engine speed - at least 2.5 atmospheres,
- when the pressure regulator tube is reset - at least 3.3 atmospheres,
- when squeezing the drain tube - at least 7 atmospheres.
Fuel rail pressure fluctuates slightly during preparation. When you press the pedal, it suddenly takes on a value of 3 atmospheres; when you release the pedal, it drops to 2.5 atmospheres. When fuel enters the fuel system, turn off the ignition and begin observing the pressure gauge. The pressure in this case should drop to 0.7 bar and remain unchanged.
If the pressure drops to zero, there may be a problem with the fuel pressure regulator. In this case, the regulator must be replaced immediately. The cause could also be the fuel pump check valve.
It is necessary to observe the behavior of the pressure gauge even at 3,000 engine speeds. A drop in pressure will indicate a faulty fuel pump. Sometimes the fuel pump cannot reach the required pressure for a long time. In this case, the problem lies in a clogged fuel filter, which needs to be replaced, or in a dirty fuel pump mesh (read more about where the fuel filter is located).
If the above methods do not reveal a malfunction of the fuel pump, you will have to diagnose other units (DPZD, IAC, mass air flow sensor, compression in the engine and some other indicators and parts).
Signs of malfunction of the fuel pressure regulator viburnum
Hello everyone, I continue to run in the new engine, I started turning it up to 5000 rpm. And sometimes problems with traction appeared, namely, a cut-off effect was created at 4000 rpm. Those. The revolutions stupidly dropped to zero and the car did not want to go until the revolutions dropped below 3000. This happened on the old engine, but then I blamed it on a burnt gasket, but then I realized that this was connected with one of the engine systems. It also happened that with about 13 liters left in the tank, the car swallowed air and stalled like a diesel engine, at first it sputtered terribly and then fell silent, although the pump should clear the air lock. All symptoms pointed to problems in the fuel system.
the injectors were washed during assembly, the fuel pressure regulator (fuel pressure regulator) and the pump itself remained.
Checking the pressure in the system is very simple. You need a pressure gauge, a hose and 2 clamps. Do not forget that the pressure gauge accurately shows in the second third of the scale, i.e. if you need to measure pressure in the region of 2-4 kgf/cm2, you need to take a pressure gauge from 1 to 8-10 kgf/cm2. As a last resort, you can remove the pressure gauge from the pump, the main thing is that the limit is around 7 kgf/cm2. I took a certified pressure gauge for 10 kgf/cm2.
It is connected to the old and new model ramps in the same way. Remove the plastic cap from the end of the ramp
Under the cap there is a fitting in which a regular wheel spool is wrapped, unscrew it with the cap from the wheel (IMPORTANT! The system is under pressure, be careful when unscrewing the spool
), or better yet, remove the pump fuse or connector from it and start the car to relieve pressure in the system. And then we put on our hose with a pressure gauge.
Now we check the pressure regulator; to do this, at idle, remove the vacuum hose from the receiver; the pressure should jump sharply by 0.7-0.9 kgf. If this does not happen or happens slowly, the regulator is faulty.
Worked great for me, I changed it a year ago.
Next, we check the fuel pump itself; to do this, open the throttle at idle and look at the readings. The pressure should not fall below 2.2 kgf. If the pressure does not drop, read how to check the filter, if it drops like mine, then just read why it could be
, I dropped to 1kg. The drop may occur due to clogged filters or a half-dead pump. Now, in order to find the culprit of all the troubles, at idle we use pliers to pinch the fuel return, which comes from the pressure regulator. In this case, the pressure should reach 5-7 kgf/cm2. Those. the pump should pump more than 5 kgf at point-blank range. Now we watch how this happens, if the pressure reaches above 6 kgf but for a very long time, about a minute or more, clogged filters are to blame (coarse cleaning in the tank, or fine cleaning near the tank). If it does not reach at least 4 kgf, then the pump is dead, i.e. it works but not as it should. My pump cannot pump up even 3 kgf at point-blank range. The verdict is pump replacement.
Before this, about 3 years ago I already changed the pump, I had no experience then and a couple of times I got up with a dry tank. And now this happened due to a faulty device. All the readings on it are lying, so a replacement is being prepared for it with a 2110 tidy. In general, do not leave gasoline at the bottom of the tank, always keep at least 15 liters in it, the pump does not operate dry, there is no cooling by the flowing medium, i.e. gasoline, in the best cases, wear of the pump and a drop in pressure, and then complete failure. At worst, overheating and ignition inside the pump. There will be no explosion, but it will definitely scare you with smoke.
There was nothing to do, I had to take money and look for a new pump, by the way, 3 years ago I bought the original BOSCH for 750 rubles. He stood the same. Now, having asked for the original, I was shocked by the price of 1600 rubles. It's all about Kalinas and Priors, the prices of spare parts for them are higher than for the same Samara, but the pump, unfortunately, is the same everywhere, and thanks to the new markings because... Samaras are out of production, considered like a pump for a Priora, which is why the price is the same. But I went a different route and found in Magnitogorsk a functional analogue of the BOSCH from SOATE. But the price is 780 rubles. I also took a new coarse filter (crow's foot) and fine filter from SCT.
For those blog readers who follow my YouTube channel, the information will not be new, but for the rest I will describe everything here. So over the past few days my Kalina has started having problems. And they were as follows:
- After a long period of inactivity, the engine began to start poorly, often even on the second try.
- the car became very “dull”, and it felt like the loss of power was about 20%
- fuel consumption increased by 10% when the engine was idling, and when driving too
In general, based on all the signs described above, it looked like a dying gas pump. Of course, I checked the mass air flow sensor first, since its operating voltage is also already close to critical. But when it was turned off, nothing changed for the better.
As a result, I began to deal with the fuel system. I’ll say right away so that there are no unnecessary questions:
Features of the injection power system
The tasks of fuel pumps in carburetor and injection engines are somewhat different. If for a carburetor engine it is important to simply supply gasoline to the carburetor, then for an injection system this is not enough. The fuel pump must not only pump fuel from the tank to the ramp, but also create a certain pressure, without which the engine simply will not start.
Access to the fuel pump in injection cars is also complicated by the fact that in cars of recent years of production it is mounted together with a fuel receiver and a coarse filter directly in the gas tank. This complicates the diagnosis, repair and maintenance of the entire fuel module, but simplifies the design of the pump, since the gasoline itself lubricates and cools it. But this is precisely what often leads to unit breakdowns.
How to choose
If you are in doubt which fuel pump is suitable for your car, then purchase the same one that is installed in yours. When purchasing a pump from another manufacturer, be sure to pay attention to the fastenings. The fact is that if selected incorrectly during replacement, they may simply not fit. In addition, you need to pay attention to the discharge pipe. It can be either straight or curved. The new fuel pump should be exactly the same as the old one. Otherwise, the rubber hose will not work, because other parts of your car will interfere with it.
ADVICE! After replacing the fuel pump, connect the car battery and start it for a while. Check if fuel is leaking from the connections.
If everything is fine, and no problems or defects are found, then close the lid and put the rear seat back in place. If you notice that the gaskets are worn out, they need to be replaced.
Modern passenger cars are equipped with electric vibration pumps. Unlike mechanical predecessors, installed near the engine, the new units are immersed inside the gasoline tank, where direct access is limited. In order to independently solve problems associated with interruptions in the fuel supply, you need to be able to distinguish the signs of a fuel pump malfunction from problems with other elements of the fuel system.
Purpose and principle of operation of the fuel pump
The fuel pump is designed to pump fuel from one point to another. In a car, the role of the first point is played by a fuel reservoir - the tank, and the second - by the engine, where the pumping takes place. This process occurs at a certain pressure, which is maintained by the pump reducer, which is a very important point.
Fuel pump diagram
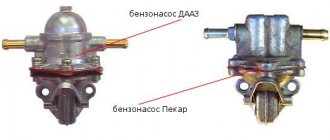
Fuel pumps are divided into 2 types according to the type of drive: electric and mechanical. Inside the first there is an electric motor with a mini-pump, which operates from the mains and uninterruptedly pumps fuel into the engine. The second type is becoming increasingly rare, as it is installed on carburetor cars, and operates due to the reciprocating movement of the lever.
Fuel pump diagram
Cause of malfunction
A common malfunction of a mechanical gasoline pump is mechanical wear of its rod. When the fuel pump rod becomes shorter than necessary, it stops supplying fuel to the carburetor in the required quantity.
Worn suction valve or brass valve and sealing gasket on a mechanical fuel pump can be another cause of fuel pump malfunction.
The main sudden malfunction of the fuel pump on a car with an injection engine is low-quality fuel. Of course, the question of cleaning lies behind the fuel filter, but the fact is that the fuel injection system of a modern car is made in such a way that the finest filter element is installed after the fuel pump, and in front of it there is only a coarse filter mesh (by the way, it has to be changed or clean more often to avoid fuel pump malfunction). The strainer cannot ensure proper cleaning of the fuel available at our gas stations, and the accumulated dirt on the filter forces the pump to strain to overcome resistance. Which subsequently leads to a reduction in the service life of the part.
For car owners abroad, the fuel pump is more likely to fail due to wear on the manifold assembly in the electric motor than due to a dirty filter. But for our drivers, a typical cause of failure is severe wear and tear of the working surfaces of the fuel pump. This problem may be indicated by loud noise during operation, which will be accompanied by a drop in pressure in the fuel system and increased fuel consumption.
Also, if the issue concerns a malfunction of the electric fuel pump, worn wiring or oxidized terminals can play an insidious role. And when checking the pump shows that everything should work without failures, the electrical wiring will be baffled over and over again.
From all of the above, you can draw several conclusions for yourself:
- Firstly, you need to refuel with high-quality fuel, and also periodically clean the fuel tank.
- Secondly, replace the fuel filter on time.
- Thirdly, listen to the pump.
Here are the basic recommendations to extend the service life and protect yourself from fuel pump malfunctions.
Chevrolet Aveo T300 – Changing the fuel filter
The Chevrolet Aveo T300 model does not have a fine gasoline filter in the usual sense of the word. There is only a mesh. It is located in the fuel module in the gas tank and performs the function of cleaning gasoline. To replace the mesh you will have to remove and disassemble the fuel module.
The replacement period depends on the quality (purity) of gasoline, approximately 30-50 thousand mileage. The main sign of contamination of the filter element is a decrease in traction; in particularly advanced cases, the engine begins to stall. Today we will figure out how to carry out the replacement operation yourself.
Selecting and purchasing a cleaning mesh
The Fortech FTP05 mesh has proven itself well. It costs about 2 dollars. As an alternative, you can choose to install a Longho FT05 cleaning mesh, the average price is $1.
Replacement procedure
- You'll have to lift up the back seat to get to the filter.
- Now use a screwdriver to pry up the cover and move it to the side.
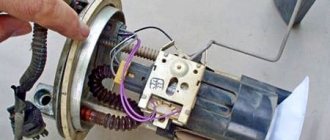
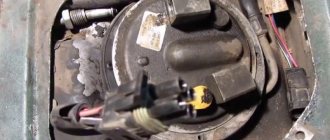
Next, you will need to remove the chip with the wires (shown with a finger in the photo), start the car and wait until the engine stalls. This is required to reduce pressure in the fuel system.
Remove the terminal from the battery. This needs to be done for several reasons. Firstly, we de-energize the car for safety, and secondly, the system needs a reset so that the error message does not appear on the driver’s panel.
Now you can remove the pipes
. They are held on with clips. The photo above shows where you need to press with a screwdriver to remove the pipes.
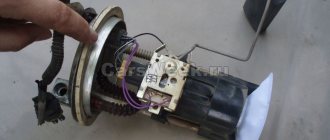
Next you need to unscrew the metal washer. Workshops have special keys for such purposes. In your garage, you can get by with a screwdriver and a hammer. There are recesses on the outer perimeter of the washer; carefully place a screwdriver and tap with a hammer. Place the screwdriver in the opposite recess and continue until the washer gives way. We remove it and put it aside.
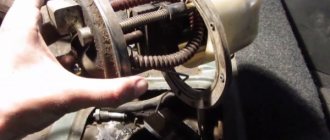
Now carefully lift the entire pump up. There is a float on the pump. It interferes with the pump output. Therefore, the entire structure must be tilted. Gasoline will flow from the pump - stock up on rags for wiping.
After dismantling, about a liter of gasoline remains in the fuel pump. Drain it into a handy container.
Remove the float. Just so he doesn't interfere.
- Now you need to remove the chips with wires.
- Here we show how to release the fastening on the body.
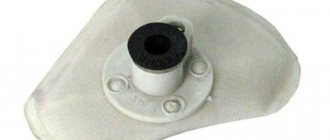
- To remove the filter mesh, you need to pry off the lock, which is located on its reverse side.
- The photo below shows the retainer with the mesh removed.
- We replace it with a new filter and collect it.
To avoid confusing the orientation of the pump during assembly, there is a recess on its body. It should coincide with the protrusion of the seat. Then you can tighten the ring. There are also level latches here that show that the ring is fixed.
All that remains is to put on the pipes and the wiring harness.
Now you can connect the battery terminals and turn on the ignition. Turn the ignition off and on two or three times. Now you can start it.
If everything is in order - there are no leaks, the engine does not stall. the correct signals are working on the dashboard, which means everything has been done correctly and you can return the rear seat to its place.
I strongly recommend watching the video version of the instructions. Many points will become clearer.
When should you check your fuel pump?
It is necessary to check all potentially faulty components one by one, and the fuel pump first.
Problems when starting and running the engine are not always associated with the fuel pump. Sometimes the signs of a fuel pump breakdown are the same as those of a faulty fuel pressure regulator , injectors or jets, spark plugs and high-voltage wiring. Even experienced specialists who know by heart all the signs of a “dying” pump cannot unambiguously determine the type and cause of the breakdown the first time, and it is necessary to check all potentially faulty components one by one. In this case, the fuel pump is usually checked first. In this case, there are two types of malfunction - the fuel pump does not work at all or does not produce the required pressure. In the first case, the malfunction can be recognized by ear, since it should start when the ignition is turned on. In the second case, you need to know how to check the pressure of the fuel pump. Here you need to use a special pressure gauge. We list the main symptoms of a fuel pump malfunction:
- the engine does not start;
- the engine is unstable;
- the engine lacks traction during sharp acceleration;
- The engine lacks traction at low speeds.
We recommend: How to properly lubricate a starter with your own hands?
Diagnostics of the fuel pump of a carburetor car
You can check the performance of the fuel pump of a carburetor car without using any instruments. Diagnostics are performed in the following sequence:
- The fuel hoses are disconnected from the fuel pump.
- The fastening bolts are unscrewed.
- The fuel pump is removed from the cylinder head.
- Use the thumb of your right hand to close the inlet fitting of the fuel pump.
- Using the thumb of your left hand, apply several pressures on the pump pusher.
- The appearance of a vacuum at the incoming fitting will indicate the serviceability of the membrane and inlet valve.
In a similar way, you can check the serviceability of the outlet valve by holding the outlet fitting with your finger and making several intense movements with the pump pusher. If the device is working properly, positive pressure will form at its outlet.
Symptoms of a faulty fuel pump on carburetor engines are almost the same as when using an electric device. The difference can only be observed in the absence of characteristic noise from the operation of a twelve-volt motor.
Design and operation of fuel supply
The system that provides the engine with the required amount of gasoline operates according to the following algorithm:
- After turning on the ignition, the electric fuel pump starts, raising the pressure in the line after itself to a certain level. The electrical power supply circuit of the unit is protected by a fuse.
- The fuel pressure regulator (common abbreviation - RDT) is located on the line after the pump and limits the upper pressure threshold, dumping excess fuel back into the tank through a separate pipeline.
- When the crankshaft is rotated by the starter and the engine continues to operate, fuel enters the fuel rail, mixes with air and is directed to the injectors built into each cylinder. The amount of mixture supplied to the combustion chambers is controlled by an electronic unit.
- On the way to the fuel rail, gasoline goes through 2 stages of filtration. The first is a mesh installed in the tank on the suction pipe of the pump, the second is a fine filter on the gas supply line.
Reference. In various car models, 2 schemes are used for installing the RTD and laying the return pipeline - in the engine compartment or directly in the gas tank. In the first case, the standard fuel pressure in the system is 2.7...3.0 Bar, in the second - 3.8...4 Bar.
A common mistake made by ignorant car enthusiasts: if the combustible mixture does not enter the cylinders, then the fuel pump is definitely not working. Knowing the design of the fuel supply, we can assume other problems:
- the protective fuse in the electrical circuit has blown, the pump is in good working order, but does not receive power;
- the primary or secondary filter is clogged (sometimes both at once), fuel flows in small quantities or does not flow at all;
- the pressure regulator has become unusable, dumping the lion's share of the fuel back into the tank, the engine gets nothing;
- One or more injectors have failed.
To accurately determine the source of the problem, you need to check the operation of the electric fuel pump and other elements. It is not necessary to go to a service station - diagnostic work can be carried out in your own garage.
Causes of fuel pump failure
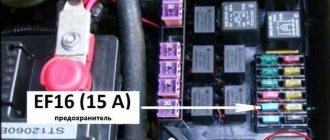
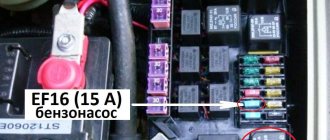
If the cause of the malfunction lies in the fuel pump, this does not always mean that it is faulty. The malfunction may be in one of its units and parts. For example, a fuse may blow. It is located in the fuse box, and its location may be different for each car. You can find out its location from the operating instructions. Most often it is located under the hood or to the left of the steering wheel on the driver's side.
The fuel pump, like any other device, wears out over time and fails. If there is a suspicion that the fuel pump is faulty, it should be diagnosed immediately.
Video on the topic
The fuel pump is one of the main components of a car. Without it, it is simply impossible to start the engine, much less operate it. Therefore, if you have any problems starting or operating the engine, you first need to check the fuel pump. To find out how to check a gas pump, you must first determine the basic principles of operation of this unit and possible breakdowns. As a rule, the fuel pump is not repaired and is replaced by a working one. However, it is necessary to identify that this is where the problem lies.
Diagnostics with pressure check
A more accurate diagnosis can be made by again measuring the pressure in the system. Each of the indicators below, or more precisely, a deviation from the norm, can signal certain problems with the pump:
- the idle pressure must be at least 0.23-0.25 kPa;
- at the moment the engine starts, the pump should create a pressure of about 0.3 kPa;
- in transient modes - 0.28-0.3 kPa.
In the case when, when the ignition is turned on, fuel does not enter the system and the pressure gauge is silent, most likely the problem is in the electronics - a relay or fuse. If the pump does not develop the required pressure during transient conditions, the coarse filter mesh is clogged. If the fuel return hose is pinched and the pressure is below 0.4 kPa, the pump is worn out.
What pressure should a mechanical fuel pump produce?
The capacity of the mechanical part is about 80 liters per hour, so if the gas pump pumps fuel, there is no need to check the pressure level. The carburetor power system of the car will work correctly even if the fuel is supplied by gravity. Taking into account the undemanding pressure in such a device, the development engineers set the gasoline injection limit to 0.3 atmospheres.
If the fuel pump does not pump, then this part must be urgently repaired or replaced. Operating a car with a faulty gasoline pump can be dangerous: the car can catch fire or stall at the most inopportune moment. Even if no tragic accidents occur, constant jerking of the car while driving will cause accelerated wear of engine and transmission parts.
Preventing fuel pump breakdowns
The best prevention for long-term operation of the fuel pump is its careful and proper operation, as well as compliance with the following rules:
- All scheduled vehicle repairs must be accompanied by the replacement of all fuel filters.
- It is necessary to monitor and ensure the cleanliness of the fuel tank and filters, as well as monitor the quality of the fuel being refilled (the absence of water, sand and other impurities in it).
- Eliminate the possibility of water getting into the fuel tank.
- Protect the fuel pump housing from mechanical stress that causes dents and cracks that contribute to the development of corrosion processes.