To ensure the secrecy of access to a car, electronic coding principles and methods are currently used. The owner has a key in the form of a certain digital combination, and the receiving device is able to read it, compare it with a sample, and then decide on access to the main functions of the car.
From the point of view of the theory of electronics and computer science, everything is extremely simple, this is exactly how it should happen. But when the corresponding compact devices did not yet exist, similar functions were performed mechanically - with the help of figured keys and larvae with response coding according to the relief.
Such mechanisms have survived to this day, although they are gradually being forced out of automotive technology.
kcctech › Blog › Repair of the ignition lock cylinder
One “beautiful” day, I got behind the wheel of my car, inserted the key into the ignition, turned it, trying to start the engine.
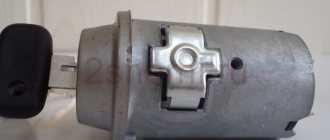
The key won’t turn... That’s it, we’ve arrived... I checked the key (that it was mine), found the rest of the car keys, tried to turn them in the ignition - none of them “fit” the lock, it felt like the key was someone else’s, not from my car . I started digging for information on ignition switches. They write on the forums that the culprit is either the lock cylinder or the contact group. I found an excellent report from BabkoAleh on how to remove the lock cylinder on an aud and what you should be careful of so as not to completely screw up the lock. The cylinder itself can be easily removed; with the lock “open” in the “ignition on” position, an “awl” made of a piece of rigid wire is inserted into a special recess and the cylinder is removed from the lock. My scoundrel was in the “locked” position and did not give in to persuasion... I removed all the plastic from the steering column, unscrewed the steering wheel, gained access to the ignition switch and its cylinder. But the lock still did not open and I mentally prepared myself to completely remove the lock from the steering column. Removing the lock from the steering column is complicated by the fact that the lock is attached to the steering column with breakaway bolts. The heads of these bolts break off when tightened and do not have any splines, and because of this they are turned out with difficulty. ELSA recommends cutting these bolts with special tool. I found on Passat-b5 that one person was helped by generously lubricating a jammed lock with WD-40. I filled mine with WD, inserted the key and began to wobble it. At first there was zero emotion, but in the end, the lock began to turn a little further, and finally opened. It was with great relief that I removed the core or “cylinder” of the lock. It was really jammed and was difficult to turn with the original key. I began to find out options for ordering a new larva. The option to restore the old one is a scary one, because it can jam again at the most inopportune moment somewhere far from home. The number of the new larva is 107 905 855 CB. Exist refused to order a cylinder based on my VIN, specifically for my set of keys, so they sent it to the officials. They said that the larva would cost about $200 and the wait would be 2-3 weeks. It takes a long time and, in general, is quite expensive... As a temporary option, I took a lock with a key from an A6 C5 from disassembly and installed it in my home. Immo tied it up and used the key from the “donor” lock for some time. I decided to disassemble my larva and try to understand why it broke. As a repair kit, I bought a cylinder with a key at a disassembly site, and practiced repairs on it. Initially, the Germans made the lock cylinder non-removable, but this is not entirely true. This is what the larva looks like:
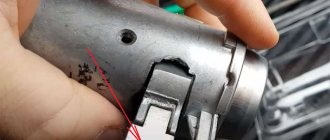
The immo coil is pressed onto the cylinder and cannot be removed by hand. You need a button head bolt and a vise.
The body of the immo coil is a couple of millimeters wider than the body of the larva. You need to install the cylinder in a vice with the keyhole facing up and squeeze the jaws of the vice so that they rest against the metal body of the larva, but do not clamp it, let the body move in the vice. The immo coil will rest against the jaws of the vice and it can be knocked out. Then, placing the semicircular head of the bolt against the keyhole on the cylinder, knock out the coil with an immo hammer using the bolt as a spacer. The larva itself is closed with a metal lid, which rotates freely on the larva. The cover is fixed from the inside with a spring washer on the body of the larva and cannot be easily removed. You need to squeeze the washer that secures the lid to the lock. I drilled two holes on this washer, opposite each other, and was able to compress the spring washer and remove the cover.
He inserted and turned the key in the lock, took out the core with the secrets. The secrets are staggered, four on each side of the core. Each secret is spring-loaded with a small spring; it is better not to lose them. I took out all the secrets and laid them out on a piece of paper.
Each secret has a number 1-4 stamped on it. The number is the position of the key groove on the secretion. The location of secrets with different numbers makes up the lock code. If you take the secrets out of the “donor” and put them in the same order as they were in the “original” lock, then the “original” key will fit. When dismantling the lock, I wrote down the numbers of the secrets and their positions. He carefully wiped the secrets and the core of the lock from dirt, stretching a narrow rag through the secret slots.
I arranged the secrets in the required order and, when assembling, lubricated them with a small amount of lithol. I also put lithol in the cutouts of the lock body. I put everything back together in reverse order. Satisfied with the work...
Source: www.drive2.com
What is the most “painless” way to remove the ignition lock cylinder? Need some advice.
Good time. The problem appeared unexpectedly, 170 miles from home. I couldn’t turn the ignition key. The car stood in the heat, it got hot, I think the reason for the breakdown was this + fatigue on the faces, wear of the bronze key. I was with my wife at the time when the car won’t start. The car is in the forest on the bank of the river, there are several villages in the area at a decent distance. It’s getting dark, there is panic in the spouse’s eyes on the verge of hysteria. The windows of the car are open, you can’t take all the scrub with you. And there’s nowhere to drag it. By the evening there are herds of mosquitoes .I had a set of sockets and a universal screwdriver with me. I started the car when I got to the plastic “washer” that is located under the ignition switch, and removed the lock with the key. The key does not reach the ACC, but the steering wheel unlocks and the gear shift knob, if you try, is removed from parking.
Now I’m at home and I need advice. How to get the cylinder out? If you drill, then where should you drill? If you break it and screw it up, then what and where to start so as not to break the lock completely? Thank you. Does anyone have a cylinder with a key? I’m in Tolyatti I 100% won't find it.
Last edited by pavel31276; 06/24/2013 at 11:38 am.
See https://parts.japancar.ru/?code=parts. l=IPSUM&page=2 Full of locks and cylinders with keys. Even with a photo. By the way, the larvae are sold separately, which means they can be removed somehow. Unfortunately I can’t tell you how.
Look through the primer, it says everything there.
The primer says how to remove the lock cylinder if the key works. It won’t turn for me. The primer doesn’t say what I’m asking. Specifically. I want to try to make sure that the lock works at least temporarily and can be turned with any Toyota key. While it’s driving spare part. It’s not about my greed, but about the delivery time of the same lock. That’s what I’m talking about. The car is needed like air.
Replacing the ignition lock cylinder - how to remove and repair?
Author:
Maxim Markov
The resource of the ignition switch is quite long, however, it also becomes unusable. Most often it is necessary to repair the ignition lock cylinder - the part into which the key is inserted. This article will show you how to remove the ignition lock cylinder and in which cases it is worth limiting yourself to only this repair, without affecting the entire lock assembly.
Lock device
The ignition switch is a rotary contact switch combined with a lock cylinder that ensures secrecy. The ignition switch installed on the steering column serves as an anti-theft device, locking the steering shaft from turning.
The breakdown may also depend on the type of ignition installed in the car - if a contact-transistor ignition system is installed (installed on classic Zhiguli cars, for example), then the contact group will fail much faster because a large current passes through the lock during startup and the contacts burn out. The solution may be to install a start-stop button instead of the ignition switch, which has virtually no moving parts.
Car brands we work with
Renault ignition switch repair
Fix the malfunction of the ignition switch mechanism of Renault all modifications. The most common cars on the roads of our region. Our mechanics will help restore them to functionality and carry out any repairs. The necessary spare parts are always available.
Honda ignition switch repair
A Honda car often ends up in a workshop. We dismantle the ignition switch quickly and, if necessary, replace failed parts. In case of serious damage, we completely replace the unit with a new one.
Peugeot ignition switch repair
Peugeot's workhorse, famous for its endurance. However, it also fails under intense loads. The sequence for replacing the ignition is not much different from that described above and has several specific features that mechanics can easily handle.
Audi and Volkswagen ignition switch repair
A well-known representative of the German automobile industry, who has been traveling the country’s roads for a long time. When repairing, much depends on the degree of malfunction and neglect. If the owner has brought the car to a critical condition, the specialist will have to tinker and, accordingly, the cost will be higher.
When is a cylinder replacement required?
It performs the main function of a lock. Its breakdown usually manifests itself in the fact that it is either impossible to insert the key due to broken pins, or even with the key inserted it does not turn in the case. This happens for the following reasons:
- Physical damage, partial destruction as a result of hacking
- Loss of duplicate keys
- Worn pins or worn key itself
- Breakage of the key in the lock, when it is impossible to remove it from there
- Burning of contacts (there are special repair kits for replacing them).
In addition, it should be remembered that when replacing the cylinder, the key also changes and will not fit the car doors. It may be wiser to purchase a complete set for all doors and trunk, so that the owner again has one key, this time a new one. Of course, such a decision will require a lot of time and money, but here everyone decides for themselves.
Front left door lock with electric drive (2 contacts) on a VAZ
- Manufacturer: AvtoVAZ
- 0 reviews
- Description
- Characteristics
- Video
- Reviews 0 ? '(' + product.reviewsCount +')' : »>>
Dear customers, in order to avoid errors when sending the left driver's front door lock assembly with electric drive (5 contacts) for Lada Granta, Kalina 2, Priora 2, Datsun "NORM" and "LUX" configurations, please indicate the model of your car in the "Comment" line , “NORM” and “LUX” or “STANDARD” equipment, year of manufacture.
Car door lock 2190-6105013 front left (driver's door) is designed to close the door and prevent unauthorized access to the car Lada Granta, Kalina 2, Datsun, Priora 2 for the “NORMA” and “LUX” trim levels.
1 – rod of the lever of the external handle; 2 – rod of the lock cylinder mechanism.
The internal door lock is an important element of the vehicle's passive safety system. During a side impact, it ensures the transmission and dissipation of forces from the door to the body.
The door lock meets the requirements of comfort - it has a pleasant sound when closing and tactile sensations when opening the handles.
1- to the rear harness block; 2 — window lift motor; 3 — door lock; 4 — switch block; 5 - to the speaker in the door
The internal lock of the front right door 2190-6105013 with electric drive (5 contacts) of the Lada Granta, Kalina 2, Datsun, Priora 2 is a non-separable structure and, if necessary, can only be replaced as an assembly.
It is advisable to lubricate the moving parts of the lock with a thick lubricant, such as lithol.
When replacing a lock with a cylinder with a new one, you will also have to replace the cylinders of the remaining locks, including the ignition switch, or already have 2 keys on the keychain.
The control signal goes through the electric lock 21900-6105013-10 of the driver's door. If the driver's door electric lock fails, the other doors will be locked. Opening occurs mechanically using a key.
Other articles of the product and its analogues in catalogs: 2190-6105013-10, 219006105013-10, 21900-6105013-10.
Lada Granta, Kalina, Kalina 2, Priora 2, Datsun.
Any breakdown is not the end of the world, but a completely solvable problem!
How to independently replace the electric lock on the driver's inner door on a Grant family car.
AvtoAzbuka Internet Store, repair costs will be minimal.
Just COMPARE and BE SURE.
Don’t forget to share the information you find with your friends and acquaintances, as they may also need it - just click one of the social networking buttons below
Removing the ignition switch
The general structure of the lock is common to all cars; only the methods of disassembling it differ. So, how do you get the larva out?
In some cars it can be changed without removing it from the car (for example, Daewoo Nexia), but in most cases, attaching the cylinder to the body involves removing the entire lock from the steering column.
First of all, you need to turn off the power to the car by disconnecting the battery. Then the steering column cover is removed. After removing the cover, access to the ignition switch and its block with wires opens. If the design allows replacement without removal and complete disassembly, then it is held in place by a special pin on the side.
It is taken out with a thin screwdriver. If the pin cannot be removed, it can be drilled out with a thin drill. After the pin is removed, you can see that the larva has crawled out of the body a little, five millimeters. After this it will be clear how to get it for replacement. The new part is installed in the reverse order.
If it is impossible to repair it without removing it, you need to unscrew the special bolts securing it to the steering column and work with the already disassembled element. They use special bolts with cut off heads. They are unscrewed with a chisel and a hammer and can be reused and will also be tightened with a chisel. Before doing this, you need to disconnect the block with wires from the ignition switch. This is how the entire assembly is removed from the car.
Design features, purpose and principle of operation
The ignition switch consists of two main parts - mechanical and electrical. The mechanical part includes a cylindrical lock or cylinder. It is also called the core. The mechanical part is designed not only to close the corresponding contacts, ensuring the operation of electrical appliances or starting the engine, but also to lock/unlock the steering wheel. A special rod is used as a blocker.
The electrical part is represented by a contact group. It is responsible for supplying power to the starter, which rotates the engine crankshaft and starts it. In addition, this device is also responsible for the operation of the ignition system, instrumentation and lighting. Below is the design of the ignition switch and its components.
The ignition switch of Lanos, Sens and Chance cars has four key positions. When the “LOCK” position is off, there is no power to all electrical devices (only the hazard lights and the brake lights work when the brake pedal is pressed). In the “ACC” mode, power is supplied to some interior electrical appliances (radio, instrument panel and interior lighting), as well as external lighting (side lights).
The third mode is “ON” - when it is turned on, the ignition is connected. In this mode, you can turn on the heater, low and high beam headlights, air conditioning (if equipped), wipers, etc. However, it is not recommended to do this for a long period when the engine is not running, since all of the above devices consume high current. And if you leave the car in this mode for a long period of time, the battery will quickly discharge. That is why this mode is also called working mode, and is operated when the engine is running.
This is interesting! In the third “ON” position, power is supplied to the ignition coil. The engine is ready to start, and all that remains is to rotate the crankshaft to start the engine. Moreover, you can start it not only from the starter, but also from the pusher. However, it is not recommended to start engines this way on electronically controlled vehicles.
The fourth position “START” is responsible for supplying power to the starter. In this mode, maximum current consumption from the battery occurs. However, this mode is short-term and is intended solely to start the engine. After starting the engine, the key automatically returns to the “ON” mode, which is realized using a specific design of contact disks.
Disassembling the lock and removing the cylinder
Disassembly begins with removing the contact group from the cylinder rod, which, in turn, is attached to the body with three screws. First, remove the plastic cover from above, which is secured with latches. Then, bending the two clamps, remove the contacts along with the wires.
When unscrewing the bolts securing the lock cylinder to its body, you should hold it vertically, with the keyhole facing up. Otherwise, the internal parts of the lock will spill out and it will be problematic to assemble them in the same order. When we disassemble the lock, we must pay attention that in the body there is a special groove with a return spring and a ball, which very easily jumps out and gets lost, you should pay special attention to this when you remove the lock cylinder.
When installing a new part, you need to insert the spring into the groove on the side and put everything in place by turning it, while the spring should rest on the ball in the housing. After this, you can tighten the mounting screws and install the contacts. Before tightening the screws, you must turn the lock so that it does not interfere with the subsequent installation of the steering column trim.
Thus, repair instead of a complete replacement in some cases may be justified, although it will take more time in cases where it is not possible to find spare parts for a particular car or the cost of the entire assembly is too high.
Source: carsmotion.ru
Repair and replacement of the ignition switch
It’s better not to just look into the power supply system, but in the event of a breakdown you have to, and sometimes it’s not immediately clear how to remove the ignition switch, so let’s think about this issue together. This device is an important automotive component, without which it is impossible to start the engine. At its core, the ignition relay plays the role of a switch that connects and disconnects certain types of contact groups (a set of pairwise contacts that, when closed, turn on the car functions assigned to them) that are part of the car's starting system.
Repair and replacement of the ignition switch - when does this happen?
The main function of the relay is to turn on the ignition and starter. In addition, it locks the steering. The main components of the device are a housing with a lock, an anti-theft device and a contact part. Wires extend from the contact part, with the help of which the entire ignition system is turned on. If any one part fails, the entire system stops working.
In order for the ignition switch to be replaced, certain conditions must arise whose consequences will make repairs impossible or too costly. For example, if an attempt is made to steal the lock, it may suffer mechanical damage. Replacement is also carried out in case of loss of keys to the system. And finally, the relay is changed in case of serious damage in the contact group.
More often the ignition switch is repaired due to poor contacts. In order to check them, the negative terminal on the battery is disconnected (the wire is removed from the battery), and the lower casing in the steering column (part of the plastic under the steering wheel) is removed. The contacts are disconnected and checked using an ohmmeter (a device for measuring resistance). The selected contacts must have zero resistance, otherwise replacement is necessary . In case of minor damage, it is enough to change the lock cylinder (the core into which the key is directly inserted) or its contact group (the entire set of paired contacts, sometimes presented in the form of a box with terminals
Troubleshooting
Replacing the ignition switch on a VAZ 2110 is not an easy task. And, first of all, you should figure out what caused the problem. Our guide below shows you how to do it correctly.
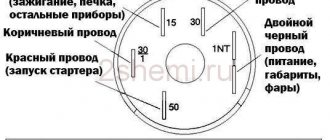
Explanation of the marks on the image: 1-reservoir; 2-negative backlight charge; 3-starting mechanism; 4 - positive charge following the ignition switch; 5-reservoir; 6- positive backlight charge; 7-constant positive charge; 8-constant positive charge.
Table 1. Replacing the ignition switch of a VAZ 2110 with your own hands: we study the structure and purpose of the main components in order to identify defects
| Item No. | Explanation (what it is used for, what it is responsible for) |
| 1, 5 | Used for anti-theft device. |
| 1-6 | Responsible for illuminating the lock. |
| INT | Light, washing device, wipers (permanent plus) |
| 50 | Starting mechanism (starter) |
| 30/1 | Permanent positive charge. |
| 15 | The positive charge created when the system starts up. |
Now take a close look at the photo below:
What do we observe on it and what are the elements designated by numbers responsible for?
1. Energy goes through this element, going to the electric switch of the key inserted sensor (+12 V);
2. Incoming weight when opening the doors on the driver's side;
3. So, staying in the starter and subsequently going to the ignition switch (+12 V);
4. A charge begins to flow from this element immediately after the key hits connection 5 in the rib device responsible for control (+12V);
5. Here the ignition switch socket is illuminated, powered by the potential that passes through the device (+12V);
6. This comes with +12V power from a reusable current source, which is a battery;
7 and 8. Do not use.
And now - step-by-step instructions for identifying defects and malfunctions in the ignition switch:
- Disconnect the battery;
- Remove the screws from the steering wheel, as well as the cover;
- Remove the ignition switch connector.
Next, arm yourself with a multimeter, which is necessary to check the voltage on the contact groups.
When diagnosing, pay attention to the following:
- The unchanged state should be maintained only on pins 8 and 30, but only when the key is in zero position;
- Equipment responsible for servicing (turning on headlights, heated glass, operation of turn signals, etc.) must come into operation when the key is in state 1;
- The force coming from location II (see image above) must be directed to the propulsion devices;
- In position 3, the trigger mechanism must be activated. After this, the key must be returned to its original position.
If something clearly goes wrong and problems are noted, the ignition switch should be disassembled and tried to be repaired.
Automotive experts note several types of main failures during the operation of a component that turns the ignition on or off on a VAZ 2110 car:
- Mechanics. A malfunction of this type is directly related to the breakdown of the larva, which is one of the most common problems. The fact is that the elements of the lock, like the keys, are often made of relatively soft material, so many simply break off and/or become deformed.
- Electronics. Such a malfunction consists mainly of worn contacts.
How to remove the ignition switch - step-by-step instructions.
Before repairing or replacing the ignition, it must be removed to inspect it and determine the nature of the damage. Removing the system is not particularly difficult, provided that a certain algorithm of actions is strictly followed:
- You need to remove the casing from the steering shaft, after which you remove the screws that secure the ignition switch.
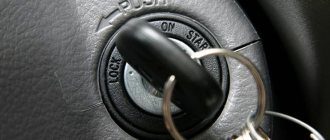
- A key is inserted into the ignition lock in the zero position to disable the anti-theft device. Through the hole in the bracket, you need to press the lock with a screwdriver, and then pull the core out of the bracket and the key out of the lock.
- It is necessary to remember the order in which all wires and pins are connected. To avoid confusion in the future, it is advisable to label them. After this, the wires are disconnected from the lock.
- The operation of all contacts is checked at different key positions. At the same time, the operation of the anti-theft device is checked. At different positions of the key, the locking rod must extend or retract.
After the inspection and check have been carried out, it is necessary to decide whether repairs are sufficient in the current situation or whether a complete replacement of the ignition switch is required.
Latest reviews about our work
Anatoly
My parents had an old lock on the door that always jammed.
I asked for their permission to change it for a long time, but they did not agree. And then they call on the weekend, they returned from the store, but they can’t get home. I don’t understand it myself, so I decided to contact the company. I dialed and said the address. By the time you got to your parents, your master was already there and opening the door. I even persuaded my parents to change the lock. Thank you! March 03, 2022
Paul
The key broke in the lock.
I thought that I would have to knock down the doors, but we just made repairs. But specialists from the Lock 2000 company carefully took out half of the key, carried out preventive work on the lock, and now it is as good as new. February 27, 2022
What should you not forget when working?
When carrying out repairs, in order to change the contact part, a retaining ring is pryed into the end of the housing with an awl (holds the core of the ignition switch inside a convenient housing), after which the contact part can be removed. The new contact group is installed in such a way that the location of plugs 15 and 30 is where the locking rod is located. In this case, with their wide protrusion, the contacts must fit into an equally wide groove in the housing. All parts are installed on the car in the reverse order corresponding to their removal.
It is better to carry out repair work in a dry room, avoid direct contact with moisture on the contacts and terminals, so as not to disassemble this system again in the near future for banal cleaning of oxides.
According to the electrical diagram, a new or repaired ignition switch is installed, as well as all wires in accordance with the preliminary marking of the terminals. In order to simplify the connection of wires, their markings are transferred to the new system. Provided all installation and connection rules are followed, the new lock will be able to operate for a long time. In order to guarantee uninterrupted operation and avoid early breakdowns, it is necessary to choose a modern and high-quality model.
Source: carnovato.ru
Our advantages
- We work around the clock. Always ready to quickly answer any question.
- The ideal combination of price and quality, regardless of the brand of the car in trouble.
- Possibility of a technician visiting the customer’s address at a time convenient for him.
- Highly qualified personnel, the ability to find a quick solution to any problem at minimal cost.
- We provide a guarantee for any type of repair. We fix problems of any complexity.
- We diagnose door, trunk and ignition locks for free.
By contacting us for help, you don’t have to worry. We will quickly find the cause and eliminate the consequences. The technician works by visiting the site of the breakdown! The ignition switch will serve properly for a long time.
How to Remove the Ignition Lock Cylinder Passat B3
Car repair information:
Volkswagen Passat B3 / Volkswagen Passat B3 (312) 1988.1994 Volkswagen Passat Option B3 / Volkswagen Passat Option B3 (315) 1988.1994
Volkswagen Passat B4 / Volkswagen Passat B4 (3A2) 1994.1997 Volkswagen Passat Option B4 / Volkswagen Passat Option B4 (3A5) 1994.1997
operating procedure is suitable for other cars
For tools we will need a hex set, a screwdriver or wrench (2422) with an open end wrench the same size as the impact drill, and a drill somewhere around 2mm and hands.
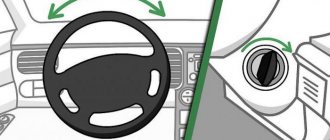
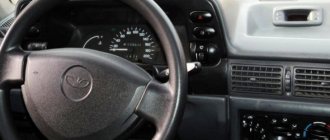
This is what the control wheel looks like.
connect and remove the signal button using a screwdriver and disconnect the two circuits from the signal terminals. (don't take it lightly like I did)
then unscrew the head on the 24 nut of the control wheel and, turning slightly, remove the guides from the grooves.
Then unscrew the three screws that secure the plastic housing and remove it.
Then disconnect all connectors from the switch block and the connector of the contact group
switch group connector
ignition lock connector connector.
The ignition switch connector has been removed.