Generator pulley
Replacing the VAZ 2109 generator pulley is simply necessary if it is broken, as otherwise the generator will fail. And this will lead to the fact that it will be almost impossible to use the machine, since it does not work without a dynamo. If any defects are noticeable in the operation of the generator pulley, then they urgently need to be eliminated by repairing or replacing it. Otherwise, the scale of work will increase greatly. Replacing the generator pulley on a VAZ 2109, it is worth noting, can be done on your own without much difficulty.
Replacing the bearing of the lada 2109 generator (VAZ 2109)
Replacing the bearing in the generator Replacing the bearing in the VAZ 2109 generator is simply necessary, since otherwise the generator will fail. And this will lead to the fact that it will be impossible to use the machine, since it does not work without a generator, and that, in turn, does not function without a bearing. If any defects are noticeable in the operation of the generator bearing, it must be replaced. Replacing the bearing on a VAZ 2109 generator can be done on your own.
Features of work
What might a faulty unit look like, how to remove and disassemble the generator, how is it rebuilt? If the device does not charge the injector or carburetor of a VAZ 21099 or 2109, first of all, let's look at the features of its functioning, namely the power circuit.
Generator power circuit
So, what does the scheme include:
- The VAZ 2109 generator itself.
- Additional element.
- Positive diode.
- The warning light also informs the driver that the battery is low.
- Vehicle dashboard.
- Voltmeter.
- The fuse box is installed in the engine compartment under the windshield opposite the driver's seat.
- Resistor elements installed in the same block.
- Ignition relay "nine".
- The castle itself.
- Battery
- Capacitor device.
- Winding.
- Generator voltage regulator relay installed in the engine compartment.
Negative diode.
It should be noted that the connection diagram for the VAZ 2109 generator is relevant for all cars with front-wheel drive of the eighth line - both 2108 and 21099 (the author of the video is Semyon Pedan).
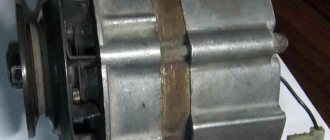
Pulley and what is it for?
VAZ 2109 generator pulley
The pulley performs quite important functions:
- Protects the generator from vibrations that appear during the rotation of the engine crankshaft.
- When exposed to it, the oscillatory movements of the generator belt calm down a little.
- Causes the belt tensioner travel to be shortened.
Note: As a result of this, the “life” of the belt is significantly increased. Therefore, if the pulley fails and is not replaced in a timely manner, the belt will break, as a result of which it will need to be replaced.
- The stress level in a drive with a poly V-belt is significantly reduced.
- The belt drive is much quieter under its influence.
Recommendations
Note: The pulley can only be removed or replaced using a special tool called a fine spline.
VAZ 2109 generator pulley
Before you start replacing the pulley, you should know:
- The pulleys, along with its inner ring, are not hardened during the manufacturing process, so they are quite fragile. They can be damaged even with mild impacts.
- There may be shallow scratches on the surface of the pulley. They will not affect its operation as it is quite durable.
- When installing the pulley, you should remember that the tightening torque of the product to the generator must be within 80 Nm.
Note: it must be strictly followed, otherwise nothing will be accomplished. The pulley must be tightened in a certain direction.
- Before installation, the installation tool must be hardened. It is advisable that it is not new (made in China). That is, it is better to purchase it in maintained condition (Soviet).
- Protective cover included. It can be installed quite simply, but it cannot be used more than once, since it is not of high quality that would allow repeated use.
Note: Under no circumstances should the pulley be used without a protective cover. This will result in the device being poorly protected, so it may break soon.
- The imbalance of the pulley and coupling should not be significant. Its maximum value is 20 gmm.
DIY replacement and removal
So, how to disassemble a VAZ generator:
- First, disconnect the battery by removing the terminals from it, this way you can turn off the power to the on-board network.
- Remove the cap from the terminal and unscrew the corresponding nut, after which you can remove the wiring from the stud.
- Disconnect the wiring block that goes to the node connector.
- Now you need to slightly loosen the tightening of the assembly to the adjustment bar. Having done this, you can lift the assembly up until it rests against the head of the BC. The generator pulley can then be freed from the belt.
- After these steps, you can completely unscrew the screw securing the bar to the BC. Then crawl under the car and remove the screws that secure the bracket to the engine. The unit can be dismantled by removing it from the engine compartment. The failed elements are disassembled and replaced with new ones, after which the generator is reassembled.
Replacing bearings for a VAZ 2114 generator
Sooner or later in the life of any car enthusiast there will come a time when it is necessary to replace the generator bearing.
Bearing failure leads to the following consequences:
- Deformation of the shaft shape leads to the shorting of the rotor steel to the stator steel. After this, the generator will become unusable and will not be able to perform its functions. Replacing and repairing a generator will cost much more than replacing a simple bearing.
- Induction of equalizing currents in the bearings and deterioration of the induction of magnetic induction in the stator winding, which leads to poor battery charging.
To determine the condition of the bearing, it is enough to turn the rotor shaft and if there is rattling or vibration, the bearing must be urgently replaced.
- In order to change the bearing, you must first remove the generator. To do this, disconnect the battery and unscrew the negative wires from the generator. Then we pull out the positive wire from the plug and unscrew all the bolts securing the generator. Remove the belt and pull the generator out.
- Now, it's time to start disassembling the generator. First of all, unscrew the brush holder and remove the brushes. Then we unscrew the 4 bolts that are screwed along the generator and carefully remove the stator (after unscrewing the diode bridge so as not to interfere) so as not to damage the copper insulation of the windings, because in the future, damaged insulation will lead to short circuits between the turns of the winding. Also unscrew the nut from the pulley side of the rotor shaft.
- Now we take a universal puller and use it to remove the pulley from the rotor shaft and the cooling impeller. The back cover is removed from the shaft along with the bearing.
- Installation of a new bearing is carried out only using a press. At the same time, it is strictly prohibited to use impact tools to install the bearing, as this will lead to damage to the part being replaced. During the installation process, it is necessary to control the tightness of the bearing and the correctness of its installation relative to the part on which it is being mounted. This means that you need to make sure that the bearing is in exactly the right place. It is also possible to use special pullers that do not create shock loads on the bearing.
- Rotate the shaft relative to the bearing and make sure there is no vibration during rotation. The bearing should rotate evenly and silently.
- We install the impeller and insert the shaft into the rear cover of the generator.
- Install the shaft pulley and tighten the nut as tightly as possible.
- Install the diode bridge and install the stator winding. When installing, you should also be careful and avoid the possibility of damage to the winding insulation.
- We install the stator in place and tighten the 4 bolts to fasten both parts of the stator. We install the brush apparatus. If the brushes are worn out enough, they can also be replaced.
- After assembling the generator, we once again check the quality of the installation by manually rotating the shaft. If there are no vibrations or suspicious sounds, then you can begin installing the generator on the car.
- First of all, we install the generator on the lower axle, bend it to the engine and put on the belt. Now we tighten all the fastening bolts, while keeping the belt tension with a crowbar. The tension should be average, otherwise the belt may break or slip.
We start the engine and listen. If no suspicious sounds are detected, then the replacement was carried out in accordance with the instructions. That's all, good luck on the roads!
How does the generator work on the VAZ 2109?
On the VAZ 2109, a generator is constantly installed according to the traditional scheme, which plays an incredibly important role in the power supply system. That is, it makes it possible to work correctly. In addition, it charges the battery. Therefore, during operation of the vehicle, it is necessary to constantly monitor the operating process of the generator. Therefore, it is not recommended to wait until suddenly a special light comes on on the dashboard. It is necessary to regularly carry out diagnostics, then immediately replace or repair broken elements.
Generator circuit 37.3701
The generator, as a rule, consists of such main housing components as: an armature, two covers, a stator and a pulley with a fan. There are windings on the stator as well as the rotor. The first is divided into three parts, because at the output you need to get a voltage consisting of three phases. There is only one reason - this scheme makes it possible to get rid of all kinds of pulsations. This means that the efficiency of the device will be much higher. However, all this in turn imposes certain requirements. The basis of the work is that the rotor moves inside the stator winding. There is a coil on it, powered by the on-board transport system. As a result, a moving magnetic field appears around the rotor. Therefore, for efficiency it is imperative to ensure voltage stability on the rotor winding. Which is precisely an important condition for the operation of the generator set, which comes in two different types.
Generator connection diagram 37.3701
One part of the machines operates on a 37.3701 series V-belt drive, and the second uses a 94.3701 series poly-V-belt drive. However, in any case, all of them are necessarily located in the front part of the car, that is, on the internal combustion engine.
Technical specifications 37.3701
| Maximum output current at 13 V and 5000 min -1, A | 55 |
| Adjustable voltage limits, V | 14,1+0,5 |
| Maximum rotor speed, min -1 | 13000 |
| Engine/generator ratio | 1:2,04 |
Checking for serviceability
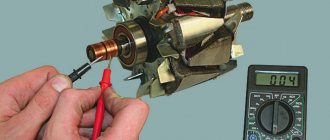
Repair of the VAZ 2109 or VAZ 21099 generator is carried out in case of failures in the operation of the unit. There are several ways to determine generator malfunctions. The most optimal of these is diagnostics using a multimeter, but you will also need an assistant to carry it out. We will tell you further about how to check the generator on a VAZ 21099 or 2109 using a tester.
So, to determine generator faults with a multimeter, follow these steps:
- First of all, it is necessary to diagnose the VAZ voltage regulator. As practice shows, if the generator on a VAZ 2109 or VAZ 21099 does not work correctly, the problem may lie in the functionality of the three-level voltage regulator. This is especially facilitated by overvoltage in the electrical circuit. To check, you need to set the voltage measurement mode on the tester. So, start the engine and measure the voltage at the battery terminals or at the terminals of the generator unit itself. If everything is normal, then this parameter will fluctuate around 14-14.2 volts. Then press the gas and check the parameter again - it should increase, but no more than 0.5 volts. If the indicators on a VAZ 2109 carburetor or VAZ 21099 injector are different, this indicates that the element is not functioning correctly. Most likely, the VAZ 2109 voltage relay will have to be replaced.
- Next, the diode bridge of the generator is diagnosed. The bridge itself consists of six elements, three of which are considered positive and the remaining three are considered negative. Some diodes have mass at the anode, and the other part at the cathode. To check the diode bridge of the VAZ generator, the tester is switched to sound mode, that is, when the probe outputs are shorted, you can hear a characteristic sound. You are required to test each diode in different directions, and the sound should be heard in only one of them. If during testing the sound is heard in both directions, this indicates that the diode is broken. The best option would be to replace the diode bridge.
- Before disassembling the unit and repairing it, check the functionality of the stator; it is a steel cylinder, inside of which the winding of the mechanism is located. For diagnostics, you need to disconnect the stator leads from the diode bridge. First, inspect the element visually - there should be no signs of damage or burning. The multimeter is set to resistance measurement mode. First, measure the resistance parameter between the winding terminal and the housing (any terminal can be used). The obtained indicators should be high and tend to infinity. If the readings are 50 kOhm, this indicates the need to replace the generator.
- Using a multimeter, you can also check the performance of the rotor - it is a steel rod with a wound winding. At one end of the rod there are rings through which the brushes of the VAZ generator pass. You need to dismantle the rotor and visually inspect the condition of the generator winding and bearing. The integrity of the winding can be checked using a multimeter, after which the resistance parameter between the rings is measured. The results obtained should be no more than a few ohms. Replacing the VAZ 2109 generator brushes is required if they are worn out.
Reassembly
Then everything is assembled in reverse order. First, install the crankshaft pulley. To tighten the bolt, set the fourth speed again and depress the brake pedal, after which the bolt is tightened with a head with great force using a collar. The generator belt is installed in place, the pulleys are moved apart using a pipe, a collar or a small pry bar. This is necessary for good tension of the generator belt, after which the nut is tightened using a wrench with a universal joint. The pulling procedure is repeated several times. This belt should be stretched very tightly and practically not bend under the force of your hand.
Video: Replacing the timing belt VAZ 21099, 2109
After this, the timing belt protection is put in place, for which you will need to install it in the seat and tighten the three bolts again. The air intake is put in place and secured with a clamp. The metal and plastic protection is installed in place and the removed wheel is secured, the car is removed from the jack. After this, you can start the engine. It will start without problems, its operation should be stable, without fluctuations or extraneous sounds. This will only be possible when all the marks match and the belt is tensioned with sufficient force.
Experience shows that replacing the timing belt on VAZ 21099 and 2109 can be done independently, without turning to professionals at a service station, especially if it is a planned replacement and the belt remained intact before replacement. You don’t need any special tools for this, just a set of socket heads and open-end wrenches and a regular flat-head screwdriver are enough to do it yourself.
If, due to an oversight or due to a defect, the timing belt breaks, then after replacing it the engine may still not start, since it will require repairs and cannot be done without professionals.
Belt installation
If the marks on the camshaft and crankshaft coincide, you need to install a new timing belt. If there are markings or inscriptions on the belt, they must be oriented clockwise, and the arrows must also be oriented if they are on the belt. Before this, the old belt is removed; if it is intact, by examining it, you can make sure that it is cracked and its operation is dangerous.
First, the belt is installed on the crankshaft gear, and then, with light force, on the camshaft sprocket. When installed, it should go around the drive sprocket and tension roller, making a zigzag.
Checking the timing belt tension is done by adjusting the tension roller, which is best replaced when installing a new belt. This is done with a special key; if you don’t have one, bolts or pins 40-50 mm long that fit the diameter are inserted into the holes. A screwdriver is inserted between them and, turning the roller, the belt is tightened. It should be quite tight, but with the average effort of the hand to turn 90°, if it is overtightened, it will quickly wear out. After this, the tension roller nut is securely tightened.
Generator repair
Repairs occur in the following sequence:
- Remove the generator from the car.
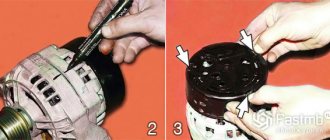
- Press three latches.
- Remove the plastic casing.
Note: this should be done with gentle movements so as not to damage the parts.
- Unscrew the two screws securing the voltage regulator.
- After this, remove it together with the brush holder.
- Disconnect the battery.
- Unscrew the four bolts securing the unit and condenser.
- Bend the stator wires so that it is possible to remove the block.
- If you want to replace the capacitor, you should unscrew the nut, remove the washer, as well as the bushing (see Changing the capacitor (vase generator)).
Note: To make work easier, you can unhook the capacitor wire lug.
- Remove the tightening screws (4 of them).
- Remove the generator cover using a screwdriver.
- Clamp the rotor until it becomes stationary.
- Unscrew the nut securing the pulley.
- Remove the spring, pulley and thrust washer.
- Remove the rotor.
Note: It is easier to remove it from the drive side.
- Remove the spacer ring from it.
Note: If there are any defects on it, it should be sanded.
- You should check the rotor with an ohmmeter. It will show whether there is a break in its windings.
- Inspect the stator. There should be no gaps from the anchor on the inside. If they are, the bearings need to be changed.
- Carefully diagnose the generator cover. If the cover sticks while the bearings are rotating, then it needs to be replaced.
- Reassemble the generator in reverse order.
- But before putting the generator in place, you should check whether its belt has worn out. To check this, you need to bend the belt in half on the opposite side. If small cracks or tears appear on it, then it urgently needs to be replaced.
Note: They are quite noticeable, so they can be easily seen. However, this does not apply to microcracks (that is, the belt can still be used with them).
- You also If they have become shorter than they were before, then they need to be changed. Otherwise, the battery will drain too quickly.
Possible faults
Before removing the generator and repairing the disassembled device, we will consider the main malfunctions characteristic of this unit:
- When the ignition is turned on, the mechanism light does not light up. As a rule, this problem is associated with a broken ignition switch, possible breaks in the wire, or a broken fuse. First of all, it is necessary to diagnose the fuses and wiring; the electrical circuit is checked using a tester.
- The unit light does not light up, and the battery is greatly discharged, but the control devices function normally. Usually the cause of the breakdown in this case lies in the performance of the generator. We are talking about a possible short circuit of the diodes, poor contact of the excitation winding connection, failure of the relay or inoperability of the brush holders. In addition, in some cases, the problem may lie in a break in the wiring that goes from the generator unit to the control panel. Perhaps the reason is simply poor contact of the light bulb itself or its failure. In order for the unit to supply current and operate normally, all its elements must be operational. If the problem is with the brushes, then they need to be replaced with similar ones of the same size.
- The unit light works when the engine is on, and the battery can be recharged. First of all, pay attention to the performance of the regulator.
- When the engine is running, the light on the dashboard lights up very brightly or only at 50%. In this case, it is necessary to diagnose the VAZ alternator belt - perhaps it is worn out or simply weakened. Replacing the strap or tightening it can solve the problem. In some cases, the cause of the malfunction lies in a short-circuit of the stator winding to ground or an open circuit. The problem may also be the inoperability of the diodes or the rotor outputs being unsoldered from the slip rings. You can try to solve the problem by soldering the leads.
- If the unit is very noisy, first you should check the bearing device. In addition, the appearance of noise may be caused by a short circuit of the stator winding to ground or a short circuit of one of the diode components (video author - Vyacheslav Lyakhov).
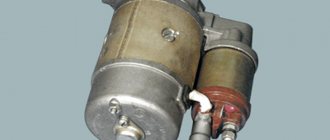
The practical part is removing the generator, disassembling it, repairing it and reinstalling it.
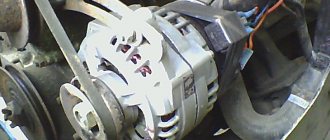
Due to the fact that the generator is located under the hood of the car, it is necessary to turn off the engine, turn the steering wheel to the right all the way and open the hood. The electric generator on VAZ 2108 - 15 cars is installed in front of the engine, in the lower left corner of the engine compartment, between the engine and the cooling radiator.
Before dismantling the generator, it is necessary to disconnect the ground from the battery, i.e. negative contact.
Replacing VAZ generator brushes
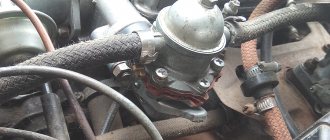
Before removing the generator itself, in order not to do unnecessary work, we remove the charging relay from the generator housing and check the production of the generator brushes.
The charging relay is installed in the rear of the generator housing, and is attached to it with two bolts. To unscrew them you will need a Phillips screwdriver. When unscrewing the bolts, be careful not to drop them on the crankcase guard, otherwise getting them out of there will be one big problem. To remove the relay, you need to disconnect the wire, the “female” contact. After removing the charging relay and visually inspecting the brushes, we decide to purchase a new generator voltage regulator relay or reinstall the dismantled one, depending on the wear of the brushes. For their normal operation, a brush length of at least 4 cm is required. Now we proceed directly to removing the electric generator from the engine.
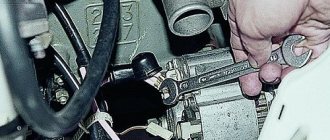
- We disconnect the wires from the generator - as a rule, they are red and consist of two groups of wires, red. One group consists of two wires and is attached with a nut to a bolt on the rear wall of the generator. The other group consists of one wire and is connected to the generator terminal via a male-female contact, also on the rear wall of the generator.
- To remove the generator from the engine, you need to unscrew two nuts and one bolt in the following sequence: unscrew the nut attached to the generator belt tensioner bar (at the top of the generator), unscrew the bolt securing the tensioner bar to the engine block and remove it. The last step is to unscrew the nut from the bolt securing the generator bracket to the engine block.
- The generator mounting bracket is located at the bottom of the engine block, directly below the generator. After unscrewing this nut, you need to remove the generator belt from the generator pulley itself.
- The generator mounting bolt should be pushed to the left, out of the bracket, until it stops against the body shell or the generator’s mud protection.
- On the right wheel side, you need to unscrew the two screws that secure the dust protection of the generator to the car body.
- If the generator mounting bolt still rests against any body parts, you should press on the engine with one hand, and at the same time pull out the bolt with the other hand.
Now your generator is completely disconnected from the engine, and you can begin to disassemble and repair it.
Disassembling the electric generator
When disassembling an electric generator, you need to have two important things on hand: a bearing puller and a vice. This will greatly simplify and speed up your work. Using a wrench set to “19”, unscrew the nut from the rotor shaft, which secures the impeller to the shaft.
To do this, you need to hold the impeller directly with one hand and unscrew the nut with the other hand, counterclockwise. It will take some effort, of course, but this nut needs to be unscrewed. The generator impeller is secured to the shaft with a key, and after removing the impeller from the shaft, it is necessary to remove this very key.
Now we turn the generator over with the back cover up, and unscrew the four nuts with an “8” wrench. We take out the released four studs and release the front part of the generator housing.
In the front part of the generator cover there is a “front” bearing secured by plates. We remove it by unscrewing the nuts and plates and knock the bearing out of its seat. The easiest way to do this is with a wooden plank, the size of which matches the diameter of the bearing.
Now we need a vice: screw a nut onto the rotor shaft and secure the generator, or something that we have not yet disassembled, in the vice. We tear off the back cover with a sharp upward movement from the bearing seat.
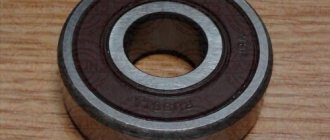
We still have the rotor shaft clamped in a vice, with the “rear” bearing in the very top part. To dismantle it, you need a puller; we put it on the bearing and remove it from the shaft.
Now you have two bearings on your hands - “front” (small) and “rear” (larger) - look at their markings and purchase exactly the same ones.
Important : Practice shows that when purchasing bearings for a generator , you need to remove them and, by analogy, buy them in a store. Advice from sellers such as: “they are all the same type” or “if you have an old-style generator, then take these” are often wrong. Yes, they are almost always wrong. To save time, the easiest way is to remove the bearings and select similar ones based on their markings.
The same advice applies to the diode bridge installed in the rear cover of the generator. If damage or metal oxide is visually observed on it, it is better to remove it without hesitation (it is secured with four nuts to the inside of the back cover) and purchase a new one.
Cost of spare parts (on average): Bearings (pair) – 150 rubles. Charging relay: 140 rubles. Diode bridge – 200 rubles. Bearing puller - 100 rubles. Total: 590 rubles.
The generator is assembled in the reverse order:
- We start by installing the rear bearing on the shaft. This is done using a hammer and a small board. With two or three blows we seat the bearing on the shaft.
- If the diode bridge is removed, we fix it in its “original” places, on the same four studs, in the back cover of the generator housing.
- We install the back cover on the generator rotor so that the bearing completely “sits” into its seat in the back cover of the generator; to simplify the procedure, you can use a hammer and, with not very strong blows on the back cover, “seat” it onto the shaft.
- In the front cover we replace the small (or front) bearing and secure it with plates in the seat.
- We take the generator out of the vice and before putting on the front cover, we put the spacer ring on the shaft, between the front bearing and the thrust recess on the shaft.
- We install the front cover and tighten the nuts “crosswise” on long studs so that the tightening is even.
- We install a key in the recess on the rotor shaft, then put on the generator impeller and tighten it with a nut.
The generator is assembled and now, for convenience, you need to install the generator relay with brushes in its standard place. And don’t forget to connect the wire from the generator to it (the relay).
Installing a generator on the engine
The installation procedure is the reverse of its removal:
- We insert the generator into the mounting bracket.
- With one hand we press on top of the engine, and with the other hand, from under the front right wheel arch, we insert the bracket bolt into place. We screw the nut of this bolt on, but do not tighten it.
- We secure the dust protection of the generator with self-tapping screws.
- We put the generator drive belt on the generator pulley and install the generator belt . We tighten the belt to the required deflection values (1 - 1.5 cm) and at the same time tighten the nut on the tensioner plate.
- Now tighten the nut on the generator mounting bracket.
Pulley removal
Unscrewing a fastening bolt or nut is only half the battle. Next you need to pull the pulley out of the shaft. The pulley cannot be removed easily by hand unless its seat is broken. In addition, if the pulley fits tightly onto the shaft, it is also secured against turning by a key.
There are special pullers for removing the pulley from the shaft. There are mechanical and hydraulic pullers.
The design of a mechanical puller is simple. Usually it has three legs, with which you need to hook the pulley itself, and rest the central rod against the shaft. After which, you need to rotate the rod, the legs will straighten and pull the pulley towards you.
It also happens that when using a puller, the walls of the pulley grooves cannot withstand and break off. Therefore, when using pry bars, they must be engaged as close to the shaft as possible.
Aligning marks
In order for the engine to work after replacement, it is necessary to set the timing marks. If the belt tensioner roller is noisy, it is better to replace it. Although it is better to do this in any case, so that no problems arise during the life of the belt. But if this is not possible, use a 17 wrench to loosen the nut holding it in order to loosen the tension for subsequent removal of the belt. We find a mark on the main camshaft sprocket and align it with the mark on the cover. To align the marks, unscrew the bolt holding the camshaft sprocket, align the timing belt marks, and then tighten it again.
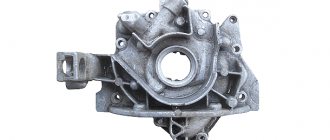
After this, we align the marks on the crankshaft. To do this, we find a groove on the housing in the area of the oil pump and a point on the crankshaft gear. We put the pulley on the gear and turn it by hand until the marks match. This is easy to do; just hand strength is enough to turn the pulley.
Sometimes the marks on the crankshaft are not visible, then after aligning the marks on the camshaft, you need to make sure that the mark on the flywheel and the notch on the casing match. To do this, you first need to remove a special plug, after which these marks will be visible. If they do not match, after replacing the timing belt the engine will not start, and if it starts, it will run unstably and intermittently. Therefore, this stage is important for successful repair and subsequent operation of the car.
Source
Enlarged generator pulley
VAZ 21093 generator and pulley
There is a myth that if you install an enlarged pulley on the “nine”, gasoline consumption will decrease. Let's see if this is true:
- Firstly, such a pulley is capable of unloading the generator at high speeds. Therefore, less load will be placed on it. This in turn results in the engine also being less stressed.
- Using it, the battery charge does not decrease too much, so the machine can work longer.
- By changing the generator pulley, the gear ratio will automatically change. As a result, at idle it will spin much slower, so it will not produce anything. And less gasoline will be spent.
Note: but the relay regulator ensures that the voltage at idle and at maximum speed is the same. Therefore, sometimes nothing works out, and the amount of fuel consumed does not decrease.
- However, it is much easier to change the generator itself than its pulley. The same thing will happen.
Note: in this way you can reduce the amount of fuel consumed by approximately 1 liter per 100 km.
Why do you need to twist the crankshaft pulley?
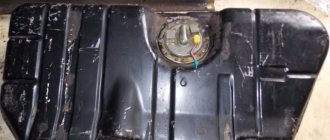
Removing the crankshaft pulley on a VAZ 2109 may be necessary in many cases. For example, you need to unscrew it to replace the crankshaft seals.
Gasket VAZ 2109
At a service station, a master will cope with this work within 10-15 minutes, but he will have to pay him a substantial amount. Therefore, there is a reason to learn how to do this work yourself.
Tools
To replace, we don’t need any special tools, just a standard set of wrenches and screwdrivers. You will also need a head with an extension. Liquid WD-40.
Stages of work
In order to cope with this work quickly and correctly, it is necessary to master and apply special techniques. In various engine models, a nut or bolt is used to secure the pulley.
In our case, the engine has an injector, therefore the removal procedure will differ from the removal process from a unit with a carburetor.
Since no one removes the crankshaft pulley on the VAZ 2109 injector unless necessary, we will consider this process when replacing the gasket. We will also tell you how to replace the part itself.
- Remove the timing belt.
- Using two screwdrivers we pry off the part we need.
We remove it with two screwdrivers. We remove it.
This is what the part we are removing looks like. Having pryed it up, we remove the crankshaft key. Be careful not to lose it.
The key that is removed. Use the same screwdriver to pry up the oil seal.
Replacement process
- Let's take it out.
- Be sure to lubricate the new one with oil.
- Using the head, press the gasket into place.
Press-fitting using a head - We put the key and the removed parts in their original place.
- Lastly, install the timing belt.
As you can see, there is nothing complicated. If you still have questions and have not yet understood how to unscrew the required part, watch the video. It describes in detail the process described in this article, and it will be useful not only for beginners, but also for experienced drivers.