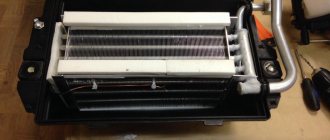
For high-quality repairs, correct diagnostics is necessary, and to carry it out you need to know how the mechanism works and the principles of its operation. First, let's take a closer look at the operating principle of the heating system in a Gazelle car. As in most cars, heating occurs due to heated liquid. Heat is a side effect of the engine running. Heating occurs due to fuel combustion and rubbing surfaces. Heat is removed by the cooling system to the atmosphere. During the cold season, this heat is used to heat the interior. For this purpose, the car is equipped with a heating system, which is an integral part of the cooling system. And the higher the temperature of the coolant in the engine cooling system, the hotter the heater radiator.
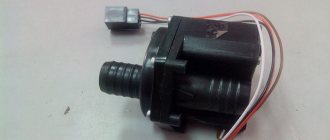
Next, the fan blows air, which, passing through the honeycombs, heats up and spreads throughout the car interior. To control all parameters of the Gazelle heater, an electronic control unit is installed. It is located on the center console of the car and has adjustments such as temperature, intensity and airflow directions. All controls are electronic and all drives are electric. This is very convenient: the driver does not need to be distracted from driving to change parameters. It is also possible to adjust the temperature automatically. Temperature adjustment is carried out by changing the amount of hot coolant passing through the heater. This controls the electric valve. The dampers are adjusted by gear motors.
How to replace the radiator of a Gazelle Business stove
For high-quality repairs, correct diagnostics is necessary, and to carry it out you need to know how the mechanism works and the principles of its operation. First, let's take a closer look at the operating principle of the heating system in a Gazelle car. As in most cars, heating occurs due to heated liquid. Heat is a side effect of the engine running. Heating occurs due to fuel combustion and rubbing surfaces. Heat is removed by the cooling system to the atmosphere. During the cold season, this heat is used to heat the interior. For this purpose, the car is equipped with a heating system, which is an integral part of the cooling system. And the higher the temperature of the coolant in the engine cooling system, the hotter the heater radiator.
Next, the fan blows air, which, passing through the honeycombs, heats up and spreads throughout the car interior. To control all parameters of the Gazelle heater, an electronic control unit is installed. It is located on the center console of the car and has adjustments such as temperature, intensity and airflow directions. All controls are electronic and all drives are electric. This is very convenient: the driver does not need to be distracted from driving to change parameters. It is also possible to adjust the temperature automatically. Temperature adjustment is carried out by changing the amount of hot coolant passing through the heater. This controls the electric valve. The dampers are adjusted by gear motors.
Advantages and disadvantages
When replacing the radiator unit of a Gazelle car, you should take into account the conditions of use of the car and the climatic features of the region. Copper models are more expensive, but they are more resistant to ruptures and corrosion. In addition, they heat up quickly and hold the temperature well.
Aluminum variations are suitable for temperate climates where there are no sudden temperature changes. In harsh climates, it is better to use a modified model with an additional radiator and pump.
To independently replace the unit in question, you need to stock up on a set of screwdrivers, keys, pliers, new clamps, a crowbar or a small crowbar.
Diagnostics
After a detailed excursion into the device, you can talk about malfunctions, or more precisely, about the reasons why they arise. High-quality diagnostics are 50% of successful repairs. It is important to eliminate the cause of the malfunction, not its consequences. If cold air is blowing from the stove, there may be several reasons:
- Low coolant level in the cooling system.
- Airlock.
- The thermostat of the engine cooling system is faulty. It is responsible for warming up the engine to operating temperature and preventing the engine from overheating. You can check the correct operation of it by testing the pipes before the thermostat and after with the engine running but not warmed up. They should be of different temperatures (warm before the thermostat, and cool after).
- The electric faucet is out of order. To check this malfunction, you need to try the pipes before and after the tap. When the tap is fully open (with the handle in the hottest position), the temperature should be the same. It would also be a good idea to check the mesh filter at the inlet of the faucet; liquid should flow freely through the holes. If this is not the case, then it needs to be cleaned or replaced.
- Ambient temperature too low. At temperatures below -20° C, the car engine does not have the opportunity to heat up to operating temperature. You can close part of the cooling radiator (no more than 50%) to better warm up the engine.
- The heater core is clogged. The passage of liquid is difficult due to debris or scale.
Repair
After diagnostics have been carried out and the exact cause of the malfunction has been established, repairs can begin. Replacing a stove radiator in a Gazelle business has become easier than in previous versions. It can be done on your own in a small amount of time. To replace we need:
- Drain coolant from the engine cooling system.
- Unscrew and remove the lower panel on the center console.
- Remove the lower glove compartment from the passenger side.
- Unscrew the clamps on the pipes and remove them (there will be residual coolant in them, you need to take measures to avoid fluid leaking into the car interior).
- Unscrew the plastic cover, which is secured with three 8mm bolts.
- Now you can remove the radiator itself from its place (you need to remove it carefully so as not to damage the seal).
- We put the seal on the new radiator and assemble everything in the reverse order.
- After assembly, fill in coolant, start it and carefully inspect all joints and connections for coolant leaks.
- If no leaks are found, replace the plastic lower part of the panel and the glove compartment.
This work does not take much time and does not require extensive experience in car repair. You can carry out repairs either yourself or with the assistance of specialists. By following the above recommendations, you can accurately diagnose the cause of the breakdown, after which replacing the heater radiator will not be difficult.
Replacing the radiator of the gazelle business stove
We will show you how to replace the heater radiator in Gazelle Business and Cummins cars (new panel) with your own hands. We start by removing the lower part of the panel, to do this we unscrew the two 8mm screws on the sides, take everything out of the lower glove compartment, remove its door, using a flat screwdriver to pry up its brackets. Next, unscrew all the screws inside and under the glove compartment lid. Remove the glove compartment completely. Let's unscrew the white air duct that goes to the feet. Now we have good access to the radiator, loosen the clamps, remove the pipes, be prepared that about 300 grams of antifreeze will spill out, prepare a container in advance where you will pour it. We unscrew the 3 screws securing the heater radiator itself, they are turnkey 8. We take out the radiator itself. It is worth noting that the sealing tape does not come with all new stove radiators, so in our case it had to be removed from the old one and installed on the new one. For those who have a different panel, see Gazelle replacing the stove radiator (old panel) it will be a little more complicated, but the principle is the same. Before installing the pipes, lubricate them with casting, it seals them well, next time it will be easy to remove the pipes, unlike sealant.
Collapsible radiator with intercooler for Gazelle Business with CUMMINS ISF2.8 engine
Radiator Gazelle Cummins ISF2.8 Cummins A073.00.010-21
Radiator Gazelle Business Cummins 2.8
Price 14,000 rub.
Replacing the Gazelle stove radiator
1200 rub. for the photo report
Old hoses or a leaky heater radiator cause antifreeze leaks in the Gazelle's cabin. And if this happens, you will have to buy a set of pipes and a stove radiator to correct the situation. For more efficient operation of the heater, they try to install a copper radiator, but if one is not available, then you have to buy an aluminum one.
To change the stove on a Gazelle (GAZ 3302 or 2705) of the old model, up to the Gazelle Business generation, you do not have to remove the entire panel, because the radiator is located behind the central panel of the dashboard and it is enough to remove only it. The plastic protection is secured with pistons.
Before unscrewing and removing the heater radiator, naturally drain the coolant, or if you are not afraid to douse the interior, then placing a container under the pipes, unscrew the clamps and tighten the hoses like this. The radiator of the Gazelle stove is screwed on with three self-tapping screws. Before installing a new heater, thoroughly clean the installation site of debris. If you do it for yourself, then when changing the stove, also change the pipes so that you don’t have to redo the job soon.
After all the work done, fill in new or top up coolant, start the engine and bleed the Gazelle engine cooling system (unscrew the bleeder screw, which looks like a faucet).
How to remove the radiator?
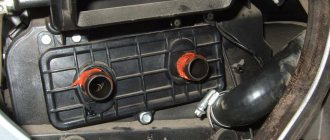
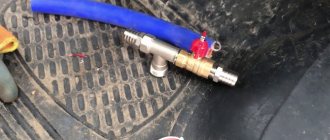
First you need to turn off the engine and disconnect the ground from the battery. Then we can start working in the salon. In order to get to the heater radiator, you do not need to disassemble the dashboard. All we need to do is pull out the glove compartment. We pull out the lower glove compartment, behind it we see a casing, we pull it over ourselves. We turn off the tap (pos. 22), unscrew the clamps and remove the hoses (pos. 23) for supplying and discharging coolant (pre-tightened so that coolant does not flow). Then, using a 10mm wrench, unscrew the bolt (pos. 24) and pull out the cover (pos. 21). We see our radiator, it is secured with 2 bolts, we unscrew it and pull it to the surface. If you just turned off the car, and the radiator of the stove is cold, most likely it will have to be replaced.
Replacing the radiator of the gazelle business stove
Gazelle until 2009. Removing the main heater radiator
Drain the coolant. We remove the shelf of the document section, disconnect the wiring harness connectors, and also remove the two fastening pistons on the right side of the heater trim (see “Replacing the heater valve,” p. 319).
Remove the glove box shelf (see “Removing and dismantling the instrument panel”, p. 312).
Using a Phillips screwdriver, unscrew the two self-tapping screws securing the air supply duct to the feet of the passengers in the front row of seats.
Loosen the tightening of the clamp with the “8” head.
. remove the heater radiator outlet hose from the tee pipe.
Having lowered the free end of the hose, we drain the remaining coolant from the heater radiator into a previously prepared container. Loosen the clamp.
. Remove the supply hose from the heater radiator tap pipe.
Below, for clarity, the operations are shown with the instrument panel removed.
Using a 8" socket with an extension, unscrew the three self-tapping screws securing the radiator trim.
Move the right side of the heater trim down (see “Replacing the heater valve,” page 319).
. remove the radiator from the heater casing.
Loosen the clamps.
. remove the inlet hose with tap and outlet hose from the radiator pipes.
Remove the radiator trim and seal.
Before installing the radiator, wash it and blow it with compressed air.
Install the heater radiator in reverse order. The cladding is installed in one position. Fill with coolant and remove air from the system. We check the tightness of the connections and tighten the clamps if necessary.
Replacement instructions with motor ZMZ-406
Replacing the Gazelle radiator yourself is quite simple. The following manipulations should be performed step by step:
- Disconnect the connector of the electric motor of the fan (EV), disconnect a pair of wires from its sensor.
- Loosen the clamp and remove the hose from the top and bottom of the pipe.
- Remove the steam exhaust element and remove the radiator.
- If necessary, you can replace the shock absorbing cushions.
- Unscrew the EV fastening nuts (4 pieces).
- Remove the electric fan and its activation sensor.
- Remove the plug and rubber seal.
- The drain tap and fixing bracket are removed from the old radiator.
- All elements are attached to a new part, which is mounted in the reverse order.
gazelle business stove radiator replacement
How to change the radiator of a Gazelle Business
For high-quality repairs, you need correct diagnostics, and to carry it out you need to know how the mechanism works and the principles of its operation. First, let's carefully examine the principle of operation of the heating system in a Gazelle . As in most cars, heating occurs due to heated liquid. Heat is a side effect of the engine running. Heating occurs due to fuel combustion and rubbing surfaces. Heat is removed by the cooling system to the atmosphere. During the cold season, this heat is used to heat the interior. For this purpose, the car is equipped with a heating system, which is an integral part of the cooling system . And the higher the temperature of the coolant in the engine cooling system, the hotter radiator .
Next, the fan blows air, which, passing through the honeycombs, heats up and spreads throughout the car interior. To control all parameters of the Gazelle heater, a control is installed. It is located on the center console of the car and has adjustments such as temperature, intensity and airflow directions. All controls are electronic and all drives are electric. This is very convenient: the driver does not need to be distracted from driving to change parameters. It is also possible to adjust the temperature automatically. Temperature adjustment is carried out by changing the amount of hot coolant passing through the heater. This controls the electric valve. The dampers are adjusted by gear motors.
Loan 9.9% and installments 0%
Modernization
The Gazelle car, popular in the domestic space, the installation of a heating radiator on which is not particularly difficult on your own, can be modernized in this particular part. The process of improving the node in question is described below.
Due to certain design flaws in the heating systems, the Gazelle car does not heat up very much; in winter it can be cold, especially when driving in open areas. This is due to the fact that cold air is constantly circulating in the central air ducts. Experienced drivers often seal them with tape or rags in cold weather. In fact, you can make sure that heat not only leaves, but also arrives.
To do this, you will need to install an additional radiator element at the inlet into a standard oven. The torpedo is removed, all hoses and cables are disconnected, the main radiator is dismantled and an additional analogue is installed on the air supply part. For example, you can use a radiator from a VAZ stove. The maximum that is required is to cut off the fittings.
Repair
After diagnostics have been carried out and the exact cause of the malfunction has been established, repairs can begin. Replacing the stove radiator has become easier than in previous versions. It can be done on your own in a small amount of time. To replace we need:
- Drain coolant from the engine cooling .
- Unscrew and remove the lower panel on the center console.
- Remove the lower glove compartment from the passenger side.
- Unscrew the clamps on the pipes and remove them (there will be residual coolant in them, you need to take measures to avoid fluid leaking into the car interior).
- Unscrew the plastic cover, which is secured with three 8mm bolts.
- Now you can remove the radiator itself from its place (you need to remove it carefully so as not to damage the seal).
- We put the seal on the new radiator and assemble everything in the reverse order.
- After assembly, fill in coolant, start it and carefully inspect all joints and connections for coolant leaks.
- If no leaks are found, replace the plastic lower part of the panel and the glove compartment.
This work does not take much time and does not require extensive experience in car repair. You can carry out repairs either yourself or with the assistance of specialists. By following the above recommendations, you can accurately diagnose the cause of the breakdown, after which replacing the heater radiator will not be difficult.
The best prices and conditions for the purchase of new cars
Replacing the radiator of the gazelle business stove
We will show you how to replace the heater radiator in Gazelle Business and Cummins cars (new panel) with your own hands. We start by removing the lower part of the panel, to do this we unscrew the two 8mm screws on the sides, take everything out of the lower glove compartment, remove its door, using a flat screwdriver to pry up its brackets. Next, unscrew all the screws inside and under the glove compartment lid. Remove the glove compartment completely. Let's unscrew the white air duct that goes to the feet. Now we have good access to the radiator, loosen the clamps, remove the pipes, be prepared that about 300 grams of antifreeze will spill out, prepare a container in advance where you will pour it. We unscrew the 3 screws securing the heater radiator itself, they are turnkey 8. We take out the radiator itself. It is worth noting that the sealing tape does not come with all new stove radiators, so in our case it had to be removed from the old one and installed on the new one. For those who have a different panel, see Gazelle replacing the stove radiator (old panel) it will be a little more complicated, but the principle is the same. Before installing the pipes, lubricate them with casting, it seals them well, next time it will be easy to remove the pipes, unlike sealant.
Video of replacing the heater radiator in Gazelle Business with a new panel:
Reserve video of replacing the heater radiator in Gazelle Business, Cummins new panel:
Here are such simple instructions, in my opinion, but on new panels the heater radiator is much easier to change than on old ones.
Heater Gazelle business troubleshooting.
What to do if something in the heater does not work? Due to the design of the heater, diagnostics in case of failure of its parts is difficult. Initially, as always, you need to check the fuse.
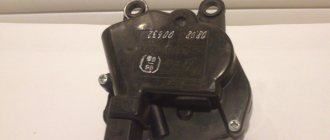
Checking gearmotors.
Checking the gear motors of the windshield blower dampers and deflectors can be checked without completely removing the panels. It is enough to remove its lower part. The main damper motor is accessible from the driver's side. To check gearmotors, you need to disconnect the connector of its electric motor, the connector with a lock, and connect a tester to it in voltmeter mode or a test lamp. With the ignition and heater on, you must press the button that controls this damper. The control lamp should light up. If the lamp is on and the gearmotor does not work, it must be replaced.
If you are on the road and do not have the opportunity to replace the damper drive with window defroster, you can remove the rod from the damper lever on the driver’s side and turn it manually, locking it in the open position. To open the damper on the passenger side, you will need to unscrew the screws securing the gearmotor and, by turning its housing, secure it in the same way.
Checking the electric motor and speed controller.
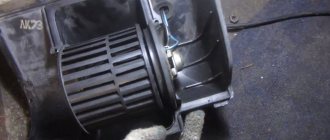
To check the heater fan motor and the cause of its failure if the fan does not work, you will need to remove the air intake in the engine compartment. Inside the opened approx.
You will see two wires with a connector. To check the power supply, connect a test lamp to the connector terminals and, with the ignition on, turn the heater speed control toward maximum speed. The control lamp should light brightly. When turning the handle towards the minimum speed, the brightness of the lamp should decrease. This indicates that the speed controller is working properly.
If the control lamp is on and the fan does not rotate, then its electric motor is faulty. To check, measure the resistance between the motor terminals in the connector. Motor malfunction may be caused by stuck brushes. In this case, you can try knocking on the heater body. In this case, the operation of the fan can be restored before the next time it is turned off, possibly longer, but you can still get to the service center in a warm place.
Replacing the Gazelle stove radiator
1200 rub. for the photo report
Old hoses or a leaky heater radiator cause antifreeze leaks in the Gazelle's cabin. And if this happens, you will have to buy a set of pipes and a stove radiator to correct the situation. For more efficient operation of the heater, they try to install a copper radiator, but if one is not available, then you have to buy an aluminum one.
To change the stove on a Gazelle (GAZ 3302 or 2705) of the old model, up to the Gazelle Business generation, you do not have to remove the entire panel, because the radiator is located behind the central panel of the dashboard and it is enough to remove only it. The plastic protection is secured with pistons.
Before unscrewing and removing the heater radiator, naturally drain the coolant, or if you are not afraid to douse the interior, then placing a container under the pipes, unscrew the clamps and tighten the hoses like this. The radiator of the Gazelle stove is screwed on with three self-tapping screws. Before installing a new heater, thoroughly clean the installation site of debris. If you do it for yourself, then when changing the stove, also change the pipes so that you don’t have to redo the job soon.
After all the work done, fill in new or top up coolant, start the engine and bleed the Gazelle engine cooling system (unscrew the bleeder screw, which looks like a faucet).
Replacing the radiator of the gazelle business stove
Gazelle until 2009. Removing the main heater radiator
Drain the coolant. We remove the shelf of the document section, disconnect the wiring harness connectors, and also remove the two fastening pistons on the right side of the heater trim (see “Replacing the heater valve,” p. 319).
Remove the glove box shelf (see “Removing and dismantling the instrument panel”, p. 312).
Using a Phillips screwdriver, unscrew the two self-tapping screws securing the air supply duct to the feet of the passengers in the front row of seats.
Loosen the tightening of the clamp with the “8” head.
. remove the heater radiator outlet hose from the tee pipe.
Having lowered the free end of the hose, we drain the remaining coolant from the heater radiator into a previously prepared container. Loosen the clamp.
. Remove the supply hose from the heater radiator tap pipe.
Below, for clarity, the operations are shown with the instrument panel removed.
Using a 8" socket with an extension, unscrew the three self-tapping screws securing the radiator trim.
Move the right side of the heater trim down (see “Replacing the heater valve,” page 319).
. remove the radiator from the heater casing.
Loosen the clamps.
. remove the inlet hose with tap and outlet hose from the radiator pipes.
Remove the radiator trim and seal.
Before installing the radiator, wash it and blow it with compressed air.
Install the heater radiator in reverse order. The cladding is installed in one position. Fill with coolant and remove air from the system. We check the tightness of the connections and tighten the clamps if necessary.
Removing the main heater radiator
2. Use the “8” wrench to unscrew the three fastening screws
3. Remove the hose protective shield.
4. Use a screwdriver to loosen the clamps on the radiator pipes
5. Remove the hoses from the heater radiator pipes.
If you have to remove the heater radiator, you can replace some of the pipes that have become rough or cracked.
6. Using a 10mm wrench, unscrew the two bolts securing the radiator trim
Removing the radiator trim
Use a 13mm wrench to unscrew the radiator mounting nut.
Removing the plastic plate
10. Remove the radiator from the heater.
Install the radiator in reverse order.
Before installing the radiator, it is advisable to vacuum the inside of the heater with a vacuum cleaner.
Please note that the radiator pipes coincide with the heater openings only at a certain position of the radiator.
When installing the radiator trim, first insert its upper edge into the groove, and then recess the lower part.
In winter, the car's heater plays a key role; it supplies the car interior with heat, thereby providing a comfortable air temperature for the driver and passengers. The stove in our country plays an integral role in the car. In winter, not only a pleasant temperature in the cabin depends on it, but also safety, since without it our windows fog up or become covered with frost. A stove breakdown in winter is certainly an unpleasant problem that needs to be solved in the near future. So, let's look at the design of the main heater of a gazelle car.
Main heater: 1 — bracket; 2, 4 — damper axis levers; 3 — bracket for fastening the drive rod shells; 5 — clamp; 6, 7, 17 — sheaths of cable rods; 8, 9 — damper drive racks; 10 — protective casing; 11 — OVU building; 12 — fan cover; 13 - seal; 14 — electric drive connector; 15 - screw; 16 — electric fan; 17 — two brackets for fastening the electric fan flange; 18 — thrust; 19 — heating radiator; 20 - gasket; 21 - cover; 22 - tap; 23 - hose
Most often, in the summer, we close the tap (pos. 22) so that warm air does not flow into the cabin by gravity. With the onset of cold weather, we forget to turn it on and our stove does not allow heat into the interior. In this case, just open it and enjoy the warmth.
One of the most common problems when the stove works but stops supplying warm air is a problem with the cable; the draft weakens or disappears altogether. It is necessary to tighten the cable (pos. 19) so that when fully opened, the cable fully opens the damper and, when fully closed, closes it. If this operation does not help, then we check the inlet and outlet pipes; if the inlet pipe is warmer than the outlet pipe, then we can conclude that your stove radiator is clogged, it needs to be removed and cleaned
gazelle business stove radiator replacement
How to change the radiator of a Gazelle Business
For high-quality repairs, you need correct diagnostics, and to carry it out you need to know how the mechanism works and the principles of its operation. First, let's carefully examine the principle of operation of the heating system in a Gazelle . As in most cars, heating occurs due to heated liquid. Heat is a side effect of the engine running. Heating occurs due to fuel combustion and rubbing surfaces. Heat is removed by the cooling system to the atmosphere. During the cold season, this heat is used to heat the interior. For this purpose, the car is equipped with a heating system, which is an integral part of the cooling system . And the higher the temperature of the coolant in the engine cooling system, the hotter radiator .
Next, the fan blows air, which, passing through the honeycombs, heats up and spreads throughout the car interior. To control all parameters of the Gazelle heater, a control is installed. It is located on the center console of the car and has adjustments such as temperature, intensity and airflow directions. All controls are electronic and all drives are electric. This is very convenient: the driver does not need to be distracted from driving to change parameters. It is also possible to adjust the temperature automatically. Temperature adjustment is carried out by changing the amount of hot coolant passing through the heater. This controls the electric valve. The dampers are adjusted by gear motors.
Loan 9.9% and installments 0%
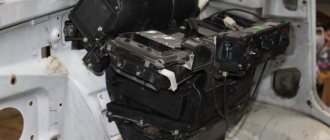
Construction of the Gazelle heating system
As you know, the interior heating system of almost all cars is designed in the same way - in gazelles of early modifications, gazelles Business and Next, it is no different. The design of the stove consists of a radiator and adjacent pipes through which antifreeze or antifreeze is supplied from the engine to the radiator, a regulator of the volume of flow of this liquid with a switch located on the dashboard, a fan and an branched system of air ducts and dampers extending from it, which distributes the flow of warm air around the cabin, directing it, at the driver’s request, directly into the cabin or onto the cab windows.
The general diagram of the operation of this entire Gazelle cabin heating system is as follows: the radiator is located behind the dashboard, two pipes lead to it, through one of them the coolant enters the radiator, through the other it is sent back to the engine. However, for the engine it is cooling, but for the radiator it is just the opposite: passing through the engine, the antifreeze heats up and, pushed by the water pump, enters the radiator and gives off its heat to it. In the summer, when the interior heating system is not in use, the heated antifreeze enters the engine radiator and is cooled by blowing the latter with a flow of oncoming air.
This design of the interior heating system, which has long become traditional, allows the driver to check the presence of antifreeze in the tank while the car is moving, without leaving the cab. To do this, you just need to turn on the stove, direct a stream of heated air into the cabin and place your palm on the heating grille. If there is heat coming from there, it means that the engine cooling system is functioning normally. If not, you should look for an antifreeze leak. All this is possible, of course, with the stove running.