A generator in a car is a device that ensures stable operation of the vehicle’s on-board electrical network, in particular the VAZ-2114. This system of generating and supplying electricity has its advantages and disadvantages. In this article we will look at the main malfunctions of this unit, as well as the process of replacing the part with a new one.
Main malfunctions of the VAZ 2114 generator
- The fuse has blown. To fix this problem, you just need to change the fuse. But first you need to find out the reason.
- The circuit supplying the devices is broken. Be sure to check the connection of the neutral wire with other contacts.
- Damage to the ignition switch. Make sure the ignition switch circuit board is in good condition.
- Indicator lamp malfunction.
- Brush malfunction. To eliminate the problem, it is necessary to replace the brush holder and the brushes themselves; it is enough to clean the oxidized slip rings with gasoline, or treat them with WD-40.
- Malfunction in the voltage regulator.
- Damage or malfunction of the alternator belt.
- The bearing is faulty or broken.
The described malfunctions are very common, if you ignore them and do not make the necessary repairs in a timely manner, the generator will be permanently damaged, and subsequently it will have to be completely replaced. Which in monetary terms is much more expensive than repairing minor problems.
But don't rely on yourself if you don't have the appropriate training. The best solution would be to contact a service station for qualified assistance.
Diagnostics
If such signs of generator malfunction occur, it is necessary to diagnose and repair the generator.
Before starting repairs, it is necessary to carry out diagnostics and exclude trivial breakdowns, such as a fuse and loose battery and generator terminals.
If the battery is not charged, it is necessary to check the integrity of the fuse numbered F16; this fuse is responsible for the excitation winding of the generator. If the field winding fuse fails, the generator will not produce voltage.
If the charge is in progress, but the voltage at the generator output is negligible, then it is necessary to check the tightness of the terminals on the battery and the tightness of the positive contact on the generator.
If the diagnostics show that the fuse is intact and the terminals are sufficiently tightened, then you should begin repairing the generator.
Checking the serviceability of the generator
Defects in the operation of the generator can have unpredictable consequences. If there is insufficient charge coming from the alternator, the consequence will be that the battery will die and as a result the car will simply stall. But the most dangerous thing is that if the alternator produces high voltage, the entire electrical system of the vehicle will be damaged as a result.
We check the power of the VAZ 2114 generator using a tester:
- After turning on the ignition key, make sure that the instrument panel lights are on, only then the engine starts. If the battery icon is lit or blinks dimly, this indicates damage to the generator circuit.
- The engine must be warmed up to 90 degrees, only after that all energy-consuming devices must be turned on.
- We connect the tester directly to the battery. The assistant accelerates, keeping the rpm at approximately 3200 - 2500. If the voltage is 13V, the generator is working.
- We turn off the devices consuming energy, and again take measurements, also at engine speeds of 3200 - 3500. The generator is operational if the voltage is 14.7V.
On a note! The main reason why the generator produces low voltage, below the level of 13V, may be due to malfunctions: insufficient tension of the generator belt, the generator circuit is damaged, the voltage regulator is damaged, the brushes are completely worn out, the generator must be replaced.
While the car is running, you need to pay attention to the sounds coming from the generator; if you hear a hum, this is an indicator of bearing wear, in this case it needs to be replaced.
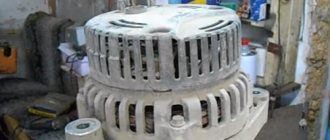
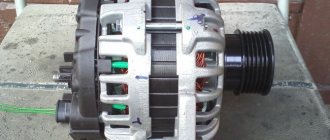
WHAT IS A GENERATOR?
The VAZ 2114 generator can be imagined as an electric three-phase alternating current machine. It has a built-in rectifier unit that converts alternating current to direct current. The device consists of the following parts:
- Front and back cover made of aluminum alloy. Each of them has slots for installing bearings. On the back cover body there is a battery connection terminal and a connector for supplying voltage to the excitation winding. There is also a capacitor installed on the back cover, which suppresses radio interference; there is a place for installing and fastening the brush assembly;
- Stator core cylinder made of transformer iron. Inside it there are grooves for laying the power windings of the generator. They have leads for connection to the rectifier block. Both covers are attached to the stator with four bolts;
- Excitation winding on the rotor shaft. It is connected with its leads to slip rings made of copper, which are installed on the same shaft. The front of the shaft has a keyway to accommodate the drive pulley;
- The brushes of the VAZ 2114 generator are a non-separable unit combined with an electronic relay controller. The relay in a metal case is riveted to the brush holder;
- A block of power and additional diodes is attached to the back cover from the inside. It contains six power and three additional diodes. To cool semiconductor devices, they are mounted on horseshoe-shaped aluminum alloy plates.
Why does the battery icon light up on the dashboard?
When you turn the ignition key, the system displays all icons on the instrument panel to check the vehicle’s serviceability, i.e. All system lights are fully functional. Then the engine starts, so the lights should go out when the machine is in full working order. But if one of the lights does not go out, this indicates an existing problem.
Accordingly, if the battery icon does not go out, this is a consequence of the fact that the generator supplies too little voltage, or it is completely absent.
Possible malfunctions: signs and causes
The generator set is an electromechanical device. Therefore, two types of faults are possible: mechanical and electrical.
A sign of mechanical problems is increased noise during generator operation. The cause of the noise is the destruction of the bearing pressed into the cover. It constantly experiences large radial loads and therefore has a short service life.
An over-tensioned drive belt of the VAZ 2114 generator shortens its service life. Therefore, it is necessary to monitor its tension and condition. The generator will not work if the belt breaks.
Signs of electrical faults are:
- the generator does not charge the battery;
- charging voltage too low;
- charging voltage is too high;
- the unit is heating up.
You can determine the malfunction using a multimeter. You can judge an insufficient charge by dimly lit headlights and slowly working wipers, as well as by a control light that blinks or is constantly on. If the charge is too high, the electrolyte in the battery boils and the headlights shine too brightly.
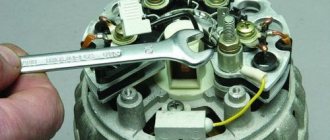
Replacing generator brushes after their natural depreciation
Reasons for depreciation of generator brushes:
- Voltage drop.
- At dusk, there is insufficient illumination from headlights.
- The battery is not charging.
- and etc.
During normal maintenance, no one pays attention to small problems of the generator; for this reason, worn brushes are always a surprise. Do not rush headlong to change brushes if primary symptoms of problems occur. Find out the source of the problem, then disassemble the generator housing.
How to dismantle the generator brushes:
Before carrying out work on replacing the generator brushes, it is necessary to remove the assembly together with the voltage regulator, so we unfasten the minus terminal and disconnect the wires from the casing.
- Disconnect the wires.
- We remove the cap from the output wire system to +, disconnect the nut securing this bundle and remove it from the block.
- We remove the plastic casing, having first disconnected the clamps.
- Disconnect the voltage regulator fasteners.
- When removing the regulator, do not forget to disconnect the wire block.
- We change the brushes using the same method, but the sequence changes; we install everything in its original place.
Just a note! Be sure to check the wear of the brushes; they change when the length of the rod wears down to less than 0.5 mm. If the brushes are of normal length, a possible reason for the lack of charge is a malfunction of the voltage regulator or brush regulator circuit.
Procedure for replacing the generator
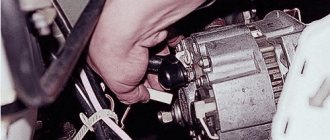
If the electrical unit fails and repair is impractical, you must first find a replacement. It is recommended to buy a factory version that will fit the fasteners and terminals. Otherwise, the repair will be accompanied by changing the wires.
Replacement process for VAZ 2109-2115:
- Drive the car onto the overpass.
- Remove engine protection.
- Remove the (−) terminal from the battery.
- Move the protective cover away from the positive one, unscrew the fixing bolt and remove the terminal.
- Remove the wires (secured with a block).
- Remove the upper fastening element.
Upper mounting bolt
- Take off the belt.
- Unscrew the bottom bolt.
Bottom bolt
- Dismantle the device.
- Install a new unit so that the fasteners match.
- Secure with the lower and upper bolts.
- Install the belt (preferably a new one).
- Place the terminal, secure it, and return the protective cover.
Securing the terminals on the generator
- Connect the wire block.
- Adjust tension.
Attention! If you overtighten when adjusting the belt, the bearings will quickly fail. If the tension is weak, there will be no proper grip and the battery will not be able to charge.
To tighten, you need to turn the adjusting screw, which, when moving clockwise, is tightened, and when moved counterclockwise, it is loosened. It's easy to check - you need to gently press the belt so that it bends no more than 15 mm.
Checking the voltage regulator
As we have already found out, the voltage regulator is checked together with the brush holders, so that if the circuit between the brushes and the regulator is damaged, we can immediately see this problem.
First, we check the brushes to see if they are broken or worn out; therefore, on your VAZ 2114, replacing the generator brushes is inevitable.
We prepare the necessary parts for testing, these are wires, a car battery, a 12V light bulb, AA batteries, to build two circuits:
Checking the voltage regulator
Checking the voltage regulator
If the voltage regulator is working properly, then the voltage is 14.7 V. If the supply exceeds the norm, it is necessary to stop the supply of voltage to the brushes.
If there is a problem with the voltage regulator, if the lamp is on, the cause is damage to the regulator. If the lamp does not light up at all, the reason is that there is no contact connecting the regulator and the brushes, or the circuit may be broken.
The regulator must be replaced if the voltage is less than 13V when the on-board system devices are turned on. An increased voltage of more than 14.7V may also be a consequence of damage to the regulator.
The process of removing and reinstalling the voltage regulator completely coincides with the process of removing the brushes from the generator, because they are removed along with the voltage regulator.
Problems with the diode post
Checking the serviceability of the diode bridge is quite simple. The fact that it is faulty is indicated by either increased voltage or lack of charge. You should not delay repairs, as this may result in serious problems in the vehicle's electrical network.
But the diode bridge can fail only in the event of a breakdown of the power diodes. They can be replaced if necessary. True, sometimes some problems arise with this. The fact is that finding power diodes is quite difficult. You may have to make an exciting journey through the disassembly of a VAZ-2114, but it is much faster and easier to replace the old diode bridge with a new one.
As you can see, a generator is a necessary part in a car, without which it simply cannot work. If the generator breaks down, you can replace it if you can’t repair it yourself. In addition, replacement of the generator will be required in the following cases:
- improving the car sound system;
- installation of additional vehicle lighting, both inside and outside;
- installing additional outdoor lighting or replacing the old one with a more powerful one.
Source
Alternator belt tensioning procedure
An important factor is the tension of the alternator belt. If its tension is weak, the voltage in the on-board system can be reduced. In this situation, a whistle is heard, and the battery icon on the dashboard begins to flash.
Strong tension also has a negative effect, since it negatively affects the life of the bearings in the generator.
Important! The alternator belt must be replaced every 15,000 km. When visually checking the belt, pay attention to its structure; it should not peel off or tear, otherwise it should be changed urgently.
The permissible belt tension depends on the generator: for model 37.3701, when tensioning, the permissible deflection is 10 -15 mm, for model 9402.3701, the deflection is allowed 6 - 10 mm, when pressing 10 kg.
Types of electrical faults
The problem with the generator is that it stops producing current. The indicator on the dashboard lights up. Electrical faults lead to breakdown:
- The fuse or contacts have blown. Making a replacement is a matter of minutes. With contacts things are different.
- The brushes are worn out. You can change it yourself; you don’t need to buy a new device.
- The regulator relay has failed. You can repair it yourself or contact a professional.
- Diode bridge failure. Cannot be repaired, only replaced. To do this, you need to disassemble the generator; without experience, it is better not to carry out such work; it should be left to the experts.
Diode bridge failure.
- An open circuit in the stator or rotor due to a short circuit. Repairing is more expensive than purchasing a new electrical unit.
Signs to help detect an electrical problem:
- The battery indicator on the dashboard does not go out after starting the power unit or blinks.
- Burnt wire smell coming from under the hood (a serious problem that may not be related to the alternator).
- The appearance of sparks in the housing.
- Voltage drop.
- Constantly recharging the battery.
- The headlights are adjusted, they shine dimly, and when other sources of power consumption are turned on, they almost do not light up.
Generator connection diagram
We tighten the belt
The tensioning process itself depends on the engine size of 1.5 or 1.6, since the VAZ 2114 model.
1.5 L engine:
- We loosen the fastening of the VAZ 2114 generator.
- Using the adjustment screw, we adjust the belt tension; if we need to tighten it, we act clockwise; if necessary, loosen the direction of movement counterclockwise.
- When we have reached the required belt tension, we strengthen the generator and be sure to check the belt.
1.6 L engine:
- In the same way as in the first case, we loosen the fastening of the VAZ 2114 generator.
- Using a crowbar, we move the generator slightly away from the engine and tighten the belt; if it is necessary to loosen the belt, we move the generator in a different direction, i.e., towards the engine.
- After completion, secure the generator and check the belt tension.
Important! After the work was done, the problem did not disappear, the voltage drop process continues, so the problem was not identified, be sure to check the generator.
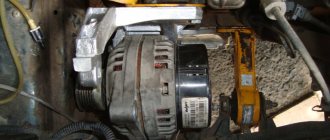
HOW TO REMOVE THE GENERATOR FROM THE CAR
It is installed in a special bracket on the cylinder block; there is also a bar for tensioning the generator belt. Find the generator in the front part of the engine compartment on the right side in the direction of travel of the car. To remove it, you need to prepare the following tools:
- Wrench set to “10”;
- The same key for "13"
- Open-end wrench 17x19;
- Head at "15"
- Mount.
We remove and do not touch the engine protection
Removal is carried out in several ways, where it is necessary to remove the engine protection. They are well described in various sources. Let's try to remove it without removing the protection. The procedure will be as follows:
- The first step is to disconnect the terminals from the battery;
- Loosen the belt tension, remove first the belt, and then the entire tension mechanism;
- Disconnect the wires from the battery, they are covered with a rubber cover, and the connector for supplying voltage to the excitation winding;
- The generator on the bracket is mounted on a long bolt and nut. It’s not very convenient to get it, so use a “15” head to unscrew the two bolts securing the bracket to the block. They are found at the back of the generator, one bolt is long and the other is shorter. Now the generator can be turned clockwise and it will be possible to remove the axis of its attachment to the bracket;
- Unscrew the nut with a wrench to “19” and remove it together with the spacer sleeve;
Use a small punch or something similar to knock the axle out of the bracket. The generator is lifted up. Now you can use it to repair the generator or perform maintenance.
Generators for VAZ 2114 and Priora in comparison
Many car enthusiasts want to install the most powerful type of generator in their car. In this case, the best option would be a generator with air conditioning used for installation on models such as Priora and Kalina. The power is 115A, while the power of the factory copy is only 80A.
But there is a small nuance: you will have to replace the pulley; this is an inexpensive and fairly easy procedure.
Many car owners recommend the Eldix model generator, with a power of 115 A. It is a good model, but it has a huge disadvantage: it is impossible to get spare parts.
Which generator to install
Most car enthusiasts strive to install a part with more power than the standard device recommended by the manufacturer. In this case, the most suitable options would be the Priora or Kalina models. The power of such devices is 115A, while the factory equivalent is only 80A.
However, if you install another generator, you will need to install a different pulley. This procedure is simple and does not require large financial expenditures.
Experienced drivers recommend installing an Eldix generator on the VAZ-2114, the power of which is the same 115 A. But such a device has a significant drawback - it is difficult to find spare parts for repairs.
Signs of a faulty generator diode bridge
The bridge is an electrical circuit of diodes that process signals from alternating current flows into direct current. Problems with the generator directly depend on problems in the diode bridge.
Problems that can completely leave the battery without a charge or charge the battery more than normal ultimately have huge negative consequences with the internal electrical system of the car.
The function of the diode system is not only in the process of converting current pulses, but also in its unipolar transmission from the generator to the battery. Accordingly, if the diode is faulty, the current is directed in both directions, or the current supply is completely stopped. The cause of damage and malfunction of the diode bridge is poor-quality contacts, or as a result of moisture penetration.
To check the diodes, the bridge must be dismantled using fairly light manipulations.
We dismantle the diode bridge of the generator:
- Disconnect the “-” terminal from the surface of the battery and detach the wiring system from the casing.
- Unscrew the wires.
- We remove the rubber cap from the wires + terminal, disconnect the nut securing these wires and remove them from the generator block.
- We remove the plastic casing, having previously unfastened the fastening system.
- Disconnect the mount for the regulator.
- When removing the voltage regulator with brushes, do not forget to unfasten the wire block.
- Use a wrench to remove the bolts securing the bridge.
- Having bent the leads directed to the stator winding, we unscrew the capacitor mount.
- We take out the diode bridge. We unscrew the 2 nuts of the contact bolt, remove the bushings from it, and also remove the bolt from the bridge. That's all, now you can change or check the diode bridge.
- We repeat the installation process in reverse order.
Removing the diode bridge
The principle of operation of a generator in a car
The peculiarity of the generator is that it produces alternating current. Whatever one may say, when operating this electric machine, you can only get alternating current, and only then convert it to direct current. General generator design:
- Back and front covers with pressed bearings.
- Rotor with excitation winding.
- The stator with power windings is where the voltage is removed.
- Diode bridge - three-phase rectifier.
- Electrolytic capacitor - to get rid of the alternating component of current.
- Voltage regulator - necessary for accurately setting the supply voltage of the rotor winding.
- Carbon-graphite brushes are necessary for transmitting voltage from the relay regulator to the rotor winding.
- And the remaining components - brackets, nuts, bolts, belt.
For normal operation of the generator, two components are required:
- Rotation.
- Magnetic field (constant).
It is enough to remember the school physics course - an electric current will appear in the winding only if it is affected by a moving magnetic field. Moreover, the output voltage will depend directly on the magnitude of this magnetic field. This means that the rotor winding is a source of a constant magnetic field, and it is powered through a voltage regulator, therefore, the output will always have the same voltage.
The alternating voltage is removed from the stator winding. Moreover, there are three windings, they are connected in a “star”. Consequently, we get three phases at the output. This is necessary primarily in order to reduce current ripple in the on-board network. With the help of a diode bridge, which contains six semiconductors, the current is rectified. And the capacitor cuts off the entire variable component. According to Kirchhoff's law, an electrolytic capacitor is replaced by a gap when operating in a DC circuit and by a conductor in an AC circuit.
How to remove a generator on a VAZ 2114
We remove the VAZ 2114 generator:
- In order to remove the VAZ 2114 generator you need a pit or a lift.
- The protection must be removed from the engine.
- The tension roller for the drive belt needs to be loosened.
- Disconnect the top bolt securing the generator.
- Then remove the bottom bolt securing the generator.
- Disconnect the air conditioning compressor mount.
- The drive belt is removed and the VAZ 2114 generator is removed from its seats and subsequently shifted to the right closer to the battery.
- Then simply unscrew the top bolt securing the air conditioning compressor.
- We simply take out the compressor and hang it up; the tubes are strong enough and can easily support its weight.
- The generator holder bolts must be unscrewed.
- After disconnecting the terminal, the generator and its holders can be pulled down.
- Installation follows the same method but in reverse order, and be sure to adjust the drive belt.
As a result, if the winding is shorted, it is necessary to find out the reason. If any contact ring has become unsoldered, this problem can be eliminated by unwinding the defective turn back, then removing the broken end and soldering the unwound drive. If desoldering occurs, it is also enough to simply solder the wires.
Relay problems also occur due to a sufficiently strong or weak charge; it is changed during repair of the generator. If the generator is working properly and the signal on the panel is flashing, this indicates a malfunction of the diodes. Since these elements are located in the generator, their necessary replacement is carried out when the VAZ 2114 generator is disassembled.
Excessive noise is the result of wear on the rotor bearing. If it is completely worn out, it must be replaced; if the violations are related to the lack of play in the bearing, it is enough to fill it with oil.
You can repair a generator yourself if you know and follow the procedure. If possible, check the operation of your vehicle in a timely manner and carry out the necessary replacement of parts.
GENERATOR FAILURES
Malfunctions of the VAZ 2114 generator can be divided into “mechanical” and “electrical”. Let's look at them in that order.
MECHANICAL FAULTS
Indirect confirmation of the presence of such a breakdown is the increased noise of the generator set while the car engine is running. It can “make noise” in some other cases, but this will be discussed a little later. The source of increased noise in most cases is worn generator bearings. This primarily concerns the bearing in the front cover of the generator. It experiences increased radial loads, so it can fail faster . Excessive tension on the drive belt increases the load on the bearing.
ELECTRICAL FAULTS
There may be several of them, these are:
- Lack of battery charging voltage;
- The generator produces low voltage;
- Exceeding charge voltage.
An initial check of the functionality of the generator set can be carried out without removing it from the machine. To do this, you need to have a measuring device such as a tester, multimeter or DC voltmeter. Even a simple Chinese tester will do. By measuring the voltage at the battery terminals, you can make a definite conclusion about the functionality of the generator.
The method of checking the generator, in which the positive terminal is removed from the battery, cannot be used to avoid failure of the electronic relay-regulator or other electronics of the car. We'll look at more specific verification methods a little later. Now let’s remember how to remove the VAZ 2114 generator for further inspection.
Installation of the generator with subsequent adjustment
When installing a generator on a VAZ 2109 (no matter the injector or carburetor) and other models, be sure to check whether the purchased clamps, bolts and nuts fit the installation locations. Also, we must not forget that the mounting holes on old-style electric generators are different from new ones. Therefore, when installing a modern autogenerator on front-wheel drive models of the first generations (08, 09, 99), you should purchase the appropriate fasteners.
The generator mounting mount cannot be taken from Grants or Prioras. You can take a new potassium generator and no additional modifications will be required, but the mounting plates must be type 21082. In addition, you will need to purchase a pulley 2110 and a tensioner type 21082.
The installation process is identical to the removal process. If the standard strips are worn out, they are replaced with new ones; this will require unscrewing several bolts and installing new strips.
When installing the electric generator, start from the bottom fastening plate, tighten (but not completely) the fixing bolt (do not forget to put the bushing), put the belt on the pulley and move to the top. To fix the generator, install the top fastening, but do not screw it all the way. Then the tension bar is inserted. Then tighten the tension bolt, checking the belt tension.
The belt should not bend more than 1-1.5 cm when pressed with a force of 10 kgf. It is quite difficult to maintain these indicators in garage conditions, so you should focus on the gap between the frame and the tension bolt of 15–20 mm. There should be a small gap (15–20 mm) between the tension frame and the screw (from the thread side). Then turn the engine crankshaft two turns with a wrench and monitor the position of the belt and its tension.
If, after checking the engine by turning the key, the gap changes, then the bolts securing the electric generator should be tightened. As soon as, after a control rotation of the crankshaft with a key, the gap remains the same, and the belt bends slightly when you press it, the bolts of the upper and lower fastenings are finally tightened, a control rotation of the crankshaft is performed two turns, the wires are connected to the electric generator and the engine is started.
If, when starting the engine, the belt does not make unwanted noise or whistle, and the charge level is normal, then the installation procedure was completed correctly. If a whistle appears, then most likely the belt is too tight and should be loosened.
Video about tightening and adjusting the belt:
Installation of generator from 2110 to 2109/08/99 – video:
Did you manage to solve your problem using the recommendations from the article?
Yes!
46.52%
No. More answers required. I'll ask in the comments now.
37.79%
Partially. There are still questions. I'll write in the comments now.
15.69%
Voted: 733
Repair instructions for the VAZ 2114 unit
Disassembling the unit for repair is a sequence of steps:
- By releasing the three latches, remove the protective casing from the housing.
- We make marks of the relative positions of the two covers and the stator to facilitate assembly.
- Having unscrewed the fastening screws, we dismantle the brush assembly.
- Next, you need to disconnect the wires from the regulator terminal.
- We unscrew the fastening bolts and dismantle the diode bridge, while disconnecting the winding terminals.
- After unscrewing the four tie screws, you need to remove the cover from the side where the generator slip rings are located.
- We fix the rotor shaft from turning using a vice and unscrew the pulley mounting nut. Now remove the generator set pulley and washer from the rotor shaft.
- At the last stage, we dismantle the rotor cover of the unit.
Then you can inspect the parts and repair or replace them. The brushes, diode bridge, bearings, three-level voltage regulator and other parts of the generator set may be faulty.
Modern cars are equipped with a large number of electronics, which requires a more powerful generator set for stable operation of the on-board network. Low voltage can affect the operation of the valves. Under heavy load, the generator heats up. In this case, a generator from Priora or Kalina is installed on the VAZ 2114, capable of delivering a current of up to 115 A. It is mounted in the same way as the standard one, only the drive belt pulley needs to be replaced.
The generator is installed on the VAZ 2114 in the reverse order. After installing the unit in its original location, all connectors and wires are connected, and the drive belt is put on. To tension the drive belt with a volume of 1.5 liters, the generator housing is removed from the motor block using a mount. And with a volume of 1.6 liters, the belt is tensioned using a tension screw. The performance of the generator depends on the tension of the belt. If the tension is insufficient, a weak charge is generated, which negatively affects the operation of the on-board network.
Thus, the car’s generator ensures uninterrupted operation of the on-board network and charges the battery. If problems occur with the diode bridge, bearings, brushes or other parts of the generator set, their cause should be identified and repaired or replaced, otherwise problems may arise with the instruments and sensors included in the on-board network.