Actually, the idea is not mine and has been sucked up many times on the Internet. I just finally got around to doing such a modification, since the old voltage regulator began to lower the voltage to 13.4 V. Which is not very good in winter and leads to undercharging of the battery. In addition, the mileage approached 60 thousand km. and according to the service book at this mileage it is necessary to “Clean the contact rings of the generator, check the wear and fit of the brushes.” Those. Please remove the generator.
The point of the modification is that the new voltage regulators, used for example on the Chevy Niva, measure and maintain the voltage in the vehicle's electrical system, and not on the alternator's auxiliary diodes, as was the case with the old voltage regulators. By the way, the voltage on the additional diodes can be quite different from what happens in the car’s on-board network and, together with thermal compensation, can significantly underestimate the on-board voltage. Hence the undercharging of the battery and its earlier death, especially for new calcium batteries, which require a slightly higher voltage for charging.
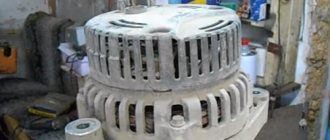
So, I purchased this voltage regulator from Chevy Niva - 94.3701. You can use similar ones, but with two terminals.
The connectors were cut off from the voltage regulator and screw terminals were installed instead. In the figure below: on the left - for an 8 mm bolt, on the right - 6 mm.
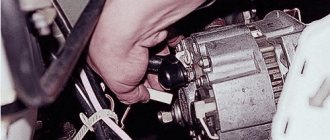
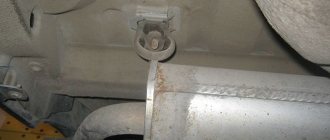
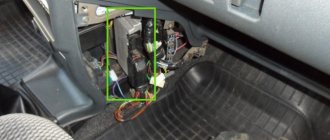
Next, install the voltage regulator in place, connect the right contact (6 mm) to the bolt to which the capacitor is connected. In the photo there is a circle with the number 3.
We connect the left wire (8 mm) to the terminal of one of the windings. In the photo there is a circle under the number 1. There is a slight subtlety here; under the bolt there is a textolite washer, designed to prevent the bolt from contacting the winding terminal. So you need to install the terminal so that there is no electrical contact between the bolt and the winding terminal. After installation, be sure to ring the tester to prevent a short circuit. Otherwise, failure of the diode bridge and even fire may occur.
Well, you also need to turn off the additional diodes. In the photo in circle 2. We bite off the metal plate leading from the additional diodes to the terminal on the tidy and bend it (the strip) to the side, or you can even bite a piece out of the metal strip.
That's all, install the generator in place and enjoy the results obtained. During subsequent checks on a warm engine, at idle speed with the load on (side lights, low beam, heater at 1st speed, heated rear window), the voltage does not drop below 14 V. No load - 14.2 V. The results are quite decent
another's computer
VAZ 2114 | Official community
return to page
Sasha Matveev pinned post
Is the Priorovsky generator suitable for four?
Like Show list of ratings
Old ones first
Will work with minor modifications.
Like Show list of ratings
Yes, there and from 2109, 2010 2011 they are all standard, just the amperage is different
Like Show list of ratings
It will work, I set it to 115 from the Priors without any problems, only the terminal doesn’t seem to fit, minor modifications and all is fire
Like Show list of ratings
Of course it will fit, the fastenings are perfect. But the terminals will have to be redone, on the standard one to 6, on the Priora to 8 and the excitation wire, to wire 1 on the Priora generator chip
Why 90A? Priorovsky is 115A.
VAZ 2115 generator from Priora
Therefore, the subject, since a friend had a Prior in 3 years, nothing happened to the generator; there was 13.9 volts of charge and it remained.
I know more current, but the battery must withstand it,
besides, I’m not running around on the highway right now; the car is mainly used in the city, so there won’t be high revs and, accordingly, recharging the battery with boiling over and other delights)))
But when the service technician did it for the first (and last) time, he said that it was a disease of tags.
As far as I know, a two-pin chip is inserted into the Prioro generator. One wire is to the charge control lamp, and the second input is from the tachometer. But they say you don’t have to connect the second one.
Install KZATE 9402.3701-03 with a new model LV and you will be satisfied.
and fastening to the bridge by SOLDERING (this is about the often pop-up question about burnt terminals of phase windings due to loose screws)
As far as I know, a two-pin chip is inserted into the Prioro generator.
In general, I’ll look at the store directly (which is used for priors) number like 9402.3701-04
So is it better to take KZATE or PRAMO?
I just lost all my brains. What have I done with it, two horseshoes, three regulators, and it has never happened since the new 14th century. In winter we had to recharge the battery. And in the end the lamps began to flicker, not much and only on a hot generator. While you remove it, it will cool down and you will ring it all together. The car was already shaking in time with the flickering. Now I have KZATE. I forgot about the voltage problems. 14.5 for cold and 14 for hot with main consumers. Finally the battery was charged to 100%. So it's a lottery I think. what is PRAMO what is KZATE.
Look for topics on the KZATE 9402.3701-03 generator, it can be modified to 90A.
So is it better to take KZATE or PRAMO?
Is the generator suitable for Priora VAZ 2114
But when the service technician did it for the first (and last) time, he said that it was a disease of tags.
As far as I know, a two-pin chip is inserted into the Prioro generator. One wire is to the charge control lamp, and the second input is from the tachometer. But they say you don’t have to connect the second one.
Install KZATE 9402.3701-03 with a new model LV and you will be satisfied.
and fastening to the bridge by SOLDERING (this is about the often pop-up question about burnt terminals of phase windings due to loose screws)
In general, I’ll look at the store directly (which is used for priors) number like 9402.3701-04
So is it better to take KZATE or PRAMO?
I just lost all my brains.
What have I done with it, two horseshoes, three regulators, and it has never happened since the new 14th century. In winter we had to recharge the battery. And in the end the lamps began to flicker, not much and only on a hot generator. While you remove it, it will cool down and you will ring it all together. The car was already shaking in time with the flickering. Now I have KZATE. I forgot about the voltage problems. 14.5 for cold and 14 for hot with main consumers. Finally the battery was charged to 100%. So it's a lottery I think. what is PRAMO what is KZATE.
Look for topics on the KZATE 9402.3701-03 generator, it can be modified to 90A.
So is it better to take KZATE or PRAMO?
Kzate I haven’t heard a single good review about Pramo
As for reliability, it really depends on your luck.
I just lost all my brains.
What have I done with it, two horseshoes, three regulators, and it has never happened since the new 14th century. In winter we had to recharge the battery. And in the end the lamps began to flicker, not much and only on a hot generator. While you remove it, it will cool down and you will ring it all together. The car was already shaking in time with the flickering. Now I have KZATE. I forgot about the voltage problems. 14.5 for cold and 14 for hot with main consumers. Finally the battery was charged to 100%. So it's a lottery I think. what is PRAMO what is KZATE.
Installation of a generator from Priora on a VAZ 2114
Below you can see the technical specifications of how to connect a generator from a Priora to a VAZ 2114. Express your opinion about the car in the comments.
Original name: . . . . ?? . . . priors' ?? . 2114
Release date: 07/17/2022
Posted by admin: at the request of Demid
Reasoning of a car owner named Toros: I bought it, sat down and drove 600 miles without reading the instructions, etc., everything is harmonious and convenient - it’s German.
Laughter on topic: - Mom, I'm going for a walk! - Who are you going with? Where will you be walking? When will you return home? What will you go on? - Dad, I'm going for a walk! - Okay.
Description: Dimensions are as follows: length - 3977, width - 1100, height - 1989 mm. The wheelbase is 2845 mm. Ground clearance 199 mm. The car is equipped with a hybrid power unit. The 2-cylinder engine is equipped with a system that provides engine power output. There are 4 valves per cylinder. The diameter of one cylinder is 76 mm, the piston stroke is 79 mm. The engine crankshaft accelerates to 8000 rpm. Maximum torque is maintained up to 4000 rpm.
The generator's task is to ensure the functionality of the entire electrical circuit of the car. In this case, we are talking about the VAZ 2114 model. The system facilitates the distribution of electricity. It cannot be called perfect and trouble-free, so sometimes certain problems may arise.
Car generator for 2114: features
Let's start with the fact that although simple domestic models (for example, VAZ 2107, 2110, 2114, 2115 and many others) do not have a large number of primary and additional on-board electronics, the VAZ 2107 generator or VAZ 2115 generator is of particular importance. The reason is the need to charge the battery and replenish the charge lost by the battery to start the internal combustion engine, as well as the power supply to the on-board network.
The generator or generator set on the VAZ 2114 is a three-phase alternating current electrical installation. The device has a built-in rectifier unit, which converts alternating current into direct current.
The VAZ 2114 generator has the following technical characteristics: the voltage value for powering the excitation winding ranges from 13.2V to 14.7V. The generator produces a current of 80A.
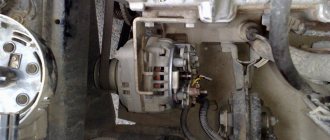
To understand how to remove the 2114 generator (we’ll look at it in more detail below), you must first note that the unit is installed on the engine on the left. The generator is driven from the crankshaft through the generator drive belt. The rotor rotates to the right.
The general structure of the generator includes a number of individual elements:
- a front cover made of aluminum and a rear aluminum cover (the covers have seats for bearings);
- battery connection terminal;
- connector for supplying voltage to the excitation winding;
- capacitor for noise suppression;
- mounting location for the generator brush assembly;
- diode block (6 power diodes and 3 additional) mounted on the inside of the back cover;
- in order for the semiconductors in the generator device to be well cooled, they are installed on special aluminum plates;
- The stator core cylinder, made of transformer iron, also stands out. The covers are attached to the stator with 4 bolts;
- There are grooves inside the stator into which power windings are placed, having leads for connection to the rectifier block;
- We also note that the excitation winding with its leads is connected to slip rings mounted on the rotor shaft;
- in front of the rotor shaft there is a special keyway where the drive pulley is located;
- The brush assembly of the VAZ 2114 generator is not dismountable, it is made as one piece with a relay-regulator, which is enclosed in a separate steel case attached to the brush holder (by the way, the brushes are carbon-graphite).
Replacement
Now let’s talk directly about how we can remove our ill-fated generator. We recommend that you study the relevant videos in order to better understand the nuances of dismantling.
If you follow the instructions, there should be no problems with removal and replacement.
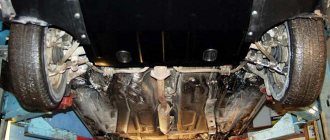
- Find a place where there is a lift or pit. That is, an ordinary garage may be quite suitable.
- Remove the protection from the power unit.
- Loosen the drive belt tension roller slightly.
- The upper bolt responsible for fastening the generator should be unscrewed.
- By analogy, we work with the lower fastening element.
- Next, be sure to disconnect the air conditioning compressor fasteners.
- Then remove the drive belt.
- Now you can remove the generator from its seat and move it slightly to the right in relation to the battery.
- Remove the bolt on top of the air conditioning compressor. Remove the compressor and hang it up. Don’t worry, the tubes used are quite reliable, so they can easily handle the weight.
- Remove all bolts from your generator holder.
- When you disconnect the terminal, calmly pull down the generator along with the holders.
- Reinstallation of the new device is carried out in strictly reverse order. In this case, adjusting the drive belt is a must.
It is not difficult to remove and replace such a unit yourself. But you will definitely need certain skills and preliminary study of the instructions. Use only high quality and efficient replacement parts to ensure that your generator does not cause problems in the future.
A generator in a car is a device that ensures stable operation of the vehicle’s on-board electrical network, in particular the VAZ-2114. This system of generating and supplying electricity has its advantages and disadvantages. In this article we will look at the main malfunctions of this unit, as well as the process of replacing the part with a new one.
Basic device malfunctions
On a VAZ-2114, the generator may fail for the following reasons:
- The fuse has blown. To solve the problem, it is enough to install a new element, having first determined why it failed.
- A break in the circuits that go to the devices. Be sure to make sure that the neutral conductor is connected to other contacts.
- Malfunction of the ignition switch.
- The control lamp has burned out.
- Problems with generator brushes. To fix the damage, you need to install a new brush holder and brushes. Additionally, clean the slip rings, which are probably already oxidized, using WD-40.
- Damage to the voltage regulator.
- Problems with the belt.
- The bearing has failed.
The above breakdowns are quite common and if the problem is not solved in time, the generator may fail and will have to be completely replaced. In terms of costs, the car owner will lose much more money compared to repairing minor faults.
If you need to replace a part, you shouldn't do it yourself unless you have the proper experience in car repairs. In this case, it is better to seek help from a service station.
Generator for VAZ 2110 which injector is better
thx was just wondering
07.26.2017 — 14:29 Alexander Menshchikov
I bought it in 2013 at the eleventh volt start, died a week later, passed it under warranty
07/05/2017 — 22:00 Denis Kamozin
start volts is complete crap the bearing fell apart after 7 thousand km.
Hello, could you tell me one thing? When many devices are turned on, the voltage drops. If you power the relay regulator with a plus to the power terminal +, and not with the add. diodes? Does the minus of the relay need to be moved? Or can I leave it on the body?
05/13/2017 — 04:44 Alexander Selivanov
my drain outputs 14.5. So I shouldn’t bother?
05/06/2017 — 23:00 Murat Karaketov
Replacing brushes
During regular maintenance, few people pay attention to minor generator malfunctions. Subsequently worn brushes are always a surprise. However, you should not rush to replace these parts. Initially, you need to determine why this happened, and only then disassemble the case.
The brush replacement process is as follows:
- Disconnect the wires from the generator.
- Remove the cap from the wires going to +, unscrew the nut that secures it, and remove it from the block.
- Remove the plastic casing by first releasing the clips.
- Disconnect the voltage regulator clamp and do not forget to disconnect the wire block.
- Replace the brushes and reassemble in reverse order.
Please note that you need to check the wear of the brushes by the degree of wear of the length of the rod, the value of which can be less than 0.5 millimeters. If the length of the brushes is normal, then the reason for the lack of charge is a faulty voltage regulator.
Basic problems
There are several main problems specific to a generator. If you study them, it will be quite possible to carry out repairs even on your own.
We will list them and also tell you about the necessary additional actions to eliminate them.
| Breaking | Your actions |
| Fuse blown | To fix this problem, simply replace the old fuse with a new one. But be sure to determine the reason why the problem arose |
| The circuit supplying the devices has broken | In this situation, be sure to make sure that the neutral wire is connected securely to the other contacts |
| Having problems with the ignition switch | Check if the ignition switch board is working |
| The control lamp has failed | Just change the device to a new one if the lamp just burns out |
| The brushes are out of order | You will have to change the brushes themselves, as well as their holders. Check the contacts for oxidation. They can be treated with WD40 or cleaned with gasoline |
| Voltage regulator does not work | This unit must be replaced. It is impossible to repair it |
| The alternator belt is damaged or faulty | You can try to adjust the belt tension if this is the problem. If the unit is damaged, it must be completely replaced. |
| The bearing has failed | Only its complete replacement will help here. |
Such breakdowns occur quite often, so they cannot be ignored at the first sign. Having understood the structure of the generator, solving problems with its malfunction becomes much easier.
In some cases, it is not possible to resolve the issue by replacing or repairing individual elements of the generator, so the only correct solution is to completely replace the unit.
Where is he located
Before removing the generator, you need to at least figure out where this device is located.
This unit is located in the engine compartment to the left of the engine. Look in relation to the interior in the area near the front right headlight.
This is exactly where the desired element is located.
Location
Functionality check
If the generator does not work correctly, the consequences can be unpredictable. If the charge coming from the device is low, the battery will quickly run out and your VAZ 2114 will simply stall. High voltage is even more dangerous because it damages the entire electrical circuit of the car.
The power indicators of the generator can be measured using a tester.
- Turn the ignition on and make sure all the lights on the dashboard come on. After this, start the power unit.
- If the battery icon lights up on the panel or blinks dimly, there is damage to the alternator circuit.
- Warm up the engine to approximately 90 degrees, then turn on all volatile devices.
- Connect the tester directly to the battery. The second person at this moment will press the gas pedal and keep the speed in the region of 3.2-2.5 thousand revolutions.
- When the tester reads 13V, the generator is working properly.
- Now turn off all power consumers and take measurements again. The revolutions are kept the same. If the generator is working properly, the tester readings will be 14.7V.
- At the same time, we recommend paying attention to the sounds that come from the generator. If there is a hum, there is a high probability of bearing wear, which should be replaced.
Low voltage can be caused by one of several reasons:
- The timing belt tension is not strong enough;
- The generator circuit is damaged;
- The voltage regulator is faulty;
- The brushes are worn out;
- The generator is worn out and needs to be replaced.
What causes the battery sign to light up on the dashboard?
When you turn the ignition key, the system turns on all the lights on the dashboard, allowing you to check that the systems are working properly. After this, the engine starts and all these lamps go out. But only if the car is in good working order.
If one of the lamps remains on, there is a problem with the car.
As for the battery icon, its glow when the engine is running indicates that the voltage generated by the generator is too weak or completely absent.
Replacing brushes
Replacing generator brushes is not difficult if the need arises. Such work is carried out if natural depreciation occurs.
There can be several reasons for depreciation:
- The battery is not receiving a charge;
- At night, the headlights do not generate enough light;
- Reduces tension, etc.
Typically, service stations do not pay much attention to minor generator malfunctions, so discovering failed brushes is often a complete surprise.
To replace, you will need to disassemble the assembly along with the voltage regulator.
- Disconnect the negative terminal from the battery.
- Disconnect all wires.
- Remove the cap from the plus terminal wiring system, unscrew the nut that holds this bundle in place, and remove it from the block.
- Remove the plastic casing. To do this, you must first disconnect the clamps.
- Now unfasten the regulator fasteners.
- When you remove the regulator, be sure to disconnect the wiring harness.
- The brushes are replaced in a similar way, but with a changed sequence.
- All disassembled elements are returned to their places.
The brushes are replaced as they wear out. The rod should be less than 0.5 millimeters in length, which indicates the need for replacement. If the rod length is normal, the cause of the malfunction may be a damaged regulator.
Regulator check
The regulator is checked together with the brush holders. This will allow you to immediately detect damage in the circuit of the regulator and brushes, if any.
Three-level voltage regulator
To check you will need:
- Wires;
- 12V light bulb;
- AA batteries;
- Car battery.
- If the regulator is working properly, the voltage will be 14.7V. If the supply is higher than the norm, the voltage supplied to the brushes will have to be stopped.
- If there is a problem with the regulator, the lamp is on, the device is most likely damaged.
- If the lamp is not lit, the contact that connects the brushes to the regulator may be broken. Or there is a break in the circuit.
- If the voltage is less than 13V, the regulator must be replaced with a new one.
- The job of removing and replacing the voltage regulator is similar to replacing the brushes, since both devices are removed together.
Belt tension
In many ways, the functionality of the generator depends on how correctly the timing belt is tensioned. If the tension is too weak, problems will occur in the on-board system. You can identify the problem by a whistle coming from under the hood and a flashing battery icon on the dashboard.
When the tension is too strong, there is little good in it either. Because the service life of the bearings is significantly reduced, and they soon fail.
The timing belt must be replaced after every 15 thousand kilometers. Be sure to periodically check its condition for signs of peeling or tears. If they are found, be sure to replace the unit.
The tension indicator depends on the timing belt model used.
- Model 37.3701 provides tension with a permissible deflection of 10-15 millimeters;
- Model 9402.3701 allows deflection within 6-10 millimeters with a pressure of 10 kilograms.
The tensioning procedure directly depends on the type of engine used in your VAZ 2114. Therefore, we will tell you about each type of engine separately in our table.
| engine's type | Tension procedure |
| 1.5 liter engine | — Loosen the generator fasteners; — Use the adjusting screw to adjust the tension; — To increase tension, the screw moves clockwise; — When the tension is weakened, we move counterclockwise; — After adjustment, secure the generator and check the belt. |
| 1.6 liter engine | — In a similar way to the 1.5-liter engine, we loosen the generator fasteners; — Using a crowbar, the generator is slightly moved away from the motor, which allows you to tighten the belt; — By moving the generator towards the engine, you loosen the tension; — Tension the belt, secure the generator and check for proper operation |
If this method does not resolve the problem, you should look for other causes of the problem.
Device from Priora on VAZ 2114
It is not uncommon for VAZ 2114 owners to think about installing a more efficient, powerful generator on their car.
Regulator from Priora
In this case, experts recommend using a device from Priora or Kalina, which these models receive with air conditioning.
The power of the units is 115A, while a regular factory generator has only 80A. The difference is significant, as you can see.
In this case, you will definitely have to change the pulley on your VAZ 2114. The task is simple, and it will cost a small amount of money.
Also pay attention to the Eldix generator. Its power is 115A, perfect for the “fourteenth” model. The only, but serious, disadvantage is that it is very difficult to find spare parts for it.
Which generator to install
Most car enthusiasts strive to install a part with more power than the standard device recommended by the manufacturer. In this case, the most suitable options would be the Priora or Kalina models. The power of such devices is 115A, while the factory equivalent is only 80A.
However, if you install another generator, you will need to install a different pulley. This procedure is simple and does not require large financial expenditures.
Experienced drivers recommend installing an Eldix generator on the VAZ-2114, the power of which is the same 115 A. But such a device has a significant drawback - it is difficult to find spare parts for repairs.
Signs of generator failure
There are several signs by which a driver can determine that the VAZ 2114 generator is faulty.
Here are the main ones:
- the corresponding lamp on the instrument panel indicates that the battery is not charging;
- insufficient or overcharging of the battery;
- weak headlights and poor performance of the wipers (with the engine running);
- excessively bright headlights;
- the electrolyte in the battery boils;
- appearance of extraneous noise in the generator set.
Which generator should you choose?
Before we get to the story about which VAZ 2114 generator is better, it’s worth saying - why shouldn’t you buy a battery native to the 14th model? The fact is that it is designed for a fairly low current - only 80 A.
Considering that while the car is running, the generator has to not only charge the battery, but also power electronic devices, this current is simply not enough to fully charge the battery (we should also add, albeit small, current losses in the circuit). That is why it is advisable to install a more powerful generator.
When choosing a generator in a car store, it is better to give preference to more expensive models. As the practice of many drivers shows, the cheapest models of generators fail almost immediately.
So, what devices can be installed on the VAZ 2114?
Firstly, without any modifications you can install 37.3701 from the 15th model. It is completely interchangeable with the original 14th generator, but the problem is that its amperage is even less - only 55 A. Therefore, it should be installed only as a last resort.
The second acceptable option is a generator from Priora or Kalina - it creates a current of 115 A, which is enough to charge the battery and operate all on-board electronics. True, you will have to replace the device pulley with a more suitable one.
The third option is a generator from PRAMO, which has an amperage of 120 A. This is the most optimal option of all for 2114.
And finally, generators from Eldix with a current of 80 or 115 A - they are completely identical to the 14th model generator in terms of external dimensions and pulley parameters. The only thing worth remembering is that they are practically not repairable. Even if there is a minor breakdown, the entire device will have to be replaced.
Functions and connection diagram of the generator
The generator, like all other car parts related to movement, plays a certain functional role. And performs the following functions:
- charging the battery;
- replenishment of the starter at the moment the engine starts.
Proper and early care of the generator will preserve the functionality of not only the generator itself, but also the battery. This is due to the fact that with a constantly reduced charging voltage, the power source is discharged, as a result of which this will lead to degradation of the storage plates and their further premature destruction. And this, in turn, will lead to an urgent replacement of the battery, the cost of which is sometimes more expensive than the generator.
To deal with possible generator malfunctions, you need to have a good understanding of its structure and connection diagram.
Connection diagram for the VAZ 2114 generator
Modern automobile generators have 3 windings, wound in such a way that an alternating voltage source is obtained. The stator windings act as magnets, and they are powered by a constant voltage from the battery. A magnetic field is formed in which a rotor rotates with a leaf-type magnetic core and a winding from which voltage is removed through slip rings and graphite brushes, with a rating of more than 18 V and a current of 60 to 120 A, depending on its power and number of revolutions. But since the battery voltage should not exceed 14.7 V, a rectifier unit and a stabilizer are used. They are installed on the generator itself, because based on the diagram, it is clear that the wires go directly to the battery and to the starter relay.
Sequence of replacing the generator on a VAZ-2114
To replace, follow these steps:
- Place the machine on a pit or lift it with a lift.
- Remove the engine protection.
- Next you need to loosen the tension roller for the drive belt.
- Unscrew the top bolt that secures the generator.
- Remove the bottom bolt.
- Disconnect the air conditioning compressor retaining fasteners.
- The drive belt is removed and the generator can be removed from its seats by moving the device closer to the battery.
- Next, unscrew the top bolt that secures the air conditioning compressor.
- Now you can completely remove the compressor and hang it on its own tubes. The pipes are quite strong, so they can easily support the weight of the block.
- In this step, unscrew the generator holder bolts.
- Disconnect the terminals and the generator, disconnect the holders that can be pulled down.
- Installation of the new part occurs in the reverse order, followed by adjusting the belt.
To summarize the article, we note that we told you about the main malfunctions of the generator on the VAZ-2114, and also examined the process of replacing the device. If you have never encountered this kind of repair work, then the best solution would be to contact a service station.
Where is the generator located?
Engine VAZ 2114
How to change brushes on a VAZ 2114 generator? Before answering this question, let’s determine where the patient himself is. This is the simplest, but at the same time difficult question, because the generator is under the hood. But when you open it, the alternator is not visible there, because it is attached to the bottom of the engine and connected to the crankshaft by a separate belt. To see it, you need to be in front of the car and look into the left side of the hood behind the engine. There you will also find a belt tensioner.
To easily replace the brushes, it is necessary to dismantle the generator, because this will allow you to check it more thoroughly as a whole. But if desired, this can be done without removing it. But then a number of problems arise that are associated with limited space and the inability to support anything with the second hand if necessary. In addition, you must be 100% sure that the problem is only in the brushes.
Removing the generator
Before starting to work with the elements and devices of a machine powered by electricity, it is necessary to disconnect the negative terminal from the battery.
In order to remove the generator, you need to loosen the tension bolt or mechanism and move the generator towards the engine with a pry bar or a large screwdriver. After which the belt can be easily removed. Next, you should loosen the mounting bolt with a head of 17. And freely remove the generator. Of course, before removing the generator, it is necessary to disconnect all terminals and wires from it.
Replacing brushes
Generator brushes VAZ 2114
Replacing brushes on a VAZ 2114 consists of the following sequence of actions:
- disconnect the negative terminal from the battery;
- disconnect the block with wires and the protective rubber cap;
- unscrew the clamping nut and remove the power wires from the stud;
- release three latches around the perimeter of the round plastic cover;
- remove the cover and find the regulator with brushes in the water body;
- unscrew the mounting bolts of the brush device;
- remove the brushes with the regulator;
- take new brushes and measure the size of the protruding graphite contacts, it should be at least 1 cm;
- if the size corresponds to the required one, then it is necessary to check the regulator itself;
- take new brushes and perform all the steps in reverse order.
The steps to remove the generator when replacing the brushes will be the same, but you have the need to carry out a complete diagnosis of it.
After replacing and installing the generator in place, it is necessary to check the belt tension. It should be no more than 10 kg. This can be checked using a special device or by eye. The belt should sag slightly when pressed with a hard object, but should not be taut like a string.
Generators for VAZ 2106 and 2107
The generator on the VAZ 2106-2107 costs the same as on the VAZ 2101 - G221. If you install additional external current consumers that operate constantly, this will lead to undercharging and insufficient current will be supplied from the relay regulator. These additional devices include:
- powerful audio systems;
- fog lights;
- TV;
- preheater;
- additional heater;
- fridge.
Any similar device will lead to greater power consumption and, consequently, to premature battery discharge, even when the engine is running at high speeds. Standard devices for 2106 were developed a long time ago and are not designed for modern energy-consuming add-ons.
In this case, it is recommended to replace the standard generator with a more powerful unit.
What to install?
G 222
It can be installed on a VAZ 2106 G222 with a standard regulator, but then it is necessary to change the connection diagram of the electrical machine.
On 2107 everything is installed without problems.
Check the voltage at medium engine speeds at the battery terminals, if it is 14 V at 2500 rpm, then everything is fine. You can drive with a more powerful unit by connecting additional options.
Generator 2108
This installation has greater efficiency, delivering a current of 55 A. It is installed on both 2106 and 2107.
It is useful to make some more minor modifications. Instead of the old relay, install a regular power one. Then the light comes on only when the engine starts and at low speeds.
On 2107 you only need to add a power relay.
2107-3701010
When installing this equipment on 2106, it is better to modify it: replace the relay regulator with a similar one from G 222.
Regardless of which generator is installed on the Priora, the owners of these cars often replace the unit due to the fact that not all devices allow connecting various equipment to the on-board network. Which manufacturer is good and which device is better to install on the Lada Priora?
You can supply generators of the following brands:
- BATE 90 ampere;
- KZATE 115a;
- BOSCH 120 amp;
- devices manufactured by VAZ for 120 or 115a.
Generator unit for Priora
In principle, other models of generator devices for domestic cars can be found on sale. When purchasing, the main thing is to check the integrity of the unit so that there are no signs of damage on the body. It is better to install high power so that there is a power reserve, thereby the device will last longer. In addition, it should be taken into account that it is not recommended to install less powerful generators, especially if many devices are connected to the vehicle’s on-board network.
Generator - performance check
Many car enthusiasts are interested in how to test a new generator that has just been installed on a car? Or how to check that the old one has already failed, although it seems to be working normally? After all, driving with a faulty generator can have a number of unpleasant consequences, the easiest of which is completely discharging the battery and stopping the car, and the most severe is damage to the on-board network and devices.
In order to test this device, you will need a tester (multimeter).
The diagnosis itself is performed in the following order:
- Turn on the ignition.
- Check to see if the generator/battery lights on the instrument panel come on.
- Start the engine - if the light goes out, then everything is in order, if not, then there is a malfunction.
- Wait until the engine warms up to operating temperature.
- Turn on ALL electrical consumers - lights, fans...
- We bring the engine speed to 3500.
- Turn on the multimeter in voltage measurement mode and connect the probes to the battery.
- If the generator is working, the multimeter will show 13 volts, if less, then there is a malfunction.
- Without turning off the engine and maintaining speed, turn off all electricity consumers - the multimeter should now show 14.7 volts or slightly higher - this also indicates that the device is working properly.
By performing the test according to the specified scheme, you can quickly and accurately determine whether the generator is working. But, there are a number of indirect signs that may also indicate a malfunction of this device.
These include:
- the battery charging icon is constantly lit;
- interruptions in the operation of electrical equipment, flickering headlights;
- boiling of the electrolytic solution in the battery;
- Generator operation is too noisy (as a result of bearing failure).
If you detect even one of these signs, you should immediately perform a full check (according to the scheme described above). If it turns out that the generator is faulty, a new one should be installed instead. But we’ll look at which generator is better to put on a VAZ 2114 below.
The best generator for VAZ 2110-12
FAQ on generators (automotive)
What is the service life of a car generator? The service life of a generator varies greatly and depends on the quality of its performance. For example, a standard generator can last 140 thousand km, which is almost 10 years of operation.
How to replace the generator on a VAZ of the tenth family? Replacing the generator is shown here.
Is it possible to repair a generator with your own hands? Self-repair of generators is possible (for example, replacing the slip rings of the generator) Approximate cost of spare parts:
- Winding 600 rub.
- Anchor 850 rubles.
- Generator diode bridge 250 rub.
- Generator brushes 100 rub.
- Generator bearing 150rub/set.
At these prices, repairing generator malfunctions is much more profitable than buying a new generator.
What is the price of a generator for a ten? The cost is from 2500 rubles to 5000 rubles. By the way, in order to save money, a generator from Volga (406 engine) is installed on the VAZ 2110, the price of which is 2200 rubles. No alterations or modifications are required.
So, let’s vote and leave reviews about the VAZ generators of the tenth family:
- What generator did you buy?
- Impressions and comments on the operation of the generator?
- How long did the last generator last?
ps Off-topic comments will be deleted.
Which generator is better to choose for the VAZ 2110-12?
If a dozen is standard with small additional consumers, then what should the generator current be?
How long did your standard VAZ 2110-12 generator last?
Possible malfunctions and ways to eliminate them
The operation of Lada Priora generating devices may occasionally fail.
For what reasons may a generator from Priora not work correctly:
- Elements F12 have burned out on the fuse diagram. In this case, the devices on the dashboard will stop working, and the lamp will not light up when the ignition is turned on. Replacing the part will solve the problem.
- There has been a break in the power supply circuit of the instrument devices; the symptoms will be similar to those described above. To fix the problem, you need to check the connections, as well as the contacts from the orange wiring.
- The ignition switch refuses to function. Regardless of what kind of lock it may be, it needs to be changed.
- Souring or wear of the mechanism brushes, oxidation of slip rings. Symptoms of malfunction will be the same. To solve the problem, you need to change the voltage regulator on the Lada Priora, and also clean the contacts. Many priority drivers today use a three-level voltage regulator - three levels allow you to always control the voltage level in the network.
- The excitation winding leads have broken. The problem can only be solved by replacing the rotor of the unit.
- If the drive belt slips, the battery discharge lamp will indicate this - adjusting the tension will solve the problem.
- Another reason why the Priora Lux generator may be faulty is damage to the valves of the rectifier device. The block itself will have to be replaced.
- The battery discharge lamp may appear when the diode batteries of the excitation winding are damaged. In this case, the rectifier unit will also have to be changed.
- A short circuit or break may occur in the stator winding - it will be necessary to repair the latter or install a new one instead. Also, the stator needs to be changed in case of an interturn short circuit or a short circuit to ground.
- The bearing elements have worn out - the car owner will be informed about this by third-party sounds when the generator unit is operating. In the video below you can familiarize yourself with the procedure for repairing a mechanism at home (the author of the video is Repair and Tuning).
Generator device VAZ 2114, VAZ 2115, VAZ 2113, Lada Samara 2
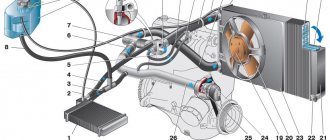
Generator type 94.3701 alternating current, three-phase, with built-in rectifier unit and electronic voltage regulator, right rotation (drive side). Generator system connection diagram: 1 – battery; 2 – generator; 3 – mounting block; 4 – battery charge indicator lamp, located in the instrument cluster; 5 – ignition switch
Generator connection diagram. The voltage to excite the generator when the ignition is turned on is supplied to terminal “D+” of the regulator (terminal “D” of the generator) through indicator lamp 4 located in the instrument cluster. After starting the engine, the excitation winding is powered by three additional diodes installed on the generator rectifier block.
The “W” output of the generator is not used on cars of the Lada Samara 2 family. The operation of the VAZ 2114, VAZ 2115, VAZ 2113 generator is controlled by a warning lamp in the instrument cluster. When the ignition is turned on, the lamp should be on, and after starting the engine, it should go out if the generator is working. A brightly burning lamp or glowing at full intensity indicates a malfunction.
WARNINGS The negative of the battery should always be connected to ground, and the positive should always be connected to the B+ terminal of the generator. Failure to turn the battery back on will immediately cause increased current through the generator valves and damage them. It is not allowed to operate the generator with the battery disconnected. This will cause short-term overvoltages to occur at the “B+” terminal of the generator, which can damage the generator voltage regulator and electronic devices in the vehicle’s on-board network. It is prohibited to check the functionality of the generator “for spark” even by briefly connecting the “B+” terminal of the generator to ground. In this case, significant current flows through the valves and they are damaged. The generator can only be checked using an ammeter and voltmeter. The generator valves are not allowed to be checked with a voltage of more than 12 V or with a megohmmeter, since it has a voltage too high for the valves and they will be broken during testing (a short circuit will occur). It is prohibited to check the vehicle's electrical wiring with a megger or a lamp powered by a voltage of more than 12 V. If such a check is necessary, you must first disconnect the wires from the generator. The insulation resistance of the generator stator winding with increased voltage should be checked only on a stand and always with the terminals of the phase windings disconnected from the valves. When electrically welding components and parts of the car body, you should disconnect the wires from all terminals of the generator and battery
Diagnostics of electrical equipment of Lada 2113. Instructions for repairing electrical equipment, starter, ignition of Lada 2114. Checking instruments, cleaner, lighting of Lada 2115, Generator design. Instructions for disassembling and assembling the Lada 2113 generator, repair procedure for the Lada 2114 generator, removal and installation of the VAZ 2113, VAZ 2115, VAZ 2114 generator.
- Electrical components of VAZ 2113, VAZ 2114, VAZ 2115,
- Repair of electrical equipment VAZ 2114, VAZ 2115, VAZ 2113,
- Generator device VAZ 2114, VAZ 2115, VAZ 2113
© Club of domestic cars Lada. Do-it-yourself repair and tuning of VAZ (Lada) with photos. The portal will help you do the work on modifying and repairing your VAZ car yourself.
Stories from our readers
“Fucking basin. "
Hi all! My name is Mikhail, now I’ll tell you a story about how I managed to exchange my two-wheeler for a 2010 Camry. It all started with the fact that I began to be wildly irritated by the breakdowns of the two-wheeler, it seemed like nothing serious was broken, but damn it, there were so many little things that really started to irritate me. This is where the idea arose that it was time to change the car to a foreign car. The choice fell on the melting Camry of the tenth years.
- HUCO-130512
- Febi-17202
- Bosch-1197311028
- Hella-5DR 004 242-061
- Beru-0 190 005 004
The modification process begins with the removal of the relay regulator. Required:
- Standard voltage regulator (160r.)
- Voltage regulator from a foreign car for 14.5V.
The box contains the catalog code for the spare part. Price 420 rubles, a cheaper brand will cost 220 rubles. In general, any company will do, the main thing is that the shape is identical to ours.
We separate the tablet from the standard voltage regulator; this is done simply and does not require demonstrations. As a result, we just get a bare body with brushes. We separate the 14.5V tablet from the LV of the foreign car. Be careful not to damage the tablet. Now we are trying to combine the tablet of a foreign car and our body with brushes.
- The photo shows a dismantled tablet with a foreign car's pH and a body with brushes.
- Because it is a little larger, it is not that easy to install. This is what a combined foreign-made 14.5V tablet looks like with our PH housing.
- And a standard pH and a 14.5V tablet assembled and ready for use.
Next, we solder the leads of the foreign tablet to our RN body. The terminals will have to be slightly bent to fit the outputs of the LV housing. We place the tablet on the standard PH body and screw the tablet to the body with bolts.
Next, solder the terminals of the tablet. We clamp the lead at the very base to dissipate heat and place the solder so that the lead of the tablet is completely covered with tin. We cover the nuts to prevent self-loosening due to vibration. We get a standard pH and a tablet from a foreign car at 14.5V. Now all that remains is to install a reinforced generator on the car.
As a result, our high-power generator showed:
- On a warm car, the voltage at the terminals is 14.4V
- With an average network load, the voltage was 14.2-14.3V
- When all devices were turned on, the generator voltage dropped to 14-14.1V and remained the same when the internal combustion engine warmed up to 90C o.
Another way to increase the car's network voltage is to install a diode in the generator or other voltage regulator. If after such modifications the generator still cannot cope, then think about how to put the electrical equipment in the car in order.
The generator is responsible for the functioning of the complex of accounting programs for the electricity of the VAZ 2114 car. This system of dispersing electricity has its shortcomings, both purely personal and more widespread.
- The fuse has blown. To fix this problem, you just need to change the fuse. But first you need to find out the reason.
- The circuit supplying the devices is broken. Be sure to check the connection of the neutral wire with other contacts.
- Damage to the ignition switch. Make sure the ignition switch circuit board is in good condition.
- Indicator lamp malfunction.
- Brush malfunction. To eliminate the malfunction, you need to change the brush holder and the brushes themselves, just clean the oxidized contact rings in the presence of gasoline, or treat them with WD-40.
- Malfunction in the voltage regulator.
- Damage, as it is also called, is a malfunction of the alternator belt.
- The bearing is faulty or broken.
The described malfunctions often occur, if you ignore them and do not make the necessary repairs in time, the generator will be completely destroyed, and then it will have to be completely replaced. Which in monetary terms is even more costly than repairing small problems.