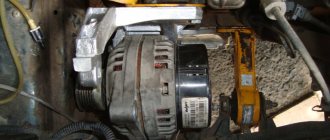
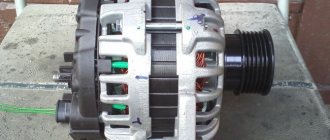
We will show you how to repair, disassemble and diagnose the Eltra generator with your own hands, which was installed on VAZ 2115, VAZ 2114, VAZ 2113 cars. The reason for the repair was that the owner’s battery was discharged on the road, the car twitched and stalled, when they tried to start the relay crackled, the battery was completely empty discharged. After that, the car was lit, it drove for some distance and stalled again. It was clear that the generator was faulty. A charged battery was taken, and when it was connected, the generator began to smoke. As soon as partial disassembly was completed, a malfunction immediately became visible; several diodes burned out on the diode bridge. Before further disassembly and subsequent repairs, it is necessary to re-solder the diode bridge to check the winding and everything else. The places where the winding will be soldered must be cleaned with a brush with metal bristles.
Video of repair and disassembly of the ELTRA generator in the VAZ 2115 2114 2113:
Reserve video on repair and diagnostics of the ELTRA generator in the VAZ 2115, VAZ 2114, VAZ 2113:
The generator is easy to disassemble, all its fastenings are 8 nuts, it is convenient to unscrew them without changing the head, plus a couple of screws for a flat-head screwdriver.
The VAZ 2114 generator is the main source of voltage in the car. It is this that generates electricity when the engine is running. Remember that the battery is actually needed for one purpose - to start the internal combustion engine. But, like any other component, the generator can fail completely, or some of its elements. And therefore it is necessary to carry out repairs, and you can do it without much difficulty with your own hands, without resorting to the help of specialists at service stations.
Unfortunately, there are always masters who, let’s say, “starred.” In other words, they don’t undertake repairs of domestic cars, although recently they were even ready to repair mopeds. Well, it’s better for us - DIY repairs will cost much less. By the way, if the generator is completely “bad”, there is damage to the covers, windings, and rotor, then it will be much easier to buy and install a new one. Now let’s look at the features of the operation of the generator set on a car as a whole and smoothly move on to repairs specifically on the VAZ 2114.
Main malfunctions of the VAZ 2114 generator
- The fuse has blown. To fix this problem, you just need to change the fuse. But first you need to find out the reason.
- The circuit supplying the devices is broken. Be sure to check the connection of the neutral wire with other contacts.
- Damage to the ignition switch. Make sure the ignition switch circuit board is in good condition.
- Indicator lamp malfunction.
- Brush malfunction. To eliminate the problem, it is necessary to replace the brush holder and the brushes themselves; it is enough to clean the oxidized slip rings with gasoline, or treat them with WD-40.
- Malfunction in the voltage regulator.
- Damage or malfunction of the alternator belt.
- The bearing is faulty or broken.
The described malfunctions are very common, if you ignore them and do not make the necessary repairs in a timely manner, the generator will be permanently damaged, and subsequently it will have to be completely replaced. Which in monetary terms is much more expensive than repairing minor problems.
But don't rely on yourself if you don't have the appropriate training. The best solution would be to contact a service station for qualified assistance.
How to disassemble the 2114 generator yourself
Having removed the generator, you can disassemble it and carefully inspect all its components. This will allow you to find worn/damaged parts and replace them.
For disassembly you will need tools such as open-end wrenches (19 and 10), as well as a Phillips screwdriver.
The disassembly procedure involves sequentially performing the following steps:
- The protective plastic casing on the body is removed. To do this, you need to release the three existing latches.
- The screws that secure the brush assembly are unscrewed using a screwdriver. Then it can be removed from the body.
- The wires coming from the regulator output are disconnected.
- Unscrew the screws (4 pcs.) that secure the rectifier unit. Next, the winding terminals are disconnected, and then the block itself is removed (along with the noise suppressor capacitor).
- Unscrew the tightening screws (4 pcs.) and remove the cover on the side of the slip rings.
- Unscrew the nut that secures the pulley. To do this, it is advisable to clamp the rotor shaft in a vice to prevent it from turning.
- The generator pulley is removed, as well as the thrust washer from the rotor shaft.
- Remove the cover from the rotor.
It is necessary to mark the relative position of the stator and covers in a convenient way. This will greatly facilitate the assembly process.
In this disassembled state, the 2114 generator can be easily inspected to identify existing problems. After eliminating them, the device is assembled, for which all steps should be performed in the reverse order.
If the “opening” showed that the generator cannot be repaired, then it will need to be replaced with a new one.
Checking the serviceability of the generator
Defects in the operation of the generator can have unpredictable consequences. If there is insufficient charge coming from the alternator, the consequence will be that the battery will die and as a result the car will simply stall. But the most dangerous thing is that if the alternator produces high voltage, the entire electrical system of the vehicle will be damaged as a result.
We check the power of the VAZ 2114 generator using a tester:
- After turning on the ignition key, make sure that the instrument panel lights are on, only then the engine starts. If the battery icon is lit or blinks dimly, this indicates damage to the generator circuit.
- The engine must be warmed up to 90 degrees, only after that all energy-consuming devices must be turned on.
- We connect the tester directly to the battery. The assistant accelerates, keeping the rpm at approximately 3200 - 2500. If the voltage is 13V, the generator is working.
- We turn off the devices consuming energy, and again take measurements, also at engine speeds of 3200 - 3500. The generator is operational if the voltage is 14.7V.
On a note! The main reason why the generator produces low voltage, below the level of 13V, may be due to malfunctions: insufficient tension of the generator belt, the generator circuit is damaged, the voltage regulator is damaged, the brushes are completely worn out, the generator must be replaced.
While the car is running, you need to pay attention to the sounds coming from the generator; if you hear a hum, this is an indicator of bearing wear, in this case it needs to be replaced.
Basic problems
There are several main problems specific to a generator. If you study them, it will be quite possible to carry out repairs even on your own.
We will list them and also tell you about the necessary additional actions to eliminate them.
| Breaking | Your actions |
| Fuse blown | To fix this problem, simply replace the old fuse with a new one. But be sure to determine the reason why the problem arose |
| The circuit supplying the devices has broken | In this situation, be sure to make sure that the neutral wire is connected securely to the other contacts |
| Having problems with the ignition switch | Check if the ignition switch board is working |
| The control lamp has failed | Just change the device to a new one if the lamp just burns out |
| The brushes are out of order | You will have to change the brushes themselves, as well as their holders. Check the contacts for oxidation. They can be treated with WD40 or cleaned with gasoline |
| Voltage regulator does not work | This unit must be replaced. It is impossible to repair it |
| The alternator belt is damaged or faulty | You can try to adjust the belt tension if this is the problem. If the unit is damaged, it must be completely replaced. |
| The bearing has failed | Only its complete replacement will help here. |
Such breakdowns occur quite often, so they cannot be ignored at the first sign. Having understood the structure of the generator, solving problems with its malfunction becomes much easier.
In some cases, it is not possible to resolve the issue by replacing or repairing individual elements of the generator, so the only correct solution is to completely replace the unit.
Where is he located
Before removing the generator, you need to at least figure out where this device is located.
This unit is located in the engine compartment to the left of the engine. Look in relation to the interior in the area near the front right headlight.
This is exactly where the desired element is located.
Location
Functionality check
If the generator does not work correctly, the consequences can be unpredictable. If the charge coming from the device is low, the battery will quickly run out and your VAZ 2114 will simply stall. High voltage is even more dangerous because it damages the entire electrical circuit of the car.
The power indicators of the generator can be measured using a tester.
- Turn the ignition on and make sure all the lights on the dashboard come on. After this, start the power unit.
- If the battery icon lights up on the panel or blinks dimly, there is damage to the alternator circuit.
- Warm up the engine to approximately 90 degrees, then turn on all volatile devices.
- Connect the tester directly to the battery. The second person at this moment will press the gas pedal and keep the speed in the region of 3.2-2.5 thousand revolutions.
- When the tester reads 13V, the generator is working properly.
- Now turn off all power consumers and take measurements again. The revolutions are kept the same. If the generator is working properly, the tester readings will be 14.7V.
- At the same time, we recommend paying attention to the sounds that come from the generator. If there is a hum, there is a high probability of bearing wear, which should be replaced.
Low voltage can be caused by one of several reasons:
- The timing belt tension is not strong enough;
- The generator circuit is damaged;
- The voltage regulator is faulty;
- The brushes are worn out;
- The generator is worn out and needs to be replaced.
What causes the battery sign to light up on the dashboard?
When you turn the ignition key, the system turns on all the lights on the dashboard, allowing you to check that the systems are working properly. After this, the engine starts and all these lamps go out. But only if the car is in good working order.
If one of the lamps remains on, there is a problem with the car.
As for the battery icon, its glow when the engine is running indicates that the voltage generated by the generator is too weak or completely absent.
Replacing brushes
Replacing generator brushes is not difficult if the need arises. Such work is carried out if natural depreciation occurs.
There can be several reasons for depreciation:
- The battery is not receiving a charge;
- At night, the headlights do not generate enough light;
- Reduces tension, etc.
Typically, service stations do not pay much attention to minor generator malfunctions, so discovering failed brushes is often a complete surprise.
To replace, you will need to disassemble the assembly along with the voltage regulator.
- Disconnect the negative terminal from the battery.
- Disconnect all wires.
- Remove the cap from the plus terminal wiring system, unscrew the nut that holds this bundle in place, and remove it from the block.
- Remove the plastic casing. To do this, you must first disconnect the clamps.
- Now unfasten the regulator fasteners.
- When you remove the regulator, be sure to disconnect the wiring harness.
- The brushes are replaced in a similar way, but with a changed sequence.
- All disassembled elements are returned to their places.
The brushes are replaced as they wear out. The rod should be less than 0.5 millimeters in length, which indicates the need for replacement. If the rod length is normal, the cause of the malfunction may be a damaged regulator.
Regulator check
The regulator is checked together with the brush holders. This will allow you to immediately detect damage in the circuit of the regulator and brushes, if any.
Three-level voltage regulator
To check you will need:
- Wires;
- 12V light bulb;
- AA batteries;
- Car battery.
- If the regulator is working properly, the voltage will be 14.7V. If the supply is higher than the norm, the voltage supplied to the brushes will have to be stopped.
- If there is a problem with the regulator, the lamp is on, the device is most likely damaged.
- If the lamp is not lit, the contact that connects the brushes to the regulator may be broken. Or there is a break in the circuit.
- If the voltage is less than 13V, the regulator must be replaced with a new one.
- The job of removing and replacing the voltage regulator is similar to replacing the brushes, since both devices are removed together.
Belt tension
In many ways, the functionality of the generator depends on how correctly the timing belt is tensioned. If the tension is too weak, problems will occur in the on-board system. You can identify the problem by a whistle coming from under the hood and a flashing battery icon on the dashboard.
When the tension is too strong, there is little good in it either. Because the service life of the bearings is significantly reduced, and they soon fail.
The timing belt must be replaced after every 15 thousand kilometers. Be sure to periodically check its condition for signs of peeling or tears. If they are found, be sure to replace the unit.
The tension indicator depends on the timing belt model used.
- Model 37.3701 provides tension with a permissible deflection of 10-15 millimeters;
- Model 9402.3701 allows deflection within 6-10 millimeters with a pressure of 10 kilograms.
The tensioning procedure directly depends on the type of engine used in your VAZ 2114. Therefore, we will tell you about each type of engine separately in our table.
| engine's type | Tension procedure |
| 1.5 liter engine | — Loosen the generator fasteners; — Use the adjusting screw to adjust the tension; — To increase tension, the screw moves clockwise; — When the tension is weakened, we move counterclockwise; — After adjustment, secure the generator and check the belt. |
| 1.6 liter engine | — In a similar way to the 1.5-liter engine, we loosen the generator fasteners; — Using a crowbar, the generator is slightly moved away from the motor, which allows you to tighten the belt; — By moving the generator towards the engine, you loosen the tension; — Tension the belt, secure the generator and check for proper operation |
If this method does not resolve the problem, you should look for other causes of the problem.
Device from Priora on VAZ 2114
It is not uncommon for VAZ 2114 owners to think about installing a more efficient, powerful generator on their car.
Regulator from Priora
In this case, experts recommend using a device from Priora or Kalina, which these models receive with air conditioning.
The power of the units is 115A, while a regular factory generator has only 80A. The difference is significant, as you can see.
In this case, you will definitely have to change the pulley on your VAZ 2114. The task is simple, and it will cost a small amount of money.
Also pay attention to the Eldix generator. Its power is 115A, perfect for the “fourteenth” model. The only, but serious, disadvantage is that it is very difficult to find spare parts for it.
Why does the battery icon light up on the dashboard?
When you turn the ignition key, the system displays all icons on the instrument panel to check the vehicle’s serviceability, i.e. All system lights are fully functional. Then the engine starts, so the lights should go out when the machine is in full working order. But if one of the lights does not go out, this indicates an existing problem.
Accordingly, if the battery icon does not go out, this is a consequence of the fact that the generator supplies too little voltage, or it is completely absent.
How to identify electrical problems in a car?
The first step is to understand whether your car really has power problems. There are two groups of problems in this regard; roughly, all problems can be divided into problems during startup and strange operation of the electrical network after starting the engine
It is important to distinguish this because different modules are involved in these processes. It’s worth figuring out what symptoms of the car you should look for if the electrical network is not working well after starting the engine:
- the operation of all the lamps in the cabin, as well as the headlights, side lights and brake lights is too dim; this may not be very noticeable, but in reality the difference in brightness is noticeable;
- turning off some elements of the electrical network without permission under fairly heavy loads, for example, when the fan in the cabin is turned on, the music may turn off;
- when revving up at idle, the brightness of the interior lighting noticeably increases for a second, but when other equipment is turned on, the brightness decreases;
- perhaps a barely noticeable or annoying blinking of the light, uneven illumination of the road, rapid failure of light bulbs in various modules of your car;
- a decrease in fan speed is noticeably felt when optics, music or other power consumers are turned on; there may be an incorrect connection in the network.
The problem is that a car owner can easily get used to many such manifestations. And in this case there will be no surprises. You can get used to dim light, poor airflow and other troubles. But in general, this mode of operation is very harmful to your car. Sudden failure of the fuel pump, climate system, poor operation of the automatic transmission and other components is possible.
Replacing generator brushes after their natural depreciation
Reasons for depreciation of generator brushes:
- Voltage drop.
- At dusk, there is insufficient illumination from headlights.
- The battery is not charging.
- and etc.
During normal maintenance, no one pays attention to small problems of the generator; for this reason, worn brushes are always a surprise. Do not rush headlong to change brushes if primary symptoms of problems occur. Find out the source of the problem, then disassemble the generator housing.
How to dismantle the generator brushes:
Before carrying out work on replacing the generator brushes, it is necessary to remove the assembly together with the voltage regulator, so we unfasten the minus terminal and disconnect the wires from the casing.
- Disconnect the wires.
- We remove the cap from the output wire system to +, disconnect the nut securing this bundle and remove it from the block.
- We remove the plastic casing, having first disconnected the clamps.
- Disconnect the voltage regulator fasteners.
- When removing the regulator, do not forget to disconnect the wire block.
- We change the brushes using the same method, but the sequence changes; we install everything in its original place.
Just a note! Be sure to check the wear of the brushes; they change when the length of the rod wears down to less than 0.5 mm. If the brushes are of normal length, a possible reason for the lack of charge is a malfunction of the voltage regulator or brush regulator circuit.
What signs will indicate that the generator brushes are faulty?
Read:
Understand that generator brushes
If your Priora with power steering or air conditioning has become unusable, the following external signs will help:
- length of the element being inspected;
- if upon inspection it is discovered that the length of the brushes is less than 5 mm, they must be replaced;
- Replacement
also be required if the appearance of
the brushes
indicates uneven wear, that is, one element is heavily worn out, and the second is brand new.
Uneven wear of these elements will certainly negatively affect the operation of the generator
, so experts recommend replacing them without fail.
The cost of new components for the Priora does not exceed 150 rubles; of course, you can also find cheaper brushes for the generator, but it is unlikely that such elements will serve faithfully for a long period of time, and such savings will lead to a repeated procedure for replacing these components.
Once high-quality brushes have been purchased (it is advisable to give your choice to well-known manufacturers), you can begin assembling the entire element and installing the generator in its original place. Lada Priora installation with air conditioning, on a generator along with. But as was said earlier, such a process can be carried out without removing it, which, of course, must be decided by each car owner independently. These operations, as many understand, are performed in reverse order, and after the final stage it is necessary to check whether the entire generator is working efficiently.
If replacement
worn brushes
will be done correctly, and the problem with charging the battery was precisely the wear of these components, then the car owner will solve this issue, and without the help of service station employees, which will save a lot of his own money. The replacement process itself is quite simple, but if difficulties arise during the work, you can watch the training video on the Internet resource at any time, which is provided by professionals, choosing the most suitable time for viewing.
I was tired of voltage sags when shifting gears, the low beam was already dimmed, and in general the voltage sags bothered me when the consumers were turned on. You turn on the air conditioner, and the voltage on the dashboard drops right down to 12 and a penny volts. Oh yes, the KZATE generator is 115A.
After reading and finding out about this problem on the drive, I realized that it is necessary to change the voltage regulator, like from the factory they put some Chinese crap in it that does not handle voltage sags. Well, change, change! I was not in the mood to change the brushes and remove the genes; I’m too lazy to remove them for this reason). I read about the drive, how other prior drivers change it, one person even removed the gene through the headlight, so as not to unscrew the AC compressor) Well, I found a way to still get to the brushes, moved the air filter and barely reached the gene, the most difficult, oddly enough, it turned out to be difficult to remove the plastic cover on the gene. The plastic that presses the latches of this cover broke off and it was impossible to click it in place, or rather, it was impossible to get to it from the angle from which I was reaching for it) In the end, I simply broke off this plastic cover)
>
Checking the voltage regulator
As we have already found out, the voltage regulator is checked together with the brush holders, so that if the circuit between the brushes and the regulator is damaged, we can immediately see this problem.
First, we check the brushes to see if they are broken or worn out; therefore, on your VAZ 2114, replacing the generator brushes is inevitable.
We prepare the necessary parts for testing, these are wires, a car battery, a 12V light bulb, AA batteries, to build two circuits:
Checking the voltage regulator
Checking the voltage regulator
If the voltage regulator is working properly, then the voltage is 14.7 V. If the supply exceeds the norm, it is necessary to stop the supply of voltage to the brushes.
If there is a problem with the voltage regulator, if the lamp is on, the cause is damage to the regulator. If the lamp does not light up at all, the reason is that there is no contact connecting the regulator and the brushes, or the circuit may be broken.
The regulator must be replaced if the voltage is less than 13V when the on-board system devices are turned on. An increased voltage of more than 14.7V may also be a consequence of damage to the regulator.
The process of removing and reinstalling the voltage regulator completely coincides with the process of removing the brushes from the generator, because they are removed along with the voltage regulator.
What malfunctions can occur, and how to get rid of them?
You turn on the ignition, but the control lamp does not light up, and the instruments do not work
Look into the mounting block. The F16 adapter may have burned out. If so, replace it.
The circuit that powered the devices broke. Review the “0” wire completely.
The circuit that connects the ignition switch to the mounting block has broken. To find out, you need to check wires “K” and “G”.
The ignition switch does not work. Replace the non-working contact part.
The control lamp may have burned out. Then you need to change it.
The circuit feeding the control lamp has broken. You need to check the “CB” wires and see if there is reliable contact between the terminals of the lamp sockets and the instrument cluster board.
It may also be that the slip rings have oxidized, or the brushes have become stuck or worn out. To fix this, you need to change the brushes and their holder, wipe the rings with a napkin soaked in gasoline.
This can also happen if the voltage regulator is broken. If so, install a new one.
See if the wire is connected from the “D+” terminal of the brush holder.
There is a short circuit in the positive valves. In this case, you need to replace the rectifier unit.
It is possible that the field winding leads have moved away from the slip rings. There are two options: solder the leads or install a new generator rotor.
The battery is discharged, and the control lamp lights up brightly or, conversely, dimly when the engine is running
Look at the VAZ 2114 alternator belt. It may be slipping. If necessary, adjust its tension.
The generator does not have to be repaired, but completely replaced. Parts necessary for repair may be missing, or the breakdown may not be repairable at all. Meanwhile, the on-board voltage and the quality of battery charging depend on the good operation of the power unit. It's a shame when, despite a good motor, electrical equipment does not work properly.
And if we are talking about VAZ cars, then sometimes a replacement is in demand due to the lack of power of standard devices. Modern automakers offer many additional devices that increase the level of comfort when traveling, but they also consume a large amount of electricity, and old devices cannot cope, so they have to be replaced with more powerful ones.
Many people are interested: which generator to buy if they have a VAZ? Here you need to consider them separately by model, so before you go shopping, read the recommendations of specialists and compare them with your wishes and capabilities.
Alternator belt tensioning procedure
An important factor is the tension of the alternator belt. If its tension is weak, the voltage in the on-board system can be reduced. In this situation, a whistle is heard, and the battery icon on the dashboard begins to flash.
Strong tension also has a negative effect, since it negatively affects the life of the bearings in the generator.
Important! The alternator belt must be replaced every 15,000 km. When visually checking the belt, pay attention to its structure; it should not peel off or tear, otherwise it should be changed urgently.
The permissible belt tension depends on the generator: for model 37.3701, when tensioning, the permissible deflection is 10 -15 mm, for model 9402.3701, the deflection is allowed 6 - 10 mm, when pressing 10 kg.
Electrical breakdowns
You can understand that an electrical breakdown has occurred in the generator by the following indicators:
- the charge voltage has decreased;
- the charge voltage has increased;
- The generator stopped charging altogether.
If you don’t have a multimeter at hand, you can determine the malfunction using the following parameters:
- The battery sensor blinks or is constantly on;
- the headlights began to shine quite dimly, even when the engine was running;
- wipers work much slower than before;
- The electrolyte in the battery is boiling, while the headlights are shining very brightly.
It should be understood that you can superficially check the operation of the generator without removing it. But if such a check does not bring the necessary results, then dismantling the generator simply cannot be done.
We tighten the belt
The tensioning process itself depends on the engine size of 1.5 or 1.6, since the VAZ 2114 model.
1.5 L engine:
- We loosen the fastening of the VAZ 2114 generator.
- Using the adjustment screw, we adjust the belt tension; if we need to tighten it, we act clockwise; if necessary, loosen the direction of movement counterclockwise.
- When we have reached the required belt tension, we strengthen the generator and be sure to check the belt.
1.6 L engine:
- In the same way as in the first case, we loosen the fastening of the VAZ 2114 generator.
- Using a crowbar, we move the generator slightly away from the engine and tighten the belt; if it is necessary to loosen the belt, we move the generator in a different direction, i.e., towards the engine.
- After completion, secure the generator and check the belt tension.
Important! After the work was done, the problem did not disappear, the voltage drop process continues, so the problem was not identified, be sure to check the generator.
Removing and replacing the unit
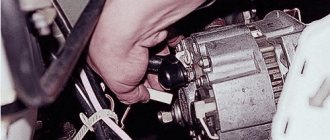
How to remove the generator? To carry out the work, you must have a set of wrenches and a pry bar. First, the negative terminal is disconnected, then the protection is removed, after which the boot is unscrewed and access to the bolts securing the generator is opened. There is no need to remove the boot completely; you can simply lower the protection along with it. Next, replacing the VAZ generator is performed in the following sequence.
- The generator belt tension bolt is unscrewed.
- The device moves towards the engine.
- The alternator belt is removed.
Disassembling the generator: 1 – generator drive pulley; 2 – bracket for the right engine mount; 3 – mounting plate; 4 – tension bar; 5 – generator; 6 – generator mounting bracket; 7 – generator drive belt
- The tensioner bar is removed by unscrewing it from the engine.
- The plug is disconnected and the terminals are removed.
- The generator is fixed on an axis. It is secured with a nut. Usually it is very difficult to remove such an axis. Therefore, it is better to release the mount of the generator with the block.
- The device is removed.
- The axle unscrews. It must be carefully knocked out of its seat. You can use a long bolt for this.
- The element is completely free.
Now the VAZ generator is being replaced. Assembly and installation are performed in reverse order. The belt can be tensioned using a conventional mount. They rest it against the engine and press on the device. It begins to move away from the engine and tighten the belt. Having obtained the desired tension, tighten the bar fastening nut.
The belt tension must be within normal limits. If it is too weak, the belt will start to spin. If the tension is too strong, the bearing will crumble. Such a breakdown sometimes leads to a complete replacement of the device. Basically, the tension is measured by the deflection of the belt. Its normal value is 1 cm. With this tension, the relay will always indicate a charge, and the battery will receive the required charge.
A review of messages on auto forums indicates that many VAZ 2114 owners, after a breakdown of the factory unit, strive to choose and install another powerful generator. However, not everyone knows which device needs to be purchased so as not to make any additional modifications to the mounting brackets.
Professionals recommend installing a generator from a Priora; a Kalina generator with air conditioning is also suitable. These devices are designed for 115 A. For the factory one, this figure does not exceed 80 A. It should be noted that such a replacement will not affect the relay in any way.
The VAZ 2114 generator is the main source of voltage in the car. It is this that generates electricity when the engine is running. Remember that the battery is actually needed for one purpose - to start the internal combustion engine. But, like any other component, the generator can fail completely, or some of its elements. And therefore it is necessary to carry out repairs, and you can do it without much difficulty with your own hands, without resorting to the help of specialists at service stations.
Unfortunately, there are always masters who, let’s say, “starred.” In other words, they don’t undertake repairs of domestic cars, although recently they were even ready to repair mopeds. Well, it’s better for us - DIY repairs will cost much less. By the way, if the generator is completely “bad”, there is damage to the covers, windings, and rotor, then it will be much easier to buy and install a new one. Now let’s look at the features of the operation of the generator set on a car as a whole and smoothly move on to repairs specifically on the VAZ 2114.
Generators for VAZ 2114 and Priora in comparison
Many car enthusiasts want to install the most powerful type of generator in their car. In this case, the best option would be a generator with air conditioning used for installation on models such as Priora and Kalina. The power is 115A, while the power of the factory copy is only 80A.
But there is a small nuance: you will have to replace the pulley; this is an inexpensive and fairly easy procedure.
Many car owners recommend the Eldix model generator, with a power of 115 A. It is a good model, but it has a huge disadvantage: it is impossible to get spare parts.
Diagnostics
If such signs of generator malfunction occur, it is necessary to diagnose and repair the generator.
Before starting repairs, it is necessary to carry out diagnostics and exclude trivial breakdowns, such as a fuse and loose battery and generator terminals.
If the battery is not charged, it is necessary to check the integrity of the fuse numbered F16; this fuse is responsible for the excitation winding of the generator. If the field winding fuse fails, the generator will not produce voltage.
If the charge is in progress, but the voltage at the generator output is negligible, then it is necessary to check the tightness of the terminals on the battery and the tightness of the positive contact on the generator.
If the diagnostics show that the fuse is intact and the terminals are sufficiently tightened, then you should begin repairing the generator.
Signs of a faulty generator diode bridge
The bridge is an electrical circuit of diodes that process signals from alternating current flows into direct current. Problems with the generator directly depend on problems in the diode bridge.
Problems that can completely leave the battery without a charge or charge the battery more than normal ultimately have huge negative consequences with the internal electrical system of the car.
The function of the diode system is not only in the process of converting current pulses, but also in its unipolar transmission from the generator to the battery. Accordingly, if the diode is faulty, the current is directed in both directions, or the current supply is completely stopped. The cause of damage and malfunction of the diode bridge is poor-quality contacts, or as a result of moisture penetration.
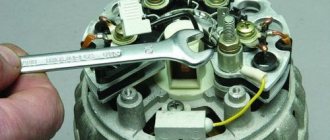
To check the diodes, the bridge must be dismantled using fairly light manipulations.
We dismantle the diode bridge of the generator:
- Disconnect the “-” terminal from the surface of the battery and detach the wiring system from the casing.
- Unscrew the wires.
- We remove the rubber cap from the wires + terminal, disconnect the nut securing these wires and remove them from the generator block.
- We remove the plastic casing, having previously unfastened the fastening system.
- Disconnect the mount for the regulator.
- When removing the voltage regulator with brushes, do not forget to unfasten the wire block.
- Use a wrench to remove the bolts securing the bridge.
- Having bent the leads directed to the stator winding, we unscrew the capacitor mount.
- We take out the diode bridge. We unscrew the 2 nuts of the contact bolt, remove the bushings from it, and also remove the bolt from the bridge. That's all, now you can change or check the diode bridge.
- We repeat the installation process in reverse order.
Removing the diode bridge
About the generator design
The VAZ 2114 generator is an alternating current electrical installation with electromagnetic excitation, three-phase, synchronous type. A rotating magnetic field is used to convert the mechanical energy of the power plant into electrical energy.
The generator design uses two main parts:
- movable rotor;
- the stationary part of the installation is the stator.
The stator is a sheet metal element, each sheet is insulated from each other. Copper windings are placed in special grooves on the inner surface. The rotor is a machine-bored part made of solid electromechanical steel. The pole tips are made of sheet steel. At each pole there is an excitation coil, powered by a direct electric current source.
The generator is protected from possible mechanical damage by the housing. The housing contains all the main parts of the electrical installation:
- bearings;
- impeller for cooling;
- rectifier block or diode bridge;
- voltage regulator;
- belt drive pulley.
Covers are installed at the front and rear, secured to the stator housing using bolted connections and are a fixed part. The rear bearing is fixed on the rotor shaft and closed with a special bushing. At the front, the bearing is located in the front cover. Due to the fact that it is pressed into the seat, the bearing changes along with the cover. The rotor shaft rotates on bearings. The lubricant provided by the manufacturer is designed for the entire service life of the unit.
The copper stator winding is assembled according to a star connection diagram, all wires are brought out to one common point. At the back of the winding wires are connected to the rectifier unit. It contains diodes (depending on the modification of the generator from 4 to 6) made of silicon. There are positive and negative diodes, their number is equal. Depending on the pole, the diode is pressed into one of the aluminum plates, which is shaped like a horseshoe. There are three more small diodes on the plates, through which power is supplied to the field winding when the engine starts. The diode block is attached to the back. The voltage regulator and capacitor are also located here, reducing the risk of winding breakdown due to voltage surges.
When the ignition is turned on, the warning lamp on the instrument panel should always light up. When the engine has not yet started, voltage is supplied to the winding directly from the battery. After starting the engine, power is supplied to the windings from the diode bridge, at this moment the control lamp on the dashboard should go out. If after starting the engine the light on the panel does not go out, it means that the battery is not receiving voltage from the generator. Accordingly, there is a malfunction of this unit.
Features of using the generator
First of all, you should not allow the generator to operate for a long time with the battery disconnected. This can cause a powerful voltage surge that the capacitor cannot handle. Because of this, the device may malfunction. The contacts from the battery must always be connected to the corresponding terminals, i.e., the plus must always be fixed to the supply terminal on the generator, and the minus to ground. If the contacts are mixed up (for example, the terminals on the battery are mixed up), too much current will flow through the diodes on the rectifier unit, which will cause their breakdown.
You should never check an electric generator for a spark. Due to a sharp surge in electricity, the diodes almost immediately fail. Checking should be carried out exclusively using special measuring instruments on a stand.
Diodes cannot be checked using a megohmmeter, otherwise this may result in a short circuit on the diode bridge. If a megger is used to diagnose electrical wiring, the generator must be disconnected from the wires. The terminals and contacts must be disconnected from the generator and battery even in the case of welding work on the car body, components and assemblies.
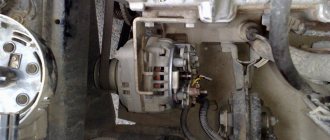
How to remove a generator on a VAZ 2114
We remove the VAZ 2114 generator:
- In order to remove the VAZ 2114 generator you need a pit or a lift.
- The protection must be removed from the engine.
- The tension roller for the drive belt needs to be loosened.
- Disconnect the top bolt securing the generator.
- Then remove the bottom bolt securing the generator.
- Disconnect the air conditioning compressor mount.
- The drive belt is removed and the VAZ 2114 generator is removed from its seats and subsequently shifted to the right closer to the battery.
- Then simply unscrew the top bolt securing the air conditioning compressor.
- We simply take out the compressor and hang it up; the tubes are strong enough and can easily support its weight.
- The generator holder bolts must be unscrewed.
- After disconnecting the terminal, the generator and its holders can be pulled down.
- Installation follows the same method but in reverse order, and be sure to adjust the drive belt.
As a result, if the winding is shorted, it is necessary to find out the reason. If any contact ring has become unsoldered, this problem can be eliminated by unwinding the defective turn back, then removing the broken end and soldering the unwound drive. If desoldering occurs, it is also enough to simply solder the wires.
Relay problems also occur due to a sufficiently strong or weak charge; it is changed during repair of the generator. If the generator is working properly and the signal on the panel is flashing, this indicates a malfunction of the diodes. Since these elements are located in the generator, their necessary replacement is carried out when the VAZ 2114 generator is disassembled.
Excessive noise is the result of wear on the rotor bearing. If it is completely worn out, it must be replaced; if the violations are related to the lack of play in the bearing, it is enough to fill it with oil.
You can repair a generator yourself if you know and follow the procedure. If possible, check the operation of your vehicle in a timely manner and carry out the necessary replacement of parts.
The principle of operation of a generator in a car
The peculiarity of the generator is that it produces alternating current. Whatever one may say, when operating this electric machine, you can only get alternating current, and only then convert it to direct current. General generator design:
- Back and front covers with pressed bearings.
- Rotor with excitation winding.
- The stator with power windings is where the voltage is removed.
- Diode bridge - three-phase rectifier.
- Electrolytic capacitor - to get rid of the alternating component of current.
- Voltage regulator - necessary for accurately setting the supply voltage of the rotor winding.
- Carbon-graphite brushes are necessary for transmitting voltage from the relay regulator to the rotor winding.
- And the remaining components - brackets, nuts, bolts, belt.
For normal operation of the generator, two components are required:
- Rotation.
- Magnetic field (constant).
It is enough to remember the school physics course - an electric current will appear in the winding only if it is affected by a moving magnetic field. Moreover, the output voltage will depend directly on the magnitude of this magnetic field. This means that the rotor winding is a source of a constant magnetic field, and it is powered through a voltage regulator, therefore, the output will always have the same voltage.
The alternating voltage is removed from the stator winding. Moreover, there are three windings, they are connected in a “star”. Consequently, we get three phases at the output. This is necessary primarily in order to reduce current ripple in the on-board network. With the help of a diode bridge, which contains six semiconductors, the current is rectified. And the capacitor cuts off the entire variable component. According to Kirchhoff's law, an electrolytic capacitor is replaced by a gap when operating in a DC circuit and by a conductor in an AC circuit.