Many car enthusiasts, when they detect an extraneous knock coming from the depths of the car’s suspension, including Renault Logan, subsequently inevitably face the need to replace the tie rods, their ends, as well as the rack and pinion mechanism itself. To carry out repairs of failed components, many Renault Logan owners resort to the services of expensive specialized centers. However, replacing the tie rod end can be done with your own hands.
This article is devoted to how to diagnose the steering unit with your own hands for the presence of play, as well as replace the steering rods, rods and rack and pinion mechanism in the Renault Logan model.
Which company should you prefer?
It is very important to correctly select the worn tie rod end. To do this, you need to carefully examine the part to find a specific serial number on it.
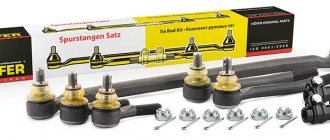
Thanks to this number, you will be able to select a repair kit for the steering rack of a Renault Logan car. Almost everyone recommends using only original parts, and only branded Renault parts, no matter how much the kit costs, although the price is not high.
It should be noted that there are replacement kits from other manufacturers, but they are not of the same quality as the original ones. The original ones have their own article number.
What signs indicate the need for repair or replacement of tips?
Even an inexperienced car enthusiast can identify steering problems. The first sign is insufficient reaction when turning, steering wheel wobbling, “wobbling” on the road when the steering wheel is released.
In the future, problems manifest themselves as extraneous knocking and crunching noises in the suspension. The reasons for this may be other problems in the car, but most often such “symptoms” are a signal to replace the steering tips.
Currently reading: Check Engine diagnostics in Renault Logan directly from a mobile phone and error codes
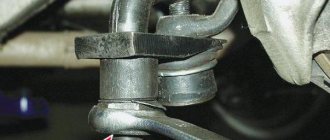
Installing the pin in the steering knuckle
Then we put the tip pin in place in the steering knuckle and tighten the nut securing it and tighten it completely. We remove the electrical tape on the rod and tighten the lock nut well with a certain force. I should have replaced the old nut, but I forgot to do it and also wrapped a layer of electrical tape for control. Therefore, I decided to leave the old tie rod nut, and it would be advisable for you to change it.
If the nut on the connection is very tight, you need to use a gas wrench to hold the steering rod from turning. Then we put the wheel in place, without first tightening the wheel bolts until they stop. We remove the stop and jack and tighten it completely.
At this point the left tie rod end was changed. As we can see, this work was completed without the use of an inspection hole or overpass, I just needed a flat area.
The right steering tip changes in the same way as the left...
The factory nut is a little lower than the Belebeyskaya one, but the length of the thread on the pin is enough to install without any problems.
After replacement, don’t forget to visit a wheel alignment service center.
Short description
- First, use a can of WD 40 to spray the fasteners. If you don’t have a wedge at hand, use water, wet a cloth, put it on the fasteners and wait for it to get wet;
- Let's start by loosening the rod end locknut. Having loosened it, we leave it in the same place;
- We unscrew the steering tip nut on the steering knuckle, holding the hexagon to prevent the finger from turning;
- If desired, use a ball joint puller and press the pin out of the steering knuckle arm. An alternative is to use a heavy hammer, tap it on the end of the fist boss from the side along the axis of the lever, alternating blows on the fasteners from above;
- We pull out the finger from the socket of the rotary lever;
- We screw the new one in the reverse order of removal, up to the locknut installed in the place where it was before;
- We place the hinge pin in the socket of the steering knuckle lever, and tighten the new pin well, holding it from turning;
- Let's tighten it with good force, so as not to break the thread of the lock nut of the rod end;
- Having completed the work on both sides to replace the steering tips, we go to a technical service, where we set the angles of the car’s wheels.
Replacing Renault Logan steering wheels incorrectly
Right
Let's start the renovation
To be able to carry out repair work, you will need an appropriate tool that allows you to dismantle the rod, its tip or boot. A lift will also greatly simplify the task.
- If an annoying play is detected in one of the tips, then we replace it according to the given algorithm and, not forgetting to check the article data.
- We remove the wheel from the corresponding side.
- We unscrew the nut that secures the ball pin of the tip in the eye of the steering knuckle.
- To release the conical part of the pin from the eyelet, we apply a lateral impact load to it (with a hammer) or, which is more civilized, use a puller.
- Lubricate the threaded part of the pin on the new tip with an appropriate lubricant, after which we screw the tip onto the rod. Tighten the locknut. To ensure a minimum error in wheel alignment, we ensure that the number of turns matches when dismantling and screwing the tip onto the rod.
- We head to the service center to monitor and adjust wheel alignment.
- During installation, we take “care” of the boot so as not to damage its rubber texture.
- The replacement algorithm is identical for both sides of the suspension.
- A failed rod should also be unconditionally replaced since it falls into the category of parts that cannot be repaired.
- Having dismantled the clamps (2 pieces), remove the boot from the rod and put it aside for a while.
- Armed with a special device that allows you to unscrew the rod, we will implement this action.
- We install a new analogue and put on the boot, securing its extreme sections with clamps.
- If it is not possible to remove the boot through the tip, we dismantle the latter. After assembling the unit, a wheel alignment is required.
- Now let's begin the process of replacing the rack, which can be done in several steps.
- First, drain the fluid from the power steering circuit.
- We disconnect the steering shaft from the seat on the rack gearbox.
- We unscrew several bolts that hold the rack assembly to the subframe. In the Renault Logan modification, 2 pcs.
- To ensure the correct angle of installation of the wheels, we first make the appropriate markings. The shaft is marked with only one mark.
- We disconnect the tips from both sides of the Renault Logan car.
- Now we take out the assembly assembly.
- We prepare a new unit and install it on the car in the reverse order of the dismantling procedure.
If the owner is faced with the need to replace the rack in a Renault Logan car, the equipment of which does not include power steering, then the technology is completely identical to the sequence of manipulations given here. The exception is that there is no need to drain the liquid.
Recommendations
Comments 16
I installed SASIK and drove about 10t.km and fell apart to hell
Installed Phoenix, drove only 25t.km.
The tip of the trv has passed almost 50 thousand and is still alive. Check for yourself first whether what the service said is really broken
Put forward, 25-30 thousand go.
In my opinion this is a bad indicator
For 400 rubles, ok
It’s better to pay once and go than to change something every time. The camber also costs money, and the time spent is priceless. A normal tip of 50 thousand should be taken care of on average roads.
I tried different ones, but they don’t go more than 30-35 thousand. So it's a better question!
It’s better to pay once and go than to change something every time. The camber also costs money, and the time spent is priceless. A normal tip of 50 thousand should be taken care of on average roads.
It’s just that everyone’s roads are different, this is the one I take to work)))
It’s better to pay once and go than to change something every time. The camber also costs money, and the time spent is priceless. A normal tip of 50 thousand should be taken care of on average roads.
Agree. With a mileage of 234,500, I still have my family and others intact, and this is far from being on good roads. This is how the original can be placed.
Maybe Renault Repair on YouTube will help, the kids there tell you how to change parts, well, and tell you which ones are better to replace. I think they have plenty of experience in these matters. Personally, I get information there, plus forums, where would we be without them.
Thanks, I looked. Now I'm leaning towards Sasik
My Sasiks have been running for a year (30 thousand), one has completely died, the second is about to do the same) I installed a Lemferder, let’s see what happens)
Thanks, I looked. Now I'm leaning towards Sasik
There are 2 Logans in the family. I only bet Sasik. Some rollnaki traveled 30 thousand km and were sold with an excellent car. condition. Sasik installed rulnaki on my mother’s car 2 years ago. More than 45 t.km. without adding lubricant. Everything is good! On my current Logan, Rulnaki Sasik a year ago and about 15 t.km - not an indicator, but everything is normal. I'm thinking of changing the ball joints. I'll take the sasik. Good luck on the roads!
There are 2 Logans in the family. I only bet Sasik. Some rollnaki traveled 30 thousand km and were sold with an excellent car. condition. Sasik installed rulnaki on my mother’s car 2 years ago. More than 45 t.km. without adding lubricant. Everything is good! On my current Logan, Rulnaki Sasik a year ago and about 15 t.km - not an indicator, but everything is normal. I'm thinking of changing the ball joints. I'll take the sasik. Good luck on the roads!
More than 40 tons. Sasik went through, although over time the anthers from Taz08 were replaced and ShRB-4 lubricant was added, now you can completely forget about them for a long time, thanks to a promotion in Avtodok that year, Sasik was also bought as a reserve, and they are still lying around. So Sasik price-quality, if not counterfeit.
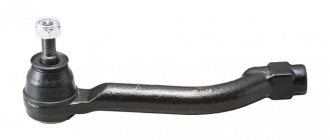
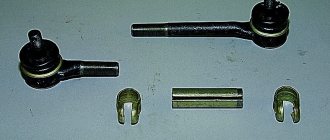
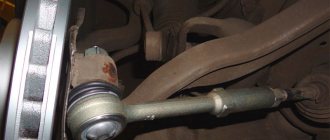
All tie rod ends used on Renault cars look almost the same - they are screwed onto the tie rod. Additionally, the tip is secured with a counter-nut. The counter side is always equipped with a hinge connected to the steering knuckle lever. We will only talk about the Logan family. Let's consider which steering ends for Renault Logan would be better to buy, so that you don't regret the purchase later. We will compare all products according to several criteria, but let the buyer make the choice.
The following video shows how the tip on the left is replaced.
What are tie rod ends
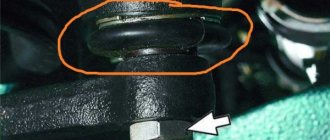
The principle of operation of such elements is extremely simple: they provide a hinged connection that transmits the steering movement to the steering axis. Any malfunction in this system leads to difficulties in driving the vehicle and can cause a fatal accident. The structure of the tips includes:
- Curved body with axle shaft.
- Threaded ball pin.
- Finger nut.
- Insert for fixation.
- Protection (cover and case).
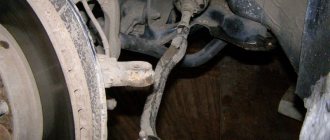
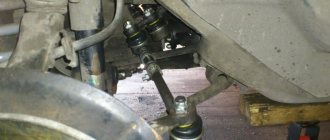
The main malfunction of this unit is the appearance of axial play. The steering end is an element of the steering rod that connects it to the rack shaft. You can determine the malfunction yourself by raising the car on jacks or above an inspection hole. When the wheels move, the balls rock or tap. This manual method is currently practically the only one that allows you to accurately diagnose the need to replace tie rod ends.
How to identify faults?
To independently perform diagnostic manipulations in order to determine the need for further repair of elements of such a unit as a steering rod, you will need the “help” of a pit or a lift. If suspicions affect the steering tip, then play in it can be identified through linear movement (force) applied to the rod. If a sound characteristic of play is detected, then the tie rod end needs to be replaced.
When the Renault Logan steering unit has power steering, the tie rod end is replaced using an identical algorithm (as in the version without power steering).
To detect play at the hinged connection of the rod with the rack, you should squeeze the boot with your fingers and feel the specified hinge for wear.
The decorative boot hides a bushing underneath, which ensures the alignment of the shaft in the rack and its tight fit. Transverse play present at the shaft will indicate wear of this bushing. Replacing it will require a difficult undertaking involving partial disassembly of the rack and pinion mechanism. And all this is done with your own hands.
The Internet allows you to find a lot of options for video material illustrating the procedure for replacing steering rods in a rack and pinion mechanism. This allows you to defeat the annoying knocking.
Replacing the accessory belt for Renault Logan
Replacing the muffler Renault Logan
Renault Logan configurations
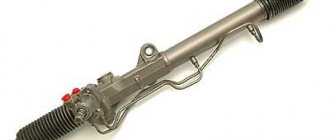
Repair of Logan steering rack without power steering and with power steering under service conditions
Repair of a Logan steering rack without power steering or with power steering is carried out after removing the rack for its subsequent restoration.
List of further operations:
- Removing the retaining ring from the distributor is the first step in the repair process.
- Next, the spool plug is unscrewed, covering the spool nut, which is subsequently also unscrewed with a special device.
- The adjusting clamp nut is removed after.
- Next, the clamp spring is removed, as well as the clamp itself.
- The distributor, hidden in the housing, is removed by knocking it out.
- Next, remove the oil seal from the distributor, as well as the bearing ring, which breaks in most cases.
- The locking bracket is removed from the rear support. When prying with a screwdriver, it flies out on its own.
- Next you get the back plate and the stem.
- When the Logan steering rack is completely disassembled, all its components are thoroughly cleaned of oil, dust, and possible wear products. Degreasing is carried out.
- The surface of the rod must be sanded on a lathe with fine sandpaper. replacing the steering rack with a Renault Logan, removing and repairing the steering rack, without Renault repairs. The distributor shaft is also subjected to grinding.
- The preparation of the components is completed. The rod comb is thoroughly coated with lubricant before returning to place. BMW E46 steering rack repair in garages from “garage mechanics” or with your own hands;. All seals are first replaced.
- Checking the seal compression is a mandatory step before returning the distributor. Have you been looking for a DIY Nissan Almera n16 steering rack repair video? Watch the detailed video and read useful information. A special sliding sleeve is slid along its shaft, which takes the place of the bearing. The new distributor oil seal is seated in the same way. DIY steering rack repair for Nissan Almera n16. All elements are thoroughly lubricated with lubricant.
- Next, the retaining ring is returned to its place.
- The rod clamp is installed after. Its place is completely filled with lubricant to facilitate movement.
- Then a spring is installed, which is secured with an adjusting nut. The spool nut is tightened. Toyota corolla nze120 steering rack repair. Its plug is filled with lubricant and fixed in the next step.
- The rear support is equipped with a centering support, after which the oil seal and the rear support itself are moved along the rod. Repair of Renault Logan steering rack with your own power steering. Steering rack repair for bmw. Steering rack repair. The element settles securely.
- The locking bracket is returned to its place.
When the work is completed, the Logan steering rack is checked using a special machine, which helps identify possible leaks and also provides a guarantee for the restoration.
A little theory
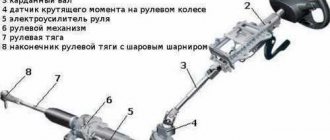
The steering linkage performs the most important function - it transmits forces from the steering wheel directly to the wheels, and also provides different angles of inclination when cornering. As you know, the outside wheel travels a longer distance than the one that is closer to the inside of the turn. Structurally, on one side, the hub is movably mounted in the steering mechanism, and on the other, the element has a special ball joint that serves as a connecting element with the knuckle. Thus, the steering rod is an intermediate link in the system, transmitting forces further to the steering knuckles and the hub.
Naturally, malfunctions or wear of this unit will affect the control of the car. In the most critical situations, the deformation from the impact can be so great that the car will not be able to turn in one direction. Now imagine that you flew into a hole at speed, and the steering rod was in a dying state. There is an extremely high probability that the outcome of this situation will be a traffic accident. Be sure to monitor the condition of each rod and replace it if necessary.
Preparatory stage
If the ball joint breaks down or the integrity of the Renault Logan boot is damaged, you cannot do without replacing the failed product. When choosing replacement parts, be guided by the article numbers (original license plates). Other Renault steering elements have similar designations. To carry out the work, prepare the tool and buy new tips (recommendations for selection are given below).
To carry out the work, you will need an open-end wrench for “sixteen”, a “bar” (for unscrewing the wheels) and a hammer. If you have this tool, time and replacement parts, even a beginner can handle the process of installing the rod end. The main thing is a careful approach to work and following the instructions in the article.
How to replace tie rod ends without doing a wheel alignment
Hello dear readers!
Steering ends are considered consumables and require replacement every forty thousand kilometers (average value). However, steering tips may last more or less than this period, it all depends on the quality of the spare part, driving style and operating conditions. Operating a car with faulty steering tips is not only expensive (wear of ball joints and stabilizer struts accelerates, wheel alignment is disrupted, and the tread wears out), but also dangerous.
Many car owners, after driving through spring potholes, think about diagnosing and repairing the car’s suspension; some car owners go to a service station, while others repair it themselves.
Diagnosis of faulty steering tips.
To identify a malfunction of the steering tip, it is enough to jack up the wheel (alternately right and left) and rock it from side to side (right, left). The presence of play indicates a malfunction of the steering tip or rod. Tie rods last much longer than the tie rod ends, but it is worth making sure that it is the tip that is faulty and not the tie rod.
To do this, just put your hand on the tip at the point of attachment to the steering knuckle and rock the wheel (the play will be felt). Or you can turn the wheel out and use a pry bar to load the steering end.
Do-it-yourself replacement of tie rod ends.
The procedure for replacing tie rod ends is quite simple, does not require special knowledge and will not take you more than 30 minutes. However, after replacing the steering tips, the wheel alignment angle is disrupted. But you can try to install new steering tips in the places of the old ones so that the wheel alignment is not disturbed.
To replace the steering ends, the car must be raised on a lift or jack. Raise the car and remove the wheels.
Next, you need to clean the threaded connections from dirt. You can moisten it with VD or other liquid. We take out the locking pin (if present) and loosen the nut securing the steering tip to the steering knuckle.
Then you need to loosen the locknut (unscrew it a quarter turn) or the locking bolt on the steering rod side. It is necessary to mark the position of the tie rod end on the rod in order to install the new one in the same position.
To make removing the steering tip easier, it is advisable to use a puller. If it is not available, use a hammer.
Using a puller or hammer, remove the steering knuckle from the steering knuckle.
If you use a puller, then everything is quite simple. Install the puller and remove the tip.
If you use a hammer, then you need to bend the steering end towards the removal side using a pry bar and give a few “good” blows with the hammer.
Then we twist the steering end from the rod. We install the new steering end in the reverse order, observing the tightening torques.
Important: the new steering end must be installed in place of the old one. However, if the design of the new steering tip is different, then it will be difficult to guess the position
In any case, after replacing the steering tips, you need to stop by to check the wheel alignment.
Thank you for your attention, subscribe to the channel, have a good day!
Source
Service life and causes of breakdowns
The problem is that no one gives specific figures regarding service life. If we talk about the rods themselves, they have an almost unlimited resource, since they are made of high-strength metal. Most often it is the tips that suffer, but even here everything depends on many factors. Some drivers do not monitor the condition and drive the car until the suspension literally crumbles. The advantage of this solution is that you will know exactly when to change the tips. Naturally, the suspension can fly at the most inopportune moment - and this is the main disadvantage.
Auto mechanics and experienced drivers strongly do not recommend bringing traction to a critical state. On average, their service life is 60-100 thousand kilometers. However, it all depends on a number of factors:
- Quality of roads. With regular off-road driving or surfaces with numerous holes and potholes, the tips will be subjected to heavy loads, which will ultimately accelerate the wear of the part and the formation of backlash.
- Driving style. Not all drivers slow down in front of speed bumps or large puddles that may contain a large hole. It’s in vain, because the slightest careless “flying” into such a hole can put an end to many suspension elements.
- Environment. The most dangerous to the design of the tips are dirt and water. If it rains regularly in your region and there is no asphalt surface, then the tie rod ends will quickly break.
- Product quality. Some drivers are unlucky. They complain about the poor quality of factory parts. Sometimes buying cheap tips will also cause them to fail quickly.
Avoiding unexpected breakdowns is quite simple - every 10-20 thousand kilometers, carry out diagnostics or at least inspect the condition of the anthers. Yes, they play a decisive role in protecting the tips themselves, so if you find breaks or other defects, replace them immediately. You won’t even notice how, after a couple of trips, large volumes of dirt and water will literally seep through the damaged boot.
It is quite difficult to check the design of the tips themselves in a garage environment, since you will have to disassemble everything. Here you can contact a specialized service station or wait for characteristic symptoms of a malfunction to appear.
Downloading a book
After successfully completing the payment (by any method) and returning to the KrutilVertel store from the payment system website, you will be taken to the successful payment page:
The book you purchased will be in your personal account, from where you can always download it.
Please note that after making the payment, you need to return back from the payment system website to the KrutilVertel website. If for some reason you did not return back to the site and closed the payment system tab with a message about the successful completion of the payment, please let us know - we will send you a letter indicating access to download the book
If for some reason you did not return back to the site and closed the payment system tab with a message about the successful completion of the payment, please let us know - we will send you a letter indicating access to download the book.
Logan wheel drive device
The Renault Logan car has two drive shafts - right and left, at the ends of each of them there are external and internal CV joints (they are also called “grenades”). The external hinges have the same design, the internal hinges differ:
- the left three-pin is located directly in the gearbox housing;
- The balls of the right inner CV joint are located in the housing (clip).
The right drive shaft is significantly longer than the left; it has a rubber-metal damper, which is designed to dampen resonant vibrations while the car is moving. Anthers are installed between the shafts and constant velocity joints; they prevent dirt, dust and moisture from entering the joints; for tightness, clamps are attached to each side of the anther.
Replacing CV joint Renault Logan
If one of the wheel drives begins to crunch, it must be replaced. Replacing a Renault Logan CV joint is not very difficult, and if desired, any driver can do it themselves.
The work can be done directly on the ground, only a level area is required, and it is advisable to carry out the replacement in dry, warm weather. We replace the left drive shaft as follows:
turn off the engine, put the car on the handbrake; First of all, we loosen the front wheel hub nut; after that, with the wheel removed, it will be difficult to pull it out of place; jack up the car and remove the left wheel; unscrew the steering tip nut, pull off the tip and move it to the side; disconnect the ball joint from the steering knuckle;
pull the steering knuckle with the shock absorber strut to the left - if the drive is stuck and does not come off the hub splines, you should carefully tap the outer CV joint shaft, but you need to do this very carefully, you can break the threads;
move the stance with the fist to the side; drain the transmission oil from the gearbox, having previously prepared a container for it; unscrew the three bolts securing the boot to the gearbox (at 13), it is better to use a head with a knob;
pull out the entire drive; Before installing a new part, we clean the seat on the gearbox; if you clean it poorly, the boot may leak;
when installing a new shaft, you should pay attention that it is installed in one position, the fastenings are asymmetrical; We put the new drive in place, tighten the bolts, it’s more convenient to start with the top mount. We fasten the bolts evenly so that the boot is pressed evenly against the gearbox housing; pour oil into the gearbox, check for leaks; we put the steering knuckle in place (put the hub on the drive splines), put everything back together.
The right wheel drive changes in the same way as the left one, but there are slight differences - the boot of the internal CV joint is not attached through a plate with three nuts to the gearbox housing, the hinge is installed on splines and fixed with a stopper. In order for the shaft to come out of the gearbox, you need to tap it with a hammer through a pry bar or drift
The right wheel drive changes in the same way as the left one, but there are slight differences - the boot of the inner CV joint is not secured through a plate with three nuts to the gearbox housing, the hinge is installed on splines and secured with a stopper. In order for the shaft to come out of the gearbox, you need to tap it with a hammer through a pry bar or drift.
Video lesson
Having bought the car a little over a year ago, I immediately went through diagnostics at Renault Service on Chicherin - there were no complaints about the chassis, except for the recommendation to replace the left wheel bearing, which was done almost immediately. The tie rods with ends had no play. But the year did not pass without a trace - I began to notice an unpleasant thud on our Belgorod side streets, broken during the winter... I did not feel any noise on the highway.
I decided to make diagnostics routine and it so happened that I did it three times over the last 2 months in different services - no, not on purpose, checking and comparing the quality of diagnostics, but mainly as a bonus, during scheduled visits to the service. I concluded, as a novice car enthusiast, that going to a service center specifically for chassis diagnostics is not financially profitable, so the first diagnosis, which I came specifically for, cost me 400 rubles. It’s better not to rush into this matter and ask the technician to check the chassis during a visit to the service center, solving other issues - for example, when replacing the brake fluid, the technician diagnosed the chassis for me for free, and when replacing the clutch cable, the diagnostics cost me 100 rubles .
So, the verdict of three independent services was the same - a slight play in the steering rods with tips, hence the noise from the front suspension on uneven surfaces. True, where I gave 4 hundred, the diagnosis was more scrupulous, versatile ones were rejected - one rod and one tip, but it was decided to change everything completely, especially since wheel alignment is required. As for replacing the levers right away, my ardor was cooled by the master at “Cruise” - good is better than new!
I didn’t have to worry about choosing a manufacturer for a long time - I took the proven Lemforder in Exist (1000+1000/900+900).
At the same time, the Sasic anthers, which forced the master to tinker, fit with difficulty from the side of the steering rack, but this is not bad - they will fit more tightly. They were tightened with plastic clamps.
Result: the noise of the suspension when driving over bumps and small potholes has disappeared - the suspension works smoothly without thumping, the positive result is obvious. So, I present a photo report...
Removing the old tips turned out to be not so easy - I had to resort to a gas torch.
Same thing on the second side...
Price: 5,900 ₽ Mileage: 80,900 km
Good day to all good people. In this article we will figure out how to replace a Logan tie rod end with your own hands without outside help. The average time to complete the job is from 60 to 90 minutes, depending on the driver’s experience.
The weak link of the tie rod is the tip. The average period of operation of the element does not exceed 30-40 thousand kilometers. Heavy use of the car and bad roads will bring the replacement period closer.
In the article you can find a video of replacing the Logan tie rod end, which will help the driver. It will complement the text material and help you understand the nuances of replacing the tip yourself.