How to remove the steering wheel on a Lada Kalina yourself
Removing the steering wheel on a Lada Kalina car is not at all difficult, and also does not take much time, so there is no need to contact a car service center to resolve this issue. It is enough to have the tools, desire and necessary knowledge. So, in order to carry out this procedure, you must have the following tools:
- head 24;
- knob with extension;
- ratchet handle.
Once all the tools are at hand, you can proceed to removing the steering wheel.
The instructions are as follows
- The first step is to dismantle the airbag, and for this you need:
- disconnect both clamps from the battery;
- Wait at least ten minutes until the airbag activator is completely discharged.
- Next, you should find the holes located on both sides of the steering wheel on the inside, and unscrew the screws in them that secure the airbag.
- Afterwards, you can carefully and slowly remove the airbag upwards.
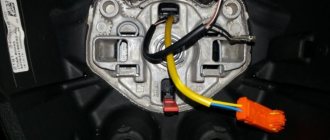
- Now, having unfolded the module, on the reverse side you can see a block with a wire that should be disconnected. But before that, you need to pry the green fastener and pull it up.
- Then you can disconnect the power plug from the airbag.
- Next, you need to unscrew the nut that secures the steering wheel to the shaft a little, and then, grasping the steering wheel on both sides, remove it from the shaft splines.
- After this, the nut is completely unscrewed, which makes it possible to dismantle the steering accessory. In the process of removing it, it is necessary to very carefully thread the power wires through a specially designed gap.
After this, you can completely remove the steering wheel from its place.
In our article, we looked in detail at how to remove the steering wheel from a Lada Kalina car, both without an airbag and with one.
We hope our article was useful to you!
How to remove the steering wheel from a car
I decided to make a short photo instruction on how to remove the steering wheel from Kalina, since some owners sometimes experience difficulties with this procedure. I’ll say right away that personally, in my example, everything worked out in literally five minutes. There were no difficulties. To remove the steering wheel from your car yourself, you will need the following tool:
- Head 24
- Wrench with extension
- Ratchet handle - optional (if the nut is tight to unscrew, which was the case in my case)
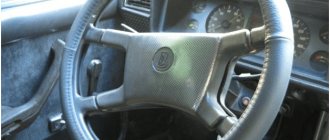
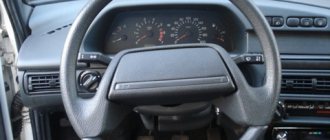
The first step is to lock the steering wheel by turning it in any direction with the ignition key removed. Then, from the top part, we pry up the cover, the so-called horn button, with our hand:
It is worth keeping in mind that the steering wheel mounts on Kalina are different depending on the date of manufacture of the car, as well as on the presence or absence of an airbag. If there is a pillow, then most likely you will have to unscrew several mounting bolts from below with a Phillips screwdriver. In my case there is no pillow, so everything is done more simply.
While performing this procedure, you will have to listen for the signal to trigger, but it’s okay, since all this is done quite quickly. When the upper part of the lining is removed from the latches, we also pry it from below and finally remove it. There is no need to pull hard, since the button contains the signal power wires so as not to damage them. Then we disconnect the wires, pulling with a certain force to remove them from the contacts:
They fit quite firmly, so be careful when disconnecting them so as not to damage the contacts in the button themselves. Now the cover is completely removed:
Next, take the head with the knob and unscrew the nut securing the steering wheel to the shaft. In this case, the steering wheel must be locked:
If the nut is difficult to turn, which was the case in my case, then you can use a ratchet to make it faster and more convenient. Please note that you don’t need to unscrew it all the way, leave it attached so that you don’t get hit on the forehead when removing the steering wheel
It is imperative to note the position of Kalina’s steering wheel relative to the shaft itself, so that later during installation it can be placed exactly as it was before! You can make marks with a marker or pencil on the steering wheel itself and the casing on top. Now you can pull upwards on both sides with both hands, after which the steering wheel should be removed from the shaft splines:
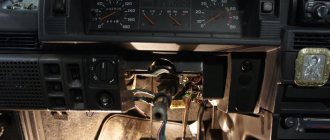
In my case, everything came off without any difficulties, but if it does not give in, then you can hit it with your hands from below on both sides alternately. When this is done, the nut must be unscrewed completely and the wheel can be removed without any problems. The final result of the work done can be seen in the photo below:
If you removed it in order to replace it, then we buy a new one, the price of which for Kalina is about 1000 rubles for the original factory one, although there are cheaper options from third-party manufacturers, but the quality there will be worse!
How to remove the steering wheel lock and start the car
If the steering is locked and the key is turned in the ignition switch, then you should look for faults in the steering column and hydraulic steering components. But if not only the steering wheel does not turn, but also the ignition key in the lock, the reasons should be sought in the anti-theft system and the steering lock.
The simplest thing you can do if the steering is stuck:
- try to turn the key in the ignition switch several times (it is possible that debris has gotten into the cell or it is frozen);
- slightly swing the column left and right while turning the key in the lock.
When trying to turn the key, try not to break it in the lock, otherwise access to the ignition will be completely blocked. If you cannot turn the key, you will have to use other methods to unlock the steering.
Removing the block without a key
This method is suitable for inexpensive foreign and domestic cars. It is necessary to make several sharp turns of the steering wheel, which will break the locking tongue installed on the steering column. True, there is a risk of breaking some other parts in the steering column, which can lead to expensive repairs.
Important! In modern cars of the “non-budget” class, the locking mechanism is made reliably and is able to withstand strong mechanical loads. Therefore, when turning the steering wheel sharply, you will most likely damage the rack itself, but not the locking tongue.
Removing the ignition switch and lock
In situations where it is impossible to break the steering lock using simple mechanical force, you will have to remove the ignition switch to get to the tongue of the locking device.
Replacing the ball joint
Tool for work:
- wrenches 17, 19;
- hammer;
- mount;
- puller;
- head for 12.
The ball joint is being replaced
The car is put on the handbrake, the bolts of the wheel from which the ball joint will be removed are loosened. Using a jack, the front part of the Lada Kalina car is raised, the bolts and wheel are removed. Use a 19 wrench to unscrew the ball pin nut. Insert the puller and twist to release the support pin.
The support fastening bolts are removed using a 12mm socket. The lever is pressed down, the support is released and removed. There is another way to dismantle the ball joint: the brake disc is placed on a rigged brick, the jack is lowered slightly to relieve the lever. At this moment the rack rises up, the ball is released.
A large amount of lubricant must be added to the new support. The pin is put in place, the nut is tightened with a torque of 66-82 Nm. If the holes of the steering knuckle and the support coincide, the bolts are tightened. The procedure requires patience and considerable effort.
What does the Kalina steering system consist of?
The steering wheel is one of the main parts of the entire mechanism. It is located on the splines of the steering shaft and is secured there with a locking nut. This ensures maximum reliability of the wheel fit and reduces the likelihood of damage.
At the same time, the steering shaft itself is not an integral element, but consists of several parts - the upper and intermediate parts. Its rotation is carried out thanks to two bearings installed inside the steering column tube, on which the ignition switch with an anti-theft system is located. The steering column is assembled with an engine gearbox and an electric power steering control unit.
Protection from dust and dirt is provided by a decorative steering column cover mounted on the front of the panel. Its dismantling is carried out using a Phillips screwdriver. The normal functioning of the amplifier depends on the speed of the vehicle.
One of the parts of the column is the steering shaft driveshaft. Finding it is quite easy; to do this you will need to remove the casing. The steering shaft cardan softens vibration and makes steering safe.
Brackets are attached to the steering column tube using hinges, and their lower part is attached to the body with studs and special nuts. The top bracket has a mechanism that allows you to fix the column in different positions. When the lever is moved to the lower position, the angle of inclination of the column changes, and when it is moved up, it is fixed.
The rack and pinion steering mechanism consists of a housing, a rack and a drive gear. It is secured to the engine compartment crossbar using two steel brackets on rubber supports. The steering rod is attached to the racks, part of which are the steering ends, as well as adjusting bushings.
The Lada Kalina steering tips are designed to ensure the mobility of the mechanism and allow you to easily change the lower angle of rotation of the wheels. The adjusting bushings are installed on the inside of the rod, and on their outer part there are ball pins that connect the rod to the rotating arms of the front suspension struts. When the slats are shifted, the position of the racks changes.
Car steering mechanism
Basic steering rack faults
Seal leakage
French and Japanese cars usually suffer from leaks in the input shaft seals. It occurs due to corrosion of the oil seal area.
2. Leaking power seals and corrosion of the steering column shaft
This problem occurs when water gets in through the rod boots.
Leaking hydraulic hoses
Connecting elements often leak due to rubbing.
Worn steering rack center tooth
Due to the fact that the steering wheel remains in the central position most of the time, the vast majority of all loads fall on the central part of the rack.
5. Knocks of the support bushing
The support bushings are designed to centralize the shaft in the steering rack housing; when it wears out, the shaft begins to knock on the rack housing.
Knocks of the pressure block
Over time, a sample forms on the surface of the cracker and the gasket wears off. At the same time, the cracker begins to knock on the steering rack, dangling in its body.
Steering wheel turns tight to one side
This effect is observed when the hydraulic fluid is contaminated and grooves are formed inside the distributor.
Tight steering in both directions
There could be many reasons:
- grooves described above.
- The Teflon ring on the piston could rupture.
- wear of the working pair could have occurred on the pump.
- The distributor torsion bar could have broken.
Photo report on removing the steering wheel yourself
First of all, read the material on removing the driver's airbag on a Priora. Then, when you have dealt with this, you can proceed further. Disconnect the power wires to the sound signal.
Then we put the head on 24 and rip off the nut, but don’t unscrew it completely yet. Before you start knocking it off the shaft, you need to mark the position of the steering wheel relative to the shaft - you can make marks on the steering wheel and casing.
When the nut is loosened, leave it on the shaft for now. Then we take and knock down the steering wheel from the reverse side, tapping it with medium force - on both sides.
Removing and installing Kalina steering wheel
Tool:
- Marker
- Open-end wrench 10 mm
- Driver for socket attachment
- Knob attachment 24 mm
1. Disconnect the wire terminal from the negative terminal of the battery.
2. Using your fingers, press the horn switch trim.
3. Remove the trim from the steering wheel.
4. Disconnect the wire ends from the horn switch.
5. We use a marker to mark the position of the steering wheel relative to the shaft. Using a 24mm socket, we do not completely unscrew (so as to avoid injury when removing the steering wheel) the steering wheel fastening nut.
6. While rocking, pull the steering wheel towards you and remove it from the shaft splines.
7. Completely unscrew the fastening nut and remove the steering wheel.
8. We install the steering wheel in the reverse order, following the marks made during removal.
The article is missing:
- Photo of the instrument
- High-quality photos of repairs
Repair of electric power steering on Kalina. Signs of breakdown and repair »
Electric power steering is a problem area for the Lada Kalina. Surely this is due to the fact that the domestic auto industry has only recently become acquainted with the ESD. Avtovaz has not yet learned how to make good steering systems. Therefore, repairing electric power steering on Kalina remains a common practice.
. But it is best done by specialists. Amateurism will be inappropriate here - it can only aggravate the situation. The steering system is an important component, the serviceability of which determines the efficiency of driving and, of course, safety.
Repairing the electric power steering on Kalina is a responsible job that requires certain knowledge in the field of power steering. And since a minimum number of car enthusiasts have such knowledge, mostly when problems arise, drivers go to a service station, which is fundamentally correct. How to determine the malfunction?
Despite the fact that repairing the electric power steering requires contacting a car service,
you can detect the first symptoms of a malfunction yourself
. Viburnums on the front panel have a special yellow indicator, which, in the event of a breakdown of the electric booster, lights up and reports an error in the system. If it lights up, it means you have another reason to visit the nearest auto repair shop. But it’s immediately worth noting that the yellow indicator does not indicate a critical malfunction, but only signals the occurrence of a problem that allows you to drive the car, but without the participation of the ESD.
If the electric power steering has completely failed, it is better to stop immediately and pull out its fuses.
. In Kalina they are located on the left side of the steering wheel. Theoretically, in case of malfunctions, the EUR should turn off on its own. However, it doesn’t happen once at a time. Therefore, to be sure, it is still worth taking care of the fuses.
Possible malfunctions and their causes
The main problem that causes breakdown of the electric power steering is.
The EUR installed on Kalina does not work with a constant force applied to the steering rack. The amplifier begins to operate at full strength only when the car is moving at low speed or is at rest. When accelerating, the power steering forces on the steering rack decrease. That is, the lower the speed, the more the power steering starts to work.
The naturally described malfunction can only be detected when the car is standing still or moving at low speed
This failure can only be corrected by completely replacing the speed sensor. Moreover, here it is not necessary to go to the service. You can replace everything yourself.
The second malfunction may be hidden in the EUR itself. Basically, it consists of self-disabling the electric power steering due to the fact that it has not passed self-test. That is, the device turns off automatically so as not to interfere with the driver when driving the car.
This kind of malfunction guarantees a trip to the service station and will require you to spend a lot of money.
Additional reasons
Troubles in the operation of the electric power steering can be caused by:
- voltage drop due to possible circuit breaks due to wiring faults;
- exceeding the internal combustion engine speed;
- lack of speed sensor information.
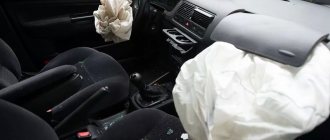
Features of removing the airbag on an opel astra h/ vectra c/zafira b car
On Opel cars of the above-mentioned models, the airbag also snaps off in two places, but the pressing should not be done directly, but at an angle from the edge to the center. In this case, the flat screwdriver should not be straight, but with a recess in the middle. The clamps holding the airbag are clearly visible in the photo below, and when the airbag is released from the fasteners, they move towards the center of the steering wheel.
Also, when you press the clamps on the steering wheel, we pull it towards ourselves, and to prevent it from locking again, we place some object between it and the steering wheel, for example, a piece of insulated wire.
To remove the airbag, you need to remove two connectors from the inside of the airbag.
The RK itself is screwed not with a nut, but with a bolt with an internal T50 sprocket. The fastening is tightened very tightly, and considerable force must be applied to unscrew the bolt. It is better to do the operation of removing the steering wheel together - one person should hold the steering wheel, and the second should unscrew the bolt at this time.
If the steering wheel has never been removed, it will be difficult to move it, so there is no need to completely unscrew the fasteners; you should leave the bolt attached.
Some car owners on their cars, in order to remove the steering wheel, knock on the bolt - this is strictly forbidden, as you can easily damage the threads in the steering column.
If the steering wheel does not change and remains the same, you need to make a mark on it in the slot area, and also make a mark on the steering column. If you install the steering wheel in a position other than the markings, it will become crooked and the car will be difficult to drive.
New Lada: Products for the car Lada Kalina, Kalina 2 | Online store VS-AVTO: Tuning from Tolyatti
Video review on how to remove the instrument cluster on Kalina with your own hands
This video was prepared by me personally using the Priora car as an example, but there is practically no difference, moreover, on Kalina everything is made even simpler.
If even after watching you still have any questions, please ask below in the comments to the article or the video itself.
Owners of a Lada Kalina car sometimes think about how to remove the dashboard in order to remove unnecessary noise or replace the heater radiator. Today I want to show you detailed photographs of the process of removing the panel with my own hands.
I would like to immediately clarify that I will remove the torpedo without draining the antifreeze (without removing the stove).
How to remove a torpedo on a Lada Kalina with your own hands:
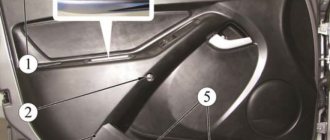
1. Bend the front door seal. We pull carefully.
2. Remove the decor (plastic casing) from the front roof pillar. It is held on by 3 clips. In the photo I have already pasted over the lid.
Removal sequence
First you need to unscrew two screws on the back of the Priora steering wheel, which are located on both sides. To do this, you will need a 5 mm hexagon, while on both sides it is necessary to compress the spring clamps, preventing the pillow from falling out. It is important to remember that before starting work, you must remove the battery terminals to prevent the airbag from deploying.
After this, carefully remove the cushion from the front of the steering wheel. To do this, you need to carefully pry the clamp together with the wires and move it to the side, and also disconnect the power wires leading to the sound signal.
Please note that disassembling the airbag module is strictly prohibited.
Next, a pre-prepared 24-millimeter socket will come in handy, with the help of which the shaft nut is torn off; however, there is no need to unscrew it completely yet. At this stage, you need to somehow mark the position of the steering wheel, which will be needed for subsequent assembly to its original position. For this purpose, you can make appropriate marks on the casing or, in fact, on the steering wheel.
What kind of gearbox cushions are there on Kalina?
These parts are different, and we are not talking about airbags. The first thing that comes to mind is the gearbox support cushion. They are hydraulic and rubber-metal.
Kalina has a large number of such parts installed. These are engine mount cushions that reduce vibration from the power unit. There is a rubber suspension cushion for the muffler resonator. It serves to get rid of extraneous knocks from the exhaust system.
Kalina gearbox cushion
The Kalina is equipped with rubber-metal gearbox support cushions. This is a simple design consisting of two plates (metal), with rubber located between them. Classic rubber is fading into the background, so more wear-resistant polyurethane is actively used. It’s easy to guess why most car enthusiasts install this type of support.
The supports serve to reduce vibration that occurs as a result of the operation of the power unit and suppress extraneous noise, as well as to secure the gearbox to the body.
Lada Granta horn and airbag not working after changing driveshaft
We insert the blocking plate through the hole in the steering wheel hub into the slot of the drum device in full
And remove the steering wheel by passing the wire and horn blocks through the hole in the steering wheel hub
We install the control wheel in reverse order, aligning the previously made marks and installing the new self-locking nut. The control wheel fastening nut has a torque of 32–51 Nm (3.2–5.5 kgf m).
If you need to install the steering wheel in a new position (for example, if the spokes are placed at an angle when the car is moving in a straight line), put the wheel on the shaft and secure it with a nut without putting it aside completely.
After driving straight a few meters, make sure it is in the correct position.
If necessary, move the steering wheel to the required number of splines and tighten the nut.
Installing the airbag is done in reverse order.
We connect the block of wires to the airbag connector, insert the lock into the block.