How to change rubber bands on injectors of a VAZ 2110
I decided to change the injector rings.
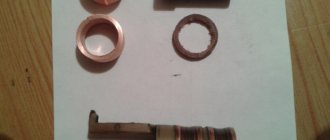
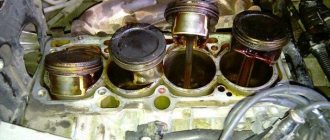
And not because there is nothing to do, but because the car continues to suck in air. During all the time that I have been struggling with this, the receiver has removed it for the 3rd or 4th time. Now for me to remove it, like unscrewing 2 terminals on a battery, it’s a piece of cake. The ramp came off quite tightly, but what I saw, at first I couldn’t even believe my eyes. The main word is “former.” I honestly forgot when I was assembling the engine what kind of ring it was. I went online and saw that there really should be a ring there, and not this one!
When I assembled the engine, I installed graphite rings because I simply couldn’t find any others. Although I heard that a red heat-resistant ring should be installed at the bottom of the nozzle. Apparently just to avoid such cases of drying out.
Before I started “pushing” the ramp into the head, I lightly lubricated the rings with oil so that it would be easier for them to fit into the holes and not accidentally lift them up. Everything came back together easily and without force. Removing the receiver is not as scary as many people think. It’s much worse on 14x or Kalina 16ve. That's all.
Detection of suction is carried out by inspecting the intake manifold gasket, connections and hose body. It is possible that air may be sucked in due to breakdowns of the cylinder head gasket (cylinder head) or the injector ring seal. Problems of this type occur more often on cars with a long service life. The engine loses power at low or high speeds, depending on the type of fuel the machine is running on.
Dismantling
Before replacing or cleaning the injectors, they will need to be removed from the fuel rail. To achieve this, the following activities are carried out:
- Make sure the engine has cooled down properly. It is not safe to work on a hot engine;
- Disconnect the power wires from the fuel pump to de-energize the device;
- Try to reduce the pressure in the engine power system as much as possible. To do this, the engine starts, and then you need to wait until it stalls at idle speed;
- Repeat this procedure several times until the car simply stops responding to turns of the ignition key;
- That's it, now our goal is the fuel rail. To remove it, you must first remove the terminals from the battery, turn off the power to the ramp itself, disconnect the fuel supply hoses, and also disconnect all electrical appliances going to it. These are pressure, idle, throttle position sensors;
- If you have an 8-valve engine, then you do not need to remove the receiver. This step is relevant for engines with 16 valves;
- Experts do not recommend removing the intake manifold without dismantling the throttle valve and the hose going to it. It is better to unscrew and disconnect everything at once, which will allow you to continue working more conveniently;
- Cover the exhaust manifold openings with something to protect them from foreign objects;
- Using a hex wrench, you can unscrew a couple of bolts and remove the fuel rail along with the injectors;
- Make sure that there are no distortions when removing the ramp, otherwise problems may arise with the dismantling processes;
- We remove the injectors. To do this, remove the mounting brackets that hold the electrical connector. You also need to remove the bracket that holds the injector in its seat.
After dismantling the elements, be sure to close the seats to prevent debris and other objects from getting in, and place the nozzles themselves on a table or floor, after laying down a dry rag.
Here you can decide whether to change or clean the elements of the fuel system. If replacement is required, install new injectors in place of the old ones and follow the assembly procedure.
Cleaning
Here proceed as follows.
- Remove the rubber rings from the injectors, and when cleaning is finished, replace them with new seals.
- The cleaning process should begin with the nozzles, on which various deposits form as the car is used.
- Be sure to thoroughly clean the funnel-shaped surfaces where tar deposits accumulate.
- The next step is the fuel mixture supply channels.
- To open the solenoid valve to supply fuel, you will have to trick the device with a 5-7 V power supply.
- Some use stabilized voltage sources, phone chargers, or even a car battery. If using a battery, the voltage should be supplied through the light bulb. It will play the role of a current damper. Otherwise you risk burning the winding.
- Electricity is supplied through two wires, in the gap of one of which a button is installed. It will close and open the network. This creates an imitation of the operation of an injector in an engine due to the influence of a pulsed electric charge.
- You can supply the cleaning liquid to clean the injectors through a can of carburetor cleaner. Inexpensive and effective, even better than specialized chemicals.
- Be sure to tightly connect the cylinder and nozzle with a rubber tube, clamps and any other means.
- All is ready? You can then apply electricity to open the injector. At the same time, press the button on the cleaning agent canister.
- Soon the torch of the liquid jet, which will exit through the fuel atomizer of the injector, will change its “clumsy” direction and will begin to uniformly exit the nozzle. This indicates that you have removed all carbon deposits.
Types of injector sealing rings
Inlet or upper o-rings are found on both gasoline and diesel injectors. They serve to eliminate air leaks and fuel leakage at the point where the injector is connected to the fuel line. Most often they are made of rubber, because:
- no large mechanical loads;
- the temperature effect is small due to the distance to the hot engine;
- rubber is characterized by high elasticity;
- slow loss of properties under the influence of an aggressive environment.
The lower seal operates under more severe conditions, so the following options are possible:
- metal ring;
- alloy seal;
- rubber, made of a special composition, capable of withstanding temperature and mechanical stress.
To increase reliability, it is possible to simultaneously use a metal and elastic seal. In this case, the lower ring is made of a resistant material, for example, copper, and serves as a flame arrester. The upper ring is in this case protected from adverse influences. It is made of rubber, which ensures the tightness of the system at the proper level.
Malfunctions that injectors may have
Injectors are a fairly precise mechanism; they can open and close several times per second, while providing:
- lightning-fast opening;
- good fuel flow;
- fine atomization of gasoline for better mixing with air;
- tight and fast closing.
The life of injectors is highly dependent on the quality of gasoline and the frequency of replacement of fuel filters. Any, even the smallest debris can prevent them from fulfilling their purpose.
Over time, the injectors become clogged with deposits and the following problems may occur:
- The injectors do not open immediately when a signal is given, or if they do not open at all, they become jammed.
- Less gasoline may pass through a clogged hole than the ECU calculated, this will lead to a lean mixture.
- Debris can also interfere with the atomization of fuel, causing it to flow in a stream and not mix enough with the air.
- A loose closure means that more gasoline than necessary will enter the combustion chamber.
Such malfunctions in the fuel system can, in turn, lead to the following problems with the operation of the engine as a whole:
- misfires at idle;
- significant loss of power;
- unstable engine operation;
- increased fuel consumption;
- Difficulty starting the engine.
Nozzle, how to clean nozzles with ultrasound, pros and cons of this method
The benefits of this method are quite controversial. Some believe that ultrasound kills injectors because it destroys the mesh, others argue the opposite - that this is a necessary measure when cleaning injectors and that it must be combined with washing them during dismantling. According to some experts, ultrasound affects the ceramic components of the nozzle, so the period of influence must be reduced to a minimum. Another disadvantage of the ultrasonic cleaning method is its high cost.
Benefits of using rings
Advantages that make O-rings widely popular in injector sealing:
- the symmetry of the design leads to a uniform fit of the seal along the entire circumference;
- ease of manufacture allows you to take into account all the subtleties of injectors of various car brands;
- use of modern materials.
The existing markings make it easy to navigate the interchangeability of seals. This makes it easier to find the ring if it fails. If possible, it is recommended to purchase original rubber bands.
Operating time of O-rings before replacement
The seals must be replaced every time the injectors are removed. Re-installation of them usually leads to loss of tightness, since the ring loses elasticity during operation. Some times only copper washers are allowed to be installed. At the same time, their visual inspection should not show any defects.
Boiling of the engine can also cause the need to replace the rubber bands. Rubber, in this case, is susceptible to thermal destruction. Fuel leaks or other symptoms that occur after overheating indicate damage to the seals.
Cleaning the injector: how to do it
If there are noticeable malfunctions in the operation of the injector, you need to know how to clean the VAZ 2114 injectors. This cleaning can be done in two ways:
- cleaning of injectors with removal;
- cleaning the injector without removing it;
The most correct method is to wash the injectors on a special stand. The stand allows you to evaluate the performance of the nozzle, effectively remove contaminants and then check the quality of the spray. If the result is unsatisfactory, problems with spraying and opening/closing are eliminated using the ultrasonic cleaning method of nozzles.
Combining these methods allows you to eliminate even complex stains and varnish deposits. As a result, the VAZ 2114 injector becomes fully operational (replacing the injector on the VAZ 2114 is not required).
We also recommend reading the article on how to clean or replace the fuel pump screen with your own hands. From this article you will learn when to clean the fuel pump strainer, what signs indicate that the fuel pump strainer is dirty, and how to clean the fuel pump strainer yourself.
As for the second method, cleaning the injectors on a machine without removing it is considered more of a preventive measure and does not remove stubborn dirt. For such cleaning, it is necessary to pour a special cleaner into the gas tank or supply a similar cleaner directly to the injectors, bypassing the fuel supply system (this is done using a special installation).
Do-it-yourself injector cleaning
During operation of the VAZ 2114, the injectors must be periodically washed. This can be done either with special equipment or independently. After removing the injectors from the car, you can begin cleaning them yourself.
To do this you will need:
- remove the sealing rings from the injectors;
- soak the injectors in acetone or gasoline;
- remove the injectors and carefully clean the nozzles with a thin needle;
- wash the inside of the nozzles by supplying cleaner;
The supply of cleaning fluid is carried out in the same way as checking the nozzle for functionality by connecting it to the battery via a button. You should purchase a cleaning liquid (carburetor cleaning liquid is suitable), you also need to prepare a syringe and tube (the diameter must match the diameter of the injector inlet holes).
As part of cleaning, the nozzle is connected to the battery through a button with wiring. You need to draw liquid into the syringe and connect it through a tube to the nozzle. Then the pressure is created by the syringe and the button is pressed, the liquid is sprayed. The procedure is repeated several times.
VAZ 2110 injectors and their cleaning
VAZ 2110 injectors A car is a complex multi-component mechanism that requires constant maintenance. VAZ 2110 injectors, however, like other elements, perform the same function: they spray fuel evenly onto the cylinders, thereby ensuring their high-quality and efficient functioning. During operation, the injectors may become clogged and, as a result, the efficiency of the engine will be reduced. Naturally, poor engine performance at idle is unpleasant news for every motorist. Replacing and cleaning the VAZ 2110 injector 8 valves and 16 valves is given in the instructions below.
Recommendations for replacing rings
To ensure a good seal, O-rings should be placed with slight tension, which increases the strength of the fastening. They should be replaced according to the following instructions:
- Relieve pressure in the fuel system;
- Remove the ramp with injectors;
- Remove all old rings;
- Clean off any remaining rubber;
- Lubricate the new seals with engine oil;
At the end, you need to return the ramp to its place. It is important to ensure that the seals are not distorted when installing it. You should also avoid using excessive force, which could damage the rubber bands.
Loss of tightness leads to deterioration in vehicle performance. In the most advanced cases, a fire is possible, so despite the small size of the seal, its condition must be treated with extreme care.
We're sorry, but the requests coming from your IP address appear to be automated. For this reason, we are forced to temporarily block access to the site.
Features of fuel injection systems
The advantages of fuel injection systems (FIS) include:
- constant pressure level in the fuel system;
- high-quality atomization of the fuel mixture;
- rapid injection of a combustible mixture;
- reduction of noise when the motor is running;
- complete independence of the complex from engine operating modes;
- possibility of implementing several injections simultaneously;
- reduction of exhaust gas toxicity;
- reduction of emissions of solid pollutants into the environment;
- reduction in fuel consumption;
- noticeable increase in productivity.
Design and principle of operation of fuel injection systems
The main element of the fuel system is the pump, which creates and maintains the required fuel pressure. There are various designs of pumps, but the principle of their operation is the same.
The main element of the fuel system is the fuel pump
The vehicle itself consists of the following components:
- fuel lines;
- fuel tank;
- fuel filters;
- fuel pump (FP);
- fuel rail (TR);
- nozzles (injectors) for each engine cylinder;
- fuel pressure sensor located on the ramp;
- a control unit that regulates the pressure and volume of fuel for maximum efficient operation.
The fuel system of VAZ 2114/15 cars is designed quite simply
Correct operation of the fuel complex allows:
- reduce the temperature of the coolant in the system;
- reduce the load on the fuel pump;
- significantly reduce emissions.
Pressure limiter device
The fuel pressure in the system can be adjusted in two ways - mechanical and electronic.
The mechanical limiter consists of a special plunger with a spring installed in the fuel line. If there is excess pressure, excess fuel is discharged back into the tank through the valve.
The electronic limiter is a more modern device. Electronics allows you to bring fuel pressure to operating values much faster. This significantly increases the efficiency of the vehicle.
Injection nozzles
A modern injection engine uses electromagnetic or electronically controlled injectors. They work like this:
- From the fuel rail, fuel is supplied under pressure to the injector.
- The fuel enters the cavity, which acts as a spray nozzle.
- At the command of the electronic control unit (ECU), the valve in the injector opens.
- Fuel enters the injector nozzle.
- Fuel is atomized and dosed into the engine cylinder.
This process is measured in milliseconds. Since the operation of the fuel system is regulated by the computer, when repairing and replacing injectors, you should carefully follow the algorithm regulated by the car manufacturer.
When replacing, original injectors or analogues specified in the vehicle’s operating instructions must be used. Otherwise, substandard injectors can lead to failure of other engine components.
A practical look at diagnosing and replacing an injector
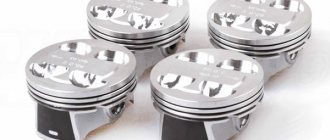
Injectors for VAZ 2110 8 valves
Objective reasons for malfunctioning injectors:
- the engine starts with great effort;
- the engine is extremely unstable;
- in case of idle operation, the engine immediately stops functioning;
- the crankshaft rotates at an increased speed if the engine is idling;
- the car engine is not able to produce the maximum degree of its power;
- while moving, some jerks and dips in the functioning of the engine are objectively noticed;
- fuel consumption has increased sharply, without objective reasons;
- exhaust gases contain an increased concentration of CH and CO;
- Due to the loss of tightness of the injectors, a glow ignition effect is observed.
Note. If at least one of the above reasons occurs, then there is only one way out - cleaning the injectors, and general cleaning at that.
Car service specialists and the manufacturer itself recommend cleaning the injectors every 120 thousand kilometers.
Detailed algorithm for cleaning injectors
- The right side of the car engine contains a pressure regulator and a ramp; you need to disconnect their fuel pipes.
Note. Immediately after disconnecting the fuel pipes from the rail pressure regulator, fuel will splash slightly. There is no need to be afraid of this, as this is quite normal.
- Next, you need to release the fuel rail, which is held by the right and left 5-point hex mounting bolts, which must be unscrewed;
- It is first advisable to remove the gas cable so that it does not interfere with unscrewing the right mounting bolt by 5;
Cleaning injectors VAZ 2110 16 valves
- after unscrewing the right hex bolt, you need to move to the left one;
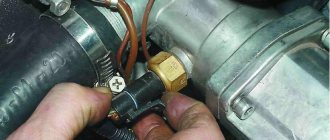
- Not far from the windshield, in the thermostat pipe, there is a wiring harness that provides power to the injectors; they must also be unscrewed.
Note. The injector power harness is located on the left, a short distance from the left hexagonal mounting wire.
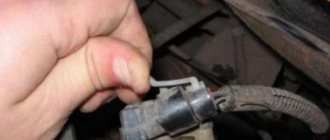
- after all of the above elements have been successfully unscrewed, it is necessary to extremely carefully remove the ramp in which the injectors are actually enclosed;
- the ramp is extremely difficult to remove, as it fits very tightly, so in this case, you can use a mount, only as carefully as possible;
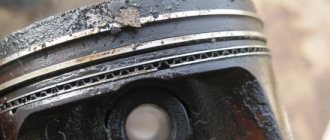
- the injectors have special rubber seals, they must be preserved or it is better to simply put them in some separate place;
- the injectors are enclosed in ramp brackets, which must be moved apart to make it possible to remove the injectors themselves;
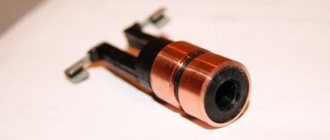
- after removing the injectors, the first thing you need to do is check their windings, which should be the same;
Cleaning injectors VAZ 2110 8 valves
Note. The essence of checking the winding is to determine the degree of resistance. Each car has a specific injector model, so you need to enter the name of the desired injector model, and then find the value of the degree of resistance that should be and compare it with the current one. In this matter, the main assistant will be an ohmmeter.
- to perform the following technical manipulation you will need a flushing device and a carb cleaner;
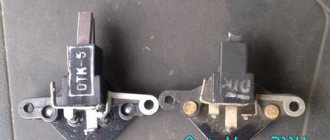
- structure of the cleaning device: one wire is connected to a 12 volt light bulb, the other to the base connector, thus a connection between the light bulb and the nozzle must be formed in series.
Note. The basic connector is made independently. Most motorists confuse it with the one located in the car.
- Next, you need to activate the indicator lamp; to do this, you need to connect it to the car battery by connecting the appropriate wires;
- the tube and bottle cleaner must be brought to a special nozzle hole;
- now it is necessary to perform a visual inspection of the spray jet; as a rule, this check takes on average half a bottle of specialized solvent;
VAZ 2110 injectors 16 valves and their washing
- The injector assembly is carried out in the reverse order with the same steps.
Note. Before installation, the nozzle rubber bands must be lubricated with oil, firstly, so that the seal does not wrap, and secondly, this will make it easier to reinstall the ramp back to its original place.
Practical changes in the behavior of cars can be observed when driving on a country road:
Diagnostic methods
The engine's refusal to idle is a consequence of a lean mixture, caused by excess air in the fuel line.
This is accompanied by:
- Rusty fuel supply pipes.
- Fuel hoses that have dried out as a result of long use and are no longer held in place by clamps.
- Fuel filter with seal defects.
- Exhaust pipes that have lost their seal.
- Injection pump seals.
- Air entering through the manual lever of the fuel pump.
- Fuel pump seals.
- Obsolescence of seals.
First way
Diagnosis of the defect involves turning off the fuel pump and powering it from another vessel (for example, a plastic canister) . Independent work will require a 3÷4 liter container, two transparent hoses, one meter long, and a pair of clamps. Observing cleanliness measures, the forward and return fuel lines from the injection pump are replaced with transparent tubes, and the air is removed from it.
One of the ways to remove suction is to clean the place of work and the location of the tank above the fuel pump . It is necessary to unscrew the “return” bolt, through which, according to the principle of a siphon, air escapes before fuel appears. The fitting bolt returns to its place. Running the engine for a few minutes removes any remaining air.
Video about diagnosing the fuel pump for air leaks
Second way
It consists of testing the fuel filter (standard), placing it below the injection pump . The method is focused on determining suction through a filter. If there is no result, all tubes, tank, and hoses are checked. This method of powering gives precise indications of difficulty starting the engine.
The origin of leaks in the fuel system of cars with a diesel engine is based on atmospheric pressure. It is higher than the pressure that is created when pumping fuel from a car tank. This is due to the replacement of brass fuel lines with rubber and plastic tubes and connecting them with clamps. Meanwhile, hoses made of such materials have a shorter service life. Reference is made to the fact that synthetic pipes in the engine compartment heat up, sag, rub, and, as they wear out, contribute to air leakage .
Repair of injectors VAZ 2110–2112
Repairing injectors means cleaning the product and replacing the O-rings. Simple measures to restore the functionality of the injectors can significantly increase the car’s power and make cold starts easier. Injector repair is possible in the following cases:
- there are no visible deformations on the body;
- the nozzle has not yet exhausted its service life;
- the car owner wants to optimize the operation of the power unit.
In all other cases (cracks and deformations, long service life), it is recommended to replace the nozzles with new ones.
How to blow out and clean oil molds
On cars of the tenth family, injector cleaning may be necessary after 40–50 thousand kilometers. In this case, it is best to carry out the procedure yourself, since you can always observe for yourself the true condition of the motor and its elements, and also save a significant amount on service station services.
Many drivers prefer to use the simplest method of cleaning injectors - fuel additives. Special liquids, along with gasoline, are poured into the tank and pass through all elements of the fuel system, cleaning them. This measure is justified for new cars in which the degree of pollution is at a minimum level. But additives will not be able to properly clean injectors and other elements of the system.
Video: a simple way to clean injectors using a repair kit
What are injectors?
An injector is a special mechanical sprayer located in the “head” of the engine, through which fuel is supplied to the cylinders under high pressure.
Injector malfunctions
Among the most common causes of injector failure may be the following:
- The injector nozzle is coked - in this case, increased fuel consumption may be observed, vehicle dynamics will decrease, and engine starting will be difficult at subzero ambient temperatures. Otherwise there are no differences.
- The injector valve does not close hermetically (“the injector is snotty” - note) - here there may be increased fuel consumption, “tripleting” and increased detonation (about checking the knock sensor here), unstable idling.
- Valve sticking - engine troubles. In order to diagnose it, with the engine running, turn off the power supply to each injector in turn. With a non-working injector, no changes in engine operation will be observed, but with a working injector, the speed will drop.
If you find a non-working injector on your car, or they need cleaning, you need to know how to properly dismantle them. You could already read more about this above.
Injection vehicles VAZ 2110, 2111, 2112 are equipped with imported injectors. This gives the models increased resistance to low-quality fuel and increases engine life. Owners of cars of the tenth VAZ family can independently repair and change injectors if necessary. The valve replacement steps are not particularly difficult even for beginners.
Where and what seals to buy
When purchasing a new nozzle, its kit always includes additional elements: a mesh filter, a set of necessary O-rings, rubber mounting sleeves, and plastic plugs.
Auto parts stores sell rings:
- piece by piece;
- repair kit for one injector (lower and upper);
- repair kit for the engine (the number of cylinders is taken into account).
The color of rubber O-rings can be any color and has nothing to do with size or quality.
Copper washers are sold in sets of several pieces.
Bosch injectors of various modifications are used on domestic and imported cars. Since the 90s, they have been unified, including by seat, and allow everyone to use the same O-ring.
If it is impossible to purchase original rings for rare or old foreign cars, replacements can be selected from seals from domestic engines.