The steering wheel braid is an accessory that has not only an aesthetic function in the car interior (although this is also important, because style emphasizes individuality). Don't know how to determine sizes? The surest way is to measure the diameter of the steering wheel or find this parameter in the operating instructions for the car of the desired model. Each brand has a corresponding size – S, M, L, XL.
For cars such as Tavria, Oka, cars with a sports steering wheel, size S is suitable - the smallest. Diameter – 35-37 cm.
The most common size is M. Nowadays, most cars have a standard steering wheel with a diameter of 37-39 cm.
These are almost any foreign passenger cars, as well as Lada Kalina, Lada Priora, Lada Granta, etc.
If the braid is chosen for a VAZ 2101-2107, 21011, 21013, Niva, Volga or Moskvich, then the car has a steering wheel diameter of 39-40 cm, which corresponds to L.
XL – GAZELLE, UAZ, etc. (42-43 cm).
PS: I bought it in China, since I sewed it myself, it took me about 3 hours, but I’m very pleased with the result!
| The leather steering wheel on Kalina is not only practical and convenient, but also beautiful. This steering wheel adds style to the interior of the car and does not allow your hands to slip. This kind of tuning can be done with your own hands, but do you know how to install leather braiding on the Kalina 2 steering wheel? |
Anyone who decides to cover the steering wheel of Kalina 2 with leather for the first time is recommended to use a ready-made kit (price about 1,500 rubles), which is called “Leather braiding for the steering wheel of Lada Kalina 2.” It contains everything you need to re-tighten the steering wheel yourself as simply as possible (leather braid, thread, needle and instructions).
This way, you don't need to remove the template and make patterns. The braid already has holes for the threads, so all you need to do is put the braid on the handlebars and lace it with thread. All details are described in this manual:
Lacing the braid onto the handlebars is a painstaking job that will require time, patience and care. The entire process of covering the steering wheel with leather will take you about 4 hours. At first, the leather on the steering wheel may turn, but after it dries and shrinks, it will no longer be possible to turn it on the steering wheel. This completes the tuning of the steering wheel of the new Kalina!
Process video:
Do you need a steering wheel braid?
The first and most frequently asked question is: “Why do you need a braid on the steering wheel, if at all?”
It’s good for owners of expensive cars with leather interior trim, where everything is harmonious, the overall style is consistent, and the leather steering wheel, pleasant to the touch, goes well with the car’s interior. But what should owners of the budget segment do, where everything in the car’s interior is so minimalist that there’s nowhere for the eye to fall? A steering wheel braid is also needed if you buy a used car, if the steering wheel is well-worn, with numerous scratches and abrasions.
The steering wheel braid also serves as a kind of cover, and like covers on mobile phones, it allows you to preserve the presentation of the steering wheel in case of selling the car.
The braid on the steering wheel prevents your hand from slipping and turning the steering wheel, which makes driving safer. It increases the thickness of the steering wheel, making the steering wheel more comfortable for drivers with a wider hand.
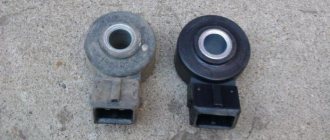
The main reasons for the malfunction of the steering column cable
In electrical engineering, a loop is understood as a bundle of conductors in general insulation. Otherwise known as ribbon cable. Such devices are well known to computer scientists.
A multi-core ribbon cable is well suited for transmitting signals from a device rotating along the axis of the steering column. In this case, the cable is wound on a special mini-coil. Initially, the loops transmitted signals directly from mini-switches mounted on the steering wheel, as well as to the airbag. Subsequently, an electronic device was installed on the steering wheel, which encrypts signals for transmission. This made it possible to increase reliability and reduce the number of failures.
However, technical problems associated with the failure of the loops remained. The main reasons for the unreliability of steering column cables:
1. Natural wear and tear
. Mechanical stress accumulates when bending the cable. Over time, this leads to a break in the conductors.
2. High current when airbags deploy
. From this point of view, airbag deception is especially dangerous. Typically this is a 2.2 ohm resistor. It does not instantly burn out like a pillow squib. A large current flows for a long time, which overheats the loop.
3. Corrosion
. Even a small amount of moisture that gets into the space under the steering wheel can cause corrosion of thin conductors at the soldering point of the cable.
4. Traffic accident
. Increased mechanical loads during an accident can lead to damage to the cable.
Which steering wheel braid should I choose?
But let's start choosing the braid for the steering wheel. We will select it according to parameters.
Material. Today on the market you can find steering wheel braids made of various materials. Most often, girls buy “fun” soft steering wheel covers made of velor, fabric, suede, plush, foam rubber, while men prefer classic options made of genuine leather or leatherette. The most durable and advantageous option is the one made of genuine leather, but such popular cases made of foam rubber very quickly become crushed and lose their shape.
Color and design. You should not buy a steering wheel cover that does not match the color scheme of your car's interior. So, if your interior is black, it is better to take the same dark steering wheel cover and leave beige models to the corresponding cars. Of course, everyone chooses a cover in accordance with their taste preferences, but sometimes this choice looks simply monstrous, especially if a colorful velor cover with butterflies is placed in an incredibly stylish and beautiful car.
Fixation method. There are two main types of steering wheel braids: covers that do not require covering, and the steering wheel braids themselves, which are fixed to it using special threads. Each variety has its own pros and cons. Fixed covers are quite easy to put on, however, during use, such covers can twist and slide if the cover does not fit tightly enough. The steering wheel braids can be completely integrated into the interior, so that an uninformed person will not even know that it is not native to this car, however, there are difficulties in covering the steering wheel with such a braid. You need to have a certain skill, free time and patience to cover the steering wheel yourself. You will learn how this is done further down in this article.
How to repair the steering column cable
The driver's airbag light began to light up periodically.
My warranty has expired; replacing the unit with the cable from the officials costs an unreasonably crazy amount of money, about 6,500 rubles. There is another option to order a new unit with a cable on the Internet for about 1,500 rubles. At the same time, repairing it is not a big problem, in my opinion. I am describing how I did it, I am not imposing the possibility of such a repair on anyone, if you are not confident in your abilities, seek help or advice from an auto electrician, or order a new unit. I couldn’t find a detailed description of such a repair on the Internet, only a mention of the fact that someone soldered something there and everything worked, so I decided to write it myself. I will not describe in detail the removal of the airbag and steering wheel, because... didn't take any photos. To remove the airbag, remove the battery terminal and wait 15 minutes so that the airbag is completely discharged and does not accidentally trigger when disconnected. We use a flat-head screwdriver to access the rear side of the steering wheel and, alternately pressing the clamps (shown by arrows), remove the cushion from the steering wheel and disconnect the cable from the cushion. (the photo shows the pillow already removed)
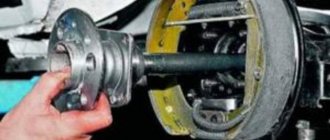
To remove the steering wheel you will need a TORX T50 tool. For this purpose, I bought something like this set for 155 rubles.
After removing the steering wheel, remove this block; to do this, loosen the bolt from below (you will need TORX T20) and pull, it can be easily removed. We unscrew the visible bolts and remove the steering column switches so that they do not interfere, although this is not necessary, to remove them we pull one to the right and the other to the left, respectively; they are removed without effort. To get to the cable, remove the round cover by prying it off with a screwdriver.
We find such a cable wound in a spiral. As the steering wheel rotates, it twists and unwinds, i.e. is in constant motion. To prevent the cable from unwinding during the repair process, we tie it with electrical tape. I saw the advice with electrical tape here www.drive2.ru/l/960440/ Do not rotate this structure yet so as not to later get confused in what position it should be in order to install it back into the car, or remember how many turns and in which direction you turned it so that you know how to return it to the middle position.
pull out this mount
and find places where the contacts are broken. It is not clear to me why the train was bent and laid in a zigzag, this was the reason for the breakdown. The contacts broke due to constant flexion and extension.
We clean the copper strip before and after the break, then solder wires to connect the broken tracks.
To solder reliably, it is advisable to have a thin soldering iron and straight hands) And of course it is important not to short the tracks together
we connect the second track on the back side of the cable to prevent the tracks from shorting with each other
After I connected everything, I straightened the zigzag made at the factory and covered everything with electrical tape. We don’t overdo it with electrical tape, because... a thick skein will interfere with the rotation of this entire structure. We insert the mount into place.
Now we remove the isolette, which we used to prevent the cable from unwinding, and check that the rotational structure, after our modifications, can freely make one and a half turns of the “steering wheel” to the right and one and a half turns to the left. We close the round lid and check again that the structure can rotate freely. We assemble and install everything back. The battery terminal must be removed; connect it after installing the airbag. Turn the ignition key for the first time from the front passenger seat to be sure that the airbag will not deploy in your face.
Comments 35
The bend is a consequence of a breakdown, in the photo below I have a tongue, without it there will be a crease.
Please answer, I had a break in the cable, I soldered it and insulated it, the problem went away. But I can’t help but wonder if the insulation will fray or if something will happen and the contacts on the cable will close and the pillow will bang?
I know a little about electronics, and as far as I can tell, the airbag is triggered by a signal from the brains of the machine (i.e., the brains supply current to two lines of the loop), THIS HAPPENS STRICTLY AT THE MOMENT OF IMPACT. In all other cases, no current is supplied to the loop. If you accidentally close two contacts of the loop, then at the time of the accident, the current due to the closed contacts will not reach the airbag, and it WILL NOT WORK AT THE MOMENT OF THE IMPACT. But it cannot work randomly without an accident.
Please answer, I had a break in the cable, I soldered it and insulated it, the problem went away. But I can’t help but wonder if the insulation will fray or if something will happen and the contacts on the cable will close and the pillow will bang?
Easily! This loop sometimes also sends a signal to the horn button. Now, if he misses the signal for igniting the pillow... then - oh! And if there is nothing else besides 2 wires (+ and - on the airbag), then nothing bad can happen.
And my light is on. Send me the number or link.
Does anyone know if this Gadget is sold separately in the catalog?
Thanks for the detailed report: the airbag light came on in the 5th year, 75,000 km. Everything changed. The same thing - the cable broke off. Just in case, I bought a new one on Aliexpress: 980 rubles from Renault Laguna. Everything fit perfectly.
Can I send you a link in a private message? Maybe I’ll order it too, otherwise it costs 2600₽ in the store
Thanks for the detailed report: the airbag light came on in the 5th year, 75,000 km. Everything changed. The same thing - the cable broke off. Just in case, I bought a new one on Aliexpress: 980 rubles from Renault Laguna. Everything fit perfectly.
Please share the link.
Thanks for the detailed report: the airbag light came on in the 5th year, 75,000 km. Everything changed. The same thing - the cable broke off. Just in case, I bought a new one on Aliexpress: 980 rubles from Renault Laguna. Everything fit perfectly.
Thanks for the detailed report: the airbag light came on in the 5th year, 75,000 km. Everything changed. The same thing - the cable broke off. Just in case, I bought a new one on Aliexpress: 980 rubles from Renault Laguna. Everything fit perfectly.
Would I like a link too? or leave it here so they don’t ask
Aliexpress closed this product. Look, maybe there are others. The train works great.
Thanks for the detailed report: the airbag light came on in the 5th year, 75,000 km. Everything changed. The same thing - the cable broke off. Just in case, I bought a new one on Aliexpress: 980 rubles from Renault Laguna. Everything fit perfectly.
Thanks for the detailed report: the airbag light came on in the 5th year, 75,000 km. Everything changed. The same thing - the cable broke off. Just in case, I bought a new one on Aliexpress: 980 rubles from Renault Laguna. Everything fit perfectly.
Hello. Did you take this one? Does it fit Logan 1?
As for the fuse being pulled out, this is apparently just a coincidence. Three to four months later I followed the procedure described in this post, i.e. soldered the cable. Unlike the situation of the author of the post, the contact broke at the second of the cable creases. I wonder why these creases are even made at the factory?
Instead of electrical tape, I used heat shrink (cambric). There is plenty of copper cable there, so by carefully dividing it into two tracks you can solder them together without additional wires. To avoid a short circuit at one end of the loop break, one of the tracks is made longer, the other shorter. We do the same thing in a mirror way at the other end of the loop break. We put a piece of heat shrink on the long parts of the tracks in advance, and after soldering them, we close each of the connections with a cambric. Solder without fanaticism, do not forget about the gentle insulation of the cable. To shrink the cambric, it must be heated very carefully with a soldering iron, NOT WITH A LIGHTER! (to avoid damage to the loop insulation). The cambric will provide reliable insulation and give additional strength to the connection without additional thickening.
The photo shows the length of the pieces that I had to cut from one of the two tracks at each end of the cable. The cable can be shortened to this length without compromising its functionality.