The “simplest” on-board computer for the Lada Granta is the BC STATE X1-G. It is compatible with ITELMA M74, M75 units, as well as BOSCH ME17.9.7. The connection is made to the OBD connector, which is located in the cabin. No additional power is required. We will look at how to install it, as well as how to update the firmware. Sometimes you need to update it immediately to get compatibility with a new car. Therefore, read the review carefully.
All functions of BC STATE in one video.
On-board computer STATE 110Х4М
On-board computer with text display (16 characters on 2 lines) and blue backlight.
Sound accompaniment with a squeaker.
This BC does not have an input for connecting gas equipment.
Compatible with controllers:
BOSCH 1.5.4, MP7.0, M7.9.7; JANUARY 5.1, 7.2; ITELMA/AVTEL M73 and their modifications
Compatible vehicles (with fuel injection system):
VAZ-2110 (Lada 110) (2000 - 2007)
VAZ-2111 (Lada 111) (2000 - 2009)
VAZ-2112 (Lada 112) (2000 - 2008)
VAZ-21123 (Lada 112 Coupe) (2000 - 2010)
Trip computer with two independent mileage and consumption counters, as well as the ability to view previous parameter values (before reset) for one type of report.
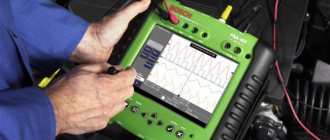
Diagnostic tester allows you to read ECM errors with their status and text decoding, as well as operating parameters of the ECM controller.
Eight multi-displays (MD) with a variable set of parameters and one multi-display with automatic change of parameters depending on current conditions.
The BC has a “TAXI” mode, which allows you to display the cost characteristics of the trip and the cost of fuel consumed.
The BC has a “DYNAMICS” mode, which allows you to measure and display the dynamic characteristics of the car.
The ability to program the functions of the “CLOCK” and “FAVORITE” buttons has been implemented.
Functions PLAZMER (drying and warming up spark plugs for cold engine starts), TROPIC (automatic control of the cooling system fan when the engine temperature specified by the user is reached), FORCING (reset of the controller learning memory when switching “gasoline” / “gas”, leading to the state of the original factory settings) installations for gasoline with an octane number of at least 95)
Emergency alarm for critical events, as well as warnings about the expiration of insurance and the need for maintenance
And also many other functions………….
History of software (firmware) versions for BC State 110Х4М
Changed melodies for the new tweeter
Version 2.0a Fixed a glitch with the display in the ECM parameters mode Version 2.0b Added CO correction Version 2.0c Changes for Tropic in wired control mode. Version 2.0d Changes for Tropic in wired control mode. Version 2.0e Added output of the “Max air flow sensor voltage” parameter for Bosch MP7.0 in the “Reading ADC channels” mode Version 2.0f Removed automatic indicator selection Version 2.1a For the Bosch MP7.0 (Euro-2 and Euro-3) controller, plasma and fuel pump test. For the Bosch MP7.0 (Euro-3) controller, the calculation of parameters has been corrected. Version 2.1b For the Bosch MP7.0 controller (Euro-2 and Euro-3), the injector test has been corrected. Version 2.1c For the Bosch MP7.0 controller (Euro-2 and Euro-3), work has been carried out to test the injectors. Version 2.2a Added a mode for informing about ECM errors. Enabled in the menu “Settings and settings” - “Additional settings”: “Error signaling”. Added a parameter to the “SETTINGS AND SETTINGS” group: Setting the cost of a liter of gas. Minor improvements to MI control (plasmer, injector test, tropic, XX) Added a warning about low beams not turned on, with the ability to turn it off. Attention. When reprogramming to this version, all data (mileage, consumption, settings) will be automatically reset to factory settings. Version 2.2b The engine test for the MP7.0 controller has been corrected. Version 2.3a Added display of the tropic status (in the Engine Temperature parameter) and the IAC status (in the Tachometer parameter). When the tropic is turned on, the engine temperature will blink in the multi-displays. Changes in the “Autolight” function (added switching on if the side lights are on). The “ADDITIONAL ECM PARAMETERS” functions have been added to the “MAINTENANCE AND DIAGNOSTICS” group. Direct control of the ECM actuators has been added to the “MAINTENANCE AND DIAGNOSTICS” group. Fixed minor glitches Added display of car parking time. Displayed when the ignition is turned off by pressing the “Exit” button. The parking time is counted from the last time the ignition was turned off. Version 2.3b Increased waiting time for a response from the controller Version 2.3c Changed the range of values for the cost of gasoline (from 15.0 to 40.5)
Source
On-board computer staff VAZ 2112 16 valves instructions 110x4 m
- To the beginning of the forum
- Forum Rules
- Old design
- FAQ
- Search
- Users
Any questions about the instructions? Or haven't you read it?
Added after 3 minutes 55 seconds:
| state 110 x-4.pdf.zip | ||
| Description: | Download | |
| File name: | state 110 x-4.pdf.zip | |
| File size: | 1.63 MB | |
| Downloaded: | 463 times | |
But if you knew how to do this, you would simply say - put such and such a number on a full/empty tank.
What if, on the contrary, fill the tank full and adjust it to the factory capacity?
There's something with Dot voltage that needs to be set. As I realized on an empty tank, inform the bookmaker that the air is blowing at a minimum. And on a full tank that's the maximum.
This way the bookmaker will remember the extreme positions.
Added after 4 minutes 27 seconds:
Added after 30 minutes 28 seconds:
Okay, I figured it out. Thanks to all! There is another question: I don’t have the 4th leg on my BC (it controls the Carlson). If you solder this leg yourself, will it function? According to the program, there is control, but there is no contact.
alexii54
What ecu do you have, Bosch 7.0?
Most likely, if there is no contact, then it is not routed on the board and the BC program, and it will not be possible to make it..
And if it’s a different computer, then you don’t need it. This wiring.
Added after 4 minutes 10 seconds:
I took the BC to check for errors and turn on the fan (tropical). But I missed the contacts (inexperience). Now we'll have to look for another diagram to finalize it.
Information on icons and features
You can not
start topics You
cannot
reply to messages You
cannot
edit your messages You
cannot
delete your messages You
cannot
vote in polls You
can
attach files You
can
download files
Source
Trip computer
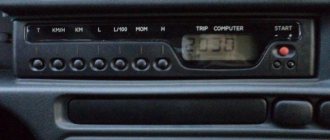
Trip computer (MC), shown in Fig. 37, is installed in a variant version instead of a clock in VAZ 2110, VAZ 2111, VAZ 2112 cars. The MK has 15 functions, divided into 3 groups (see Table 2). The group is selected using buttons 1, 2 and 3.
In each group, functions are divided into basic and additional. The main functions are navigated through the ring using buttons 1, 2 and 3. Additional functions are navigated through button 5. When the ignition is turned off, the computer is always in the “Current Time” mode. When the battery is removed, the clock progress and all accumulated parameters are retained for at least 1 month.
ADJUSTING THE COMPUTER FUNCTION
Clock correction
Press button 4 in the “Current time” mode. At the sixth signal of the exact time, press button 1, this resets the seconds and rounds the clock readings.
Setting the current time (calendar)
- Press button 4 in the “Current time” (“calendar”) mode.
- Use buttons 5, 6 to set the desired hour (day).
- Press button 4.
- Use buttons 5, 6 to set the desired value for minutes (month).
- Press button 4 to complete the time (calendar) setting.
Setting an alarm
- Press button 4 in Alarm mode.
- Use buttons 5, 6 to set the desired hour value.
- Press button 4. Use buttons 5, 6 to set the desired minute value.
- Press button 4 to complete the alarm setting.
- In the “Current time” mode, the alarm symbol will light up (the alarm is on).
* If the counter of any of the accumulated parameters (“Travel time”, “Travel time with stops”, “Total consumption”, “Trip mileage”) overflows, all accumulated ones, as well as calculated ones (“Average fuel consumption”, “Forecast”) are reset mileage on remaining fuel", "Average speed") parameters, with the appearance of a two-tone sound signal.
Turning off the alarm
- Press button 4 in Alarm mode.
- Press button 1 to turn off the alarm. “—.—” will appear in the digital digits, and in the “Current time” mode the alarm symbol will not light up (the alarm is turned off).
Adjusting the brightness of the indicator backlight
When the side lights are on, the illumination level is adjusted using the instrument scale illumination regulator. When the side lights are turned off, the backlight level is adjusted by software:
- — press button 4 in the “Traveling time with stops” mode. All single segments (pictograms) will be displayed on the indicator, which is a sign of the backlight level adjustment mode, and the digital digits will display a number corresponding to the backlight level as a percentage of the maximum value;
- — use buttons 5, 6 to set the required level of backlight brightness; press button 4 to end the brightness adjustment mode.
Source
Lada 2112 Hooliganka › Logbook › -Installation of on-board computer STATE 110x5-m;
Good health to everyone!
As was written earlier in the B/F, I planned to purchase an on-board computer at a reasonable price for me, ranging from 1500 to 2500 rubles.
THANKS TO ALL THOSE WHO LEFT THEIR FEEDBACK AND RECOMMENDED THIS OR ANOTHER ON-BOARD COMPUTER! .Having searched for on-board computers in my city, as it turned out, the choice was small, and then a day later a friend called me from another city and found me on-board computers at a reasonable price and what I needed, initially there were several models to choose from,
STATE 110x4-m
,
STATE 110x5-m
and
ORION BK-30-40
..., but after looking at the reviews and characteristics I chose the
STATE 110x5-m.
Just the day before yesterday, my friend Garamaj safely delivered it to me, for which I want to express my deep gratitude to him! .
Immediately after assembling the car interior, I decided to connect the BC, as it turned out there is nothing complicated, the only thing is that there is still no access to the engine temperature, car speed, revolutions, etc. “it says that there is no connection with the controller,” what could it be?
.
and so everything works Description from the manufacturer BC STATE 110x5-M:
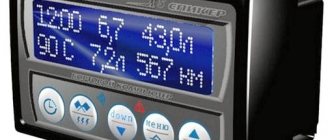
On-board computer STATE 110X5-M.
The trip computer State 110X5-M is designed for installation on fuel-injected cars VAZ 2110, VAZ 2111, VAZ 2112 with any panel. The new design significantly improves its user characteristics. Characteristics
Voice accompaniment: Yes Installation location: In a standard place Display type: LCD monochrome Taximeter: Yes Item name: On-board computer Brand: State Model: 110×5-M
Controller types
The computer is compatible with all types of controllers BOSCH, January, Itelma, Avtel, except January 4.1, GM, including E-Gas. The computer has non-volatile memory, which allows you to save all data when you remove the terminal from the battery.
Differences between the State 110X5-M and previous versions.
Automatic thermal compensation of display contrast is implemented in a wide temperature range: -30…+70°C. The possibility of parallel monitoring of route parameters at two different reference points has been implemented, with the independent ability to reset (zero) each type of report, as well as the ability to view previous parameter values (before reset) for one type of report. Eight multi-displays (MD) with a variable set of parameters and one multi-display with automatic change of parameters depending on current conditions. The on-board computer has a “TAXI” mode, which allows you to display the cost characteristics of the trip and the cost of fuel consumed. The on-board computer has a “DYNAMICS” mode, which allows you to measure and display the dynamic characteristics of the car. The ability to program the functions of the “CLOCK” and “FAVORITE” buttons has been implemented. The on-board computer has a warning mode about maintenance periods and expiration of insurance. The On-Board Computer implements a “sleep mode”. When the ignition is turned off, but the BC is still connected to the car’s on-board network, the screen brightness drops to 0% and only the “CLOCK” MD remains available. To illuminate the CLOCK MD brighter, press any button on the top panel of the on-board computer. The screen will be illuminated for 8 seconds, after which the bookmaker will go into sleep mode again. The bookmaker has 4 levels of settings: User settings; Fine settings; Settings; Additional settings. Display of ECM errors with their status and their text description. It is possible to flash the BC using a “Data cable” or “Data cable USB” (not included in the package).
Parameters that are displayed on the controller display
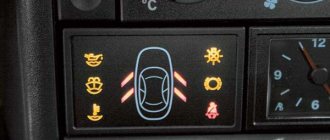
The standard on-board computer present in the Lada Kalina allows you to quickly display information that displays such important parameters.
- Distance traveled. Traditionally expressed in kilometers. The value is positioned in the top line of the display. It is this indication that appears as an unchanging criterion, because it is constantly present on the display.
- Time. Information is provided in a 24-hour format. The parameter needs to be configured correctly to combine the readings with the actual passage of time. To set the values, use the “Reset” button. Here you need to hold it pressed until the flashing “time” symbol appears on the screen. After this, we set the required value of the indicator.
- Fuel consumption during the last trip. This parameter needs to be reset regularly. The driver performs this action, since the device is not capable of this on its own. This must be done immediately before the start of the trip, otherwise the reading will be cumulative, which is incorrect.
- An indicator of the average speed during the last trip. This parameter also needs to be constantly reset. This is necessary so that the computer does not count the speed from the moment the readings are reset to zero.
- Power reserve. This indicator is formed based on several factors. Based on fuel reserves, driving pace and other aspects, the computer calculates the distance that can be covered before coming to a complete stop. If the driving style changes or the driver replenishes the fuel supply, the computer will immediately recalculate this indicator and display a new value.
- Instant consumption. This is a parameter of fuel consumption in the current unit of time. The value can vary from 0 to 20 liters. This is influenced by the level of load on the motor at a given moment.
- Average consumption. The on-board controller calculates this parameter independently, based on the speed indicator, driving pace and other factors.
- Travel time. The value needs to be systematically reset. The calculation is carried out from the moment you leave the parking lot, subject to the reset of the parameter for the previous trip.
- Air temperature. The indicator is recorded using sensors integrated into the device, after which the information is sent to the screen.
Why do you need an on-board computer?
In previous articles we have already talked about what an on-board computer is. what is it for and what types are they? But let me repeat myself so that you clearly understand all the advantages of having an on-board computer, and there are probably no disadvantages, except perhaps spending money on the purchase and that’s all.
Let's take, for example, the on-board computer STATE 115×24. With this model in your possession, you can:
- set the radiator fan start temperature; this function is very useful, for example, in winter, when you can control the temperature of the coolant, thereby monitoring the temperature of the heater radiator.
- The function of drying and warming up the spark plugs before starting the engine is very useful.
- The function of resetting settings and ECU adjustments is needed to switch to gasoline with a higher or lower octane number (from 92 to 95 and vice versa), and this function is also needed to reset settings after a long trip with increased load on the engine.
- The ability to read errors allows you to monitor the condition of the car and change non-working sensors and elements in a timely manner.
What is a plasma device in a car, and why should it be turned on?
The car has not only obvious functions, but also hidden ones, the presence of which many drivers are not even aware of. One of these options is “Plasmer”. Let's figure out what it is and why this option is needed?
Option - assistant
This option is designed to make it easier to start the engine in the cold season. It is used when the car has been left in the cold for a long time without moving. Since the winter start of the engine is accompanied by a large load on all its units, there is a need to somehow reduce this load and make the engine easier to operate. Activating the “Plasmer” option enables pairwise operation of the spark plugs in idle mode. That is, current is supplied to the spark plugs and a spark occurs, but there is no fuel-air mixture in the combustion chamber, which means the engine does not start.
Installation instructions for on-board computer
In this article we will look at the process of installing the Prestige on-board computer with diagnostic and error reading functions.
For work we will need:
Screwdrivers, on-board computer, 1m long wire.
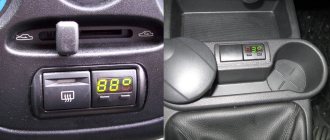
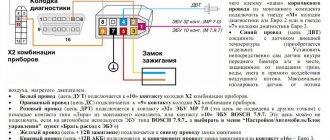
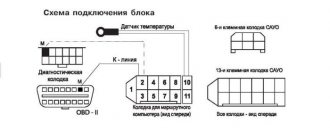
We remove the plug on the central dashboard and look for a 9-pin wiring block in it. This block must be present on all cars of our model. All that remains is to connect the block to the computer and that’s it, but we need to draw a K-line.
How to draw a K-line?
- We take our wire and install it in the second contact of our block.
- We throw the opposite end of the wire under the instrument panel down to the diagnostic block (for convenience, you can unscrew the right side panel).
- Having stretched the wire to the diagnostic block, we connect it to the “M” socket if you have a EURO-2 block or to the 7th socket if you have a EURO-3 block (it is very common that the diagnostic block for Euro-3 is installed upwards on the car feet, keep this in mind)
- Now we connect the on-board computer, insert it into its normal place and check it.
Versatile alternative
Of course, thanks to their various mounting locations, Multitronics on-board routers can compete with the States. Powered by a 32-bit processor, multitronics are precise and fast in operation. If a car enthusiast has the opportunity to buy such an on-board computer, then the car will be under excellent control thanks to functions such as:
- a large number of diagnostic protocols, including extended ones;
- transfer and save all driving statistics to a personal computer;
- voice accompaniment;
- parking radars, etc.
All of the above functions of the State on-board vehicle have been added to the multitronics. In addition, the latter have easy setup for operation and a convenient user interface. But due to all this, the price will be much higher than that of a compact and more suitable State Grant.
Initially, it was possible to buy on-board computers for the Lada Granta only from the official one. Since sales of this car started at the end of 2011, for some time the unavailability of additional equipment for the Lada made it not very popular among car enthusiasts. However, it is now possible to buy on-board computers from official dealers and various suppliers of automotive products and equipment.
Installing an on-board computer allows you to monitor problems in the operation of the internal systems of the car. The most popular device model STATE GRANTA x1 is already used by many motorists.
Owners note the ease of use of the device and its high quality. It includes 30 useful functions, which are controlled using two buttons.
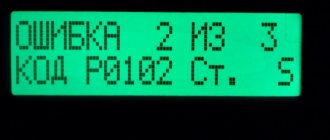
Errors when connecting/operating the on-board computer
Error: “No connection with the controller” or “break in the K-line.”
This error indicates that the K-line is not connected or a contact break has occurred. Check the wire according to the diagram described above. Most likely the contact has come off the diagnostic block.
Incorrect readings of the sea temperature sensor
If your temperature outside is -40, then this indicates that the wire to the temperature sensor has broken, or there is no such sensor at all. If the temperature is, for example, -25, but it’s only -10 outside, then you need to replace the sensor with a working one.
How to connect the State on-board computer to a VAZ 2110 (instructions)
With the advent of more modern technologies, domestic cars began to be equipped with on-board computers. The VAZ 2110 model was no exception.
Thanks to the on-board computer on the VAZ 2110, you can check for yourself what condition the car is in, what problems have arisen and how to solve them.
Stories from our readers
Digital errors on the on-board computer are easy to decipher. To fully launch the BC, all that remains is to connect the K-line.
The wire with the sensor can be taken out from the passenger compartment through a hole in the engine shield under the speedometer cable, next to it. The preliminary stage of installing an on-board computer on a car is to select the appropriate tools that will be needed during the installation process: a classic set of automotive screwdrivers; directly the on-board computer of the car; standard wire is about 1 meter. BK10 on VAZ2110
The main reasons for installing an on-board computer on a VAZ 2110
There are several objective reasons . Why is it rational to install and use on-board computers on the VAZ 2110:
- The BC demonstrates the current, average fuel consumption as correctly as possible. This allows the driver to refuel on time;
- There is a tachometer and voltmeter;
- There is functionality to notify you when the oil needs to be changed.
Such a device costs only 2,000 rubles, so it is recommended to install it. This will not require serious financial expenses, but the return and benefits from the on-board computer will exceed all your expectations.
Tuning menu
Failure of Temperature Sensors Occasionally, due to exposure to extremely low temperatures, off-board temperature sensors may fail.
Installation features and computer connection procedure
Remove the on-board computer, having first unfastened all the wires connected to it.
Features of connecting the VAZ on-board computer Saturday, July 27 The VAZ error code is deciphered using certain codes. Sometimes it is necessary to reset all data on fuel consumption, travel time, etc. Yes, morally I have matured, but financially I could not cope. I also advise you to download the application to your phone, it’s much more convenient to work from your phone. Only a touchscreen from the Sony-Ericsson G phone is added. Why do you need an on-board computer? At cost, it turned out to be about rubles.
You can remove the on-board computer on a VAZ in the following way: Remove the battery terminal; Stick your hand into the opened niche and release the BC fastening; Remove the BC by disconnecting its plug and wires; The radio is then installed in place. I continued to dig further and came across binary options. How to connect HBO and the on-board computer “State”
What does the on-board computer notify?
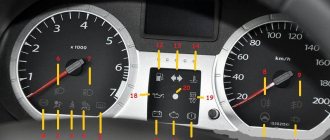
- When the car is moving, a light comes on, indicating a malfunction of the power unit. It is possible that there really are problems with the engine. It's easy to notice by the sound. If the light is on, but the engine behaves normally, do not rush to go to a car service center. A common problem with the BC on the VAZ 2110 is a small short circuit. Carry out diagnostics - cheaply and effectively.
- Fuel consumption is too high, it has even exceeded the maximum limit of 12 liters. If such a problem is detected, it can only be solved by flashing the controller firmware. Doing this on your own is difficult and sometimes impossible. Trust exclusively highly qualified specialists.
About replacing the device and the list of required tools
Which computer should I install? There are models of trip computers on sale that are specially adapted for the LADA Kalina electronic control system and have more advanced functionality. Manufacturers include instructions with the controller, which are an indispensable assistant during installation.
To quickly and efficiently install (replace) a new device in the LADA Kalina panel, you will need to acquire the following set of traditional tools:
The instructions provide detailed information regarding the functionality of the new device and techniques for its correct installation. A detailed diagram of all electrical connections is also provided. We recommend that you carefully follow the manual while performing the entire list of installation procedures. After installation, the owner of a LADA Kalina car receives more detailed information about the state of important systems that are included in the overall electronic complex of the car. The instructions also describe in detail how to use the device.