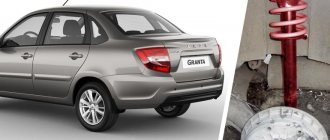
The rear suspension is dependent, with 12 coil springs and 10 double-acting hydraulic telescopic shock absorbers.
The main load-bearing element of the suspension is a beam consisting of trailing arms 14 and a connector 13, welded together through reinforcements.
At the rear, brackets 15 with eyes for attaching shock absorbers 10 and flanges for attaching the rear wheel axles and brake shields are welded to the suspension arms.
At the front, the levers 14 are equipped with welded bushings with silent blocks 3 pressed into them. A bolt passes through the central bushing of the silent block, connecting the lever to the bracket 2.
To attach the bracket to the body side member, three welded bolts are provided.
The suspension spring 12 rests with its lower end on a cup welded to the shock absorber reservoir, and with its upper end, through a rubber gasket 11, on a support welded from the inside to the body arch. The lower eye of the shock absorber is bolted to bracket 15 of the suspension arm, and its rod is secured to the upper support of the suspension spring through two rubber pads 8 (one at the bottom of the support, the other at the top) and a support washer 7 (under the nut).
The hub has a double-row angular contact ball bearing, similar to the front wheel hub bearing, but smaller.
The bearing fit on the axle is transitional (with slight interference or clearance).
During operation, the bearing does not require adjustment or replenishment of lubricant. It is not allowed to eliminate the resulting play by tightening the nut; the bearing should be replaced.
When the hub is pressed out, the bearing is destroyed, so it is not recommended to disassemble the hub if the bearing is in good condition.
Rear suspension of the VAZ 2110 - main components
The rear suspension device of the VAZ 2110 consists of two longitudinal arms 13 welded together through amplifiers with connectors 12, to the rear of which brackets 14 are welded with places for attaching shock absorbers and with flanges 15.
The wheel axles along with the brake mechanisms are attached to them. In front of the levers there are bushings 16 with rubber-metal hinges 1; bolts are threaded through them, which are connected to brackets 2, which, in turn, are attached to the body side members. Springs 11 are located at one end in the shock absorber cup 9, at the other - in the support through the rubber gasket 10, which is welded to the inner arch of the body.
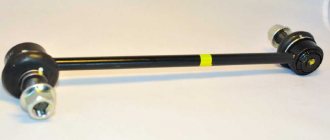
Double-acting telescopic shock absorbers. They are attached to the bracket with bolt 9. The rod is attached to the upper support 5 of the spring through rubber pads 6 and a support washer 3. A thrust bearing 12 is installed in the hub 13. It is similar to the front one, but is smaller in size and, unlike the front one, where the inner ring is installed with an interference fit, bearing 12 on axle 14 has a transitional fit. During operation, it does not need to be adjusted or lubricated; any play that occurs cannot be eliminated by tightening the nut, only replacement.
It is not recommended to disassemble the hub if the bearing is in good condition, since it is destroyed when pressed out.
Types of suspension faults
Experts identify several reasons that lead to suspension failure.
The cause of the malfunction may be:
- Shock absorber failure.
- Wear of the rod mounting, as well as poor connection of this part with its seat.
- Bushing wear.
- Spring breakage.
- Destruction of the buffer-limiter.
One of the most common causes of suspension failure is a faulty shock absorber. Since the shock absorber is a complex device, it is recommended that repairs to this part of the car be carried out by hiring a qualified specialist.
Frequency of replacement of rear struts of VAZ 2110
The service life of the rear struts and the frequency of their replacement depend on three factors - workmanship, compliance with the weight of the vehicle and driving style. Therefore, on some cars, shock absorbers have to be changed every six months, on others they work properly for 5–7 years. There are often cases when shock absorbers from well-known companies (Kayaba, Koni, Monroe, Sachs), when installed on VAZ 2110 cars, failed after 2 - 3 months, and unpretentious shock absorbers manufactured by AVTOVAZ worked for more than 3 years.
Rear suspension, useful assembly tips
When collecting, there are a number of basic rules that must be strictly adhered to:
- During assembly work, it is important that the lower end of the spring always rests against the protrusion of the cup.
- Springs must be of the same stiffness group. It can be identified by the color with which the suspension element is marked.
- The final tightening of the shock absorbers is necessary with the vehicle lowered to the ground so that the static load from the vehicle's weight acts on the suspension.
Reasons for failure of the rear struts of the VAZ 2110
The main reasons for the failure of the rear struts on the VAZ 2110 include the following factors:
- Wear of a part associated with its service life
- Aggressive driving style
- Poor quality road surface
- Wear of another part in the rear suspension, which collectively affected the serviceability of the struts
All of the above factors directly or indirectly affect the wear of the rear shock absorber struts of the VAZ 2110.
Suspension tuning
The factory rear suspension on the VAZ 2110 is dependent; in most modern models of this class, foreign manufacturers use multi-link independent. Several Russian companies produce for tuning the “tens” a set of independent rear suspension with anti-roll bar, the design of which is borrowed mainly from German cars. It is attached to standard places, it is possible to adjust the camber, toe, and stiffness of the stabilizer.
Independent rear suspension
The tuned independent suspension improves handling and comfort, reduces the time the wheel lifts off the surface, increases vertical travel, and allows the use of stiffer, energy-intensive struts. True, the effect will only appear at speeds above 150–170 km/h and on uneven country roads, so decide for yourself when and how much you need an independent rear suspension on the tenth family.
In the rear suspension of the VAZ 2110, during intensive use, the consumables are shock absorbers and silent blocks; over time, the springs require replacement. Inspections must be performed during each maintenance, and repairs must be made when malfunctions are identified.
Signs of malfunction of the rear struts of the VAZ 2110
The main signs of wear on the struts on a VAZ 2110 car can be considered:
- steering wheel beating;
- increased body vibration on the “comb” side; damaged rack;
- leaving a car from a straight trajectory;
- abnormal skidding when cornering;
- increased braking distance;
- the appearance of knocking noises in the strut, which indicates abnormal operation of the shock absorber valve group;
- the presence of smudges, i.e. oil leakage.
It becomes clear that you need to look for and eliminate the cause of the suspension’s malfunction. Further operation of a vehicle with obvious signs of such deviations in the suspension is extremely undesirable.
What can this lead to if you do not replace the struts on a VAZ 2110 in a timely manner:
- Firstly, after 1.5-2 thousand kilometers, you can simply “break” the support bearings of the front struts;
- Secondly, coupled with mediocre balancing of the front wheels, increased uneven wear of the tires occurs, sometimes even with “bumps”, because the wheel “jumps” on the road while the car is moving; Wheel bearings break, but their price and replacement work today amount to a decent amount;
- Thirdly, an increase in braking distance is directly related to the safety of car operation, when a few meters or a fraction of a second can decide the issue of repairing the body or its parts not in favor of the car owner;
- Fourthly, the service life of the brake pads is reduced, their uneven wear occurs, again - a safety issue, and as a consequence - unforeseen expenses for their forced replacement.
The main causes of knocking in the rear suspension of the VAZ 2110
Knocks in the rear suspension of the VAZ 2110 occur for various reasons, so this should be looked into in more detail.
- If knocking noises are observed when driving on uneven ground, the shock absorbers have apparently failed. The only solution is to replace with new ones.
- If you see that the rubber bushings of the levers are worn out, change the suspension.
- When the spring settles, it must be replaced.
- A knocking sound is likely a sign of a loose shock absorber or worn rubber eye bushings.
- When the rear suspension is overloaded or damaged, knocking noise also occurs.
- If the bushings of the suspension arms are destroyed, the rear axle moves and a knock appears.
- When knocking is observed from the suspension arms, it is recommended to replace them with new ones.
- Knocks can also be determined by how busy the rear part is. Empty the trunk and do not seat anyone in the second row. This makes it easier to figure out what the reason is - shock absorbers or springs.
Possible faults
If a knocking noise occurs when the car is moving, it is possible due to the fact that:
- the shock absorber failed;
- the fastening of the rod has become loose or the place where it fits is “broken”;
- rubber bushings are worn out;
- the spring has burst or the cup of its support has broken;
- The rubber buffer-limiter has collapsed.
A faulty shock absorber is indicated by leaks coming from it. By sharply pressing down and releasing the corner of the car, you need to see how long it will swing. A good stance, working to slow down in any direction of movement, will stop the vibrations in one, maximum two cycles without knocking.
The design of a modern shock absorber is quite complex; repairs require skill and precision in the manufacture of parts. Replacement is much simpler and more profitable, especially since the choice of suitable characteristics and manufacturers is large.
Shock absorber device
The upper mounting point of the rack is located in the trunk; for access and visual inspection, you need to remove the shelf and rubber plugs. Bushings, springs, and buffers are inspected from below on a lift or overpass. Rubber-metal hinges should not have cracks or bulging rubber; in addition, their quality is checked by shaking the levers with a crowbar or a mounting tool. A knock when the buffer breaks occurs when the rear axle is loaded on uneven roads during suspension breakdown. Spring breakage is usually manifested by a pull to the side when moving and a kind of sharp irregular knocking.
You can read about possible malfunctions of the front suspension of this car here:
Shock absorbers and springs are replaced in pairs, simultaneously on the left and right, even if the part has failed on only one side.
Which racks to choose for the VAZ 2110 - reviews from owners
The factory struts installed on the VAZ 2110 cannot be called ideal for this car. In terms of design and technical parameters, they are suitable, but do not provide the desired quality, efficiency and durability.
The main disadvantages of factory suspension elements include:
- Insufficient reliability. Many car owners note that after just a few months of use they can create a characteristic knocking sound in the suspension, which indicates the need for repairs;
- They often leak, which indicates suspension problems and the need to go to a service station;
- When driving at high speeds, the struts exhibit another drawback - they cause strong body roll, which definitely makes high-speed turns difficult to call comfortable.
The most popular brand was SS20. Today SS20 struts fit perfectly on the VAZ 2110. Let’s not hide that these elements are in many ways superior to their domestic, factory-made counterparts.
The SS20 company produces quite a lot of different suspension elements that are suitable for the VAZ model range.
Their distinctive features forced car owners to pay increased attention.
- The product quality is high at a very attractive price.
- The products are provided with a long warranty. So, for struts - 2 years without mileage restrictions, and for springs - 4 years.
- The warranty applies to the product regardless of the installation location. You don’t have to go to a service station and pay money to the technicians to maintain your warranty. Many people change the struts on the “ten” on their own, in their garage. If you do this, the SS20 parts warranty will still apply. This is the only manufacturer that offers such warranty conditions.
The Asomi company can be called a definite competitor. Their parts are of quite high quality and reliable. Only the warranty is only 1 year. Moreover, the elements must be installed at specialized service stations. And this significantly affects the cost of repairs.
Rear suspension on the VAZ 2110: fault diagnosis and do-it-yourself repair, tuning
Content:
If malfunctions occur in the rear suspension on a VAZ 2110 car, this can be determined by characteristic knocking or other extraneous sounds that come from below from behind the car.
Design Features
Let's look at the main nuances of the rear suspension design for domestic tens:
- The basis of the suspension is a pair of trailing arms, which are interconnected by a connecting beam;
- On the rear top of the lever there is an eye welded to the bracket for the lower shock absorber mounting;
- A flange is welded on the outside to protect the wheel axle and brake mechanisms;
- In front there are metallic silent blocks on the bushing arms, which are fixed with bolts and brackets on the body side members;
- From below, the rear suspension springs rest on the cup;
- From above, the springs rest against a welded special support on the arch;
- The shock absorber rod is attached to the support using a nut through a support washer and a rubber cushion;
- The lower part of the telescopic hydraulic shock absorber is connected to the rear of the suspension trailing arm;
- This shock absorber works on compression and rebound.
It is worth noting that the design of the rear suspension on the 10 is quite simple, but at the same time reliable.
Design diagram
The weakest points of the rear suspension are the springs, rubber-metal joints, and struts. Depending on the vehicle's operating conditions and mileage, their service life may be significantly reduced.
Possible breakdowns
When driving the car, you may hear extraneous knocking noises, which can be caused by several reasons:
- The shock absorber has stopped working due to wear or damage;
- The rod fastening has become loose;
- The seat of the rod was broken;
- The bushings made of rubber have finally worn out;
- The spring support cup or the spring itself has become deformed, burst or broken;
- The buffer-limiter, also made of rubber, was destroyed.
The most obvious sign of a faulty shock absorber is leaks from the element.
To check the condition of the suspension, you should sharply press the rear part down from one of the corners of the car and just as sharply release it. See how long the car will rock. If everything is fine with the suspension and struts, 1-2 cycles are enough for the movements to stop. If the swing lasts longer, then the suspension needs repair.
Examination
If shock absorbers fail, the most rational solution is to replace it. It is possible to repair a failed rear suspension element, but this will require qualifications, experience, and knowledge.
Replacement is often simpler and requires less financial resources to be spent. Plus, the choice of parts on the market today is huge, from cheap Chinese products to expensive, highly reliable imported ones.
Let us give examples of checking individual components of the rear suspension design on a VAZ 2110 car.
| Component | Your actions |
| Top mounting point of the rack | It is located in the trunk. To visually inspect the element, you need to remove the shelf and dismantle the rubber plugs |
| Bushings | To inspect them, you will have to lift the car using a lift or drive onto an overpass. When checking these rubber-metal elements, make sure that the rubber does not stick out and that there are no cracks on the part. Additionally, you can swing the levers using a pry bar or crowbar |
| Buffer | If the buffer is destroyed, then a knocking noise will occur when loading the rear axle or driving over uneven surfaces. It is not difficult to determine this even by ear. But to make sure, lift the car or drive into a pit |
| Springs | Broken springs also often create extraneous noise and often cause the car to pull to the side. The sound should be quite unusual, sharp, and does not appear regularly. |
When replacing shock absorbers and springs, the repair must be performed in pairs, that is, from the left and right sides at the same time. This should be done even if the element on one side remains intact, but the other is broken.
We disassemble and assemble
Dismantling work on the rear suspension of the car should be carried out in order to replace or repair individual components of the system.
We invite you to read the instructions that will help you disassemble and reassemble this unit of your VAZ 2110.
- Loosen the shock absorber mounting nuts located in the trunk. At the same time, hold the rod so that it does not turn.
- Raise the rear of the body with a jack to remove the wheels.
- When removing the handbrake cables, it is better to do it as an assembly - dismantle the brake drums, disconnect the cable tips from the pad drive, and disconnect the casing from the brake shield. Next, the fasteners to the body and suspension arms are released.
- The next step is to disconnect the hoses and rear brake pressure regulator.
- Lower the car onto the prepared stands under the suspension arm brackets.
- Release the upper fasteners of the shock absorber in relation to the body.
- Raise the rear of the body again and unscrew the lower fasteners.
- Depending on the work being carried out, it would be a good idea to remove the springs, bumper buffer and struts.
- Once you unscrew the bolts that secure the beam to the side members, the rear suspension beam can be released.
- To repair or replace the brake shield or hub, you will need to unscrew their mounting bolts. After this, remove the elements and do with them what you need.
Important Assembly Rules
When assembling, there are several key rules that should be strictly adhered to.
- The lower end of the spring must rest against the protrusion of the cup during assembly work;
- Springs are chosen of the same stiffness group. The stiffness group can be determined by the color with which the suspension element is marked;
- It is necessary to finally tighten the shock absorbers by lowering the car to the ground so that the static load from the weight of the car acts on the suspension.
Replacing the rear beam
Tuning
The factory version of the rear suspension for the VAZ 2110 is a dependent design. But modern cars mostly use multi-link independent suspension.
Today, several companies in Russia are producing kits that allow you to tune dozens by installing an independent structure with anti-roll bars at the rear. Such kits are based on German technologies.
The advantage of this modification is that the kit is mounted on standard mounts. During operation, you can, if desired, adjust the camber, toe, and rigidity of the stabilizer.
Tuning results
Tuning from dependent to independent suspension allows you to increase comfort and vehicle controllability, and reduce the time the wheels hang above the road surface. This makes it possible to install energy-intensive, more rigid racks.
Loading …
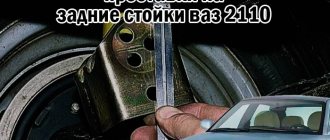
How to remove the rear struts of a VAZ 2110 – step-by-step instructions + photos
In order to replace the rear struts on a VAZ 2110 we will need the following tools:
- jack or lift;
- support for wheels and bottom;
- WD-40;
- hammer;
- keys at 17, 6, 19;
- screwdrivers;
- pliers;
- original shock absorbers for rear struts with number 2110-2915004.
And so let’s move on to the work itself:
- In order to get to the upper mounting of the rear pillar, you need to remove the backrest on the rear seat and move the upholstery on the rear wheel arch to the side.
- After unscrewing, the nut is removed, after which it is necessary to remove the support and spring washer, as well as the upper rod cushion. Then, using a jack, raise the car, after which the rear wheel is removed from the side where the strut is being replaced. The wheel is removable for easy access. If desired, this procedure can be carried out without removing the wheel.
- Using a 19mm wrench, unscrew the nut of the bolt that secures the shock absorber strut to the rear beam. To prevent the bolt from turning when unscrewing, it must be held with another wrench.
- Next, the bolt is removed. If the mounting bolt cannot be removed by hand, it must be knocked out using a hammer and a mandrel.
- After which the shock absorber is removed, along with the spring. From the removed shock absorber, remove the spring, the lower cushion with the bushing, as well as the compression stroke buffer and protective cover. It is necessary to remove the rubber spring gasket from the body support cup.
Removal and installation of the rear beam VAZ 2110, VAZ 2111, VAZ 2112
Rear beam Installation and repair of the rear suspension of VAZ 2110, VAZ 2111, VAZ 2112 do-it-yourself chassis repair rear suspension, do-it-yourself check, repair
We carry out the work on an inspection ditch or a lift.
We remove the rear brake pads of the VAZ 2110 and disconnect the parking brake cables from the rear suspension beam and brackets. Disconnect the brake pipes from the rear brake cylinders, and the rear brake hoses from the beam. We disconnect the elastic lever of the pressure regulator drive from the beam (see chapter Brake system VAZ 2111).
Using a 17mm wrench, unscrew the four bolts securing the hub axle to the rear suspension beam.
We remove the hub axle together with the brake shield of the VAZ 2111.
Having unbent the fastening bracket, remove the brake pipe.
If necessary, separate the hub axle and the brake shield by unscrewing two screws with a Phillips screwdriver.
Brake shield and hub with axle
We disconnect the lower ends of the shock absorbers from the VAZ 2111 beam (see Removing the shock absorber and spring). We unscrew the nuts of the bolts securing the beam to the brackets (see Replacing silent blocks of the rear suspension of a VAZ 2110).
We lower the beam.
After removing the bolts, remove it.
Using a 17mm socket, unscrew the three nuts securing the bracket to the body of the VAZ 2112.
. and remove it.
Install the beam in reverse order. We tighten the bolts securing the beam and the lower ends of the shock absorbers in the “car on wheels” position. After this, we bleed the hydraulic brake drive of the VAZ 2112 (see Bleeding the brakes).
Rear suspension of VAZ 2110, VAZ 2111, VAZ 2112
Rear suspension design
Rear suspension of VAZ 2110, VAZ 2111, VAZ 2112
Installing rear struts on a VAZ 2110 – step-by-step instructions + photos
Before installing a new rear strut, the previously removed lower support cup is attached to the shock absorber, and a compression stroke buffer, a protective cover, a cushion, and a lower thrust washer are attached to the shock absorber rod.
- Next, a spring is installed on the shock absorber, which must be positioned so that the rubber gasket on the spring coincides with the support washer on the car body.
- Then the lower part of the rack is secured to the rear beam, while the fastening bolt should not be fully tightened, but simply slightly tightened.
- On the shock absorber replacement side, a stop is placed under the rear beam, and the car is lowered on a jack, while it is necessary to direct the strut rod into the hole in the body. After the rod comes out of the hole in the body, the upper support washer and cushion are put on it, the rod nut is tightened, and the wheel is installed.
- The lower mounting bolt of the strut to the beam is tightened after the car is removed from the jack and is on its wheels.
- When the rear struts of the VAZ 2110 have been replaced, it is necessary to adjust the camber of the front wheels and the pressure regulator of the rear brakes.
Removing and installing the rear beam and its elements
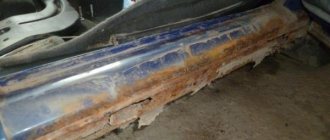
If during the operation of the vehicle the rear suspension beam of the VAZ 2110 bursts, then in the future it will need to be replaced. Of course, as a temporary aid, it can be restored by welding. But this is done solely in order to get to the maintenance site where it needs to be replaced.
Operating a vehicle with a welded beam rear suspension of the VAZ 2110 not only creates an emergency situation on the road, but also leads to disruption of vehicle stability and accelerated wear of the vehicle tires. The market value of the rear beam is quite high, but its replacement in this case is simply necessary.
We replace a product such as a rear beam, which can be purchased at any specialized automotive store, according to the following scenario:
- We place the vehicle on an electric lift or a special repair pit.
- We remove the brake pads from the rear wheels and release the hand brake cables from the rear beam and holders.
- We remove the brake pipes from the rear cylinders, and the hoses from the stern beam.
- We remove the drive-type pressure regulator fasteners from the stern beam.
- Remove the 4 bolts securing the hub axle to the aft beam using a wrench set to “17”.
- We dismantle the hub axle together with the brake mechanism casing.
- Having removed the fastening bracket, we dismantle the brake system pipe.
- If the need arises, we disconnect the hub axle and the brake mechanism housing, while freeing 2 screws with a curly screwdriver.
- We detach the lower fasteners of the shock absorbers from the rear beam.
- Remove the fasteners of the rear suspension beam to the holders.
- Place the rear beam on the ground.
- Having removed the fasteners, we dismantle the product.
- We remove the fasteners of the holder to the bodywork and dismantle the bracket.
- Installing the rear suspension component is carried out in the reverse order.
- We complete the fastening of the rear beam and the lower part of the shock absorber struts with the vehicle installed on the site.
- We finish the job by bleeding the brake system.
Tens body care and repairs
The overall body of the “ten” looks more reliable, durable and resistant to corrosion. All-metal and partially galvanized, it comes off the assembly line already treated with anticorrosive, ready for harsh operating conditions.
On the other hand, we must pay tribute to our car owners, who are accustomed to finishing everything with their own hands. In particular, while remaining adherents of the domestic automobile industry, they turn a blind eye to the differences and shortcomings of technology in comparative terms and take additional care of the body so that it serves for many years without problems. Russian car owners almost always add special protection to the standard anti-corrosion treatment.
Preventative work specifically involves tinting the bottom of the car, treating sills and fender liners with Movil.
Note. We can say with confidence that among the “dozens” with high mileage, even today you can find examples that have been so well cared for by the owner that they look like new.
People's love for the “ten” is also symbolized by the succinct names given to the car by amateurs. “Matryoshka”, “pregnant antelope”, “chubby” - all these nicknames, albeit with some degree of irony, speak of love for the car. If at first the unique, new design of the VAZ model raised questions, then over time the angular shapes of the “bow” and “stern” became familiar.
Here are the preventive works that are usually carried out on the body of the “tens” throughout the entire operational period:
- Caring for paintwork;
- Lubrication of metal components of the body;
- Cleaning of technical holes;
- Periodic anti-corrosion protection of the body as a whole and treatment of hidden areas;
- Noise insulation;
- Sealing.
To protect the original paintwork of the body, you must be able to select the appropriate polishes and follow the rules for their application. In addition, the VAZ 2110 must first be washed when the car is new, only with cold water, and for treating paintwork, use polishes that do not contain abrasives.
Caring for the paintwork of a car with a 3-5 year mileage implies a different scenario:
- Use products for weathered surfaces (they contain a certain amount of abrasive).
Accordingly, for a body older than 5 years:
- Use products specifically designed for aged surfaces.
It is also recommended to polish the body in small areas by hand using clean flannel. This is done to prevent the polish from drying out during application.
Polishes PMA-1 and PMA-2 have proven themselves well.
More good tips on the body in general:
- Do not store the car under rubber covers;
- Do not place rubber objects on painted surfaces (they will leave stains that are almost impossible to remove);
- Protect the paintwork from contact with alkalis, brake fluid and other chemicals that can destroy the coating.
It is recommended to lubricate rubbing parts and body elements from time to time in order to increase the durability of the metal frame. So, this should be done at least every 15 thousand km of the car or once a year.
Here's how and where to do it:
- Apply engine oil to door hinges;
- Apply CV joint grease-4 or Molikot to the limiters;
- Lubricate door locks with FIOL-1;
- Apply VTV-1 aerosol lubricant to the lock cylinders;
- Use the same product to lubricate the hinges and springs of the fuel tank hatch;
- Lubricate the hood lock with FIOL-1;
- Use the same tool to lock the trunk lid.
Anticorrosive treatment also needs to be given great attention. Hollow parts of the body and parts located in the lower part are most susceptible to the negative effects of rye (they are constantly exposed to moisture and dirt due to their close location to the road surface).
It has proven itself well for protecting the metal components of the body from corrosion. As for the treatment period, it is recommended to carry it out every year.
Due to the complexity of the work, it is recommended to treat hidden body cavities with anticorrosive agents at a service station. If the garage has the appropriate tools and equipment, then the process is as follows:
- The car is placed on a jack;
- The casing and all components that interfere with access to hidden cavities are removed;
- The holes are washed until clean water flows out;
- The surfaces are thoroughly dried, and all areas where the anticorrosive is applied are blown with compressed air.
The table below shows hidden cavities and how to apply anticorrosive.
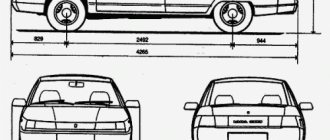
VAZ 2110 body diagram and dimensions
| Body length including bumpers, cm | 426,5 |
| Wheelbase length, cm | 249,2 |
| Height when loaded, cm | 142 |
| Distance from the front axle to the end of the bumper, mm | 829 |
| Distance from the rear axle to the end of the bumper, mm | 944 |
| Body width, cm | 168 |
| Vehicle weight, kg | 1020 |
| Body weight, kg | 260 |
| Distance between the tips of the side mirrors, cm | 187,5 |
| Front track, cm | 140 |
| Rear track, cm | 137 |
| Maximum ground clearance (empty car), cm | 18 |
| Ground clearance (car loaded and driver), cm | 17 |
| Minimum ground clearance (driver, 4 passengers and luggage), cm | 16,5 |