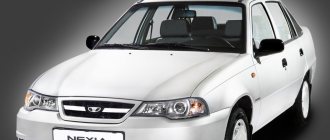
Knocks in the chassis are a frequent companion in life for VAZ 2114 owners. Many elements that can cause knocking, bad roads, and low-quality parts can cause extraneous noise in the suspension. A common source of the problem is the angular velocity distributor, or CV joint (grenade). The process of replacing a part is simple, so you can change it yourself. The question is often asked which CV joint for the VAZ 2114 is better: regular or tripoid. Among the most common arguments: tripoid is more reliable, but it hums and vibrates at high speeds. The regular one is less reliable, but the car handles better at high speed. However, you can find opposing opinions and arguments on this matter.
This article was written thanks to the help and support of the Interior Design website. This is an information portal about interior design: new products, photos, videos, the best styles, options for the perfect combination and recommendations from professionals
There is no clear answer which type is better. Operation in harsh conditions showed that there is no fundamental difference in driving sensations and reliability. The main thing is to buy a high-quality grenade made of well-hardened metal, install it correctly and monitor the safety of the anthers.
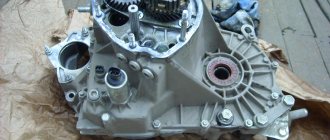
Scheme for disassembling the VAZ 2114 CV joint
Fault diagnosis
The VAZ 2114 has 2 external and 2 internal CV joints. First you need to determine which one is knocking. The optimal test would be on a suspension diagnostic stand. If this is not possible, diagnosis by ear is possible.
Two signs indicate a grenade malfunction in a VAZ 2114:
- the sound resembles a crunch;
- It usually appears when turning.
The simplest and most accurate way to do a garage check is as follows:
- Place the car on a flat surface;
- Turn the wheels to one side (to the middle position or a little further);
- Drive off with medium speed. It is worth remembering that starting too smoothly may not reveal a crunch due to insufficient load on the CV joint, and starting too abruptly may lead to the drive flying out of the wheel.
- Repeat the operation by turning the steering wheel in the other direction. The appearance of a crunch indicates a malfunction of the outer CV joint on the side in which the steering wheel is turned.
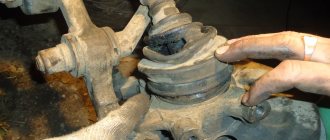
Visual detection of ruptured anthers will also be a sign of a CV joint failure. If you discover a damaged protection for any grenade, it must be immediately removed, disassembled and cleaned. If there is enough grease and there is no significant wear on the hinges yet, it is enough to replace the boot and fill it with new grease. If the wear of the balls is obvious, it is better to change the grenade.
CV joint boot VAZ 2114 with a defect
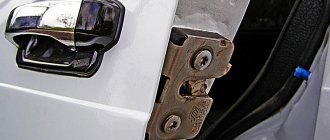
It is more difficult to diagnose a malfunction of the internal grenade on a VAZ 2114. If it malfunctions, it crunches when starting off in a straight direction, and not when turning. But the same symptoms, for example, include play in the steering rack or wear on the engine mounts.
Sometimes the problem can be diagnosed from the pit by tugging on the drive from the gearbox side: strong play or the appearance of extraneous sounds indicate that the internal CV joint should be replaced.
Types of CV joints
Before you begin repairs, you need to find out exactly how the unit is designed.
The pair of drives on the VAZ 2109 is equipped with a total of 4 CV joints.
| CV joint type | Peculiarities |
| Interior | There are 2 of them. They transmit torque to the axle shaft from the gearbox |
| Outer | There are also two of them. Installed on the ends of the axle shafts and transmit torque directly to the wheels |
Outer
This arrangement of grenades allows the wheels to rotate during turns and constant operation of the suspension system. To put it simply, the outer CV joints are responsible for transmitting torque when cornering, and the inner ones are responsible for the vertical movement of the wheels. These are collisions with bumps, holes, roll in turns, etc.
Interior
Replacement
It is better to change a grenade yourself with an assistant.
Algorithm:
- remove the wheel, remove the wheel bolts and the hub nut washer;
- unscrew the ball from the steering knuckle;
- pull out the splined end of the outer CV joint;
- pull out the drive with the internal CV joint from the gearbox;
- if you plan to remove both drives, remove the internal grenade from the drive and insert it into the gearbox so that the differential does not move after removing the second drive;
- remove or cut off the anthers, thoroughly clean all hinges with a special liquid or just gasoline;
- when filling the CV joint, use a special lubricant suitable for these purposes; ordinary lithol does not have the required temperature characteristics;
- the retaining rings of each CV joint and the hub nut must be replaced;
- The inner CV joints are inserted into the gearbox until they are completely fixed; when adjusting, you can use a hammer with a wooden spacer.
It is quite possible to diagnose and replace a CV joint with your own hands. This does not require sophisticated car mechanic skills and engineering knowledge, but it allows you to get in touch with the car, see and feel how it works. Whatever the reason for the crunching sound, you need to check the condition of the grenade as quickly as possible. Delaying this will almost certainly mean bringing the part to the point of complete wear, and timely repairs will allow you to get by with “little loss.”
Replacing the boot of the outer CV joint of a VAZ 2114, internal or external grenade
To change the CV joint, you need to prepare a workplace and tools. First of all, you will need a garage with a pit, jacks, and supports. You also need to have wrenches “17”, “19” and “12”, as well as a wrench for “30”. You also need to prepare a puller for pressing out the steering tip, a rope or wire, CV joint grease-4 or suitable analogues, a hammer and pliers.
As for the CV joint itself, you need to select a suitable spare part of good quality (you can use both the original and analogues). It is recommended not to skimp on parts of this type, since there are many products on the market that are affordable, but have very poor quality and a short service life.
Let's move on to the replacement itself:
- We put the car on the handbrake, install wheel chocks under the wheels, and remove the front wheels;
- then the front wheel bearing nut is unscrewed and the car is raised on a jack;
- you can put the wheel under the car and lower it from the jack;
- then, using the “17” key, unscrew the two brake caliper mounting bolts, one at the top and bottom;
- now you need to spread the brake pads with a screwdriver;
- then remove the brake caliper assembly with brake pads and mounting bracket;
- then the brake caliper must be tied with wire or rope so that the structure does not sag on the brake hose;
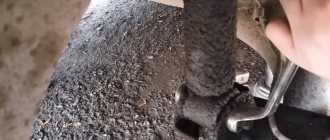
- now, using the “19” key, unscrew the steering tip nut;
- Having unscrewed the nut, you need to install a puller to press the steering tip out of the swing arm and press the tip out;
- then, using the “17” key, unscrew a pair of ball joint bolts;
- Next you need to unscrew the hub bearing nut and remove the washer;
- Now you can unscrew the fastening of the ball joint to the steering knuckle, then remove the CV joint from the bearing hole and then with a strong jerk remove the shaft with grenades (if you can’t remove it manually, you need to gently press it with a screwdriver);
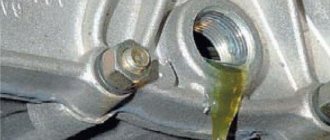
- Please note that if the gearbox oil has not been drained, the hole must be plugged with a clean rag to prevent it from leaking out;
- Next, using pliers, you should grab and unclench the large clamp, pry it off with a screwdriver and disconnect it;
- then the remnants of the boot are removed from the CV joint, after which the smaller clamp is opened in the same way, and the cover is moved along the shaft;
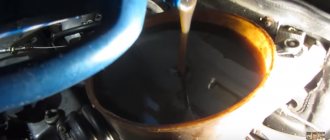
- at this stage, use a hammer to knock out the old CV joint from the drive shaft of the wheels, wipe off the lubricant with a clean rag;
We also recommend reading the article on how to lubricate car door hinges. From this article you will learn about the most suitable types of lubricants for car doors, door hinges, etc. - Now you can remove the worn lock ring from the shaft, after which a new boot is put on and a new lock ring is installed;
- we prepare a new CV joint by squeezing about 80-90 “cubes” of CV joint grease or similar lubricant into the joint cavity, after which the new CV joint is placed on the shaft;
- then, through a delivery or a drift, which is placed at the end of the grenade, the joint is driven onto the shaft with a hammer, after which the boot is pryed off with a screwdriver and pulled onto the CV joint;
- Now a new clamp is installed, and so that the end of its fastener is directed not along the road, but against the direction of travel of the vehicle.
- After installation, the clamp is crimped with pliers, then a small clamp is installed in the same way.
The final step is to install a new retaining ring on the CV joint, after which the rag is removed from the hole, and the shaft with the grenade is inserted into the gearbox. Further assembly is carried out in the reverse order of assembly. Also, upon completion, check the oil level in the gearbox; if the level is below normal, lubricant should be added.
As you can see, replacing the CV joint itself (internal or external) or its boot is not as difficult as it might seem at first glance. In this case, more difficulties are associated not with the replacement itself, but with disassembling and dismantling the old unit. One way or another, the above information allows you to get an idea of the features of this process, as well as the nuances that should be taken into account when performing this procedure.
Replacing the inner CV joint with your own hands
» alt=»»> The procedure for replacing a “grenade” is the same for the entire front-wheel drive VAZ line, starting with 2108 and ending with VAZ-2115, “Kalina”, “Priora”, “Grant”. Before removing the inner CV joint, the oil is drained from the gearbox. Then proceed according to the following algorithm:
- Unlock and unscrew the hub nut. To make the work easier, a piece of pipe about 1 meter long should be put on the key.
- The desired side of the car is hung on a jack or lift.
- Remove the wheel.
- Remove the washer located under the hub nut installation site.
- Disconnect the steering tip.
- The CV joint is removed from the hub.
- Using a pry bar, remove the drive and internal joint from the gearbox.
Note: when removing both drives at the same time, a suitable mandrel should be installed in their place.
How to change the “grenade” with the drive removed? To do this, clamp the shaft in a vice, loosen the clamps and remove the boot. After this, the hinge is knocked off the splines with hammer blows.
The new CV joint should be hammered by applying light blows to its end with a hammer. For this it is better to use a wooden mallet. The “grenade” is first filled with a special lubricant.
Before installing a new constant velocity joint, it is necessary to clean its seat from old grease and install a new boot. Assembly is carried out in reverse order.
The repair is considered complete after successful sea trials. In this case, there should be no extraneous sounds from the drive side in all modes of vehicle movement.
In what cases is it necessary to replace the inner CV joint?
Replacing the internal CV joint on front-wheel drive VAZ vehicles is required if the following symptoms are present:
- Crunching and knocking noises when driving and accelerating in a straight line;
- Vibration and shock when changing gears;
- Significant play when testing by hand;
- If the “grenade” fails completely, the vehicle cannot move further.
» alt=»»> The main reason for the malfunction of the VAZ “grenade” is the entry of water and dirt through the hole in the torn boot. The second possible cause of failure is a sharp press on the gas with the wheels fully turned, although in this case you risk killing the external rather than the internal grenade.
In addition to the above, replacing the internal CV joint on VAZ-2110 and other models may be necessary if the quality of the previously installed joint is poor.
Possible causes of crunching
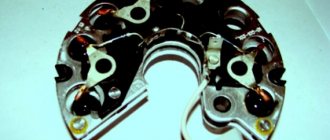
An experienced driver can by ear determine the location of a car malfunction. This quality comes with age. However, it is very difficult to confuse the crunch of a grenade with another sound. Let's figure out what a CV joint is. On the outside it is made in the form of a bowl, and on the inside the body has semicircular grooves. There are six of them.
In the internal space there is a spherical fist (clip) with 6 grooves and a splined connection for the axle shaft. Rotation occurs through the force that the cage transmits to the body through the balls located in the separator. The balls, moving along the grooves, change the angle between the axes. Manufacturers claim that all CV joint parts are made of high-strength alloys and are wear-resistant. However, there are cases when the fault in question appears in completely new cars. Why is this happening? What is the reason, how to find out? There may be several of them, here are the most common:
- low-quality or defective products, including counterfeit ones, have been identified;
- low-quality lubricants are used or they are absent;
- boot damage;
- driving on bad roads or aggressive driving style.
Each part has its own production resource. And over time, play appears in the hinges. The rolling of the balls, now more free, produces a sound reminiscent of crunching. It may appear when turning, sharp acceleration, or overcoming obstacles.
There are 2 grenades installed on the drive wheels (internal and external): the first transmits rotation from the gearbox, the second - from the axle shaft to the wheel hub. Therefore, if an extraneous sound occurs, you need to determine which CV joint is making the sound (located on the left or right, inside or outside).
The design of these grenades is the same, they differ only in size (the outer one is smaller). Outer CV joints wear out more intensively because the loads and turning angles are greater. Knowing the design and difference of grenades, which ones wear out, how quickly and why, the car owner will more carefully monitor the condition of the CV joints.