July 19, 2020 Lada.Online 16,049 3
Rear suspension with coil springs, double-acting telescopic hydraulic shock absorbers and trailing arms elastically connected by a transverse beam and a stabilizer bar. The following are instructions on how to change the rear shock absorbers and springs on a Lada Granta, Kalina 2 and Priora yourself.
The replacement process is shown on a Lada Granta car. For other models everything is done similarly.
When is it necessary to replace rear struts?
For shock absorbers there is no replacement period or service life between repairs. The condition of the Kalina's rear pillars is largely determined by the conditions and intensity of use. In the vast majority of cases, they fail after 30-50 thousand kilometers. Sometimes this happens much earlier, and in some cases the car can travel 70,000 kilometers. Therefore, the racks must be periodically monitored. Sometimes their malfunction can be determined visually.
Symptoms of a problem
Damage to shock absorbers, unlike many other components of the car, is relatively easy to determine. It is worth thinking about the malfunction of the rear struts of the Kalina in the following cases:
- oil smudges on the shock absorber housing;
- rocking of the car when overcoming bumps;
- knocking in the rear suspension;
- strong lean when turning.
In any case, when doubts arise about the maneuverability of the car, its handling, or any discomfort is felt while driving, you should first of all pay attention to the rear pillars of the Kalina.
How to make sure the rack is working properly?
Sometimes it is impossible to visually determine the cause of extraneous noise when the car is moving. For example, the rear pillars of the Lada Kalina are clean, without any oil stains. Rocking also does not allow one to unambiguously diagnose a malfunction. However, the knocking noise in the rear suspension area does not disappear.
In this case, you will have to drive the car onto a vibration stand. It simulates road irregularities, and special sensors monitor how various suspension elements perform. The data is transmitted to a computer, which draws conclusions about the serviceability of the racks. This pleasure, of course, is not free, but it won’t hit your wallet very hard either. The cost of computer diagnostics depends on the region and is within a couple of thousand rubles. But for this money, the owner will receive data not only on the condition of the shock absorbers, but also all components of the front and rear suspension, which is especially important if there is a long trip ahead.
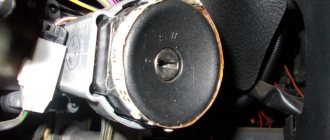
Knock in the front suspension of Lada Kalina
Many motorists dread the day when strange knocking noises appear in the suspension, especially the front suspension, which increases with increasing speed. Of course, there is reason to worry, but at the same time, a car’s suspension is a strong and reliable unit that will clearly withstand a few more kilometers to a service station or garage, where it can be diagnosed.
There are four main reasons for the occurrence of knocks and squeaks in the front suspension of the Lada Kalina. Of the three possible causes of knocking, two of them can be eliminated independently.
So, the first reason why a knocking sound may occur in the suspension is the quality of the road surface. Yes, suspensions, even the most ideal and new ones, can squeak and knock on a bad road, even if this has not been observed before. To test this theory, you should drive onto a well-paved road and drive a few hundred meters; if there is no knocking, everything is fine with the suspension; if not, look at the second reason.
The second reason for the knocking sound, if it is accompanied by vibration in the steering wheel, is a malfunction of the steering, or rather the steering rack, or thinning of the brake discs. If the discs can be replaced independently, then in the case of steering, if you are not a level 80 mechanic, it is better not to flirt with it right away bring the car to the service station.
The third reason is the springs that have lost their tone, as a result of which the car body practically hits the suspension. You should not deal with this problem on your own - it is better to immediately take the car to a service station or service center, since self-repair may seriously damage the front suspension strut.
The fourth reason is a worn-out silent block, which is designed to dampen vibrations and knocks when driving. You can replace the silent block yourself; see the step-by-step replacement of the silent block in the Lada Kalina mono in the next paragraph.
Replacing front suspension silent blocks
Replacing the silent blocks of the Lada Kalina front suspension is necessary after 15-17,000 km, otherwise noises and knocks may be observed when driving. In most cases, the loss of its functions is observed after 15-17,000 km; knocking noises that appeared during this period of kilometers are a problem of faulty silent blocks.
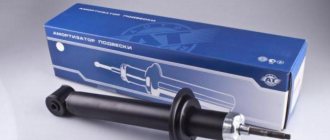
What racks should I install?
This point needs to be decided in advance. It should be said right away that the rear pillars of the Kalina in a hatchback, sedan or station wagon are absolutely identical. Therefore, the choice is limited only by the manufacturer and spring stiffness. As for the manufacturer, experts do not recommend installing original racks due to their short service life. The most positive reviews and recommendations come from SS-20 brand products.
As for the stiffness of the springs, much depends on the driving style of the owner. Softer ones are suitable for leisurely drivers who prefer comfort to speed. If the car owner prefers an aggressive driving style, and the main use of the vehicle is on roads with good surfaces, then it is worth choosing stiff springs. This will improve the car's handling, although at the expense of comfort.
Very often, owners strengthen the suspension in the hope of giving the car some imaginary advantages. For example, they install stiffer rear struts on the Kalina. In this case, the station wagon body, according to repairmen, is capable of withstanding increased load capacity. Manufacturers are wary of such experiments. Increasing the spring stiffness creates additional stress on the car body. This is especially unacceptable for machines that have been in operation for a long time.
A little about the Lada Kalina station wagon
Now the car will be equipped with electric power steering (EPS), airbags, and an ABS system. The Lada Kalina station wagon is distinguished by changes that have appeared in the interior and exterior design, while the dimensions of the car have remained virtually unchanged. Having listened to the wishes of the owners of the first generation Kalina, AvtoVAZ engineers eliminated a number of shortcomings when creating the second generation model. For example, changes affected the location of the audio system speakers, which moved from the luggage compartment shelf to the rear doors. This made it possible to increase the opening of the luggage compartment.
We can applaud the creators of Kalina for providing the opportunity to operate such a beautiful car with a cargo trailer. The weight of the trailer should not exceed 900 kg with installed brakes. In the absence of brakes, it cannot be more than 450 kg.
It must be said that the ergonomics of the new Kalina model, its technical characteristics and changes affecting the design of the car correspond to the established cost. The financial side of the issue will show the consumer what color to choose, what configuration to choose and what diameter wheels to order. At the beginning of 2013, station wagons in a “luxury” configuration rolled off the assembly line. Manufacturers plan to release Kalina in “Norma” and “Standard” trim levels.
Considering the quality of our roads, the issue of choosing and replacing struts is one of the most pressing problems.
Replacement procedure
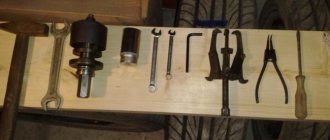
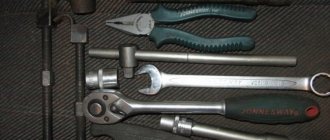
First of all, you need to prepare the necessary tools. To carry out the work you will need:
- two spanners 19;
- open-end wrench 6;
- hammer;
- curved socket wrench 17;
- mount;
- WD-40 or other penetrating liquid;
- spring ties;
- flat screwdriver;
- jack.
Replacing the rear struts of the Kalina can be done with or without removing the wheels. The second method is somewhat simpler and much safer, but is only possible if there is an inspection hole or overpass. Therefore, it is recommended to take care of this in advance.
Replacement is carried out in the following sequence:
- Drive the car into the inspection hole and set the parking brake.
- Remove the rear seat along with the backrest.
- Using a screwdriver, remove the decorative plugs from the top mounting of the racks.
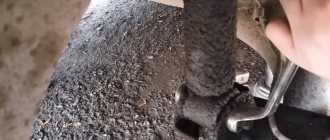
- Holding the shock absorber rod with a wrench (No. 6), unscrew the nut that secures the strut with a spanner wrench (No. 17). Sometimes this is not easy to do, especially if the replacement is being made for the first time. You will have to worry about finding a special device. If the nut is unscrewed, the work in the interior is finished for now.
- Using a jack, the rear wheel is hung from the side of the rack being dismantled. Now you need to go down into the inspection hole.
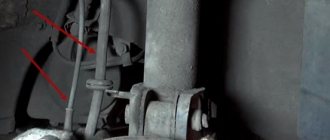
- From below, the stand is attached to the bracket with a long bolt and nut, which should be treated with WD-40.
- Use a union nut (No. 19) to unscrew the nut, holding the bolt itself with another wrench. Sometimes such manipulations do not help; you have to use a special tool to remove the stand.
- We take it out of the bracket. It is pressed from above by a spring, so care must be taken.
- We inspect all rubber parts. If possible, it is better to replace them with new ones. Assembly is carried out in reverse order.
- When installing a rubber buffer on the top of the spring, you need to ensure that the last turn rests on a special protrusion. Now you need to secure it with electrical tape or nylon ties.
- The lower coil of the spring should rest against the protrusion on the cup.
- We install the stand in place, fix it using the lower fastening.
- Now you need to compress the spring, gradually lowering the jack. The complexity of this operation is that at the same time the shock absorber rod must be directed into the hole in the upper mounting. It's better to use a friend's help.
- As soon as the rod gets into the hole, you need to attach a nut to it. This will help pull it out to its maximum length, after which it can be unscrewed.
- Place the support washer and rubber cushion on the rod. Now you can tighten the nut.
Removal
Place the vehicle on a two-post lift and turn off the ignition.
Remove the rear wheels.
Place stands under the rear suspension arms and lower the car until the springs begin to compress.
Tilt the rear seatbacks forward.
Figure 10-1 — Attaching the rear suspension shock absorber to the car body: 1 — plug; 2 — rear suspension shock absorber rod; 3 — shock absorber rod mounting nut
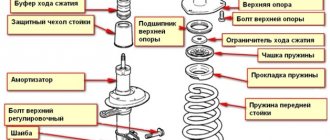
Figure 10-2 — Rear suspension shock absorber with spring: 1 — protective casing; 2 — compression progress buffer; 3 — casing cover; 4 — bushing of the shock absorber hinge; 5, 9 — shock absorber cushions; 6 — spring washer; 7 — nut for fastening the shock absorber rod; 8 — shock absorber washer; 10 — upper gasket; 11 — rear suspension spring; 12 - bolt; 13 — rear suspension shock absorber; 14 - nut
Remove plugs 1, Figure 10-1, covering the mounting points of the rear shock absorber rods (flat-head screwdriver).
Lock the rods 2 and unscrew the nuts 3 securing the shock absorbers to the body (wrench A.57070, wrench type KL-4071-3117 f. “KLANN”, ratchet wrench).
Remove spring washers 6, Figure 10-2, shock absorber washers 8 and shock absorber upper cushions 5.
Figure 10-3 — Attaching the rear suspension shock absorber to the rear suspension arms: 1 — rear suspension arm; 2 - nut; 3 — rear suspension shock absorber; 4 - bolt
Suspend the car until the springs are unloaded, unscrew nuts 2, Figure 10-3, bolts securing the shock absorbers to the rear suspension arms, remove bolts 4 and disconnect the shock absorbers 3 from the rear suspension arms 4 (wrench 19, replaceable head 19, ratchet wrench).
Remove the shock absorbers and springs.
Remove spring 11 from the shock absorber, Figure 10-2, with gasket 10, lower shock absorber cushion 9, shock absorber hinge bushing 4, casing cover 3, protective casing 1 and compression stroke buffer 2.