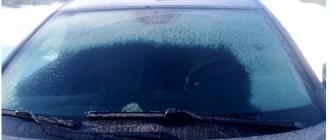
By default, production Lada Vesta models are equipped with jet washer nozzles. These are the most budget modifications. The small irrigation area is one of the main disadvantages.
Many car enthusiasts practice installing fan-type washer nozzles. Let's look at how to do this with your own hands and what is needed for this using the Lada Vesta as an example.
Algorithm for replacing injectors:
- Squeeze the parking brake.
- We turn off the engine.
- Open the hood.
- We snap off the eight clips.
- We remove the casing and rubber tubes.
- We remove the sprinklers.
- We insert new ones and assemble the structure in reverse order.
What types of malfunctions are there?
In fact, there are not so many problems, and they are divided into electrical and mechanical. Most often, problems arise in the mechanical part. Mechanical problems are simple, the first problem is lack of fluid. That is, it either simply ran out in the tank, or froze due to the low temperature. In the first case, you just need to top it up, and in the second, warm up the engine well, and its heat will defrost the liquid.
The hose could also have come off; it needs to be installed back, and the problem is solved. And the most common problem is clogged injectors. They can become clogged due to the use of low-quality fluid or due to the ingress of dust and weight.
Poor flow can also be due to problems with the pump or seals, so you should find out what the problem is.
VAZ 2114 car injector system
The VAZ 2114 is equipped with an engine with a distributed fuel injection system (injector), and the stable operation of the engine of this car depends on the quality of gasoline. A low octane number of fuel leads to a drop in power and unstable operation of the power unit. As a result, any parts of the internal combustion engine (ICE) may fail. Mechanical impurities in the fuel lead to clogging of fuel filters, damage the fuel pump, and clog the injectors. You have to disassemble the fuel system (TS) and clean the injector. How the VAZ 2114 injector works, how to clean it and in what cases, how to remove and install the fuel rail, we will look at in this short article.
The VAZ 2115 injector is no different from the VAZ 2114, so when considering the device of the “fourteenth” model, we will also keep in mind the “15th”. The mechanical part of the injector includes:
- Intake manifold;
- Fuel rail (or rail, which is the same thing);
- Throttle assembly;
- Air filter with housing;
- Air pipe (injector corrugation);
- Injectors.
Car enthusiasts who replace the carburetor with a distributed injection system in their “eights” and “nines” are puzzled by purchasing exactly these listed parts, not counting the electrical components.
Cleaning injectors
If you determine that the problem is due to simple blockage, you can clean it in several ways.
Compressor
This is the most effective and fastest way, but only if you are at home and have a compressor. Disconnect all associated hoses and wash the injectors with soapy water. Now you need to take the compressor hose and connect it to the nozzle. Why turn on the compressor for 30 seconds?
Syringe
A very simple method, but not as effective as the previous one. Pour plain water into the syringe; it will be good if you add citric acid there. Of course, we disconnect all the hoses and then wash them in the opposite direction. That is, the syringe must be inserted from the water outlet side, not the inlet side.
Pin
This method will not save you if the pollution is very strong. You can use it on the road. Your task is to take a pin or something similar and clean out all the dirt near the nozzle; unfortunately, you won’t be able to go deeper.
Replacing standard washer nozzles
To make a replacement:
- It is necessary to open the hood and remove the trim from the inside. The casing is held on by clips and removal is not difficult.
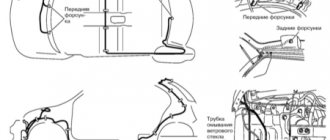
- We find the rubber lines on the bottom of the cover (if the hood is open), which lead to the windshield washer.
- Disconnect the hose from the washer.
- We see two protruding tendrils, squeeze them towards each other and push it out. You may have threaded injectors, just unscrew them.
- We insert new jets, connect the tubes with pressure and sew up the outer part of the hood with trim, as it was originally.
Done, replacement done.
Adjusting the nozzles
So, if the fluid is supplied poorly or there are problems with the direction of this fluid, then it is necessary to make adjustments. It's not that difficult and you can do it yourself without any problems, you just need a pin or a needle.
Everything must be done very carefully, as the plastic case can be damaged. First you need to insert the needle into the nozzle hole and then start making adjustments. You need to use careful movements to achieve the correct position so that the stream has the correct direction.
If you have a foreign car, then you need to be more careful here. The fact is that the nozzle supplies several jets in different directions and this should be taken into account when adjusting. The reason is that if you don't take this into account, three or four jets will be sent in one direction and less of the windshield surface will be affected.
In the end, you need to check what you end up with. Is the glass washed well, will visibility be safe in bad weather, if the answers are “yes,” then you did everything right.
How to make heated washer nozzles
- mark the points on the lining (insulation) on the inside of the hood where the washers are located;
- draw zones with a diameter of 20-30 mm;
- Carefully cut out the drawn zones.
Due to the heat from the engine, the injector will be heated without wiring. Even in severe frosts, this method works very well, but it will take a couple of minutes longer to thaw. This approach does not require any money and takes very little time. Cut the hole carefully so as not to disturb the appearance of the trim.
Dismantling
It will be much better if you remove the nozzle, as this will be more convenient for adjustment. This will also be useful if you just want to replace it with a new one. In order to do this, you must first remove all suitable hoses. There is a nut for fastening, you need to unscrew it and then calmly remove the washer.
If it gets hard, it’s better to spray in WD-40 and wait a little, as too much force can break the washer. Putting it back is more difficult and you need to be even more careful here than when removing it.
New injectors will cost you about 300 rubles, and for AvtoVAZ models you only need to pay 60 rubles. The price may be slightly different due to the brand of the car; of course, they will cost more for expensive cars.
Adjusting the windshield washers is not difficult, but the main thing is to do it all carefully. For more information, watch the video instructions.
Engine oil burner 1.8 l. Lada Vesta, X-ray (21179). Oil nozzles.
A very useful theory about the causes of oil burn on the Lada Vesta and X-ray 1.8 liter engine (21179).
The widespread occurrence of such a phenomenon as increased oil consumption on a 1.8 liter engine. (21179) has given rise to a huge number of theories about its causes, car owners are trying to deal with the problem, AvtoVAZ helps with modifications and work with spare parts suppliers, but at the moment, oil burn can only be treated by a major overhaul of the engine and the main reason is said to be poor processing of the block and incorrect selection pistons to the cylinder block.
Against the background of these problems, replacing oil nozzles seems like a mere trifle. What is the essence of the theory?
The 21179 engine is equipped with oil nozzles for piston cooling; this is a modern, worldwide trend, and it looks quite logical on a fairly modern domestic engine. During engine operation, the piston is the hottest part of the SG, if heat is removed from the cylinder walls by the coolant, then the piston has no forced cooling, it is impossible to supply coolant; for this purpose, machine oil was adapted to be supplied directly to the piston cavity through nozzles.
At the same time, if 5-10% of the heat was removed by oil mist, then the injectors can remove up to 50% of the heat obtained during combustion of the fuel mixture.
As a result of adding injectors, the piston temperature may decrease by 15-35*C. According to Internet theory, as a result of such a decrease in temperature, the piston does not expand to its design dimensions, and a gap remains between the piston and the cylinder, through which the oil enters the combustion chamber.
It is difficult to say how much such a decrease in temperature will affect the thermal deformation of the piston (when calculating for aluminum, it turns out 22.2 * 10-6 * 82 * 35 = 0.064 mm - which cannot be correct, due to too large values, thermal expansion the piston material is different), most likely it is about 0.01-0.02 mm. Can such an increase in the gap affect the increased consumption? Perhaps it can.
Oil injectors of the 21179 engine can affect oil consumption; how significant this effect will be can only be determined experimentally. Consumption, however, will be influenced by other factors, including the accuracy of manufacturing and selection of parts (if assembly is successful, there is no oil consumption even with existing injectors), the viscosity of the oil being poured (consumption will be lower if it is thick), the fuel used and operating modes. Therefore, the problem should be solved comprehensively and individually for each engine; the most effective way to eliminate oil leakage will still be a major overhaul of the ShPG; the selection of pistons for the cylinders will compensate for all shortcomings in oil distribution and cooling.
Link to video with an alternative oil nozzle for engine 21179:
System design - advice from the experts
By default, production Lada Vesta models are equipped with jet washer nozzles. These are the most budget modifications. The small irrigation area is one of the main disadvantages.
Many car enthusiasts practice installing fan-type washer nozzles. Let's look at how to do this with your own hands and what is needed for this using the Lada Vesta as an example.
Algorithm for replacing injectors:
- Squeeze the parking brake.
- We turn off the engine.
- Open the hood.
- We snap off the eight clips.
- We remove the casing and rubber tubes.
- We remove the sprinklers.
- We insert new ones and assemble the structure in reverse order.
Which injectors are best installed on Vesta?
If you are not satisfied with the performance of standard spare parts, they can be replaced with analogues from other manufacturers. Instead of standard jet injectors, fan-type injectors (1.6 2022 and other models) or equipment for other cars are often installed on Vesta.
Replacing injectors. Photo source: https://www.drive2.ru/l/497127141142430460
Most owners of Lada Vesta, Lada Cross and Grant prefer to install jets from Volvo (cost about 250 rubles), from the Korean manufacturer Sang Yong (number 7845009010 at a price of 120 rubles) or Toyota (catalog number 85381-AA042b).
When to change injectors
The service life of the jets is unlimited. Injectors are replaced in case of mechanical damage, accident, impact, or ignition of the plastic housing.
Failure to replace spray nozzles in a timely manner does not have any negative consequences, except for the absence of a stream of water on the glass when the lever is pressed.
Pros and cons of HR16DE
The engine in question has been familiar to Russian consumers for several years. Based on the results of many test drives carried out on cars equipped with this engine, in real conditions on Russian roads, we can confidently list the advantages and problems of this power unit.
Advantages
- Engine reliability regardless of operating mode.
- Moderate requirements for gasoline consumed (Ai-92 and higher).
- Economical.
- Environmental friendliness (Euro 4, Euro 5).
- Engine response (confident operation at low speeds without downshifting).
- Possibility of tuning, from easy by flashing the internal combustion engine software to deep with the replacement of injectors and installation of a turbine.
Disadvantages of HR16DE
- Lack of hydraulic compensators (the need to periodically adjust the valves by replacing pushers, the price of which is not encouraging).
- Relatively high cost of timing chains and oil pump.
- Modular design of the fuel pump in the gas tank (complete with filter, pressure and level sensors) - failure of one component can result in replacement of the entire unit.
How to remove the washer reservoir on a Lada Vesta
Required materials and tools:
- ratchet;
- set of heads;
- Torx T20;
- flat head screwdriver;
- knife or plastic spatula;
- new Lada Vesta washer pump as needed.
- We provide priority safety measures: we secure the rear row of wheels with wheel chocks.
- We turn off the engine and open the hood.
- Unscrew the washer reservoir cap.
- Remove the windshield blades one by one (key 14).
- Along the perimeter of the plastic frill, unscrew the screws and fasteners, and remove the frill, under which the tank is installed.
- Disconnect the terminals from the pump, unscrew the two retaining screws, and remove the pump.
- On the right side of the engine compartment, remove the washer reservoir from its regular place for maintenance and replacement with a new one.
- We assemble the structure in the reverse order of removing the tank.
The volume of the washer reservoir is 5 liters.
Video of fan injectors operating at a speed of 90 km/h
Tools:
- Driver for socket attachment
- 8mm wrench attachment
- Small flat screwdriver
Parts and consumables:
New injector O-rings
Notes:
We remove the fuel rail to check the operation of the injectors and replace them.
Removing the fuel rail and injectors
1. Relieve the pressure in the power system.
2. Disconnect the wire from the negative terminal of the battery.
3. Remove the fuel rail protection.
4. Squeeze the clamps.
5. Remove the tip of the fuel pipe from the fuel rail fitting.
6. Press the spring lock.
7. Disconnect the wiring block from the injector.
8. Similarly, disconnect the wire blocks from the remaining injectors.
9. Using a 8mm socket, unscrew the two bolts securing the fuel rail to the intake manifold.
10. Location of fuel rail mounting bolts.
11. Having moved the fuel rail along the axes of the injectors so that all the injectors come out of their nests in the intake manifold, remove the ramp along with the injectors.
12. Use a screwdriver to pry off the injector retainer.
13. Remove the injector retainer.
14. Overcoming the resistance of the sealing ring, remove the injector from the fuel rail.
15. Using a thin slotted screwdriver, remove the injector O-rings.
Note:
The injector is sealed with two rubber rings: blue - in the fuel rail, black - in the intake manifold.
16. Similarly, remove the remaining injectors.
17. Replace the O-rings with new ones. We assemble and install the fuel rail with injectors in the reverse order. Before installation, apply a thin layer of engine oil to the injector sealing rings.
The article is missing:
- Photo of the instrument
- High-quality photos of repairs
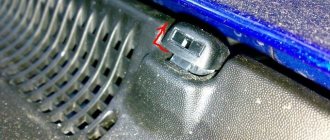
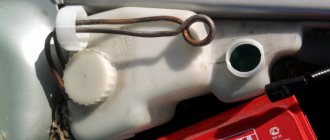
Largus' standard windshield washer nozzles do not work very well, and their settings are often lost. They can be replaced with Volvo fan washer nozzles, order number - 30655605. To install a new nozzle, you will have to slightly trim one mounting ear on one of the nozzles. You can also install a Toyota washer fluid check valve, order number 85321-26020, to prevent washer fluid residue from getting onto the hood.
This is what a fan washer nozzle looks like:
It is better to embed the check valve as shown in the photo. In this place, the valve will always be warmed up by the heat emanating from the engine, so the washer fluid in it will not freeze.
Review of Manufacturer Prices
| Name / catalog items | Price in rubles |
| Jet nozzles (30655605) | From 100 |
| New type sprayers (fan) 289308338R | From 120 – 150 |
| Renault Logan 7700846456, 289321198R | From 150 – 200 |
| Chevrolet Niva 00001-75046760 | From 170 |
| Ssang Yong 7845009010 | From 180 - 200 |
| Tank 8450008574 | From 1100 |
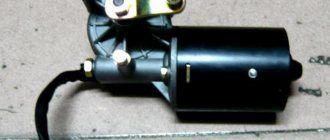
| Pump 8450008573 | From 300 |
| Pipe from pump 8450007341 | From 150 |
| Hex bolt 7703602209 | From 50 |
| Fastening clip 7703079631 | From 50 |
| Wire seal 21010372411800 | From 40 |
| Tube seal 11180520812400 | From 50 |
| *prices are as of 04/06/2019 | |
Conclusion
Replacing the washer reservoir or installing new nozzles is quite simple even for an inexperienced driver.
When purchasing, check the catalog numbers of spare parts with the data specified in the article above. If a non-original accessory is installed, the functionality of the equipment is not guaranteed. As for the manufacturer, there is no particular difference in quality between imported and Russian analogues. The cost of domestic spare parts is 20 - 25% cheaper.
Design features of HR16DE
Cylinder block
The use of aluminum as a cylinder block material made it possible to reduce the weight of the engine and reduce the static load on the suspension, increasing its service life.
Reducing the weight of the internal combustion engine ensured an increase in dynamics and a decrease in the inertial performance of the car.
The higher thermal conductivity of aluminum reduced the time it takes to warm up the engine and, accordingly, reduced fuel consumption before driving.
2 injectors are responsible for supplying fuel to each cylinder, which stabilized engine operation at idle and reduced fuel consumption, and the cooling system of the combustion chambers was improved.
The introduction into the manufacturing process of internal combustion engine components of a complex of technological operations, including increasing the class of mechanical surface treatment, and the use of structural materials made it possible to increase the efficiency of the unit by reducing the friction of the working surfaces in the connecting rod and piston group.
Gas distribution system
To ensure more complete combustion of fuel in the cylinders and efficient use of combustion energy, the HR16DE or H4M uses an automatic gas distribution system using the latest developments, ensuring optimal filling of the cylinders in any operating mode of the internal combustion engine.
HR16DE cylinder head
Phase regulators, installed on the intake camshafts and controlled by oil pressure from the hydraulic drive of the internal combustion engine lubrication system, rotate the gear teeth of the intake camshafts relative to their axes, and the oil pressure is regulated by a solenoid valve controlled by the engine electronics.
The HR16DE engine, otherwise H4M, uses fuel injectors of a new design, the latest generation spark plugs and an electronic throttle valve; the fluid coupling device has also undergone design changes in order to increase reliability.
Injector and electronic throttle body
By reducing resistance in the intake and exhaust systems and using exclusive CVTC in the valve timing between the intake valves, the torque value in the low and medium speed range is increased.
The timing drive uses a reliable design chain, the life of which is equal to the life of the engine and, unlike a toothed belt, does not end suddenly, which leads to expensive engine repairs, but first reminds itself of itself by the appearance of a characteristic crackling noise when the internal combustion engine is running at idle speed. The oil pump is also driven by a chain.
In the HR16DE design, engineers abandoned hydraulic compensators, so after every 80 thousand km the engine needs valve adjustment, which is carried out by selecting and replacing pushers.
Reviews
| № | Positive |
| 1. | Valery , 43 years old (www.otzovik.com): The sprinklers are working fine for the second year, no comments. |
| 2. | Kirill , 39 years old (www.zr.ru): after the purchase, he replaced the standard nozzles with new fan-type ones. The water supply is under pressure and washes all the glass. |
| 3. | Vitaly , 23 years old (www.autobann.su): comrades advised us to additionally install a return valve. Now you don’t have to wait long for the pump to pump fluid from the washer reservoir. |
| 4. | Georgy , 33 years old (www.lada-vesta.net): the car is in its third year, there were no major breakdowns, and minor ones were fixed on my own. |
| 5. | Vladlen , 41 years old (www.otzovik.com): sprayers work perfectly, even in winter on “anti-freeze”. |
| 6. | Dmitry , 43 years old (www.zr.ru): I can’t say anything bad, the car is good, there were no special problems with it. |
| 7. | Vitalievich , 25 years old (www.autobann.su): several times in two years I cleaned the jets myself, there were no more breakdowns. |
| 8. | Zheka , 33 years old (www.lada-vesta.net): after winter, the direction of the fluid jet from the injectors is consistently lost. It’s clear why this is happening. I quickly corrected it with a paper clip and moved on. |
| 9. | Konstantin Vladislavovich , 49 years old (www.otzovik.com): a good domestic car, no special comments. I comply with maintenance deadlines and buy original spare parts. |
| 10. | Leonidovich , 33 years old (www.zr.ru): comrades advised replacing the standard nozzles with new, fan-type ones. Initially I doubted the quality, but now I am 100% satisfied. |
| 11. | Vasily , 36 years old (www.autobann.su): I spend a lot of time driving, often use wipers and windshield washer. There are no comments or complaints. Additionally, I installed protection for the windshield washer nozzles. |
| Negative | |
| 12. | Ivan , 42 years old (www.zr.ru): the motor is weak, you need to wait a long time for the liquid to be pumped into the system. |
| 13. | Vitaly , 38 years old (www.otzovik.com): there is a constant outflow of water, you are waiting for the show to pump up the engine. In the second generation Renault Logan, the mechanism is implemented much better and more perfectly. |
| 14. | Ivan Vasilyevich , 47 years old (www.autobann.su): in two years of operation of the machine, I replaced the motor, rubber hoses, and one sprayer. The workmanship is very low. |
Cleaning injectors without removing them from the engine. There is also such a way
- Ultrasonic washing is carried out using a special stand. A special liquid is used for this. This method is not suitable for old and heavily soiled injectors. Not recommended for use with ceramic nozzles;
- Liquid washing. This type of work can be done either with removal or directly on the engine.
- A temporary power supply system is being prepared. For this you will need a plastic bottle. A cleaner is poured into it; for a 2.5 liter engine, one liter is enough, then for every half liter of volume, 100 grams of liquid are added. You need to add a little gasoline to it; it is enough to take half of the washing volume. A hose is placed over the neck and secured with a clamp. There is also a stocked fuel pump cut into the hose;
- The engine is started and warmed up to operating temperature. Then remove the fuse responsible for the pump;
- The engine is started several times. Thus, pressure is released from the fuel system;
- The hose supplying fuel to the injector is removed. In its place is attached a freshly assembled fuel system with a tank made from a bottle. You also need to remove the hose from the return line and plug it. To do this, insert a 10mm bolt inside the hose and clamp it with a clamp;
- The fuel pump turns on and the fluid is pumped out. The tightness of the connections is checked. If everything is normal, then you can move on to the next stage;
- The engine starts, first it must run for 5 minutes, after which it is allowed to rest for a few minutes. During this time, the liquid that gets into the nozzles will soak the deposits. Then the engine starts again. This time it should work for half an hour. All this time you should keep it idling, periodically raising the speed to 2500 rpm. But this is optional;
- After this, disconnect the device and assemble the standard system. Then start the engine and let it run for 10 minutes, during which time the remaining fluid will burn out. At the same time, check the tightness of the connections;
- The engine is turned off and new spark plugs are installed. At the same time, errors are reset from the ECU. It is advisable to carry out diagnostics and make sure that the engine is operating normally.
AutoFlit.ru
Video - after adjustment
Like any other car part, injectors can be faulty. It is important to fix the problem in time and adjust them. In this case, especially in bad weather, the injectors will ensure safety on the road.
The window washer is not the last mechanism you can do without. Just remember rainy weather or muddy roads. Incorrectly adjusted washer nozzles will render the unit useless.
Principle of operation
The windshield wipers clean the windshield from raindrops, dust, midges, and other contaminants using the washer. The efficiency of the device depends on the serviceability and correct adjustment of the jets. For high-quality cleaning, the direction and intensity of spraying are important.
To choose the right washer nozzles for a Vesta or other car, you need to know the type of device:
- The simplest jet mechanism provides liquid supply to the surface to be washed through several channels. If the nozzle becomes clogged or the channel is contaminated, the quality of liquid atomization will be significantly reduced. Certain areas will not be washed, which will worsen the result and negatively affect the comfort and safety of movement.
- The fan model creates a wide front of water spray. This ensures that the glass is quickly coated with small droplets.
The second method is more effective.
Troubleshooting
Technical problems with injectors can be divided into two groups: electrical and mechanical. The first type is less common, unlike the second.
There are several causes of mechanical problems. The main problem is that there is no liquid at all. There are several more reasons for this. The first is that it has simply run out, and to fix the problem you just need to add a new one. The second reason is that at low temperatures the liquid tends to freeze. To avoid this, keep the car in a warm place or let the engine warm up.
Sometimes the liquid stops flowing because the hose has come off or the nozzles are simply clogged. This may be a consequence of poor quality or diluted liquid. Various dirt and dust can also get into them. To fix problems, they need to be cleaned or replaced. Typically cleaning is done using a pin or a compressor.
When exactly does the injector and injectors become clogged, particularly on VAZ-2110 cars?
And everything is very simple. This is due to low-quality gasoline. It doesn’t take a rocket scientist to say that domestic automobile fuel hardly meets international standards. Of course, our gasoline is far from the worst in Europe, for example, let’s not exaggerate. But even the smallest fractions of debris or impurities can clog the nozzle.
This kind of “disease” is very difficult to confirm visually. Dust microparticles deposited on the nozzle may be invisible to the human eye. As a result, the device no longer atomizes fuel effectively during operation. The car loses power, troits, the internal combustion engine detonates, and much more. We will tell you more about the symptoms below.
But it is not only dust that causes clogging. An interesting physical process occurs inside the VAZ injector system immediately after stopping the engine. The coolant no longer removes heat from the internal combustion engine and the fuel inside the injectors begins to heat up intensely and boil. This is especially true for the eight-valve VAZ-2110 engine, where the injectors are located directly above the exhaust manifold.
If gasoline is of poor quality, light fractions are separated from heavy impurities (the same acids, phenols, etc.). As a result, the so-called coking process of the injectors occurs, after which they fail. This happens, of course, gradually. Low-quality gasoline usually “kills” the VAZ 2110 injectors after about 40 thousand kilometers.
We make the correct diagnosis when exactly the replacement of VAZ-2110 injectors makes itself felt
When it comes to replacing VAZ injectors, the golden rule works perfectly: do not touch the equipment as long as it is working properly. When the car becomes, frankly speaking, bad, then there is nothing left to do but roll up your sleeves and take the initiative into your own hands. As a result of coking or clogging, the following characteristic malfunctions may occur:
- the outlet nozzle becomes clogged;
- leaky closing or stuck valve.
In all the above-mentioned cases, on VAZ cars, first of all, fuel consumption sharply increases, and the overall driving dynamics also worsen. If the nozzle is clogged, the car will start quite confidently and idle without any complaints. Problems with starting an internal combustion engine can only arise in winter.
If the VAZ-2110 injectors do not close hermetically, then more serious problems are evident. Even the process of starting an internal combustion engine can turn into a serious test. The engine “troits”, operates unsatisfactorily both at idle and while driving, and the knock sensor is triggered.
The problem may also be caused by the valve getting stuck in a certain position. You can understand that the solenoid valve is not working normally by disconnecting the plug-in electrical connector of the injector on the working internal combustion engine and observing the behavior of the engine at idle. If the car does not react at all, then the valve is faulty. If there is a drop in engine speed, it means the rod is working as it should.
Intermittent valve sticking may also occur. In this case, the engine “plays naughty” without additional impact on it and turning off the injector solenoid valve. VAZ malfunctions are very typical for the entire fuel injector system
If replacing the product does not lead to anything, you should pay attention to the fuel pump, fuel filter and other elements supplying the fuel-air mixture to the internal combustion engine (the same mass air flow sensor, spark plugs, etc.).
Vesta 1.6 runs cold + check. Help.
Thank you all very much for the advice, I'll dig in. I will answer everyone in one post.
Car 2022 I haven’t gone deep yet, several different candles, coils here and there. Today is the last attempt, another spark plug, and swapped the coils. But during these days I changed it in different ways, in the morning one horseradish first cylinder. I bought the car two weeks ago, of course I didn’t notice such a jamb, as usual it came out later. I don’t want to go to the officials yet, the warranty has expired. Tomorrow morning I'll try, if the same thing happens again, I'll change the wiring harness, it doesn't help, I'll go deeper.
I don’t understand the fuel system so deeply, but I think so, you can swap the injectors and look at the reaction?
You can change the injectors. But I don’t know about Westies, but on Grants/Kalinas the engine is 21126/21127 (almost like the author’s), in order to pull out the fuel rail you have to remove the intake manifold, or do proctology by removing the air intakes, 1 injector and trying to pull out the ramp. Checking the suction is easier and faster.
Which wiring harness are you going to change and why? If there was a tourniquet, it would hurt when driving on the kidneys when you shake it, but when it’s cold. Yes, and by pulling the tourniquet, when the pain should go away, and when it doesn’t, it should start.
While the cold oak gasket was siphoning, the parts warmed up and pressed harder and flattened them. But it will degrade quickly with cold weather. Soon the traffic lights will be freezing and hot.
If you don’t want to do it yourself, go to a diagnostician (if you have an NSC, don’t go to the officials). Otherwise you will now start capitalizing on the engine.
We wash the fuel injectors: by washing and rolling
Fuel injectors are essentially solenoid valves that, when voltage is applied to them, open the path of fuel into the intake manifold. When there is no power, the shut-off needle lowers under the action of the return spring and closes the channel in the sprayer. Over time, deposits accumulate on the nozzle seat, causing the needle to lose mobility. As a result, the seal of the injectors is broken. A sign of such a malfunction is poor starting of the engine, even when warmed up: the fuel mixture turns out to be over-rich. In addition, contamination of the nozzle holes leads to disruption of the atomization and a decrease in the total amount of fuel supplied. Because of this, when you sharply press the gas, dips appear, the engine loses power, and begins to work unstably.
A radical solution to the problem is to replace the injectors. But there is a cheaper alternative - rinsing. For those who are not afraid to get under the hood, I will tell you how to do it yourself. No fancy tools or special skills are required. It is better to do the work outside or in a well-ventilated area.
We carry out the operation on an editorial Lada Granta car with an eight-valve engine and a mileage of 100,000 km. At this mileage, the injectors of most cars already need “wet cleaning”. You will need an aerosol can with a carburetor cleaner (its price is about 500 rubles). We also have to assemble a simple electrical circuit from a battery, a button from a household bell, and wires with female lugs 2.8 mm wide.
HOW ELSE CLEAN INJECTORS
- Flushing with a composition poured into the fuel tank
The cost of the drug is from 250 rubles
The instructions for the preparations promise that after washing, not only the injectors and the fuel system will become clean - soot will be removed from the valves and surfaces of the combustion chamber. There is only one question: where will he go? Obviously, into the exhaust system. And there the designers placed a catalytic converter and oxygen sensors. Soot particles and liquid combustion products will fall on the delicate ceramic honeycomb. And then - depending on your luck. Pieces of carbon deposits stuck to the surface of ceramic honeycombs are hotspots - the honeycombs can melt. The combustion products of a mixture of gasoline and liquid greatly increase the temperature of the exhaust gases, which is also dangerous for the catalytic converter.
- Flushing the fuel rail and injectors using a special unit at a service station
The cost of the service is from 2500 rubles
The equipment supplies solvents to the input of the fuel rail, which remove tar deposits from the injectors and dirt from the surfaces of the valves and combustion chamber. The concentration of cleaning components is much higher than when pouring the cleaner into the fuel tank. Consequently, the amount of substances entering the exhaust gas catalytic converter is also significantly greater. The consequences of this are described above.
- Cleaning injectors with ultrasound
The cost of the service is from 4000 rubles
The nozzles in the bath with the cleaning solution are exposed to ultrasound, which frees the surfaces from contamination. But first the injectors need to be removed. You can do this yourself or entrust all the work to the masters. The disadvantage of this method is the likelihood of complete failure of the nozzle.