AvtoVAZ strives to produce products that will be suitable for use in cold weather. The engine starts working even at a temperature of -30 degrees, door locks are also adapted to cold weather. The designers took care to include a heated windshield in the Lada Vesta, as it is a product of the highest comfort.
However, not all models are equipped with this function. The heated windshield of the Lada Vesta is designed to ensure that car owners do not experience discomfort when driving in cold weather. Previously, I had to deal with ice and snow myself, which took strength and patience.
How does a heated windshield work?
Heated glass The option of heating the windows of the Lada Vesta is an indispensable and primary function for the operation of the car on harsh and cold days.
- There is no longer any need to manually scrape ice from the front and back of the machine. Heating removes ice from the front, rear and mirrors of the car in a short time. In case of strong wind and snow, it is also worth turning on this useful option on the Lada Vesta.
- The heating efficiency of all glass and mirror elements depends on the ambient temperature. Owners of Lada Vesta note that ice and snow thaw in three minutes at -3 degrees. If the ice does not drain away on its own, it is wise to use your windshield wipers. In colder weather, it takes longer for the heater to heat not only the interior, but also the outside area of the car.
screensaver
Vesta was not deprived of options. Having given money for them, naturally, you want them all to work and fulfill their functions. There were a couple of “saboteurs” on our car.
All Vestas have automatic door locking when starting to move, but ours refused to lock the doors when the speed reached 7 km/h from the very beginning. The instructions are silent about the fact that this function can be disabled, but experience with foreign cars suggests that there are usually “on” and “off” modes. And so it turned out: after holding the key on the front panel for several seconds, the auto-lock turned on, although only for five to ten cycles, after which it had to be activated again.
Heated windshield does not work
The operation of the function can be easily monitored at temperatures down to – 10 degrees. It handles ice and snow with ease. However, at a lower degree, heating productivity rapidly decreases. It takes a little longer to deal with the problem. You should not turn it off immediately without noticing the result.
Possible causes of the problem and their solution:
- If the heated windshield of the Lada Vesta really stops turning on, you must first check the condition of the fuse, and if it breaks, replace it with a new one.
- It happens that the heating function works partially and does not thaw small strips of snow on the windshield. The only thing that will help here is to completely replace it with a new one.
Most car owners, in the event of a breakdown and a warranty card in hand, prefer to contact dealers with a question about a replacement if the heating turns off on the Lada Vesta. At the first complaint, sellers refer to the fact that the problem will be solved by itself, because turning on the function works well in mild frost. If the owner agrees to replace the windshield, it is worth remembering that an incorrect repair will cause more trouble than a problem when the defrost does not turn on, and you need to wait a little longer.
Results
In severe frost (at -20 degrees), the thawing order will be approximately as follows:
- 1 minute - the ice on the mirrors begins to melt;
- 2.5 minutes - the ice on the mirrors has almost melted, the bottom of the windshield (stove) begins to thaw;
- 4 minutes - the mirror elements are completely dry, the snow on the threads of the rear window will melt;
- 5-6 minutes - the windshield and areas on the side windows near the mirrors noticeably move away from the ice;
- 7-8 minutes - the heating has melted the ice from the main part of all the windows, you can drive.
In warmer weather, you can start driving earlier, as soon as the engine speed drops to operating speed. There are no comments on the operation of Vesta’s heating; one can only find fault with the fact that the seat heating is not adjustable.
Often on forums, in VK groups, etc. I see complaints from owners that glass heating does not work well. Many people say that the windshield heating does not work at all. Interesting, I thought. Everything is fine with me.
Posted the video on YouTube. And so it began... All the commentators, owners and those who were not even close to Vesta, as well as various “experts” in heating, began to assure me that everything was wrong, it was not true, the engine was warm and that sort of thing. There were many opinions that it was just warm, and at -10°C and below, the windshield heating does not work “a hundred pounds”.
Some believed. Some doubted that it was -20. Although the snow creaked a lot and I filmed it (who doesn’t know - the lower the temperature, the better you can hear the creaking of the snow). And the regular BC showed -19. But then, as the engine warmed up, it began to lie, as usual. You should have placed your street thermometer next to the car. But I didn’t want to tear the windows off the plastic. Well, okay, the weather forecast for the Belgorod region will help them. Some said that everything was nonsense, although then I still didn’t understand lying to me. Some have become convinced that heating is not needed for nothing. To be fair, it is worth noting that there are people who agreed - yes, windshield heating is a good thing. Here I am attaching both videos. They are long - because of distrust, I didn’t cut anything out. If you are interested in this question, take a look. Tell us in the comments if this option is useful and how it works for you.
How does heated glass work?
- Buttons distribute air flow.
- Starting the air conditioner.
- Air recirculation mode (intake from the cabin or outside).
- Temperature setting.
Vesta's heated windshield is similar in design to other cars. Its button is indicated in the picture in the center and surrounded by a red circle.
This system consists of several parts:
- switch in the cabin;
- in expensive versions of Vesta, a “Defrost Max” button is installed, which, together with heating, activates the air conditioner and maximum air pressure;
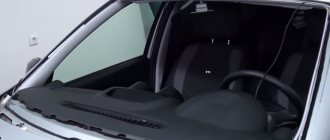
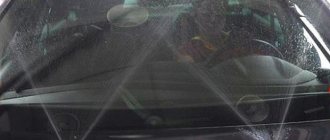
- heating filaments inside the windshield, they can only be seen in the sun;
- electrical wiring, relay, fuse link are located under the front panel.
Defrost Max button on Lada Vesta “Lux” configuration
The “Defrost Max” button activates a relay that supplies current to the filament. As a result, the windshield heats up and thaws away ice and snow.
The system is configured in such a way that after a while the automation turns off the power so as not to waste extra energy.
Lada Vesta mounting block in the car interior
The mounting block is located in a familiar place - near the driver’s left foot. To access the relays and fuses:
- turn the plastic handles (3 pieces) holding the unit cover from below;
- remove the lock on the upper right side of the cover;
- Pull the bottom of the cover, disconnect its upper holders to the instrument panel and remove the unit cover.
Fuse diagram (
- F1 15A K15R Windshield washer mini
- F2 30A*1/5A*2 K15R Left steering column switch (not luxury/lux) mini
- F3 10A*1 Left high beam headlight (not luxury) mini
- F4 30A*1/5A*2 K30S Left steering column switch (not luxury/lux) mini
- F5 15A K15R Heated seats mini
- F6 7.5A*1 K30S Right side lights mini
- F7 10A*1 K30S Left side lights mini
- F8 5A*1 K30S Rear fog lights mini
- F9 3A Direction indicator (turn signals) in the right mini mirror
- F10 5A K15S AMT mini robotic gearbox selector
- F11 10A*1 Left low beam headlight (not luxury) mini
- F12 15A K30S BCM controller (turn signals) mini
- F13 10A K30S BCM controller (own power supply) mini
- F14 10A K30S Mini brake pedal switch off
- F15 5A BTP Power supply for D&O (rain and light sensor), mini headlight range control
- F16 5A BTP Mini brake pedal switch off
- F17 5A BTP Lighting (canopy) for the glove box, trunk, thresholds mini
- F18 3A Direction indicator (turn signals) in the left mini mirror
- F19 10A*1 Right low beam headlight (not luxury) mini
- F20 5A Heated exterior mirrors mini
- F21 15A K15S BU SNPB mini
- F22 5A K15S Gearbox (instrument cluster) mini
- F23 5A K30S Gearbox (instrument cluster) mini
- F24 5A ACC ERA GLONASS, radio mini
- F25 5A VTR Controller ESP9.1 mini
- F26 15A K30S Power supply for mini fuel pump module
- F27 5A K15S Power supply for parking sensors mini
- F28 5A K15S EURU controller (electric power steering) mini
- F29 10A*1/5A*2 K30S Power supply for mini trailer lighting
- F30 5A K15S Controller ERA GLONASS mini
- F31 5A K30S Controller ERA GLONASS mini
- F32 10A K15S Bus power supply K15M (engine compartment) mini
- F33 5A BTP Window control mini
- F34 5A VTR Power supply for steering angle sensor, mini steering wheel button block
- F35 5A BTP Switch block in the driver's door mini
- F36 15A K30S Radio, mini diagnostic connector
- F37 7.5A K30S Stop lamps right mini
- F38 7.5A K30S Stop lamps left mini
- F39 10A*1 K15R DRL (daytime running lights) not luxury mini
- F40 10A*1 K15R High beam headlight right (not luxury) mini
- F41 20A ACC 12V socket (power supply for additional devices), cigarette lighter JCase
- F42 20A K30S BCM controller (BTP bus power supply) JCase
- F43 20A K30S BCM controller (door locks) JCase
- F44 30A K30S Electric windows (ESP) JCase
- F45 30A K30S Interior heater fan (heater) JCase
- F46 30A*1 K15R Power supply for windshield wipers JCase
- F47 25A*2 K30S EMM controller (PDS, LBS, LGO)
- F48 30A*2 K30S EMM controller (window cleaning)
- F49 25A*2 K30S EMM controller (PTF, ZPTO, license plate)
- F50 25A*1 K30S EMM controller (LDS, PBS, PGO)
In a variant:
Relay diagram:
| K2 (30A) | Free |
| K3 (30A) | Heated rear window |
| K4 (30A) | Front windows |
| K5 (40A) | Interior heater fan |
| K6 (30A) | Rear window lifter |
| K7 (20A) | Fuel pump module |
| K8 (20A) | ACC (12V socket power supply) |
*1 - for Classic and Comfort trim levels
*2 - for Luxe trim levels
In a variant:
How to turn on the heated glass on Vesta
There is no separate heating button on regular Vesta trim levels. The heated front window starts working from one button, which is responsible for heating the rear window and side mirrors.
The operation of the system depends on the ambient temperature. If the temperature outside is down to -10 degrees, then heating will quickly melt the icing on the glass. But if it gets colder, the efficiency decreases noticeably. The greater the temperature difference between the cabin and the outside air, the less power the windshield heating is turned on. This is done to prevent the glass from breaking.
To speed up the process of defrosting the windshield, additionally turn on the heater at the highest blowing speed. To prevent fogging, turn on the air conditioner additionally.
Attention! Do not rush to turn on the wipers - they may fail if they do not have time to thaw. Wait until the snow starts rolling down the glass, then you can turn them on.
Replacing the radiator of the VAZ 21129 Lada Vesta stove
To replace a stove radiator with your own hands:
- It is necessary to turn off the power to the car, free the cooling system from antifreeze;
- Remove the plastic trim of the instrument panel;
- Remove the top panel in the glove compartment, remove the glove compartment;
- The unit is located in the heater block on the driver's side, you need to free access to it - remove the metal pillar of the dashboard frame, remove the air pipe for heating the driver's feet;
- Disconnect the pipes (be prepared for antifreeze leaks);
- Open the cover of the stove device with a Torx screwdriver;
- Remove the heater/cooler from the heater housing;
- Install a new spare part;
- Reassemble the structure in reverse order.
Lada Vesta drives on Russian roads. Passengers should be warm and comfortable. The new AvtoVAZ stove (with a cooling glove compartment for drinks, heating the driver’s feet) copes with its job “excellently”. But any device fails sooner or later. If faults are diagnosed and corrected in time, the device will warm your feet and soul for a long time.
Which Vestas are heated?
The basic configuration is not equipped with this function. You will find Vesta's heated windshield starting with the "Comfort" version. The minimum price of such a car is 592,000 rubles, and it is constantly being adjusted. Compared to the basic configuration, the difference in cost is about 75 thousand rubles.
If you need this function, but don’t have enough money for an expensive package, you can do it differently. You can install the option after purchasing the car. It will be much cheaper, especially if you install it yourself.
The “luxury” configuration will have “Defrost Max” - the button discussed above. It simultaneously connects rear and front heating, as well as heated side mirrors, air conditioning and air supply.
Probably everyone knows the morning winter symphonies of various sounds in the courtyards. First, the wipers break the snow crust and rake tons of snow with iron shovels, and then the sounds are born, thanks to other wipers - the ones that are stuck to the windshields of most cars parked in the yard. This is especially true when the temperature fluctuates near zero and the thawed water on car windows turns into ice. Until recently, this was the only method to prepare a car windshield for driving in the cold season.
Fortunately, engineers from automobile companies noticed this problem not long ago and provided an excellent way out of it - a heated windshield. This technology did not pass by the new Lada Vesta cars. In this article, we will look in detail at the question of how to turn on the heated windshield on Vesta, and also find out in which trim levels this option can be found.
1 — air flow distribution buttons, 2 — air conditioning button, 3 — recirculation mode button, 4 — air temperature adjustment handle.
Air recirculation mode
Activation is carried out by button No. 19, the indicator light lights up. The air supply from outside is blocked, the climate control system takes the air flow inside the cabin.
The “Recirculation” mode is used to prevent smoke and exhaust gases from entering the cabin, as well as to accelerate the heating of the cabin during the first start after a long period of inactivity.
Note to the driver!
Do not overuse recirculation, as the lack of fresh air in the cabin causes drowsiness in the driver and passengers. Often this factor becomes the cause of accidents. To deactivate the mode, use the mechanical button (number No. 19). To start heating the rear and side windows, press button No. 15 once.
How does the heated windshield work on Vesta?
The windshield heating device on the Lada Vesta is no different from similar installations on other cars. This node can be divided into several elements:
- A switch located inside the car.
- In expensive Vesta configurations there is a “Defrost MAX” button, which, in combination with heating, turns on the air conditioning and maximum heater fan speed.
- Transparent filaments located inside the windshield (between the layers). They directly carry out heating. If you carefully examine the glass in sunny weather or take a photo, you can see them.
- Wires, fuse and relay located under the dashboard.
When you press the button, the relay closes the “plus” to the contact of the grid of incandescent filaments, after which the windshield is heated by current. After some time, the electronic control unit automatically turns off the heating to avoid unnecessary energy consumption.
Dismantling
To connect, first of all, you need to gain access to the SAUKU - the heater and air conditioning control unit. On Vesta and X Ray, the algorithm is different, so it’s worth looking into everything in more detail.
Lada Vesta
In a sedan, the SAUKU unit is traditionally located on the center console. To get to it, you will need to remove 3 elements:
- Panel overlay (plastic);
- Key block;
- SAUKU overlay.
The plastic trim is fixed to the center console using plastic fasteners. To snap them off, you need to pry it at the bottom and pull it towards you.
Next, the panel with the keys is dismantled, which is attached to the clamps, also around the entire perimeter. They need to be snapped off.
The most difficult thing to remove is the SAUKU trim.
It is better to start working on the left side. First you need to get to the fuse box by removing the plastic cover that covers it. You need to turn the 3 plastic handles that secure the lid at the bottom, and then remove the lock from above.
In the end, all that remains is to pull the cover from below, disconnect the clamps that secure it to the device from above, and remove the cover. Once the fuse box cover is removed, you will need to remove 2 mounting screws.
Next, we move on to the central part, where it is also necessary to unscrew the 2 mounting screws, which are located directly under the panel with the keys.
Then all that remains is to unscrew 1 mounting screw on the right side, which is located under the glove box lid.
After this, access opens directly to the SAUKU block, which is attached to the cover plate with Torx screws. They need to be unscrewed and the plug disconnected.
Lada X Ray
Independent connection of a heated windshield on a Lada X-Ray through an additional alarm channel also begins with the removal of the SAUKU unit. Everything here is noticeably simpler than on Vesta. The panel itself with the block is fixed with 2 hooks at the top and 2 iron guides equipped with springs at the bottom.
You need to carefully pry the panel at the bottom and carefully pull it towards you. This will cause the top fasteners to disengage.
In the end, all that remains is to disconnect the plug from the wires.
How to use heating correctly
Unfortunately, the heated windshield of a Lada Vesta does not provide adaptability to the ambient temperature. Therefore, defrosting time varies depending on weather conditions. As the practice of using Lada Vesta cars shows, at temperatures just below zero, the snow begins to “slide” within 3 minutes. At -20 degrees, you can wipe off the thawed snow with your wipers in 5-10 minutes. At lower temperatures, the heating time will correspondingly increase.
Thanks for subscribing!
In order to significantly reduce the heating time, simultaneously with heating, turn on the stove fan to maximum power. To prevent the windows from fogging up, it is also recommended to turn on the air conditioning. Do not rush to use the wipers under any circumstances - if you turn them on too early, the wiper drive mechanisms may be damaged. Wait for the snow to move and then turn on the wipers.
3_4
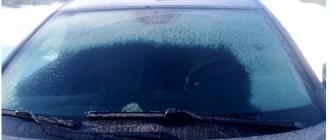
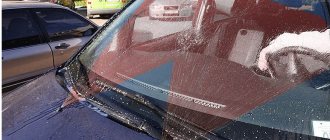
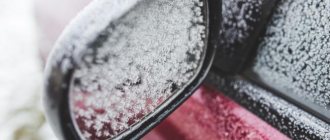
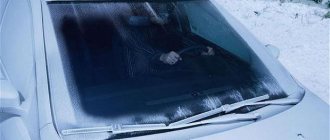
The photo shows the glass after 8 minutes of heating at an outside temperature of -13 degrees. The rear one has become transparent, but on the windshield there is only a narrow embrasure from the heater fan blowing. If you wave the wipers, they will not cause any damage to the ice on the glass. The photo shows the glass after 8 minutes of heating at an outside temperature of -13 degrees. The rear one has become transparent, but on the windshield there is only a narrow embrasure from the heater fan blowing. If you wave the wipers, they will not cause any damage to the ice on the glass.
The photo shows the glass after 8 minutes of heating at an outside temperature of -13 degrees. The rear one has become transparent, but on the windshield there is only a narrow embrasure from the heater fan blowing. If you wave the wipers, they will not cause any damage to the ice on the glass.
However, electronic diagnostics revealed some errors, and they were erased from memory. So far the frosts have receded, so I can’t say anything about changes in the heating operation yet. Taking this opportunity, I would like to ask the owners of Russian cars and foreign cars with a warm windshield: how efficiently does it heat up in yours?
Lada Vesta from ZR park: going for service
Which Vesta configurations include heated car glass?
Unfortunately, in the basic configuration of the Lada Vesta, you are unlikely to find such an option as a heated windshield. The minimum configuration that includes heating is Comfort. The cost of Vesta with a set of Comfort options is at least 592,000 rubles (at the end of March 2022). If you compare it with the base, the difference in price is a little more than 75,000 rubles.
If you fundamentally need this option, but there is no way to overpay almost a hundred thousand rubles, then you can install a heated windshield on your car in the future - it will cost much less, especially if you do this work yourself.
In Luxe trim levels you will receive the “Defrost MAX” button, which was already mentioned above. This button comprehensively launches all possible systems to speed up the heating of all windows and side mirrors of the car.
Self-assembly
The car owner can implement the windshield heating function on his own without spending a lot of money, which is the main advantage of this option.
You can choose the simplest type of system - install the elements on the wipers themselves or on the glass in this area, and equip them with a regular network connection. More complex heating involves filaments throughout the entire area of the glass and its perimeter. This can be supplemented with a power regulator to reduce the risk of cracks. An alternative option is the installation of finished glass with a built-in heating system, which is rarely performed outside of special workshops. For the first two types of heating, there is no need to dismantle the factory glass, which reduces risks.
The main element of the entire system is the heaters. This can be a solid mesh with metal dots on an adhesive base or the metal threads themselves. The second option is more convenient because it leaves a better view for the driver and allows it to be mounted strictly in a given area of the windshield. You will also need connection wires and switches. Experts advise assembling stationary versions, for example, with output to a regular button, and not for connection to the cigarette lighter socket. This is safer from a car electrical point of view. Additionally you can use:
- relay;
- power regulator;
- controllers;
- temperature sensor.
The owner will need a low-power soldering iron to install the elements, insulating tape and a button. The first stage is glass preparation. It must be carefully inspected for cracks and deep chips. Then clean from dust and grease using alcohol-containing substances. This will ensure better adhesion of the elements to the surface. Glue metal threads or ready-made strips to the glass, avoiding creases, bends and deformations. The second stage is to connect the electrical wiring to the car’s standard power supply through the control unit. It is better to place the unit under the hood, and not inside the panel in the cabin. In this case, it will be more convenient to carry out repairs if the heating fails.
It is better to place heating elements in standard positions: near the washer nozzles, under the wipers and around the perimeter. Here they will not interfere with the view, but will prevent icing of the main functional units. Additionally, you can install a complete power shutdown button in the cabin. To do this, you need to bring the contact to the dashboard and mount a regular two-position switch. Thus, it will be possible to turn off the element completely in the summer.
Heated windshield systems are a useful option that is necessary in harsh climates with cold and snowy winters. But in summer and autumn, it is also necessary, especially if the windows sweat a lot, and the stove and air conditioner cannot cope with the air flow. It is quite possible to save money and not overpay the salon for additional equipment: anyone who knows how to connect wires and glue film to glass can assemble the glass heating themselves and attach it correctly.
At any time of the year, the driver needs a properly working car. And sometimes some details are considered not so important, but according to the law of meanness, they will be needed in difficult times. One of the troubles that can happen to a driver on the road is damage to the rear window heating system. Both in winter during cold weather and in summer during rainy weather, this function of the car must be performed in full. Otherwise, moisture will enter the cabin, and visibility will be reduced to the limit, as a result, the driver will be forced to repair the rear window heater of the car.
Rear window heating repair
Reviews
| № | Positive |
| 1. | Stepan , 44 years old (www.otzovik.com): the heating system (hereinafter referred to as the heating system) in the Lada Vesta is functional; it takes no more than 5 minutes to completely clean the glass. |
| 2. | Fedor , 40 years old (www.zr.ru): in severe frosts, heating elements take longer to heat up, on average 7 – 10 minutes. If the temperature outside is below -15°C, a few minutes are enough. |
| 3. | Vladimir , 22 years old (www.autobann.su): I’m happy with the car, its functionality, no comments. |
| 4. | Sergey , 33 years old (www.lada-vesta.net): the “Defrost MAX” system works well in cold weather, no comments. |
| 5. | Semyon , 43 years old (www.otzovik.com): after 3 - 4 minutes after starting the CO, the glass heats up and the ice melts. |
| 6. | Svyatoslav , 44 years old (www.zr.ru): the car is two years old, the CO works stably, without any problems. |
| 7. | Mikhailovich , 20 years old (www.autobann.su): in winter the CO worked at 100, the windows warmed up in a matter of seconds. |
| 8. | Anatoly , 43 years old (www.lada-vesta.net): my positive review of the “Defrost MAX” system. In twenty-degree frosts I had no problems with warming up. |
| 9. | Gennadievich , 39 years old (www.otzovik.com): the car is two years old, the systems are working normally, without any problems. |
| 10. | Dmitrievich , 43 years old (www.zr.ru): I recommend the Lada Vesta in the maximum configuration, a decent domestic car, good quality, affordable price. |
| 11. | Konstantin , 35 years old (www.autobann.su): the heating system is good, I don’t use it often. |
| Negative | |
| 12. | Victor , 44 years old (www.zr.ru): CO does not help in severe frosts, insufficient heating, icing in places. |
| 13. | Alexey , 37 years old (www.otzovik.com): the system worked for six months, after which the heating element burned out, took it to a service station for replacement under warranty. |
| 14. | Stepan Ignatievich , 46 years old (www.autobann.su): the implementation of CO in Renault Logan, Megan of the second generation is better organized. |
Control unit for ventilation and heating system with air conditioning (manual control)
- The air supply mode is regulated by pressing buttons numbered 11 – 16, the indicator light lights up.
- To cool the incoming air, press button No. 18.
- The minimum air temperature depends on the “degree” of the air outside, the angle of the sun’s rays, the fan rotation speed, the active recirculation mode, and the speed of movement.
- After turning on the air conditioner (separate button No. 18), the indicator light comes on. Cooled air enters the car interior, and the humidity decreases sharply.
Before activating the air conditioning system, be sure to start the car engine. Do not allow the “cooler” to operate when the outside air temperature is below 5°C.
- During operation of the air conditioner, moisture and condensation will accumulate under the bottom of the car on the asphalt. Don't worry, this is a natural process.
- Before starting the air conditioning system (hereinafter - AC), be sure to make sure that at least one or more deflectors on the dashboard are in the open position. Otherwise, the air ducts will freeze up and the air conditioner will fail.
- It is strictly forbidden to direct a flow of cold air onto the windshield or side windows. This will lead to freezing and fogging.
- Do not direct the air flow towards the body, limbs of the driver or passengers.
An active air conditioner takes 5–7% of power from the power unit, and also increases fuel consumption by 3–5%. The indicator values are averaged; the higher the speed, the greater the consumption. When driving in mountainous areas or serpentines, the SC can be deactivated automatically, as the load on the motor increases several times.
Connection
Not all 2180 owners are satisfied with the operation of heating the windshield, rear windows and rear-view mirrors simultaneously with the heater fan and air conditioning. There is one way out of this situation - installing a separate button. Even on Vesta models that do not have a heated windshield function as standard, it is possible to connect this very convenient function when replacing the glass unit. If you need to replace your heated windshield for technical reasons, you should contact an official Lada dealer. Under the guarantee, the procedure is carried out free of charge, after an examination. It is necessary to make sure that replacing the windshield with heating is the only solution to the problem, since not a single part will last better than the original one. Careful operation and compliance with the recommendations of specialists will significantly extend the service life of the heating device. High water pressure on the windshield should be avoided when visiting car washes. Timely replacement of wiper blades is necessary, because poor-quality wipers scratch the glass surface.
Quality issue
Technically, heating the car area is a very simple option.
Double-layer glass and metal threads or mesh do the job. You can heat the entire surface or work only with the most problematic areas: the wiper line, center or corners of the area. However, experts do not recommend saving on the system. You can find versions on the market at a low price, but they will have all these disadvantages and will most likely impair visibility, reducing the level of driving safety. Higher-quality types of heating are more expensive, but last longer, do not require seasonal repairs and do not suffer even due to long-term downtime. Problems with the quality of heating arise for those who buy systems separately from the car and not from the manufacturer. Even installation through an authorized dealer or an authorized workshop may not guarantee high quality. Sometimes, if purchased separately, not as an option for a new car, the cheapest assemblies can be installed here, which rarely last longer than the warranty period and often lead to cracking of the glass. The best option would be to install it yourself. However, it is necessary to understand that electrical safety should come first.
You can either install ready-made heating systems yourself or assemble them from scratch using simple elements.
Do-it-yourself modification
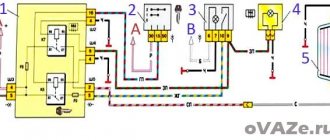
You will need: install an additional non-locking button in the car panel (or buy a block with five buttons), a relay with two groups of switching contacts, 1N4007 diodes and a transistor.
Description of the circuit: When the button is pressed, the low level at pin S1-14 activates the standard heating of the entire CBKE and at the same time the relay is activated due to the pickup by the transistor for a time determined by the capacitance of the capacitor. After 3-4 seconds, a low level appears at pin S1-34 and fixes the relay in the on state for the time specified in the CBKE (6 minutes). The relay turns off the heated mirrors and rear window, leaving only the windshield.
As a result, when you press the additional button, the indicator of the standard button lights up and only the heated windshield turns on. After 6 minutes it turns off on its own.