How to turn on the heated mirrors on a Priora
Heated mirrors of the Priora
provide heating of the rear view mirror of the Lada Priora car.
LADA Priora, Lada Priora is a family of Russian passenger cars produced by AvtoVAZ OJSC and classified according to the European classification.
You can order heated mirrors for a Priora car through the representative office in St. Petersburg, tel. 8(812)4524540 by submitting an application by email.
To obtain the mirror heating circuit for the Priora GEN-147 on a scale of 1:1, print the file GEN-147;
. Attach it to your rearview mirror and determine how suitable this heater is for you.
Representative office phone numbers or. You can also buy these heaters in stores in St. Petersburg. Find out the addresses of stores and the cost of the mirror heater in advance from the official dealer by phone.
The parcel is sent by Russian airmail on the next (working) day after payment for the order. Delivery time is from 5 to 7 days to any point, depending on the location of the post office of the customer for heated mirrors.
Sample application for obtaining GEN-147
GEN-147 - two sets
My address: index - 344113, Rostov region, Rostov-on-Don, Koroleva Ave., 11, apt. 23
Efremov Dmitry Sergeevich
Mobile phone: 8-904-147-92-75
Send your application to the email address: [email protected]
- How to connect SE mirrors on a VAZ 2110
The payment method and order amount will be indicated in the response letter.
Technical characteristics of heated mirrors GEN-147 Priora
You can install heated mirrors on the Lada Priora in our service. Installing heated mirrors on Lada Priora takes 6-8 hours. The mirror housing is completely disassembled, and the lower and side parts of the dashboard and center console are partially disassembled. The heating wires are extended to the mirrors and to the power supply, and all this is output to the rear window heating button through a relay.
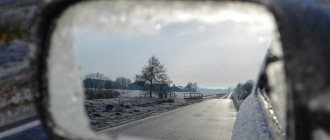
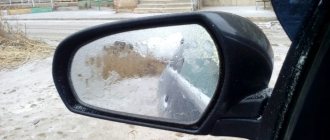
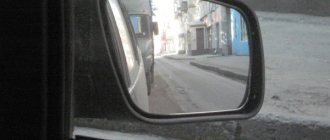
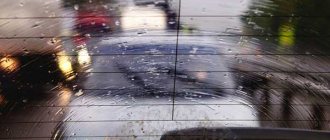
Heated rear view mirror does not work
Malfunctions in the heated rear view mirror affect vehicle safety. If a breakdown occurs, you can periodically clean the mirror surface yourself. But this is not always convenient and effective, especially in rain and snow.
Heating helps combat bad weather conditions while maintaining excellent visibility for the driver. And if a breakdown occurs and the heated rear view mirror does not work, you can independently determine the malfunction, its causes, and carry out simple repairs.
Priora rear view mirror wiring diagram
1) The presence of turn signals on the mirrors. SE has them, old ones don't.
2) Visibility, it is greater on the SE mirrors.
3) Mirror mounting triangle. On the SE mirrors it fits better without any gaps.
4) Protection from rain. SE mirror housings provide less protection from rain and snow.
5) The external differences of the mirrors can be seen in the following photos:
At the moment, the price of SE mirrors on Lada Priora is about 3,300 rubles.
Installing SE mirrors on Priora
How to remove a mirror on a Priora. We follow these instructions, dismantle the old-style mirrors and install the SE mirrors in the reverse order.
Connecting rear view mirrors Priora (SE)
Old style mirrors have 2 connectors with wires:
Block No. 1: mirror control:
Block No. 2: heated mirrors:
SE mirrors have 3 connectors with wires (an additional plus (6th wire) is for the turn signal). Connecting new mirrors is carried out in the same way, all colors are the same, except for one - +12V mirror heating, brown is used instead of Gray.
Block No. 1: mirror control:
- red connects to red-blue.
- blue with blue-black.
- green with green-black.
Block No. 2: heated mirrors:
- Instead of gray there is brown, we combine it with blue-red (black-red).
- black with black (used for heating and for turn signals).
Block No. 3: direction indicators:
For those who haven’t figured it out, here’s a diagram for connecting the SE side mirrors on a Lada Priora:
Fuses and relays in Lada Priora, electrical diagrams
Lada Priora is another car in the line of new VAZ cars, which is gaining popularity among segments of the population. External similarities with the 10th model attract the attention of young people; the relatively low price is also a reason for purchase for most car enthusiasts. Along with the growth in popularity, the owners of this model are gaining experience in repair and maintenance, which is becoming more and more every year.
If your Priora has electrical problems, do not rush to get upset; first, check the fuses and relays in your Lada Priora. These are the ones that will be discussed in this article.
Where is the fuse for the heated mirrors of the Priora?
A variety of seemingly complex breakdowns in the electrical equipment of your car can be hidden simply under the cover of the fuse box. These include stuck or non-operating relays, blown fuses or tracks. We recommend starting any work to eliminate breakdowns in the Priora’s electrical system from here.
The Priora mounting block is located in the instrument panel on the left driver's side at the bottom and is closed with a lid - in the photo its location is highlighted with a blue frame:
To gain access directly to the fuses and relays themselves, you need to unscrew the three latches that hold the cover, highlighted in red in the photo:
Removing the cover, we see the block itself:
Before replacing a blown fuse, find out the cause of its blown and eliminate it. When troubleshooting, it is recommended to look at the circuits that are protected by this fuse.
What are the fuses responsible for in the mounting block of VAZ 2170, 2171, 2172 (Lada Priora).
| Fuse number in the mounting block (Priora) | Current strength, Ampere | Protected circuit |
| F1 | 25 | Electric fan of the engine cooling system (Priora) |
| F2 | 25 | Heated rear window (Priora) |
| F3 | 10 | High beam (right side) (Priora) |
| F4 | 10 | High beam (left side) (Priora) |
| F5 | 10 | Sound signal (Priora) |
| F6 | 7.5 | Low beam (left side) (Priora) |
| F7 | 7.5 | Low beam (right side) (Priora) |
| F8 | 10 | Alarm signal (Priora) |
| F9 | 25 | Heater fan (Priora) |
| F10 | 7.5 | Instrument cluster, interior lighting, brake light Priora |
| F11 | 20 | Windshield wiper, heated rear window Priora |
| F12 | 10 | Conclusion No. 15 from devices (Priora) |
| F13 | 15 | Cigarette lighter Priora |
| F14 | 5 | Side light (left side), Priora |
| F15 | 5 | Side light (right side), Priora |
| F16 | 10 | Conclusion No. 15 of the Priora ABS system |
| F17 | 10 | Priors left |
| F18 | 10 | Priors right |
| F19 | 15 | Heated seats Priora |
| F20 | 5 | Priora immobilizer control unit |
| F21 | 7.5 | Rear fog light Priora |
| F22-30 | — | Reserve place for fuses in Priora |
| F31 | 30 | Priora car electrical package control unit |
| F32 | — | Reserve location for fuse in Priora |
Location of relays and fuses in the mounting block:
1, 2 – tweezers; K1 – relay for turning on the electric radiator fan of the engine cooling system; K2 – relay for turning on the heated rear window; K3 – starter activation relay; K4 – additional relay (ignition relay); K5 – place for backup relay; K6 – relay for turning on the windshield washer and wiper; K7 – headlight high beam relay; K8 – horn activation relay; K9 – alarm signal activation relay; K10, K11, K12 – places for backup relay; F1–F32 – fuses (circuits protected by pin-type fuses are listed in Table 10.
Electrical equipment that consumes a large current during operation is connected through relays that protect the switch contacts from burning.
To replace relays and pin fuses, special plastic tweezers are provided in the mounting block
Fuse box of Lada Priora under the hood:
It has 6 fuses F1,F2,F3,F4,F5,F6.
Fuse F1
supplies control point S2 of the ignition relay, fuel pump relay, ECU, spark plug injector, etc.
The ignition relay and fuel pump relay in Priora are located here:
Fuse F2 supplies test point S4
Fuse F3 supplies test point S1
Fuse F4 and F6 are two power fuses from + Generator to + Battery
Fuse F5 Electric power steering power
And here is the relay block located under the hood:
High beam - right headlightInstrument panel high beam indicator
LCD screen of instrument panel
Electrical accessories remote control controller: turn signal, electric exterior mirrors, electric windows
Fuses and relays in Lada Priora, electrical diagrams
Lada Priora is another car in the line of new VAZ cars, which is gaining popularity among segments of the population. External similarities with the 10th model attract the attention of young people; the relatively low price is also a reason for purchase for most car enthusiasts. At the same time as its popularity is growing, the owners of this model are gaining experience in repair and maintenance, which is becoming more and more every year. If your Priora has electrical problems, do not rush to get upset, first check the fuses and relays in the Lada Priora. These are the ones that will be discussed in this article.
Fuse box in the passenger compartment of VAZ-2170, -2171, -2172
The fuse box in Priora is located at the bottom of the dashboard, on the left side of the steering wheel. To get to it, you need to open the cover, which is held on by three latches. Rotate each locking knob 90 degrees and pull the lid down and it will snap open.
| Number | Rated current, A | Purpose of the fuse |
| Fuse box in the passenger compartment | ||
| The Lada Priora mounting block is located in the instrument panel on the left side of the steering wheel, at the bottom | ||
| F1 | 25 | Cooling fan |
| F2 | 25 | Heated rear window |
| F3 | 10 | |
| F4 | 10 | High beam - left headlight |
| F5 | 10 | Sound signal |
| F6 | 7,5 | Low beam - left headlight, headlight range control |
| F7 | 7,5 | Low beam - right headlight, headlight range control |
| F8 | 10 | Security alarm - sound signal |
| F9 | 25 | Heater/fan |
| F10 | 7,5 | |
| F11 | 20 | Windshield wiper |
| F12 | 10 |
Source: https://litezona.ru/gde-nahoditsja-predohranitel-obogreva-zerkal/
Causes of heating malfunction, first stages of diagnosis
To understand the causes and troubleshoot the heated rear mirror system, you need to prepare a tool. To work, you may need a multimeter, a car light bulb, a soldering iron, a screwdriver, a fuse, electrical tape - it all depends on the type of problem.
It is easier to identify a defect by studying the main components of the heating circuit:
Installation
Remove the door trims and dismantle the old exterior mirrors (by removing the mounting screws). Mirrors of the new SE model are installed in place of the old ones without modifications.
To install the joystick, make a hole in the door trim using a file or a utility knife. Sample:
To stretch the wires from the interior to the doors (see connection below), you will need to drill a hole in the door rosette with a drill (or find a suitable female-male connector).
Where are the fuses on the Priora?
- The main mounting block of the Priora is closed with a lid and located at the driver’s left foot. To open it, you need to turn three latches 90° and unclip the lid.
- The fuse box is under the hood, which is located near the expansion tank.
- Another mounting block, which is located near the left foot of the front passenger. To gain access to the fuses and relays, unscrew several screws with a Phillips screwdriver.
Below is a description of each fuse and relay block in order.
Lada Priora relay and fuse diagram
- January 15, 2015 Lada.Online 1 919 378
The relay and fuse box is also called the mounting block or black box. In the event of a car breakdown related to electrical equipment, the fuses and relays are first checked. If a fuse is blown, you must first determine the cause of its blown before replacing it.
Where are the fuses on the Priora?
- The main mounting block of the Priora is closed with a lid and located at the driver’s left foot. To open it, you need to turn three latches 90° and unclip the lid.
- The fuse box is under the hood, which is located near the expansion tank.
- Another mounting block, which is located near the left foot of the front passenger. To gain access to the fuses and relays, unscrew several screws with a Phillips screwdriver.
Below is a description of each fuse and relay block in order.
Priora fuse box diagram
Fuse No. Current, A “Standard” and “Norma” “Norma” with air conditioning and “luxury”
| F1 | 25 | Engine cooling radiator fan | Reserve |
| F2 | 25 | Heated rear window | Mounting block, rear window heating relay (contacts). Electrical package controller, contact “10” of XP2 block. Rear window heating element. |
| F3 | 10 | Right headlight, high beam | Right headlight, high beam lamp. Instrument cluster, headlight high beam indicator. |
| F4 | 10 | Left headlight, high beam | |
| F5 | 10 | Sound signal | Mounting block, horn relay. Sound signal. |
| F6 | 7.5 | Left headlight, low beam | |
| F7 | 7.5 | Right headlight, low beam | |
| F8 | 10 | Alarm signal | Mounting block, alarm relay. Alarm sound. |
| F9 | 25 | Priora heater fuse | Reserve |
| F10 | 7. 5/10* | Interior lighting, instrument panels, brake light | Instrument cluster, pin “20”. Brake light switch. Brake light bulbs. Interior lighting unit. Interior lighting. The door sill light on the right front door. Additional brake signal. |
| F11 | 10/20* | Wiper | Mounting block, high speed windshield wiper relay. Switch for cleaners and washers, contact “53a”. Wiper and washer switch, contact “53ah”. Heated rear window switch. Mounting block, rear window heating relay (winding). Windshield wiper motor. Rear window wiper motor (2171,2172). Windshield washer motor. Rear window washer motor (2171,2172). Airbag control unit, pin “25”. |
| F12 | 20/10* | Terminal 15 devices | Instrument cluster, pin “21”. Electrical package controller, contact “9” of block X2. Electromechanical power steering control unit, contact “1” of block X2. Reversing light switch. Reversing lamps. Parking system control unit, contacts “11” and “14”. |
| F13 | 15 | Cigarette lighter fuse Priora | |
| F14 | 5 | Left headlight, parking light, license plate light, trunk light | Side light lamps (left side) Instrument cluster, main light indicator License plate lights Trunk light Electrical package controller, pin “12” of block X2 |
| F15 | 5 | Right headlight, parking light | Side light lamps (right side) Glove compartment lamp |
| F16 | 10 | Terminal 15 ABS | Hydraulic unit, contact "18" |
| F17 | 10 | Left fog lamp | |
| F18 | 10 | Right fog lamp | |
| F19 | 15 | Seat heating | Seat heating switch, contact "1" Front seat heaters |
| F20 | 5/10* | Immobilizer control unit | Recirculation switch (switch on) Mounting block, relay for low beam headlights and parking lights (automatic lighting control system) Heater electric fan relay Automatic lighting control switch Windshield wiper and external lighting control unit, contacts “3”, “11” Automatic climate control system controller installation, pin “1” Automatic window cleaning system sensor (rain sensor), pin “1” |
| F21 | 7.5/5* | Rear fog lights | Light switch, contact "30" Diagnostic block, contact "16" Clock Automatic climate control system controller, contact "14" |
| F22 | -/20* | Reserve | Windshield wiper motor (automatic) Mounting block, windshield wiper relay and windshield wiper high speed relay, (contacts) |
| F23 | -/7.5* | Reserve | Windshield wipers and external lighting control unit, pin “20” |
| F24-F30 | Reserve | ||
| F31 | 30 | Electrical package control unit | Electrical package controller, terminal “2” of block X1 Electrical package controller, terminal “3” of block X1 Driver’s door module, pin “6” Threshold light of the left front door |
| F32 | Reserve |
* - for the “Norma” configuration with air conditioning and “luxury”
Relay “Norma” “Norma” with air conditioning “Lux”
| K1 | relay for turning on the electric radiator fan of the engine cooling system | Reserve | Relay for turning on the low beam and side lights of the headlights (automatic lighting control system) |
| K2 | rear window heating relay | ||
| K3 | starter activation relay Priora | ||
| K4 | additional relay (ignition relay) | ||
| K5 | space for backup relay | ||
| K6 | windshield washer and wiper relay | ||
| K7 | headlight high beam relay | ||
| K8 | horn relay | ||
| K9 | alarm relay | ||
| K10 | Reserve | Fog light relay | |
| K11 | Reserve | Front seat heating relay | |
| K12 | Reserve |
Location of Priora fuses under the hood
- F1 (30 A) – power supply fuse for the electronic engine control system (ECM);
- F2 (60 A) – fuse for the power supply circuit of the engine cooling system fan (power circuit), additional relay (ignition relay), rear window heating, electrical package controller;
- F3 (60 A) – fuse for the power supply circuit of the electric fan of the engine cooling system (relay control circuit), sound signal, alarm signal, ignition switch, instrument cluster, interior lighting, brake light, cigarette lighter;
- F4, F6 (60 A) – generator power circuit fuses;
- F5 (50 A) – fuse for the power supply circuit of the electromechanical power steering
Relay and fuse box for Halla air conditioner
- right electric fan power supply fuse (30 A);
- fuse for the power supply circuit of the left electric fan (30 A).
- right electric fan relay;
- additional relay (sequential activation of left and right electric fans);
- left electric fan relay;
- heater fan power supply fuse (40 A);
- compressor power supply fuse (15 A);
- heater fan relay;
- compressor relay.
Panasonic air conditioner relay and fuse box
- Heater fan maximum speed
- Right fan
- Fan sequential relay (low speed)
- Left fan
- Left fan fuse (low speed)
- Right fan
- Heater fan
- Compressor
- Heater fan
- Compressor
Block in the engine compartment
The power fuse box is located in the engine compartment under the hood, near the left strut support. To get to it, you need to open the lid by prying the latch.
1 (30 A) - engine control system circuit . If there are problems with the electronic control unit, short circuits or other malfunctions, this fuse may blow out.
2 (30 A) - vehicle on-board circuit . 3 (40 A) - vehicle on-board circuit .
4 (60 A) - generator circuit.
5 (50 A) - electric power steering circuit.
6 (60 A) - generator circuit.
In case of any problems, it is important not to panic, to think soberly and logically. The most important thing is to diagnose and establish the cause of the breakdown. If you don’t have enough experience or nerves, it’s easier to sign up at the nearest car service center if it has a competent electrician.
I hope this article will help you deal with electrical problems and quickly fix any Priora malfunctions. If you have any experience or information, please leave a comment below, useful information will be added to the article.
Theme Options
Search by topic
Installation and connection of SE side mirrors on Priora
Category: Do-it-yourself external tuning of Priora
| The mirrors on the VAZ 2170 can be considered a gift from AvtoVAZ, because they are heated on all trim levels. Despite this, many car enthusiasts replace them with mirrors from Lada Priora Second Edition (SE). Most often, difficulties arise only during connection. |
Mirrors on the Priora SE and the old model, what is the difference?
1) The presence of turn signals on the mirrors. SE has them, old ones don't.
2) Visibility, it is greater on the SE mirrors.
3) Mirror mounting triangle. On the SE mirrors it fits better without any gaps.
4) Protection from rain. SE mirror housings provide less protection from rain and snow.
5) The external differences of the mirrors can be seen in the following photos:
At the moment, the price of SE mirrors on Lada Priora is about 3,300 rubles.
Installing SE mirrors on Priora
How to remove a mirror on a Priora. We follow these instructions, dismantle the old-style mirrors and install the SE mirrors in the reverse order.
Connecting rear view mirrors Priora (SE)
Old style mirrors have 2 connectors with wires:
Block No. 1: mirror control:
Block No. 2: heated mirrors:
SE mirrors have 3 connectors with wires (an additional plus (6th wire) is for the turn signal). Connecting new mirrors is carried out in the same way, all colors are the same, except for one - +12V mirror heating, brown is used instead of Gray.
Block No. 1: mirror control:
- red connects to red-blue.
- blue with blue-black.
- green with green-black.
Block No. 2: heated mirrors:
- Instead of gray there is brown, we combine it with blue-red (black-red).
- black with black (used for heating and for turn signals).
Block No. 3: direction indicators:
For those who haven’t figured it out, here’s a diagram for connecting the SE side mirrors on a Lada Priora:
The main thing is not to confuse the red-blue and blue-red wires. They are almost the same, so before connecting it is better to check them with a tester (multimeter or + 12V light bulb), connecting the minus of the tester to the body, and the (+) to the wire. If the lamp lights up after turning on the heated mirrors, then this is the correct wire that needs to be connected to the brown mirror wire.
Connecting the SE mirror turn signals: You can take the plus for the turn signals from the direction indicators in the car's wing.
- Left wing - blue-black and black wires.
- Right wing - blue and black.
By the way, for the VAZ 2172 the VAZ 2112 Coupe also borrows some body elements, for example, a spoiler.
The most common reason why many people replace the exterior mirror on a Priora is its failure due to the so-called impact “on the mirrors” from another car. This can happen on the highway when the road is too narrow, when two cars can hardly fit on the roadway. If you and your car are unlucky and the mirror breaks, then replacing it will not be difficult.
To perform this simple repair of the Lada Priora, we will need two screwdrivers, a flathead and a Phillips.
First of all, you need to pry off the “triangle” plug from the inside of the door with a flat screwdriver, as is clearly shown in the photo below.
Underneath it are all the fastening screws, as well as the power wires for the electric drive and the heating of the mirror element.
Disconnect the wires by lightly pulling the edges in both directions:
And after that, you can unscrew the three screws securing the exterior mirror using a Phillips screwdriver.
Now all that remains is to thread the wires through the door hole and completely remove this part from the car.
Installation is carried out in reverse order. Replacement will not take more than 10 minutes. The price of a set of new Lada Priora mirrors starts from 1800 per pair - with electric drive and heating. But the same option can be found at a disassembly site for almost half the price.
Operations carried out when removing and installing the exterior rear view mirror on a VAZ 2170 2171 2172 Lada Priora
You will need flat and Phillips blade screwdrivers.
1. Use a screwdriver to pry off the mirror trim from the interior side
2. ...and remove the triangular trim by removing the two pistons for its fastening from the door holes.
3. Holding the mirror with your hand, remove the three screws that secure it.
4. Remove the mirror...
5. ...and disconnect the heating wiring harness block...
6. ...and mirror adjustments.
Note
This is what the outside rear view mirror looks like when removed from the car.
7. Install the outside rear view mirror in the reverse order of removal, adjusting its position using the oval holes in the door.
Operations performed when removing and installing the internal rear view mirror on a VAZ 2170 2171 2172 Lada Priora
You will need a Phillips blade screwdriver. 1. Pry up the front edge of the decorative cover...
2. ...and remove the cover.
3. Remove the two mirror mounting screws...
4. ...and remove it.
5. Install the interior rear view mirror in the reverse order of removal.
Malfunction of button and wiring
After checking and confirming the serviceability of the fuses, you need to move on to the button. This element may also fail. The manifestation of a defect is accompanied by the absence of light from the LED. That is, the light bulb will not turn on and needs to be replaced. In this situation, the voltage at the output contacts of the button is checked.
Sometimes the question arises where the mirror heating button is located. The required element can be located on the microclimate control unit. Often the button for turning on the heated mirrors is combined with the heated rear window, then when turned on, two systems will work simultaneously. Situations of separation of devices are not excluded, when the required button is located on the driver's door.
If the problem is not in the button, you should start wiring. Further testing will require dismantling.
How to remove a mirror:
- The adjustment needs to be lowered down, which is accompanied by the appearance of a small gap, which allows you to pry up the structure and easily remove it.
- Next, disconnect the connector of the contacts connected to the heating. Just pull them, no special effort is required.
Examination:
- Using a multimeter, determine the voltage. When the button is turned on, the indicator should be 12–14V.
- Testing with a light bulb also involves connecting wires to the terminal. If you turn on the button, the light will light up.
If the wiring is faulty, the tester will not show results and the light will not light up. It is recommended to check the wires for damage, insulation problems, and short circuits. Another weak point is the contacts, which sometimes break off and come off. To eliminate the defect, they are soldered.
Heating system problems, troubleshooting
If all possible malfunctions have been ruled out, you need to pay attention to the heating circuit itself - the filaments, because they are sometimes damaged. Here it is easy to determine when and why the heated mirrors do not work.
Examination:
- When connecting the tester, the resistance value is determined. Optimal parameters range from 10–30 ohms. The presence of a defect is indicated by missing or inflated indicators.
- Checking with a light bulb involves disconnecting the circuit and connecting the wires in series. The complete absence of glow may indicate a malfunction - the heating system has burned out.
Another typical failure involves breaking off contacts and connections on copper pads that should secure the power wires. In this case, the filaments themselves must be in good condition.
When thinking about how to check the heating of mirrors, determine the resistance of the filaments, the tester should give a result of 100 Ohms.
Then, to eliminate the defect, it will be enough to solder the contact fastenings. If the problem is a broken thread, no values will be displayed as the track progresses. This means you need to find a break and solder it.
Heating element replacement process
Sometimes a complete malfunction of the heating element is detected and restoration is impossible. It is necessary to replace the unit and a new device made in the form of an adhesive tape on which tracks are applied - filaments.
If the left mirror stops working, you can use a universal heating element. When the heating of the right mirror does not work, two elements change. Since they are universal, adjustments and cutting to the desired size are possible.
How to install a new heater:
- work begins with removing the plastic protection, for which you need to heat the surface using a hairdryer or hot water;
- as the plastic frame gradually separates, the soft coating holding the filaments becomes noticeable;
- under the influence of high temperatures the coating is also removed;
- Taking a new heating element on the side mirror, cut it to the required size and glue it onto the mirror surface, removing air bubbles;
- for new contacts you need to make additional holes;
- then the protection is removed and a plastic frame with suitable holes is glued on.
Having completed the manipulations, you can begin to reassemble the mirror heating system and safely operate the car.
Life hack: side mirrors on Priora - removal and installation
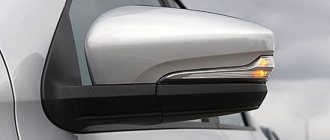
Good visibility is important for safe driving. While driving, the driver always has to “keep his finger on the pulse” so as not to get into an unpleasant situation (accident). The side mirrors on the Priora are initially made quite well - the viewing angle is enough to sit still when reversing or changing lanes.
This is not a joke, it’s really like a Kruzak review. After the Priorovskie cars I get into other cars and I miss my familiar overview. Mirrors on Priora come with turn signals (repeaters); this is the Special Edition version of Lada (luxury) Priora cars. The price of these is naturally more expensive, but not by much 900 rubles. They can be installed on a regular Priora.
Turn signals in mirrors are a newfangled theme and they look beautiful and are also practical.
The side mirrors of the Priora 1 car have been improved along with the restyling of the car. In the SE luxury version, which is essentially the most expensive and complete package of the car, these devices have changed, the car has become even more convenient “for the driver”. Some people buy such SE mirrors on a Priora 2 and install them even if they originally bought a car with a more economical package.
All that remains is to properly disassemble the mirror and make friends with the wires. Indeed, to install the modernized version you will have to put a lot of effort into finding reasons. You can do simple tuning, if you want to change the appearance to a more curly one - just put covers on the mirrors. It seems like a small change, but the car looks more solid with them.
Block in the engine compartment
The power fuse box is located in the engine compartment under the hood, near the left strut support. To get to it, you need to open the lid by prying the latch.
1 (30 A) - engine control system circuit . If there are problems with the electronic control unit, short circuits or other malfunctions, this fuse may blow out.
2 (30 A) - vehicle on-board circuit . 3 (40 A) - vehicle on-board circuit .
4 (60 A) - generator circuit.
5 (50 A) - electric power steering circuit.
6 (60 A) - generator circuit.
In case of any problems, it is important not to panic, to think soberly and logically. The most important thing is to diagnose and establish the cause of the breakdown. If you don’t have enough experience or nerves, it’s easier to sign up at the nearest car service center if it has a competent electrician.
Source: https://prometey96.ru/modeli/zerkala-priora.html
Return Guarantee
We guarantee a refund of money paid for the entire order or individual goods if we cannot fulfill the order in full.
We also guarantee the buyer’s right to return goods of good quality that are not suitable for the buyer for any reason. You can always return such a product by paying for the shipping of the product at your own expense, and get the cost of the product back.
If upon receipt of the goods you see that you have received the wrong product or the wrong color that you ordered, be sure to contact us and send us photos of the received product. If we made a mistake during assembly, we will definitely return your money or send you the product you ordered for free. But still, we ask you to carefully inspect and completely unpack the parcel, removing all packaging materials; often small parts are wrapped in film to large ones to avoid loss or damage.
The heated mirrors stopped working (you need to find the location of the fuse) *
The heating of the mirrors has stopped working (you need to find the location of the fuse) I found one (it’s intact), but I can’t find the second one shown in the diagram with a red arrow. When you press the button in the panel, the switch clicks, but none of the mirrors heat up. Can you please tell me I am attaching the diagram?
There are only two options. One under the hood fuse and relay box. The second one is under the dashboard. Everything is signed on the covers of these blocks.
TLC Prado 150 TX-L
It’s stupid to look for a black cat in a dark room, especially if it’s not there. But it’s even stupider to look for a black snake in a dark room. Especially if she is there.
in these places I found only the fuse that is “gauge” in the diagram on the right
You also have fuses on the passenger side, remove the mess, there are still fuses there and this is indicated on the diagram.
Fuse box in the passenger compartment of VAZ-2170, -2171, -2172
The fuse box in Priora is located at the bottom of the dashboard, on the left side of the steering wheel. To get to it, you need to open the cover, which is held on by three latches. Rotate each locking knob 90 degrees and pull the lid down and it will snap open.
Fuses in the interior mounting block
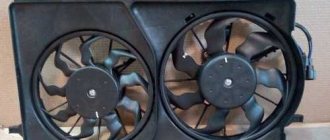
F1 (25 A) - radiator cooling fan . If your fan does not work, check its motor by applying 12 V directly to it from the battery. If the engine is working properly, then most likely the problem is in the wiring or connectors. Check the serviceability of relay K1.
The fan in the Priora usually turns on at a temperature of 105-110 degrees. Do not allow the engine to overheat, watch the arrow of the temperature sensor.
If the fan runs constantly and does not turn off, check the coolant temperature sensor located on the thermostat. If you remove the connector from the working sensor, the fan should turn on. Check the wiring to this temperature sensor, as well as the contacts of relay K1, move this relay, clean the contacts. If this is the case, replace it with a new relay.
F2 (25 A) - heated rear window . Check together with fuse F11 and relay K2. If the rear window does not fog up, the heating element threads may have broken. Inspect all the threads and if you find a break, seal it with special glue or varnish, which can be bought at car dealerships for 200-300 rubles. Check the connection contacts at the terminals to the heating elements at the edges of the glass, as well as the switch on the dashboard and the wiring from it to the rear window.
F3 (10 A) - high beam, right headlight . F4 (10 A) - high beam, left headlight . If the headlights do not shine on high beam, check the K7 relay and the headlight bulbs. The steering column switch, wiring or connectors may also be faulty.
F5 (10 A) - sound signal.
If the signal does not work when you press the steering wheel button, check relay K8. The signal itself is located under the radiator grille; you can get to it by removing the plastic casing from above. Check it by connecting the voltage to 12 V. If it doesn’t work, try turning the adjusting screw, or replace it with a new one.
F6 (7.5 A) - low beam, left headlight . F7 (7.5 A) - low beam, right headlight . When replacing lamps, be careful; there are separate lamps for the low and high beams, so they can be easily confused. It is better not to install lamps in high-power headlights; the reflectors may melt and the desired effect will not be achieved. Most low beam headlight problems that cannot be corrected by conventional means can be related to the light control module (LCM). The low beam relay is only available in cars equipped with a light sensor, it is located in the place of relay K1; on most cars this relay is not in the mounting block; the low beam circuit goes through the MUS block. It happens that the tracks in the block burn out; if there are problems, it is better to replace it with a new one. If the windshield wipers turn on spontaneously when the low beam is not working correctly, the problem is most likely in the windshield wiper control unit, located in the center of the dashboard, the topmost block, next to the radio, is best reached from the glove compartment, or by hand through the removed console covers at the feet.
F8 (10 A) - alarm signal . If the alarm does not work, also check relay K9.
What you need
To make a heater you only need:
- Nichrome wire;
- Double-sided and regular tape;
- Wires;
- Sealant;
- Soldering iron;
- Multimeter;
A wire with a cross section of 0.4-05 mm and a length of 1-1.3 m is suitable for the heater. For normal functioning of the heating system, the resistance of the piece of wire must be 12 Ohms. This is exactly what a multimeter is for. That is, we took a section of 1.5 meters and measured the resistance. If it exceeds the specified value, cut off 10 cm and measure again. Thus, we select the desired segment.
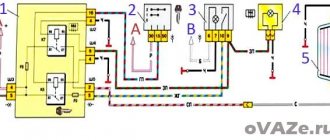
Priora mirror heating button
Here's the process. Here, on the right side of the connector, you can see the necessary gray wire, which is connected in a terminal to a thick blue wire (this must be cut off and connected to a new button): 1. We look at the diagram of the instrument panel harness and see that there is “4” on the block. on contact No. 2, 2 wires are connected (gray and blue) ... 2. +12 V is supplied to them through the relay. The relay is turned on by a button on the instrument panel. 3. When we get to contact “2” on block “4” of the instrument panel harness, removing the cover of the mounting block and looking just above the mounting block and to the right, we see:
Additional block
Additional relays are mounted on a bar and located under the dashboard, near the front passenger's feet. To get to them, you need to remove the right tunnel lining. Next to the additional relays is the electronic engine control unit (ECU).
If its connector interferes with access to the relay, disconnect it by first removing the negative terminal from the battery.
Circuit breakers
F1 (15 A) – main relay circuit, starter interlock.
F2 (7.5 A) – power circuit of the electronic control unit (ECU).
F3 (15 A) – electric fuel pump . If the fuel pump has stopped pumping (this can be determined by the absence of a sound when the ignition is turned on), check together with relay K2. There may also be problems with the immobilizer, it blocks the pump, see information about F20. If the wiring, this fuse and the relay are good, most likely the fuel pump itself has failed. To remove it, you need to disconnect the battery, remove the rear seat cushion, unscrew the cover, ring and fuel hoses, then carefully remove the entire fuel pump.
K1 – main relay.
K2 – electric fuel pump relay . See above about F3.
Product delivery options
Note! Below are the shipping methods available specifically for this product. Payment options may vary depending on the shipping method. Detailed information can be found on the “Delivery and Payment” page.
Parcel by Russian Post
Available payment methods:
- Cash on delivery (payment upon receipt)
- Using cards Sberbank, VTB, Post Bank, Tinkoff
- Yandex money
- QIWI
- ROBOKASSA
Shipping throughout Russia. Delivery time is from 5 to 12 days.
Parcel by Russian Post 1st class
Available payment methods:
- Cash on delivery (payment upon receipt)
- Using cards Sberbank, VTB, Post Bank, Tinkoff
- Yandex money
- QIWI
- ROBOKASSA
Shipping throughout Russia. Delivery time – from 2 to 5 days. More expensive than regular delivery by Russian Post, approximately 50%. Parcel weight up to 2.5 kg
Express Parcel EMS
Available payment methods:
- Cash on delivery (payment upon receipt)
- Using cards Sberbank, VTB, Post Bank, Tinkoff
- Yandex money
- QIWI
- ROBOKASSA
Shipping throughout Russia. Delivery time – from 3 to 7 days. More expensive than regular delivery by Russian Post, approximately 100%.
Transport companies
Available payment methods:
- Using cards Sberbank, VTB, Post Bank, Tinkoff
- Yandex money
- QIWI
- ROBOKASSA
Delivery is possible to any locality where there is a representative office of the transport company. Delivery time – from 2 to 10 days. Sending large parcels is approximately 50% more profitable than by Russian Post.
Courier delivery in Togliatti
Available payment methods:
- Cash upon receipt
- Using cards Sberbank, VTB, Post Bank, Tinkoff
- Yandex money
- QIWI
- ROBOKASSA
Delivery time from 1 to 12 hours.
Pickup from our warehouse
Available payment methods:
- Cash upon receipt
- Credit, installments
- Using cards Sberbank, VTB, Post Bank, Tinkoff
- Yandex money
- QIWI
- ROBOKASSA
Pickup times must coincide with store opening hours.
Connection
Connecting the central lock
. We use a circuit of two relays so as not to go under the panel to the central locking unit:
Connecting heated mirrors
(to the wiring harness under the driver's threshold)
Connecting mirror turn signals
- Option 1: Pull the wire from the direction indicator on the fender.
- Option 2: To the wiring harness under the driver's threshold (blue - left turn signal; blue-white - right).
We transfer the wires from the power windows from the standard buttons to a new block with a joystick.
For Lada Kalina and Granta with heated and electric side mirrors (without direction indicators):
- The new mirror has a chip with six wires, but the old one has only five. We pull the sixth contact, which is used to operate the turn signals.
The process of installing exterior mirrors from a liftback on a Lada Granta sedan is also shown in the video:
Are you considering replacing old mirrors with new ones with turn signals?
Connecting rear view mirrors Priora (SE)
Black-red (right mirror)
- red connects to red-blue.
- blue with blue-black.
- green with green-black.
Block No. 2: heated mirrors:
- Instead of gray there is brown, we combine it with blue-red (black-red).
- black with black (used for heating and for turn signals).
Block No. 3: direction indicators:
- White-red.
The main thing is not to confuse the red-blue and blue-red wires. They are almost the same, so before connecting it is better to check them with a tester (multimeter or + 12V light bulb), connecting the minus of the tester to the body, and the (+) to the wire. If the lamp lights up after turning on the heated mirrors, then this is the correct wire that needs to be connected to the brown mirror wire.
You can take the plus for the turn signals from the direction indicators in the wing of the car.
- Left wing - blue-black and black wires.
- Right wing - blue and black.
By the way, for the VAZ 2172 the VAZ 2112 Coupe also borrows some body elements, for example, a spoiler.
Comments (6)
Does anyone know how to connect electric mirrors to the standard configuration: the one from the factory with mechanics?
In my opinion, all Priors immediately have heated mirrors from the factory, well, in any case, the heated mirrors are done together with the heated rear window, do that
The interior of the Priora has already been written in the top ten, now it’s time for the exterior