Where is it located?
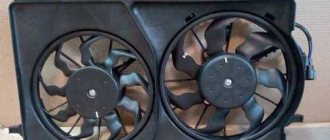
The fan is located on the inside of the radiator between the engine and radiator. Bolted to the radiator housing. In luxury versions of the Lada Priora, a dual cooling radiator is installed, one for the engine cooling system, and the other for the car's air conditioning system. It should be noted that when the car reaches a critical temperature, these radiators begin to work in pairs and cool the engine more intensively.
How to make a replacement yourself
Replacement of the Lada Priora DTOZH is carried out only after the preparatory work described above. For this purpose, disconnect the wires from the part along with the terminal and unscrew it. The most convenient way to do this is to use a 19 mm deep socket. As soon as the sensor begins to give in, it is unscrewed and removed manually.
Sequence of actions when replacing a temperature detector:
- Find the negative wire and remove it from the battery;
- A little antifreeze needs to be drained;
- Press out the plastic clips;
- Disconnect the wires;
- Loosen the tension a little and carefully unscrew it;
- Replace the sensor and perform all steps in reverse order.
- Add antifreeze back.
Change this spare part at least once, and it will become clear that the procedure does not present any particular difficulties.
Protection system
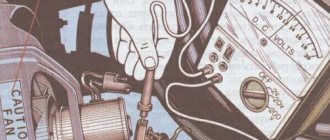
Since the fan is an electrical part, it must have some kind of protection against short circuits or overheating. To provide this protection, it uses a relay and a fuse, which quite often fail, resulting in the fan not working.
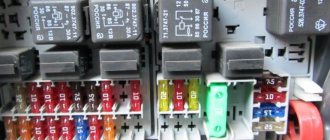
Priora cooling fan fuse
To protect the circuit from short circuits and overloads, a fuse is used, which breaks the circuit when it overheats or a short circuit occurs in it.
The Priora uses several fuses to protect the cooling fan circuit: power and control. The cooling fan power fuse is located under the hood in a block near the battery number F3 at 60A. The control circuit fuse is located in the fuse box under the steering column and is numbered F1 at 25A.
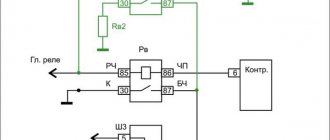
Priora cooling fan relay
The location of the relay depends on the vehicle configuration.
In the “NORM” configuration, the fan relay is located on the main fuse block under the steering column and has the number K1.
In the “NORM+” and “LUX” configurations, the relays are located in the engine compartment and there are 2 of them. For the right fan, relay number 3, for the left fan, relay number 5.
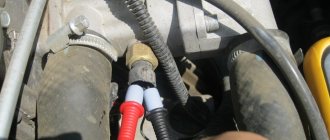
Priora cooling fan sensor
The cooling fan on the Priora turns on automatically when a certain temperature is reached. The coolant temperature is determined by a special sensor installed in the thermostat housing, which sends signals to the ECU when the engine temperature reaches a high temperature, after which the cooling fan turns on and begins to create an artificial air flow through the radiator.
The sensor is a simple part inside which houses a thermistor. As the temperature changes, it changes its resistance.
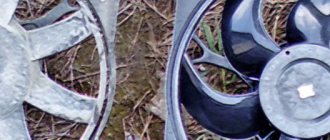
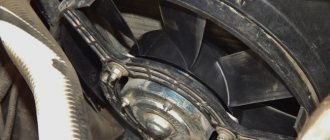
Design of a cooling fan on a Priora
From a constructive point of view, the product is quite simple and consists of the following elements:
- electric drive;
- plastic blades;
- relay responsible for turning on or off;
- connecting wires.
The electric drive is powered by a battery and is activated depending on the coolant temperature.
Causes of failure
Quite often it happens that the cooling fan on a Priora stops working, this may be due to the following reasons:
- The fuse has blown;
- The fan control relay has burned out;
- The fan switch sensor is faulty;
- The motor winding has burned out;
- The fan power connector has come off;
If the engine cooling fan does not work on your car, then you need to examine all possible options for its malfunction, which are indicated above.
Coolant temperature sensor (fan on) and its purpose
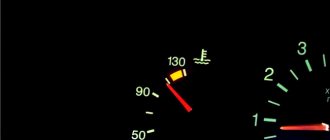
A temperature sensor or DTOZh is a part that is included in the engine cooling system and controls the process of warming it up. This element does not display the corresponding temperature values on the instrument panel, since another device is responsible for this action (temperature sensor on the DUTOZH arrow). DTOZH sends a signal to turn on the fan to cool the radiator (at a temperature of 98 to 107 degrees), through which liquid circulates. That is why such a device is often popularly called a fan sensor. However, its correct name is DTOZH or coolant temperature sensor.
In addition to turning on the fan, the DTOZH on the Priora performs another very important function. It consists of adjusting engine operation by changing the composition of the fuel-air mixture and setting the ignition timing. This is achieved by connecting the sensor to the electronic control unit. A corresponding signal about the engine temperature is sent to the ECU from the DTOZH, and depending on the incoming readings, the engine operation is adjusted. It looks something like this:
- When starting the engine cold, the ECU receives a signal that the engine has not warmed up to operating temperature (i.e., cold).
- The control unit makes a decision on preparing fuel assemblies in a certain proportion. To do this, a signal is sent to the idle speed regulator, which opens the XX valve to the appropriate distance (a certain number of steps), which leads to an increase in crankshaft speed. To quickly warm up the engine, more fuel is supplied through the injectors, and the ignition angle is also adjusted.
- When the coolant temperature rises to a certain value, the engine speed is reduced and the mixture composition is adjusted.
If on carburetor cars only liquid temperature sensors are used to display information on the dashboard, and they do not affect the operation of the engine, then on modern injection engines two types of devices are installed. If the coolant sensor is faulty, the engine will most often start and it will run, but the fuel assemblies are prepared according to average values in emergency mode (the computer, if there is no signal from the DTOZH, takes the temperature of the internal combustion engine as 0 degrees). This also turns on the fan, which cools the liquid in the radiator to eliminate the possibility of overheating the engine (since the ECU does not see the actual engine temperature).
Typical signs of a device malfunction are the following:
- unpredictable operation of the cooling fan. If a break occurs in the electrical circuit, which happens due to damage to the supply wire or sensor contacts, the fan will operate continuously;
- floating speed, since the faulty element gives incorrect signals, as a result of which the ECU will strive to adjust the optimal mixture ratio;
- The Check Engine light comes on, indicating an engine malfunction.
It is important not to confuse the coolant temperature sensor on the Priora with the element that is responsible for displaying information about the temperature of the internal combustion engine on the instrument panel. These are two different sensors that have a similar operating principle, but are responsible for performing different functions. If there is a malfunction of the device that displays the engine temperature value on the instrument panel, the CHECK indicator will not light up.
This is interesting! On the Priora, the DTOZH has two contacts, and there is only one sensor per arrow. The operating principle of the devices is the same, and the only difference between them is that on the DTOZh the resistance is measured between the terminals, and on the pointing device - between the body and the contact.
Scheme VAZ-2170 - VAZ-21728 Lada Priora
Complete information is provided about electrical equipment, wiring, relays and fuses of VAZ-2170 - VAZ-21728 vehicles. The collection is intended for auto electricians and those who, having some knowledge of circuit design, can carry out minor auto repairs with their own hands. The Lada Priora sedan (VAZ-2170) has been produced since 2007, the VAZ-2172 hatchback since 2008, and the VAZ-2171 station wagon has been produced since 2009. In 2013, the car was modernized and they began installing an AMT robotic gearbox (21723, 21728).
There are 4 main harnesses in the Priora electrical circuit:
- from the instrument panel;
- providing motor control;
- front electrical harness;
- rear electrical harness.
All these harnesses are connected to each other using detachable connections. The connectors are located under the dashboard. Each of the harnesses is assigned a serial number.
In addition to the main ones, there are also secondary ones:
- installed in the front passenger door;
- identical in both the left and right rear doors;
- installed in the driver's door;
- connecting the backlight of the license plate;
- connecting the electrical package.
Each element in the diagram corresponds to a number with an explanation. Since all elements are standardized, their designations are identical on car diagrams of all car manufacturers. Next to each electrical appliance, the connectors that go to them are indicated. The pins or sockets of the pads are also numbered.
Lighting control unit diagram
| G, 56b | To the gear motor for adjusting headlights |
| 58b | Output to backlight sources |
| 31 | Mass (ground) |
| Xz | +12 volts (from terminal 15 of the ignition switch) |
| 56 | To the relay for switching high and low headlights |
| 1,3 | From rear and front fog lights |
| 2,4 | To the rear and front fog lamp relays |
| 58 | For lamps of Lada Priora dimensions |
| 30 | +12 V from terminal No. 30 of the ignition switch |
Instrument cluster block diagram
| № | Decoding |
| 1 | Electric power steering |
| 2 | Emergency gang control VAZ-2170 |
| 3 | Connection to oil pressure sensor |
| 4 | Parking brake indicator light |
| 5 | Electronic anti-theft device |
| 6 | Airbag control module |
| 7 | External lighting switch |
| 8 | Right turn signal indicator and doubler |
| 9 | Left turn signal indicator and backup |
| 10 | Engine control unit |
| 11 | Disabling the passenger's front airbag |
| 12 | Seat belt warning light |
| 13 | ABS brake system unit |
| 14 | Steering column switch button |
| 15 | Brake expansion tank indicator |
| 16 | ABS safety control module |
| 17 | Main beam headlight control unit |
| 18 | Shield backlight module |
| 19 | General disadvantage of the device |
| 20 | Constant positive battery terminals |
| 21 | Ignition switch contact |
| 22 | Fuel flow meter |
| 23, 24 | Steering wheel turn switches |
| 25,26 | Overboard temperature sensors |
| 27 | Fuel sensor VAZ-2170 |
| 28 | Speed sensor |
| 29 | Coolant temperature sensor |
| 30 | Tachometer signal |
| 31 | Shield diagnostics |
| 32 | Generator Regulator Relay Terminal |
Electrical connection diagram for heater wiring harness PRIORA 21723
- heater wiring harness block to the front wiring harness block;
- air mixing gearmotor;
- evaporator temperature sensor;
- electric fan 2172;
- speed controller;
- recirculation gearmotor.
Parking system sensor diagram 2172-3724248
DIY fault repair
We will not talk about solving problems such as failure of fuses or the sensor itself. Everything is so simple here - failed elements are removed from their installation locations and replaced with new ones.
Separately, it is necessary to highlight the replacement of the ventilation unit - read about this below:
- So that during the repair process you do not have to dismantle the radiator, do everything carefully, since there is a possibility of damage to other elements.
- Open the hood and disconnect the battery. Remove the air filter.
- Having done this, you can dismantle the radiator grille.
- Next, you will need to unscrew the top mountings of the optics - the right and left lights.
- Using a 10mm wrench (it will be more convenient to take a socket wrench), you will need to remove the upper front panel.
- After these steps are completed, you will need to disconnect the plugs that are connected to the ventilation unit. Having done this, the wires can be twisted a little.
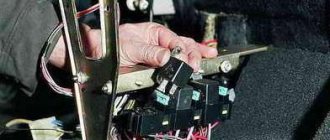
- Next, using a wrench, you will need to unscrew the four screws that secure the device to be replaced. The arrows in the photo indicate the screws that secure the assembly; they will need to be unscrewed.
- Only after the unit is freed will it be necessary to dismantle it and replace it with a new one. After removal, just in case, clean the connectors themselves so that in the future you will not be bothered by the problem of poor contact. Further assembly of the system and installation of all elements is carried out in the reverse order.
1. Remove the air filter.
2. Unscrew the mounting bolts marked with arrows.
Modernization
If you want to improve the operation of your radiator fan on the VAZ 2109, we offer the appropriate instructions.
To upgrade, you will need to install a second sensor and modify the system somewhat.
- The standard power sensor will be responsible for the operation of the fan at maximum speed.
- An additional sensor will include a reduced speed. It is installed at the top of the cooling system.
Now let’s talk more specifically about how to organize all this.
- Take a temperature sensor whose response temperature is similar to the standard regulator.
- Install it in the upper pipe fitting to the radiator.
- To mount the element, you will need a pair of washers and a nut. Be sure to lubricate the washer with sealant to prevent leakage from the installation hole.
- Buy a resistor to install on the stove fan. It has several outputs, so if desired, you can make several operating speeds.
- It is necessary to make an additional control circuit. Through it, less voltage will be supplied to the motor winding.
- The temperature sensor located in the upper part of the cooling system is responsible for turning it on.
- It is better to do control not by plus, but by weight.
- The system will work through a button in the cabin. To the left of the dashboard there is a grille with two plugs. Cut out one of them and set it to turn off on two modes. You can take the heater switch from a VAZ 2107.
- In the first position the low frequency will be switched on, and in the second – the maximum speed.
- One common wire is fed to the minus.
Such modernization is not provided for by the design of the VAZ 2109. These are modifications made by car enthusiasts. Therefore, installing a second sensor is entirely your personal responsibility.
The fan is an important component of the cooling system of VAZ 2109 injection and carburetor engines. If you wish and have time, you can easily replace or repair it yourself.
For owners of classic cars it becomes one of the important problems. In addition to various nuances that lead to overheating, a non-working radiator fan almost always causes boiling on a hot day. Why it may not turn on and how to find the reason, you can learn more about this in this publication.