Circuit diagram for switching on the cooling fan for a VAZ 2110 carburetor engine.
The circuit diagram for switching on the cooling fan of the VAZ 2110 on carburetor and injection cars is different. On cars with a carburetor engine, a thermobimetallic sensor TM-108 is used for this, and on cars with an injection engine, control is carried out by a controller.
When the fan is controlled by a sensor, the switching temperature depends on the sensor setting temperature, which is indicated on the housing. If the fan does not turn on when the temperature rises to the sensor response temperature, you must first check the serviceability of the sensor. To check, just close the contacts on the sensor and if it turns on, you need to change the sensor. If after closing the terminals the fan does not work, then the cooling fan switching circuit and the integrity of the fuse need to be checked.
Electrical circuit malfunctions
If everything is fine with the tank cap and there are no problems with pressure, then the causes of the radiator cooling malfunction should be sought in its electrical circuit.
- The search begins with checking the functionality of the fuse marked F7. To do this, you have to get to the mounting block. Check the quality of the contacts and the presence of traces of oxidation. If everything is good here, we move on. If the contacts are broken, simply clean them, or simply change the fuse. This is a small financial cost.
- The next place to check will be the VAZ 2110 fan switch sensor. You do not have to go to a specialized service station to check the efficiency of the sensor. This is done in a garage: Warm up the engine of your car to above 100 degrees Celsius;
- Turn off the engine, then start the engine again;
- Lift the hood and remove the terminal from the VAZ 2110 fan sensor;
- If after removing the element the fan begins to spin, then the unit is working properly, but there are problems with the sensor;
- When on a VAZ 2110 the cooling system fan does not turn on after disconnecting the terminal, the situation is the opposite - the fan does not work, but the sensor is in good condition.
- The commutator brushes are worn out;
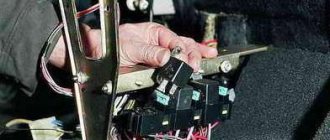
- The trim on the right side of the console inside the cabin is removed by unscrewing two screws;
The fan does not turn on.
But there are malfunctions in which the controller does not recognize the malfunction and the fan may not turn on when the temperature reaches above 105 degrees. C. In this case, to check the circuit and sensor, it is necessary to remove the connector from the temperature sensor while the engine is running. If the circuit is working properly and the sensor is malfunctioning, the fan will turn on and turn off when the connector is returned to its place.
If the circuit malfunctions, it is necessary to check the integrity of the fuse, the serviceability of the relay and wires, according to the circuit. For a quick check, you need to bridge terminals 30 and 87 of the fan relay, located in the heater shaft on the passenger side. If the fan works, without removing the relay from the block, connect the case and pin 86 of the relay with a test lamp, the relay should work and the fan should turn on. In this case, the controller or the wire connecting the relay to pin 46 of the controller is faulty.
If you do not hear the characteristic click of the relay turning on, and a positive signal is supplied from the main relay to pin 85 of the relay, and if there is a click and the fan does not turn on, change the relay. When installing a jumper between pins 30 and 87 does not turn on the fan, check the integrity of the fuse and the presence of power at the fan terminals. If there is power on one terminal and no power on the other, this indicates a possible malfunction of the fan motor.
Scheme for switching on the cooling fan of an injection engine.
admin 09/06/2011
“If you notice an error in the text, please highlight this place with the mouse and press CTRL+ENTER” “If the article was useful to you, share the link to it on social networks”
Design
Cooling system diagram
The cooling system includes many components. Among those that interest us today, which can cause problems with the radiator fan, we note:
- Electric fan. This unit starts working when the coolant temperature reaches 100-105 degrees Celsius;
- Fan switch sensor. It is configured to operate precisely within the specified temperature range. The sensor is located on the inlet pipe of the cylinder block (labeling from the sensor factory is LS0112);
- Fuse marked F7. It is located in the mounting block;
- Fan relay. You will find this unit already in the cabin, under the right panel of the front console.
If the radiator fan does not work on your VAZ 2110, the cause of the malfunction should be looked for in the above-mentioned system elements. Although there may be one situation in which the electrical circuit has nothing to do with the fault.
Stories from our readers
“Fucking basin. "
Hi all! My name is Mikhail, now I’ll tell you a story about how I managed to exchange my two-wheeler for a 2010 Camry. It all started with the fact that I began to be wildly irritated by the breakdowns of the two-wheeler, it seemed like nothing serious was broken, but damn it, there were so many little things that really started to irritate me. This is where the idea arose that it was time to change the car to a foreign car. The choice fell on the melting Camry of the tenth years.
Yes, I had matured morally, but financially I just couldn’t handle it. I’ll say right away that I am against loans and taking a car, especially not a new one, on credit is unreasonable. My salary is 24k a month, so collecting 600-700 thousand is almost impossible for me. I started looking for different ways to make money on the Internet. You can’t imagine how many scams there are, what I haven’t tried: sports betting, network marketing, and even the volcano casino, where I successfully lost about 10 thousand ((The only direction in which it seemed to me that I could make money was currency trading on the stock exchange, they call it Forex. But when I started delving into it, I realized that it was very difficult for me. I continued to dig further and came across binary options. The essence is the same as in Forex, but it’s much easier to understand. I started reading forums, studying trading strategies. I tried it on a demo account, then opened a real account. To be honest, I didn’t manage to start earning money right away, until I understood all the mechanics of options, I lost about 3,000 rubles, but as it turned out, it was a precious experience. Now I earn 5-7 thousand rubles a day. I managed to get the car buy after half a year, but in my opinion this is a good result, and it’s not about the car, my life has changed, I naturally quit my job, I have more free time for myself and my family. You’ll laugh, but I work directly on the phone)) If If you want to change your life like me, then here’s what I advise you to do right now: 1. Register on the site 2. Practice on a Demo account (it’s free). 3. As soon as you get something on the Demo account, top up your REAL ACCOUNT and go to REAL MONEY! I also advise you to download the application to your phone, it’s much more convenient to work from your phone. Download here.
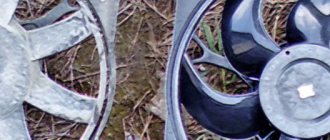
- 2123-1300025 – this fan is installed after the radiator and operates on suction.
It turns out that the fan from the injection Niva needs to be placed in front of the radiator, and the Shnivy – after.
Many people know that it is possible to change the direction of air flow from the fan by inverting the power. Then the fan will blow in the other direction, BUT with less efficiency and more noise, and even with more current consumption.
We identify the cause of the breakdown
First, you need to figure out the reason why the stove fan is not working. There may be several of them.
- A faulty fuse is the most common, simple and most common reason that the motor does not turn. On the one hand, replacing a fuse is not a big and difficult problem, which can be easily handled even by a beginner. But on the other hand, it will be necessary to find the reason why the fuse has become unusable. And to do this, you will need to examine the electrical circuit that ensures the normal operation of the heating system for the presence of a short circuit. Since we are talking about fuses, it would be useful to know that the operation of the stove on the VAZ-2110 depends on fuse F7 with a current strength of 30 amperes. Also, the operation of this fuse determines the illumination of the glove compartment, the functioning of the cigarette lighter, the electric motor from the headlight washer and the heated rear window. If a short circuit is not found in the electrical circuit of the heating system, then the cause will need to be looked for throughout the wiring.
- Problems with the contacts that are located inside the mounting block are a common reason for the VAZ heater motor not working. To identify this problem, you can move the block with the attached harnesses while the car is running. If the VAZ-2110 heater fan starts working, then it is necessary to remove the block and clean the contacts.
A problem with the contacts inside the mounting block is a common reason for a non-working fan.
- A flooded relay may also be one of the reasons why the heater fan does not work. Diagnosing this problem is very simple: the fan will turn on only after the car has warmed up well. In this case, you will need to replace the relay, which is hidden behind the dashboard.
- The heater electric motor can only operate when the third speed is activated. This situation is explained by the nature of the current supply to the fan: at speeds 1 and 2 this process is implemented through a resistor, and at speed 3 - directly. Consequently, if the heating does not work at the first two speeds, then the reason lies precisely in the resistor, which must be replaced.
- The malfunction of the switch can be identified as follows: after removing the center console, start the car, take a large 12-volt light bulb with soldered wires, connect the negative wire from it to the body and touch the second wire to contacts 1, 2 and 3 on the additional resistor. When the light comes on, it indicates that the switch is working properly. But if the light bulb does not light up, then you will need to connect the wire from the light bulb to the positive terminal on the switch. If there is no light on the light bulb, you can talk about an open circuit or a faulty fuse.
A broken fan motor could also be the cause.
- A faulty fan motor is the final cause that can result in a fan not working. Here we can consider three main reasons, the elimination of which may require replacing the motor, cleaning the contacts and replacing the brushes.
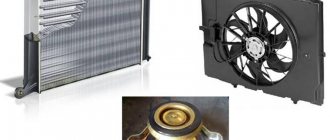
Replacing the cooling fan and radiator on VAZ 2110, VAZ 2111, VAZ 2112
The engine cooling fan plays a very important role, since it cools the radiator, which in turn circulates coolant through the system and all of this together is a cooling system, but the fan sometimes fails, and the radiator sometimes gets punctured by pebbles, which causes it to start Coolant leaks and it needs to be replaced.
We recommend: Replacing the front engine mount of a VAZ 2114
Note! To replace both of these units, you will need to stock up on: Wrenches, as well as a socket wrench, in addition, you will need a small container (it should be wide) into which you will drain the coolant from the radiator of the cooling system, and you will also need a screwdriver!
Where are the radiator and cooling fan located? Both of these units are located in the front of the car, you won’t be able to see them so easily, because they are large and therefore you can only see parts of them, for example, to see the fan you will only need to look under the TV of the car (The TV is its front part on which the headlights, bumper and other parts are located, the wings no longer belong to it) and you will see a fan thanks to which the car’s engine is cooled (For clarity, the fan is indicated by a red arrow, and the air filter housing has already been removed since it is very in the way review), and in order to see the radiator itself, you can also look under the same TV or look through the radiator grill (The radiator will be visible through it).
When do you need to change the radiator and cooling fan? The radiator, as mentioned earlier, needs to be changed when a hole or holes appear on it, which may appear due to a pebble getting into it (this happens through the radiator grille) or due to strong pressure in the cooling system, which may appear due to a valve malfunction in the cap of the expansion tank or in the radiator cap, if these valves or only one valve fails, the pressure in the system increases, and therefore the increased pressure in the expansion tank (Tank cap valve has failed) will ultimately lead to the fact that the tank is in in the literal sense of the word, it will explode, as for the radiator relief valve, it is still located on the same cap (On the radiator cap we mean) and when this valve fails, the pressure in the radiator begins to increase, and therefore it begins to leak from all the cracks of the radiator The fluid and radiator will eventually (if you drive at high pressure for a very long time) become unusable.
Note! To prevent this from happening, change the radiator cap and the expansion tank cap once every year or two, buy these things after making sure that the valve works, and then in the future you will have fewer problems with this! (For information on how to check the functionality of the expansion tank cap valve, see the video below and always remember this thing: the valve must keep the pressure within 1.1 - 1.5 kgf/cm2 and then the cap can be said to be working properly)
A couple more words about the radiator, in fact, you can check whether there are holes in it or not, they are just usually small and it can be quite difficult to notice them, so in order to find them they use a very cunning method, which is as follows: Take the radiator and all the pipes that go from it and on which the hoses are put on are closed with plugs (you can close them with anything, the most important thing is to make the radiator sealed so that no water gets into it) and then lowered into water (in the bath is easiest), after Once the radiator is in the water, figure out how you can pump air into it, after you come up with an idea, supply air to the radiator at a pressure of 2 kgf/cm2 (You can pump this pressure into the radiator with a compressor, or you can try with a regular pump) and after that you will immediately you will see whether there are holes in the radiator or not (If there are, then air bubbles will come out from there), for clarity, how to check the radiator for serviceability, look at the video clip located just below:
Note! If the holes are small, then buying a new radiator does not make any sense, because small holes can be closed, for example, using a special substance that is sold in a car shop and which will need to be moved with coolant, this substance will clog into the hole and thereby prevent the penetration of liquid through it, also a not very large hole in the radiator can be removed by soldering or welding, but we do not recommend that you remove large holes, so in this case it is better to go to an auto store and buy a new radiator!
Connecting the engine cooling fan
- Connecting the engine cooling fan
- 1. Design and purpose of the engine cooling fan
- 2. Installation and connection of the fan
- 3. Refinement of the fan motor switching circuit
We all know that when almost any mechanism operates, a certain amount of heat is generated.
In everyday life, a similar phenomenon can most often be observed when the computer is running, and if it is not cooled in any way, the internal boards along with the contacts will simply melt. To prevent this from happening, the computer design includes a special fan designed to cool heated parts. In the automotive world, the main source of heat for a vehicle is its engine, so the need for its cooling arose almost simultaneously with the creation of this power unit. Initially, the process of evolution of vehicle cooling systems followed two paths, which is why two types of cooling systems are installed on manufactured vehicles: air and liquid (hybrid). Since in both systems the final carrier, designed to dissipate the heat removed from the engine, is air, their design uses one common element - a fan. This device ensures constant and uniform heat removal into the atmosphere, thereby cooling the internal structural elements of a car engine.
Design and purpose of an engine cooling fan
As we have already said, a running engine is a powerful heat emitter, and in order to avoid overheating of the unit itself, this heat must be removed. The solution to this problem relies on various cooling systems.
For example, in a liquid engine cooling system, water or antifreeze is used as the main working element.
The fluid circulates in the cylinder block and in the cylinder head, where it takes heat from the engine, thereby heating itself. Naturally, in order to successfully perform its duties, the coolant must release the heat it receives in order to perform the same function again. This is where the radiator comes into play.
The location of the radiator of the cooling system of a car engine allows it to “catch” flows of incoming air when the car is moving, which significantly accelerates heat transfer, which means the liquid cools faster. However, a car cannot be in motion all the time, therefore, in traffic jams or during long periods of parking, when the vehicle does not move, but its engine continues to work, the heat from the radiator is removed much worse, which often causes overheating of the engine with all the ensuing consequences. This result can also be obtained due to the vehicle moving at low speeds, especially on a hot summer day.
The fan located in front of the radiator prevents such situations and provides the engine with the necessary cooling.
It turns on when the car is idle for a long time with the engine running, when the temperature in the cooling system becomes critical. The fan disperses the heat by passing the necessary air flow through the radiator, thereby dissipating the heat into the atmosphere.
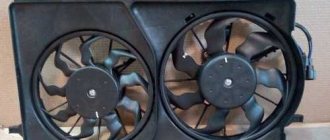
Despite the importance of such a device, it has a fairly simple design and usually consists of three main elements: an impeller (usually has four blades, but there may be more), a casing and a fan drive .
The fan drive, which ensures its rotation, can be of three types (on one machine, of course, only one of them is installed): mechanical, hydromechanical or electric.
The simplest option is a mechanical fan drive, in which rotation is transmitted from the crankshaft via a belt drive. But in this case, the fan always rotates when the engine is running, which in some situations (for example, when starting a cold engine) causes extremely negative consequences. Therefore, this cooling method is no longer used on cars produced today.
A hydromechanical drive is considered more advanced, which uses a hydraulic or viscous coupling for operation.
In the hydraulic version of this element, torque is transmitted or disconnected from the crankshaft by changing the amount of lubricating fluid.
In a viscous coupling, silicone liquid is used for this purpose, and its viscosity depends on temperature indicators, the change of which gives the command to turn the fan drive on or off. To date, both species have not found widespread distribution, which is why they can be seen infrequently.
The most advanced, and at the same time, relatively simple type of fan drive is an electric drive , which sets the fan in motion using a simple electric motor connected to the vehicle's electrical system. Thanks to an electromechanical (used on older car models) and electronic (used on new) control system, a fan equipped with an electric drive can turn on and off when the temperature of the coolant changes. It can also rotate at different speeds under different operating modes of the vehicle’s power unit.
Nowadays, fans equipped with an electric drive type are most widely used, and this state of affairs is unlikely to change in the near future.
Installation and connection of the fan
Considering that cars are equipped with fans in normal mode, re-installation may only be necessary during repair work, that is, after replacing broken parts of an old part or when installing a new device. In addition, some car enthusiasts install an additional fan, which, in their opinion, can help better solve the problem of engine cooling.
Let's consider the option of installing an electrically driven fan in a situation where a part is completely replaced. So, in order to install a new device, you will first have to dismantle the old one. To do this, take a suitable socket wrench and slightly loosen the electric fan mounting bolts from below. Then, using the same key, unscrew the bolts securing the radiator tube that connects it to the air conditioning system (if, of course, such is provided for by the design of the car) and move it to the side.
Next, unscrew the upper and lower (already loosened) bolts securing the old fan, tilt it back a little and remove the part from the engine compartment. Now you need to disconnect the wiring harness from the fan casing. To do this, simply remove the wire harness from the clips located on the casing. While holding the impeller from rotating (you can use any convenient method), unscrew the nut securing it to the electric motor with a socket wrench, then, freeing it from the connection with the casing, simply remove it.
Installation of the new part is carried out in the reverse order, and most often the electric fan is replaced assembled with a new casing. Note! When installing the impeller on the axis of the electric motor, you need to align the groove located on the axis of the electric motor with the protrusion located on the hub of the impeller.
The fan can be connected in several ways: for example, through the ignition switch or through the coolant temperature sensor. In these cases, it should turn on when the ignition is turned on and when the antifreeze temperature is above 90 ° C, and the shutdown occurs either due to a decrease in the temperature of the specified fluid or when the ignition is turned off. Also, in parallel with the temperature sensor, some car owners recommend installing an additional switch (toggle switch), with which you can activate the fan at the driver’s request. If the temperature sensor breaks down, such an addition will help you get to the repair site without any problems, and in hot weather it will provide the opportunity to cool the engine in conditions of forced downtime with the engine running.
Refinement of the fan motor switching circuit
Many responsible car enthusiasts can spend hours in the garage, trying not only to fix existing problems, but also to prevent the occurrence of new problems through various improvements and modifications.
The main goal of refining the electric fan switching circuit is to be able to force the fan to turn on and then operate stable, regardless of the position of the key in the ignition switch or the temperature of the cooling fluid. There are several ways to complete this task. Let's give an example of some of them. The first method is the most ideologically correct and least expensive. In this case, to force the engine cooling fan to turn on, it is enough to short-circuit one of the contacts of the black box to the housing, and when the radiator fan is activated, a “plus” should appear on the other contact of the black box.
The switch can be placed in any convenient place, for example, instead of the headlight washers or heated front seat switches.
The second method is more labor-intensive and expensive, but at the same time much more beautiful and elegant than the first. To implement it, at the initial stage it will be necessary to remove the instrument cluster cover, and a new fan switch relay, which has a special bracket for mounting the device, can be placed in the passenger compartment or in the engine compartment, but in the cabin it will probably be a little more convenient. Running wires into the interior is not a problem, and you can use the rubber plug for the headlight range control to complete the task. The “CHECK ENGINE” control lamp of the gearbox is perfect for the role of a light indicator for turning on the fan , and a diode soldered between them will help protect the contacts of the switching sensor from electromotive force (EMF).
To ensure that the circuits of the electric motor and the windings of its relay are protected by a fuse, a jumper is installed in the black box between the contacts, the material for which can be, for example, two male terminals and a piece of thick copper wire. Upon completion of work, all contacts should be treated with special lubricant.
In addition, when performing such modifications, it would be useful to clean and lubricate the fan motor, and if you also replace the standard impeller with four blades with a part with eight blades, then the air flow passing through the radiator will increase significantly, which means the cooling quality should improve.
We briefly described only two options for refining the circuit for switching on an electric radiator fan, but this is far from a final figure, because everything depends on the imagination of the car owner and the capabilities of his vehicle.
Subscribe to our feeds on social networks such as Facebook, Vkontakte, Instagram, Pinterest, Yandex Zen, Twitter and Telegram: all the most interesting automotive events collected in one place.
How to check the thermostat
The function of the thermostat in an internal combustion engine is to regulate the flow of coolant, directing it in either a small or large circle. While the engine is cold, its valve blocks the flow of coolant into the cooling radiator. This allows the engine to warm up faster.
When the coolant warms up, the thermostat valve opens, directing it to the radiator for cooling. If the valve jams, the coolant constantly moves in a small circle, not reaching either the fan switch sensor or the temperature sensor. In this case, the liquid may even boil, but the sensors, being uninvolved in such a circuit, will not work.
Check the thermostat by determining the temperature of its pipes by touch. When the engine is warm, they should all be hot. If the pipe leading from the thermostat to the cooling radiator is cold, the locking device is faulty.
Fan operation temperature VAZ 2112
Probably, many have noticed that the fan switching temperature on the latest generation VAZ 2110 -2112 engines (100-105 C) is too high compared to the normal operating temperature of the engine (85-90 C).
First of all, this introduction is connected with the manufacturer’s struggle for cleaner exhaust from the pipe of your car (requirements of modern Euro 3 standards and higher). At this temperature, more complete combustion of the fuel and its components occurs.
But it should be noted that, as always, a given positive side for one aspect brings something negative for another. So, with a slight, but still overheating of the engine and head, irreversible physicochemical processes occur in the metal, which ultimately affects the overall final operation of the engine hours of the power unit. Apart from the fact that in the event of a failure of the electrical components that affect the fan’s activation, the time to notice this at an elevated standard switching temperature of 105 C to overheating of 125 C will be significantly less than from normal operating temperature to overheating. So it depends on people... let’s say it turns on at different temperatures... it’s 100 or 110 degrees) I don’t deny that the instrument panel itself may be lying) but I think it’s better to play it safe and make a chip tuning to turn on the fan, let’s say 98 degrees or stupidly remove the button to the fan)
PROBLEM SOLVED) I SCREWED THE ADDITIONAL MOUNT FROM THE GENERATOR TO THE BODY) AND EVERYTHING FOUND INTO PLACE) THERE IS NO LONGER VOLTAGE DROPS))) AND ON THE INSTRUMENT PANEL, THE FAN ACTIVITY INSTRUMENT BEGAN TO SHOW 98 AS IT SHOULD BE)
Many motorists, when operating the 16-valve VAZ-2112 engine, encountered the fact that the engine simply boiled. This is due to the engine overheating. What is the operating (normal) engine temperature? In this article, we will consider what temperature should be in the power unit and its systems, as well as the reasons and methods for solving an increase in this indicator.
Fan replacement
If the problem still lies in the fan itself, then it would be best to replace it with a new one. The stove fan can, of course, be repaired, but this may involve, for example, replacing the brushes. It simply doesn’t make sense to carry out more comprehensive repairs, since you can’t hope for long-term service for such a part. Replacing a VAZ-2110 stove fan requires selecting a new part. There are two options here: find an old-style part or buy a new spare part. The second option is more acceptable and accessible.
VAZ stove fan
The replacement process is not as complicated as it might seem. It is enough to be able to work with standard tools, have free time and have the desire to tinker with your own machine. To replace a faulty fan, you must follow the following work plan:
- Open the hood and remove the battery negative terminal.
- We remove the windshield wipers by prying and dismantling the rubber caps. Using a 10mm wrench, unscrew the nuts and remove the brushes.
- Using a slotted screwdriver, pry up the decorative plugs, unscrew the screws on the frill and the nuts on the edges. Now we can remove the frill.
- Under the rubber seal you can find screws that hold the shield from the engine compartment. We also unscrew them.
- We dismantle the hose through which washer fluid is supplied to the injectors.
The process of replacing a fan is not as complicated as it seems
- On the right side of the engine compartment, there are two nuts on the bottom side that fit a 10mm socket wrench. They are difficult to get to, but you don’t have to unscrew them all the way, because with a few turns the shield can be easily removed.
- It is necessary to remove the clamps from the hose that connects to the vacuum booster of the brake system in advance.
- There are four self-tapping screws on the cabin filter cover; after unscrewing them, you can easily remove it.
- Already at this stage the outlines of the stove motor are visible. But you will also need to disconnect the block on the heating system motor and on the resistor.
- After the work has been done, it becomes possible to dismantle the left side of the stove along with the motor.
- A new part is installed in place of the damaged element, and assembly is carried out in the reverse order.
If you have never had to remove a heating system fan before, this process may take several hours. But in the future, any problem with the heating system can be fixed much faster. Even if something doesn’t work out for you during your work, you don’t need to stop trying to achieve a positive result. Over time, everything will definitely work out.
Stove fan
Structurally, the fan consists of a DC electric motor with a commutator-brush assembly and an impeller mounted on the electric rotor. motor. The electric motor is powered from the vehicle’s on-board network. There are several modes of fan operation, the difference between which comes down only to the rotor rotation speed, and this is realized by inserting a resistor into the power supply circuit of the electric motor.
The fan operating mode is set using a handle located in the heater control unit on the center console. Initially, on the VAZ-2110, this handle was part of the design of the SAUO controller, but functioned separately from the controller itself. Later, the ACS added an automatic fan control function (position “A” on the handle), using which the controller regulates the rotation speed of the electric motor in order to maintain the set temperature.
The electric motor used in the design of the VAZ-2110 fan is simple, but it has “weak points” - the commutator-brush assembly and bearings. Wear of these elements causes incorrect operation and complete inoperability of the fan. Short circuits and winding breaks in the stove drive are rare, but don’t forget about these breakdowns either.
Symptoms of failure. Heater components that affect fan operation
Signs of a malfunctioning stove fan are quite obvious and impossible not to notice. Common symptoms of failure:
- Increased noise, grinding noise during operation.
- Significant reduction in air injection efficiency.
- The fan does not turn on.
- Spontaneous change in the rotation speed of the electric motor.
- It can be determined by ear that the electric motor is operating under heavy load.
In some cases, such consequences result from malfunctions in the power supply and fan control circuits, so you should check them first. This applies to:
- fuse (blowout is the cause of complete failure of the electric motor);
- resistor (if it is faulty, some speed modes of the electric motor stop working);
- controller (the knob for switching fan modes is part of its design, so malfunctions of the automatic control system affect the functioning of the electric motor);
- wiring terminals of the power and control circuits (oxidation, damage to wires is one of the reasons for a malfunctioning electric fan).
If diagnostics of these elements shows that they are in good working order, it is necessary to dismantle and repair the fan itself. But it can be diagnosed first.
Fan check
A check is done by directly powering the electric motor from the battery (we lay wires from the battery terminals and connect them to the power terminals of the motor) - operation under load, difficulty in gaining rotation speed, squeals and squeaks indicate wear of the drive components and the need to replace them. But if, even with direct voltage supply, the electric motor does not start, it is most likely that it has burned out or the windings have broken. Such faults are difficult to fix and it is easier to replace the entire unit.
Design features of the stove of the old and new models
The design of the electric motor of the stove on the VAZ-2110 is identical, but the fans and their location are different. On models of the first years of production, the electric fan is installed in the stove housing in front of the radiator and it is located horizontally (old-style stoves). Afterwards, the design was revised - the fan was already placed in the cabin filter housing and installed vertically (new model heaters).
Despite the design features, dismantling the fan is a simple operation and does not require complete disassembly of the stove.
On a VAZ-2110 with an old-style heater, to remove the electric fan you need to:
- Dismantle the frill.
- Remove the front wall of the niche in which the heater is located.
- Remove the back cover of the fan housing by first unscrewing the screws and removing the clamps.
- Disconnect the wiring from the fan and remove it.
As for models with a new type of stove, the technology for removing the electric stove fan on such cars is different:
- dismantle the “jabot” and the front wall;
- remove the air filter;
- unscrew the fastening of the filter housing to the stove body and separate them;
- disconnect the wiring;
- remove the filter housing together with the fan;
- dismantle the electric fan.
We recommend: Removing the front door trim of the Lada Granta with your own hands
After removing the electric motor with the impeller, we disassemble it, perform troubleshooting, replace worn elements and put it back together.
VAZ 2110 engine operating temperature
Normal operating temperature of internal combustion engine: +90. +95, if above +97 then the internal combustion engine will be slightly dulled, but this t is also considered normal, up to +110 is also normal, but the radiator fan should already turn on. If t is below +90, this is not overheating. We look at the thermoelement for grinding into the thermostat cover (so that when closed it does not etch into a large circle) and the serviceability of the thermoelement itself by boiling it in the thermostat cover. If the lower pipe is cold, this is not a fact that it does not poison the large circle.
I purchased a 6-hole thermostat assembled, sealed, with an Quality Control Department stamp, t 85, PRAMO, for 505 rubles. I also had a thermocouple from a viburnum, also at t 85, lying around for a long time. ___________________________________________
Kalinovsky thermoelement: ___________________________________________________
Thermostat with thermocouple: ___________________________________________________
I boiled both thermoelements in this one housing of the new thermostat, the result:
1. Thermoelement from viburnum: opened slightly at +92 (began to let water through at atmospheric pressure) at 96 opened slightly by 5 mm +100 opened by 8-9 mm diluted the water to +83 - almost instantaneous slamming.
2. Stock thermocouple Pramo: opened slightly at exactly +85 and went at atm. pressure +86 hole mm 2-3 +88 hole approximately mm 5 diluted the water to +83 - it slows down for about a minute.
Now do you understand why your operating temperature in winter is +88 and below?
There was a thermoelement left from the new PRAMO thermostat, which turned out to be a little longer (rod) and did not fit tightly into the cover of the Priora thermostat. The cover of the Priorov thermostat was drilled out a little and the thermoelement sat tightly, now it is not blown through. (before these actions I thought about it, I didn’t sit down by two mm)
via FTP video 5:52, 24.4 MB _______________________________________________________________
And now the sea trials of the Kalina thermoelement with the Pramo cover:
In weather -15, VideoAdded t coolant on the move, t air in the driver's compartment, t air flow at the carrier's feet (16.6 MB)
Via FTP, 16.6 MB ________________________________________________________________
Warming up from a cold start, with on. stove, -16 on the street, -15 coolant, -15 in the cabin, at XX, 24 minutes: here is the video, 63.4 MB:
Warming up from a cold start, with off. stove, -19 on the street, -18 coolant, -17 in the cabin, at XX, 23 minutes: here is the video, 30.4 MB:
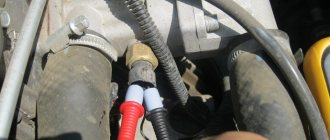
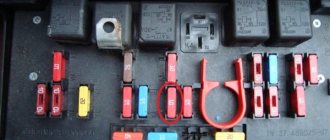
Where is the fan relay located?
4 – electric fan relay; 5 – electric fuel pump relay; 6 – main relay (ignition relay).
Attention: the order of the relays and fuses can be arbitrary, we are guided by the color of the wires. Therefore, we find a relay from which comes a thin pink with a black stripe wire coming from the main relay (pin 85*) (not to be confused with the thin, red with a black stripe wire coming from the controller) and a thick power white with a black stripe wire (pin 87) (white and pink wires we need), this is the fan relay.