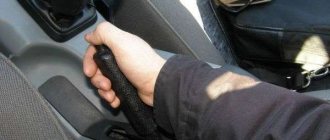
Since ancient times, a brake pressure regulator has been installed on Soviet cars; in colloquial language it is called a sorcerer. This small invention serves to distribute the braking force of the wheels, although it is not for nothing that it was nicknamed the sorcerer because of its unpredictability. If the sorcerer is not working properly, when braking, the car may skid to the side or the brakes may not be effective. Incorrect braking can also be caused by incorrect settings of the sorcerer. The front wheels always start braking, and then the rear ones, but the transition delay time depends on the sorcerer.
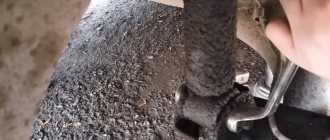
To properly configure the sorcerer, load the rear of the car halfway, that is, as much as you usually carry, including passengers, divide in half. We climb into the inspection hole and, using any object two millimeters thick, create a gap between the plate and the sorcerer.
The sorcerer may be faulty due to souring of the rod or internal blockage; it is better not to delay repairs, because faulty brakes are dangerous!!!
When replacing the sorcerer, only the rear brake cylinders need to be bled. To bleed the brakes, unscrew the nipple (not completely) from the inside of the wheel, ask an assistant to press the brake pedal, and bleed air from the system. We press the brake pedal with three long presses and on the fourth press we press the pedal, at this time we loosen the nipple and then tighten it again.
You can remove the sorcerer at your own risk, but at the same time you will have an even distribution of braking force on all four wheels, which will need to be taken into account when braking. The sorcerer can be replaced with a tee (2101-3506091), or bypassed using two brake hoses from a VAZ 2108.
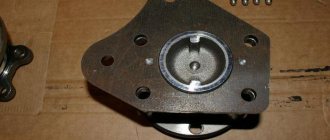
Pinout of sorcerer tubes
:
1. Highway
2. Right wheel
3. Left wheel
4. Highway
When hooking up brake hoses from a VAZ 2108, you just need to connect 1 and 2, 3 and 4. Using a tee, we combine 4 and 1 and hook up 2.3 into the tee.
Personally, I do not recommend removing the sorcerer, and if it is not working properly, then it is better to simply replace it with a new one.
Replacing the brake pressure regulator on VAZ 2108, VAZ 2109, VAZ 21099
Welcome! Today you will read detailed instructions on how to replace the sorcerer on cars of the Samara family. The first question you ask yourself will sound like this: “What kind of sorcerer, I was looking for instructions for replacing the pressure regulator?” We will explain everything to you in order. The so-called name “Sorcerer” came from the people, and “Brake Pressure Regulator” is its real name.
Note! To replace the pressure regulator, you will need the following tools: First, be sure to stock up on a screwdriver and a small set of basic wrenches. And also for the convenience of unscrewing some nuts, you can stock up on an extension cord with a union head!
- Replacing the brake pressure regulator
- To remove the regulator together with the bracket
- To remove the regulator without bracket
- Disassembling the brake pressure regulator
- Additional video clip
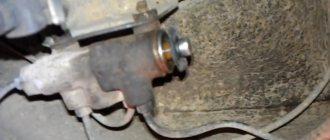
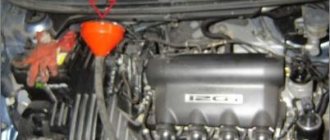
Where is the brake pressure regulator located? The pressure regulator is located on the left side of the body compartment, closer to the rear wheel. But to find it you will need to know what it looks like, if you still don’t understand what it looks like, then look at the very first photo at the top of the article. If you already know what it looks like, then look at the bottom photo where the red arrow indicates its location.
When should you change your brake pressure regulator? The regulator must be replaced if:
Its breakdowns can be very easily identified. Usually, with a faulty regulator, when braking sharply, the car skids, which can be very life-threatening if you are driving on the highway.
Note! With a working regulator, when braking sharply, the car does not go anywhere, that is, it brakes strictly in a straight line, but there is one “But!” The pressure regulator only works when, when braking, the nose of the car goes down and its rear part rises. Otherwise, the sorcerer will not work!
Replacing the brake pressure regulator:
Note! It is recommended to replace a faulty sorcerer with a new assembled one!
Removal: 1) First you will need to drive your car into the inspection hole.
2) Next, use a screwdriver to slightly lift up the bracket of the lever earring; for clarity, it is indicated by a red arrow.
3) Then remove the lever from the hole in the shackle and, as a result, remove the shackle bracket from the lever.
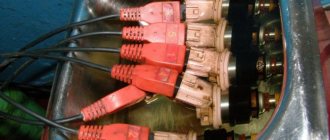
4) Then, using a wrench, unscrew the fittings of all pipes connected to the pressure regulator.
Note! Before unscrewing them, be sure to mark which tube goes where. If you have not done this, then when installing a new sorcerer, watch the video at the very bottom, which describes the correct connection of the tubes!
5) And after unscrewing the fittings, disconnect the brake hose tubes from the regulator.
Note! It is best to plug the holes in the brake pipes with something, because otherwise fluid will leak from the hydraulic drive of the system!
To remove the regulator together with the bracket: 1) Using an extension with a union head, unscrew the two nuts that secure the bracket to the body and then remove it together with the regulator.
To remove the regulator without a bracket: 1) Using a wrench, unscrew the two bolts that secure the sorcerer body to the bracket and then remove the regulator separately.
Installation: 1) Installation of a new brake pressure regulator is carried out in the reverse order of removal.
Note! To connect the tubes to the regulator, use the video located at the bottom of the article!
After final installation of the regulator, be sure to bleed the brake system! (How to bleed the brakes, see the article: “Bleeding the brakes on a VAZ”)
And finally, adjust the regulator drive! (For how to adjust the regulator, see the article “Adjusting the rear brake pressure regulator”)
Disassembling the brake pressure regulator:
Disassembly is carried out only to replace individual parts, but as mentioned above, it is best to replace the sorcerer as an assembly and not individually.
1) First, remove the drive arms and bracket from the regulator.
2) Next, taking the bracket in your hands, use a wrench to unscrew the bolt that secures the latch.
Note! After unscrewing the bolt, remove the clamp that holds the elastic lever!
3) Finally, disconnect both drive levers from each other.
Additional video: Don’t know where to screw the brake pipes onto the sorcerer? If not, then watch a video specially prepared for you, in which everything is indicated and explained in detail.
Vaz-Russia.ru
Brake pedal sensor
The brake pedal sensor on Lada cars is involved not only in sending a braking signal to the car's brake lights, but also in regulating the air-fuel mixture.
As you know, vehicle emission standards are becoming stricter every year and manufacturers are forced to adhere to these criteria in order to bring their products to market.
The brake pedal sensor (BPS) is involved in the formation of the fuel mixture only on Lada cars equipped with the E-GAZ system. If in a car the accelerator pedal is driven by a cable, then the sensor is responsible only for turning on the brake lights when you press the gas pedal.
If there is a malfunction or incorrect adjustment of this sensor, the car will operate in emergency mode, which will be indicated by the “check engine” lamp and error number “P0504” will appear.
This article will discuss malfunctions of the brake sensor on Lada Granta cars, as well as its replacement and adjustment.
About the sensor
The DPT is a conventional “frog with two contacts” for making and breaking. There are no complicated electrical circuits in its design.
One of the contacts, which works to close, when you press the brake pedal, lights up the brake lights, which in turn signal the cars behind to brake.
The second contact, which opens when the brake pedal is pressed, opens its contacts and thereby sends a signal to the ECU to remove the load from the engine. This is necessary to reduce the fuel supply during braking, that is, driving at high speeds (above idle) and when you press the brake pedal, the car begins to stop, and at this time the sensor sends a signal to the ECU to reduce the fuel supply through the injectors to reduce speed and exhaust emissions in atmosphere.
The sensor is located on the pedal assembly under the steering column of the car, mounted on a plate with two nuts, and they are also used for adjustment and control tightening.
The cost of the sensor in an auto parts store is up to 300 rubles.
Causes of malfunction and their consequences
If there is an external or internal breakdown of the sensor on the Granta dashboard, the “Check Engine” will light up with error “P0504”. This error indicates a malfunction of the DPT.
Symptoms of a problem
- The car starts poorly and immediately stalls;
- The idle speed fluctuates;
- The motor does not develop the required power;
- Jerks when moving;
Reasons for failure
The main cause of DPT failure is the spring, which returns the sensor contacts to their original position. If the spring breaks, the contacts do not return and remain in the final position, thereby the ECU continues to receive a signal that the car is braking and thus does not allow it to develop the necessary speed to complete the maneuver.
Broken spring
A less common breakdown is the failure of the sensor housing, since the sensor is made of plastic, when removing or replacing it it is easy to damage it, which can harm its design and operating mechanisms.
And the last reason is carbon deposits on the contacts. When the sensor is used for a long time, electrical deposits appear on its contacts, which soon leads to a poor connection between the moving contact and the fixed one.
Carbon deposits on contacts
Before purchasing a new sensor, it is necessary to diagnose the DPT. It happens that the sensor nuts are unscrewed due to vibration and thus its adjustment is disrupted, which can result in an error on the dashboard.
Check sequence:
Check the connector contacts, make sure the connector has not come off the sensor;
Press the brake pedal by hand and release, make sure that the sensor stop returns to its original position, thereby confirming that the return mechanism spring is working.
Check the adjustment and tightening of the locknuts; with the brake pedal free, there should be a distance of no more than 0.5-1 mm from the sensor stop to the housing.
If any of these points are not met, you must begin replacing and adjusting the brake pedal sensor on the Lada Granta.
The main task of regulators and the physics of braking
Why is the brake pedal on a VAZ 2110 tight?
The adhesion force of a car wheel to the road surface, like the friction force, is proportional to vertical loads. The proportionality coefficient is considered to be the coefficient of the tire's level of adhesion to the road. This value does not depend on the person in any way. It can be determined based on the condition of the road and tires. The higher the adhesion of the wheel to the asphalt surface during braking, the less will be And since when the pads operate, inertia also acts on the car, the vertical load on the wheels is redistributed. Therefore, the force on the disk should be uneven. The brake force regulator is also used to improve braking efficiency when the machine is not loaded. In this case, the traction force will be completely different than in the case of a loaded car.
"Chevrolet Niva"
“Chevrolet-Niva” “Chevrolet-Niva”
Third condition - we reduce the influence of the regulator, increasing the gap from the original one by 8 mm, that is, we set it to 24 mm. When there are two people in the car, the braking distance remains virtually unchanged - 34.3 m. However, now the rear wheels are blocked. But at full load the braking is very effective, the deceleration is easy to control and the result is a record: only 30.8 m!
- In the normal position of the regulator, as the vehicle's weight increases, its braking distance decreases - this affects the more complete use of the traction weight by the rear wheels.
- The best braking is at full load, when the regulator minimally limits the pressure in the rear brakes.
- However, at partial load this can lead to skidding. The high center of gravity and short wheelbase of the Shnivy contribute to a significant redistribution of mass during braking, therefore, at partial load, the contribution of the rear axle to braking is small.
Replacing the sorcerer on a VAZ 2114
Reasons for VAZ 2110 battery discharge
Dismantling and reinstalling a non-working device does not cause significant problems and is accessible to almost anyone. The automaker recommends replacing the faulty regulator assembly. To carry out the work you will need:
- flat screwdriver;
- key to 13;
- 10mm socket for removing brake pipes.
The replacement sequence is as follows:
- We provide convenient access to the rear of the car's underbody (we use a lift, pit, or overpass).
- We find the regulator drive lever. We lift the bracket up and release it. If difficulties arise, use a screwdriver to slightly release the bracket.
- Remove the earring bracket.
- Now we disconnect the four tubes from the body of the product. To do this, you need to loosen and unscrew the fastening nuts. To prevent brake fluid from leaking, plug (seal) the holes of all pipes. In the future, in order not to confuse the connections to the regulator, we mark the 4 pipes with different colors or numbers.
- We unscrew the front bolt of the sorcerer (with which it is attached to the bracket).
- From the side of the bracket, unscrew another bolt.
- Remove the complete device (together with the drive).
- After replacing the product, installation is carried out in the reverse order.
Please note that after reinstallation, the earring fastening bracket must be crimped with pliers. In addition, it is necessary to bleed the brake system and adjust the device for proper operation.
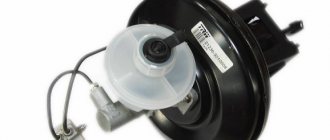
The feasibility of installing a vacuum brake booster
The vacuum booster dramatically improves the driving comfort of the VAZ 2108. It reduces the pedal effort required to stop the car. All modern cars are equipped with a vacuum booster. Domestic and imported. Nowadays, it is impossible to imagine a car without a vacuum brake booster.
The amplifier is aggregated with the master brake cylinder and is mounted on a shield separating the engine compartment from the interior of the VAZ 2108. It is connected to the engine crankcase with a flexible hose to supply rarefied air necessary for the operation of the amplifier. A malfunction of the amplifier is clearly indicated by a noticeable increase in the force on the brake pedal. Braking acceleration decreases.
Continuing your trip with a broken amplifier is very risky.
You can drive to the nearest car service center with caution. A cracked hose can be wrapped with several layers of electrical tape. If replacing a cracked hose and check valve does not produce results, the unit must be replaced
If replacing the cracked hose and check valve does not produce results, the unit must be replaced.
Work on removing the amplifier is carried out in this order.
- Disconnect the negative battery terminal. De-energize the electrical system.
- Disconnect the wiring block from the hydraulic reservoir cap located on the brake master cylinder body.
- From the passenger compartment, remove the amplifier pusher pin using pliers. Disconnect the pusher.
- Disconnect the hose going to the engine crankcase.
- Unscrew the two nuts securing the brake master cylinder.
- Move the cylinder away from the amplifier housing. Leave it hanging from the metal hydraulic pipes.
- Unscrew the four nuts securing the amplifier bracket to the engine shield and carefully remove the amplifier.
- Unscrew the two nuts securing the amplifier to the bracket. Disconnect the bracket and amplifier.
Install the new VAZ 2108 vacuum booster in the reverse order.
How to adjust the sorcerer on a VAZ 2114
Do-it-yourself replacement of rear brake pads on a VAZ-2110
To correctly distribute workloads between front and rear drives, it is necessary to manually adjust the operation of the device. The adjustment principle is as follows. The preliminary gap between the end of the piston and the plate is from two to three millimeters, but in your case this parameter must be determined “experimentally”. To make more precise adjustments, you need to move the regulator along the bracket.
The clearance parameters are selected depending on the behavior of the wheels in each specific case. For example: - There is no skidding of the rear wheels - we reduce the gap. — When triggered early (skidding), we increase the distance.
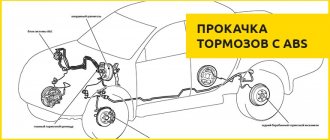
ABS
The coefficient of adhesion between wheels and the road depends on the degree of their sliding, which varies from 0 (pure rolling of the wheel) to 100% (complete slipping or sliding when the wheels are locked). The maximum values of the coefficient of adhesion of the order of 10... 30% (depending on the road surface) will be when the wheels slip. Consequently, with this coefficient and degree of wheel slip, the greatest efficiency and safety of braking can be ensured. This is exactly what ABS provides.
All modern ABS are self-adjusting automatic systems. They include:
- wheel speed sensors
- electronic decision block
- pressure modulators
When ABS is operating, the signal from the wheel angular speed sensors is fed to an electronic decision unit, in which, in accordance with a given program, control signals are generated and sent to the modulator.
Rice. Diagram of the pneumatic ABS modulator (a) and its characteristics (b): 1, 5, 6 - valves; 2, 3 - electromagnets; 4 - piston; A—D—cavities; p—pressure; t — time
The figure shows a diagram of the pneumatic ABS modulator and its characteristics (change in braking force over time). ABS operation is accompanied by a multi-cycle process of automatically releasing and braking the vehicle's wheels. In each cycle there are phases of automatic release of the brakes, “holding” and braking (dashed lines in Fig. b) of the wheels. There are ABS in which a two-phase cycle is carried out (there is no “holding” phase). ABS operation ensures the required angular speed of the wheel and its sliding, corresponding to maximum traction characteristics.
Regulator device
It should be said that the “sorcerer” is not installed on cars equipped with an ABS system. It precedes this system and also helps to prevent the rear wheels from locking up when braking to some extent.
As for the location of the regulator, in passenger cars it is located in the rear of the body, on the left or right side of the bottom. The device is connected to the rear axle beam using a rod and a torsion lever. The latter acts on the regulator piston. The regulator input is connected to the master brake cylinder, and the output is connected to the rear brake cylinders.
Structurally, in passenger cars, the “sorcerer” consists of the following elements:
- frame
- pistons
- valves
The body is divided into two cavities. The first is connected to the GTZ, the second – to the rear brakes. During emergency braking and tilting the front of the car, pistons and valves block the access of brake fluid to the rear brake wheel cylinders.
Thus, the regulator automatically controls and distributes the braking force on the wheels of the rear axle. This depends on the change in axial load. Also, the automatic “sorcerer” helps speed up the unlocking of the wheels.
"LADA KALINA"
We set the regulator so that the rear is slightly late in locking the wheels. With this setting and partial load, the car needed only 27 m to stop. Fully loaded - 29.5 m. There are slight difficulties in preventing the front wheels from skidding. We reduce the gap in the regulator to zero - the half-empty Kalina stops after 31.8 m. The braking distance increases by 4.8 m, accompanied by a sharp blocking of the front wheels. The loaded one slows down after 35.2 m, the deterioration is even greater - 5.7 m! The pedal effort is increased and the brakes become noticeably hot.
Now we move the adjuster so that the rear brakes work as efficiently as possible. At partial load, the rear wheels suddenly lock and the car drifts off course—you have to release the pedal. On the verge of blocking it is very difficult to brake. The result is 30 m, which is 3 m worse than the “norm”. Full load gave a result of 26.9 m, which is 2.6 m better than the base (29.5 m). There are no comments regarding deceleration control. At the basic position of the regulator, the braking distance increases with increasing load. At partial load the spread of results is 4.8 m, so the base position is most effective. When you deviate from it in any direction, the braking distance increases.
- On a fully loaded vehicle, depending on the position of the regulator, the spread of the braking distance is 8.3 m.
- The best results, as on the Niva, come with increasing pressure in the rear brakes.
- However, on a slippery road, even in smooth turns, early locking of the rear wheels is possible, leading to a skid.
- And at partial load, with the regulator position different from the base one, the braking distance only increases.
How to regulate RTS
If we take VAZ cars, then the adjustment of the brake force regulator greatly depends on the position of the body. The adjustment must be performed not only during each maintenance, but also when replacing suspension parts - springs or shock absorbers, after repair work on the rear beam and when replacing it. To set up, the car must be placed on an overpass. This is done not only for ease of operation, but also to install the suspension in a balanced position. In this state, when you press on the trunk with your hands, the car will rock two or three times. So, to set up, you first need to loosen the fasteners to the bracket. It is necessary to achieve a gap of 2 mm between the elastic plate against which the rod rests and the lever. This is done by moving the mechanism.
It must be taken into account that in the process you will have to overcome the resistance of the spring. They are quite large, so it is recommended to use a special tool or other suitable device. Then the bolts are tightened and the gaps are checked using a feeler gauge. If there is no such tool, then you can use a drill with a diameter of 2 mm or a suitable coin.
Regulator device on KamAZ vehicles
This unit consists of a valve, a valve pusher along with an actuator. The device also has a piston with an inclined rib. There is also a membrane that is in connection with the piston. There are connecting tubes inside the housing. Through the latter, air flows under the piston, which ensures smooth operation of the system at the moment the valve closes. The adjuster channels attach to the top of the faucet, and a second channel connects to the brake chambers on the rear wheels. The third output works with the atmosphere. When the car slows down, air supplied from the top of the brake valve to the first channel of the regulator moves the piston down, and on the other side it is compressed until it stops. The valve is pressed against the pusher seat and the second channel at this moment is more connected to the atmosphere. Further movement of the piston will then cause the valve to open. Air from the first channel will flow into the second, and then to the brake chambers. The MAZ brake force regulator has an almost similar device and principle of operation.
rav />Neoline CUBEX V50 DVR review – reviews and features
Neoline CUBEX V50 is a fairly expensive DVR that boasts good characteristics and positive user reviews. First of all, you need to pay attention to the type of mounting - the bracket is designed in such a way that it is very easy for the driver to rotate the camera in the vertical and horizontal plane. If you need to quickly remove the camera and capture what is happening on the street, this can be achieved by simply turning the DVR to the side.
A 3-megapixel camera in combination with a powerful Ambarella processor provides good picture quality with a viewing angle of 130 degrees diagonally, that is, not only the roadway, but also the side of the road is captured in the frame. Video recording is cyclic, carried out in small fragments from two to five minutes, even if the power is turned off, the last file will be recorded to the end. In order not to press the buttons on the device body again, you can set the Autostop mode, and the recording will stop as soon as the motor is stopped.
To ensure that all moments are displayed on the video, and the most important recordings are not erased after the memory card is full, there is a G-sensor that can be turned on or off at your discretion. However, a common problem with DVRs on CIS roads is that the shock sensor is too sensitive; it even perceives collisions with bumps or holes as a danger and saves these files in a separate folder, which can only be cleared after removing the memory card.
It’s nice to have a GPS module and the ability to receive GLONASS signals, thanks to which the video displays not only the video sequence itself, but also a map of the route, the speed on a particular section of the route, stamps of the license plates of the cars that were included in the frame, the time and date of recording. In addition, there is still access to the X-COP police radar database. This database includes all stationary installations on the roads of Russia and Belarus; updates occur every two weeks and can be downloaded for free on the manufacturer’s website – Neoline.
“>
Operating principle of the regulator
As a result of the driver sharply pressing the brake pedal, the car “bites” and the rear part of the body rises. In this case, the front part, on the contrary, lowers. It is at this moment that the brake force regulator begins to work.
If the rear wheels start braking at the same time as the front wheels, there is a high probability of the car skidding. If the rear axle wheels slow down later than the front axle, then the risk of skidding will be minimal.
Thus, when the car brakes, the distance between the bottom and the rear beam increases. The lever releases the regulator piston, which shuts off the fluid line going to the rear wheels. As a result, the wheels do not lock, but continue to rotate.
"CHEVROLE-NIVA"
By the way, before testing tires on cars without ABS, each time we slightly adjust the regulator taking into account the road condition (snow, ice, asphalt), ensuring that the rear wheels lock a little later than the front ones. Let's not break tradition. Our Shniva found the gap between the cheeks of the regulator to be 16 mm, which was adjusted using a stop screw.
Several brakings, and the braking distance from 80 km/h for a car with a partial load is determined: 34.4 m. With a full load... 33.6! Almost a meter shorter! At the same time, the driver noted a heavier pedal and rapid heating of the brakes, which required cooling before each measurement. Let’s remember these parameters and make adjustments to the “sorcerer” adjustment. First, let's reduce the gap to 8 mm. Now the regulator significantly limits the pressure in the rear brakes, transferring almost all the hard work to the front ones.
Braking has become more difficult, keeping the front wheels from skidding is not so easy - they lock very sharply and the car, naturally, loses control. However, the result, to our surprise, is the same as in the basic version: 34.4 m. At full load, you have to press the pedal much harder, the front brakes begin to overheat. The result is 37.8 m. This is 4.2 m more than with the basic adjustment (33.6 m).
Sorcerer VAZ 2114 operating principle
The sorcerer comes into operation in situations of sharp braking, when the car “nods off”, and the rear part, on the contrary, rises. In this situation, the device temporarily stops the supply of brake fluid to the rear wheels, thereby preventing them from blocking at the same time as the front ones. As a result, the car does not skid. In other words, the device redistributes the braking forces at the required moment. If the sorcerer malfunctions, there is a risk of sending the car into a skid or even overturning during an emergency stop.
How to check the operation of the regulator
To test the operation, at least two people will be required (driver and observer). The driver needs to accelerate in an unloaded car on a flat section of the road up to 60 kilometers per hour, and then brake sharply. At this time, the observer should check the operation of the rear wheels (whether they are locked together with the front ones or continue to spin when the brake is pressed). If the rear wheels lock immediately or continue to spin without responding to the brake pedal, the sorcerer is faulty.
Integrated Active Safety Systems (ISAB)
Currently, domestic integrated active safety systems (ISAB) have been developed, forming a complex of ABS and PBS.
Unlike ABS, the traction control system installed in ISAE ensures the required wheel movement not in braking mode (as when ABS is operating), but in traction mode. The fact is that when the car moves, including when maneuvering on a road with different adhesion properties of the surface areas interacting with the drive wheel, different slipping occurs. This can lead to a loss of motion stability, for example, when accelerating a car, when excessive traction may be supplied to the wheels, unbalanced by the traction capabilities of the “wheel-road” pair. The action of PBS, unlike ABS, is based on the fact that in the event of slipping of the vehicle’s drive wheel, the system provides a reduction in traction force on this wheel. This prevents wheel slipping and increases vehicle stability. As a rule, the operation of the PBS is based on reducing the fuel supply to the engine, i.e. comes down to reducing the traction force on the slipping wheel(s).
The principle of operation of a brake caliper and why it is needed at all
Welcome! A brake caliper is essentially a very necessary thing, since practically no car can do without it, because the brake caliper does the most basic work during braking, but not all people know how it works and what will happen if it doesn’t installed on the car, that’s what we’ll look at today.
Note! At the end, in addition to this article, there is an interesting video clip that shows the entire principle of operation of the brake system!
What is a caliper for and what is its operating principle?
In short, it is needed so that the car slows down when you press the brake pedal and if it is not there, as was said earlier, the car will not stop at all, since the main work of braking is performed by this particular caliper.
Well, if we talk in more detail and, in addition to all this, delve into the principle of its operation, then this very principle of its operation is as follows: when you press the brake pedal, pressure occurs in the brake system, namely the piston which is located in the master brake cylinder ( This cylinder is indicated by the number 3), moves from the beginning of this cylinder to the end, thereby still collecting a little brake fluid that is in the brake reservoir (indicated by the number 5), squeezing the brake fluid forward, it goes through the hoses and thereby squeezes out the pistons that are in the caliper itself, and these pistons press on the brake pads and the car stops.
Let's look at it in more detail, for this let's first look at what this main brake cylinder is, and it represents a structure inside which there is that same piston as well as a rod that presses on it, so when you have to stop the car, you press accordingly on the brake pedal, after pressing the rod will also mix forward, thereby the piston that sits on this rod will mix, and after mixing, all the brake fluid will be pushed forward, as it were, and it will go all the way to the working cylinders themselves, which we will talk about a little lower.
Note! Let us tell you right away so that you understand one thing, this brake fluid is not compressible, so if something does not press on it, it will also press on other parts of the brake system and at the same time it will not compress!
Now the fluid will press from one end, onto all working cylinders to which hoses are connected (Hoses that are connected to the working cylinders are indicated by numbers 2 and 4 in the photo above, which shows a diagram of the brakes of a VAZ 2110 car), so after the brake fluid is the working cylinder is filled, the piston which is located in this cylinder will be squeezed out and thereby put pressure on the brake pad, and the brake pad at this moment will compress the brake disc and therefore friction will occur which stops the car.
And in conclusion, let’s note why a car needs a brake reservoir, namely, thanks to the brake reservoir, which contains the fluid itself and maintains the normal level of this fluid in the system, to understand more, look at the photo located just below:
Where is the brake caliper located?
On many cars it is different, sometimes this caliper is located in the front part of the car, and sometimes in the front and rear at the same time, and on some cars (Mainly on old ones) there were usually no brake calipers at all, and instead of them ordinary drum brakes were used , and these brakes heat up very quickly and therefore the effectiveness of their braking after constantly pressing the brake pedal (Especially in hot weather) greatly decreased and thus the number of accidents was not small.
Note! On domestically produced cars (VAZ), in most cases, the brake caliper is located only at the front of the car, and the rear wheels are equipped with conventional brake drums! (By the way, if you are interested and want to know how brake pads for disc and drum brakes work, then read an interesting article entitled: “What are brake pads and how not to run into a fake?”, everything is described in detail there)
Links! How to replace the front brake caliper - on a classic? How to replace the caliper on a VAZ 2108-VAZ 21099?
Additional video clip: You can learn more about how the brake system works in an interesting video clip located just below:
https://youtube.com/watch?v=Av-jj8NNrv8
Vaz-Russia.ru
Chevrolet Niva car diagram
Cars of the Chevrolet Niva family represent a further development of the concept of domestic comfortable SUVs, which began with the VAZ-2121 Niva car. They differ from their predecessors in modern design, increased comfort and more advanced design.
VAZ-2123 (Chevrolet Niva) and its modifications are all-terrain passenger cars with a monocoque station wagon body, produced by the GM-AVTOVAZ joint venture. The number of doors is five, the number of seats is five for the L and GLS modifications or four for the LX and GLX modifications.
The engine is located longitudinally in front. The transmission is made according to the scheme of permanent all-wheel drive with a locking center differential and a range of multipliers. The front suspension is independent lever-spring, the rear suspension is dependent spring.
Also interesting: Which is better to choose Chevrolet Niva or Renault Duster
The front wheel brakes are disc, the rear wheels are drum brakes, and the LX and GLX versions are equipped with an anti-lock braking system (ABS). The ZF power steering is equipped with a steering column position adjustment device.
Chevrolet Niva cars of the 2005 model year are available in the following trim levels.
25 January 2022 LadaOnline 55 777
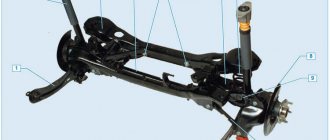
The Niva 4x4 SUV has a hydraulic, dual-circuit braking system. One circuit is connected to the brake cylinders of the front and rear wheels, and the other only to the front ones. This scheme allows you to maintain vehicle braking even if one of the circuits fails.
1 – master cylinder reservoir; 2 – main cylinder; 3 – front brake circuit pipeline; 4 – front and rear brake circuit pipeline; 5 – front wheel brake mechanism; 6 – vacuum booster; 7 – parking brake lever; 8 – brake pedal; 9 – front parking brake cable;
The front brakes of the Niva 4x4 are disc brakes with a three-piston floating caliper. The upper piston operates from one circuit (together with the rear wheels), the two lower ones - from another. Brake discs are cast iron. The minimum permissible thickness of discs is 9.5 mm, pads - 1.5 mm.
The rear brakes are drum brakes (aluminum, with cast iron rings), with two piston cylinders. The nominal inner diameter of the drum is 250 mm, the permissible diameter is 251 mm.