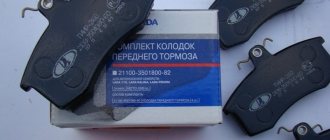
In head optics, low beam lamps most often have to be replaced. For a Lada Kalina car, the low beam lamp is a halogen lamp with an “H7” socket, the power of which is 55 watts (no more). Osram bulbs may come from the factory, but others will do. After replacement, the filament will occupy a new position, and the headlight adjustment may be lost. So, checking the settings, and, if necessary, adjusting the headlights is carried out immediately after replacing the lamps, which on the Lada Kalina is done without dismantling the headlight unit.
Step-by-step replacement instructions
Each H7 standard bulb has an iron base, which is pressed to the headlamp with a wire clamp. To bend this bracket, just get close to the plane of the headlight from behind. Let's open the hood and see what exactly will bother us.
Engine compartment of Kalina-2 (VAZ-2192, 2194)
Behind the headlight on the right is a washer reservoir. It is dismantled like this: disconnect the electric motor terminals, tighten the plug harder, find one nut and one fastening bolt. The fastening elements are unscrewed with a 10mm wrench, then the tank is placed on the engine. Next we could look at how to remove the headlight on Kalina-2, but in this case this is not required.
Before performing any manipulations with electrical equipment, always disconnect the negative terminal of the battery. It is better to connect this terminal last (before closing the hood). Be careful.
Replacement sequence:
- Remove the rubber cover covering the low beam lamp compartment;
- Disconnect both terminals from the lamp contacts;
- The fastening bracket is removed from the grooves by first pressing on it, then the bracket is moved to the side;
- They take out the lamp, install a new one in its place, and return the bracket to its place.
Next, perform steps “2” and “1” in reverse order. The connection diagram is not important - there are only two contacts, and both go to the filament. Now, if we connected LEDs, then everything would look more complicated.
The bracket presses the cartridge to the plane of the headlight
When installing a halogen light source, you must remember: the surface of the lamp glass must be perfectly clean. Do not allow grease marks to remain on the flask. Installation is carried out using only cotton gloves. The glass of the flask is cleaned with industrial alcohol or Secunda.
Rules for adjusting light
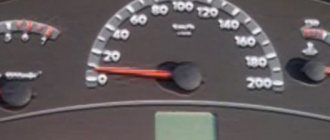
After installing the headlight, you need to adjust the luminous flux. You can do this yourself or by contacting a specialist. When making adjustments yourself, you should direct the light from the headlight to the wall with the markings. There should be 5 meters between the car and the wall.
We measure the distance from the ground to the car headlight (H), draw a vertical line on the wall parallel to the center of the car, then draw a horizontal line equal to the height H+10 cm. Set the Kalina headlight adjustment switch to position 0 and turn on the lamps. Using the adjustment screws, we adjust the luminous flux as shown in the figure.
Replacing a headlight on a Kalina with a little skill and patience is a simple process, although it takes several hours. Basic recommendations: put screws and bolts in one place to prevent their loss, check the functionality of the lamps before assembly, do not be nervous.
Question and answer: what should not be allowed under any circumstances
Q: What happens if you buy lamps with a base other than “H7”?
A: It will not be possible to install lamps in a standard headlight.
Q: If I use more than 55 watts of power, will this cause overheating?
A: Excessive power leads to the fact that the fuse in the low beam lamp circuit burns out. A separate fuse is used for each of the lamps, so it will not be possible to “deceive” the automation.
Q: Are halogens afraid of power surges?
A: For incandescent lamps, excess voltage is a harmful factor. In the case of using halogen lamps, there will be two harmful factors: overheating, underheating. Actually, this is why MTBF can be considered a relative rather than an absolute value. This value depends, and depends strongly, on the stability of the voltage.
Possible problems and methods for solving them
The fact that the Lada Kalina headlights stop working is due to many factors that the driver cannot influence. These are exposure to moisture, metal fatigue, and a combination of minor deformations that have appeared over years of operation. The most common problem that owners of this car face is the breakdown of the high or low beam.
A similar nuisance can occur while driving. Driving such a car in the dark is unsafe and can endanger the health of the driver, passengers and pedestrians. It is advisable to repair the breakdown immediately, in the field. Fortunately, in most cases the problem is resolved within 10 minutes.
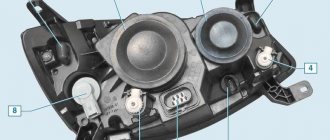
Headlight design for Lada Kalina
Headlight unit installed on a car
Like most new generation cars, VAZ 1117-1119 models are equipped with headlights of a simple design . Let's look at what elements are included in this node:
- Outer glass that protects the light bulbs and prevents water and dirt from getting inside.
- A plastic case to which all the main elements are attached.
- The rubber seal between the glass and the body provides good water and dirt resistance.
- Lamps for signaling turns, as well as low and high beam.
- There is a plastic reflector installed inside the case, which has a mirror surface and reflects the light of the bulbs.
Each headlight unit is equipped with light bulbs, which are well, one might say tightly, fixed in the housing, which ensures their resistance to vibration.
Headlight diagram with explanation
Dismantling and repair
In the event of a minor traffic accident, when the headlight housing is not damaged, only the glass can be replaced. To do this you will have to dismantle the element. How to do it?
- Remove the front bumper.
- Disconnect the connectors of the wires supplying power to the headlight.
- Unscrew the lower fasteners.
Unscrew the lower headlight mount
Unscrew the top fastenings of the headlight unit
After installing the headlight in place, be sure to re-adjust it so as not to blind oncoming traffic and not “shine into the milk.”
Glass repair will take a maximum of half an hour.
We take out the headlight towards ourselves
So, let's move on to the sequence of actions.
- Carefully remove the rubber seal.
- As practice shows, it is glued and to dismantle it you will have to cut through it with a thin knife.
- When the glass and the body are separated, it is necessary to clean off the old seal and glue residues.
Disconnecting the headlight housing and glass
The repair has been completed and the headlight can be installed in the reverse order.
Other causes of breakdowns
The reasons for the loss of light may be a broken wire, loose contact of connectors, breakdown of controls, etc. If the problem cannot be visually detected, it is recommended to test the wiring to identify network breaks. Calling did not bring results - contact an auto electrician. Neglecting the problem can aggravate the situation and lead to breakdown of other electrical elements in the network, then repairs will cost much more.
Kalina's headlight glass may fog up, which leads to a decrease in light brightness. If frequent fogging is observed, there is a high probability of depressurization of the headlight housing. It is recommended to remove it and thoroughly coat the joints with sealant.
Bi-xenon installation
With their own hands, car enthusiasts can install bilens into the lighting device. The first step will be acquiring the necessary elements. Attention should be paid only to those products that can easily fit into the cavity of the Kalina headlight. For example, if you buy a G-5 kit, you will have to cut the lenses.
Work begins with dismantling and disassembling the headlight. Then, using a file, they cut the seat in the shape of a cone, due to which the lens will fit into the body by about a centimeter. It is necessary to remove the cap so that it does not block the flow of light, and then mount the lens in the prepared place. The element is secured using factory fasteners.
After installing the lenses, the car owner needs to stop by the stand to adjust the luminous flux and position of the lamps in accordance with the current GOST.
DIY car repair and maintenance
This is us showing the top where the bumper is attached, also four self-tapping screws for a shaped screwdriver - everything is convenient and fast.
2 self-tapping screws - all for a shaped screwdriver - are located at the bottom of the amplifier.
There are two 10mm bolts at the bottom on both sides of the radiator frame, as we can see, they are marked with red circles - we unscrew everything very conveniently here with a curly screwdriver.
And here there are two ten-point bolts, and one self-tapping screw, the same thing for a figured screwdriver, attached to the wing, since everything is sufficiently provided for, no great intelligence is required.
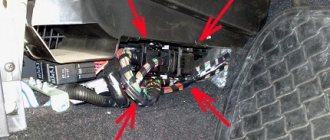
Fuse blown
To fix the problem, you need to replace the part. It is necessary to open the block in which all Kalina's electrical fuses are concentrated and find the blown one. It is worth using a location diagram if a person does not know where the right one is located. Finding and changing the fuse is a matter of two minutes.
Are fuses blowing at an unenviable rate? It makes sense to test the car's wiring yourself or seek help from a professional electrician. If the fog light has disappeared, the solution to the problem is similar.
Fuse block diagram for Lada Kalina
Angel eyes
Aesthetic appearance, attractive design and functionality – these are the distinctive features of this type of tuning. It was first introduced on BMW cars. Such an improvement can be carried out on Kalina. To create the effect you will need:
- transparent plastic rod;
- pliers, wire cutters or metal saw;
- construction hair dryer;
- soldering iron;
- insulating tape;
- 220 Ohm resistors;
- 3.5-volt LEDs (4 pcs.);
- wires and connectors.
First you need to choose the length of the rod. This can be done by measuring the circumference of the illuminator with a thread or using the formula 3.14xD, where D is the diameter of the headlight. The rod needs to be heated with a hair dryer or boiled so that it becomes soft. Next, you should select a tin can or other round container, the diameter of which coincides with the diameter of the headlight. Wrap the rod around this container so that it takes the shape of a circle.
Now you need to solder the resistors to the LED legs. Only 4 LEDs are required (2 for each headlight). When soldering, polarity must be observed, otherwise the homemade product will not work. After this, connect the element to the power source. If the diodes light up, it means everything was done correctly.
The third stage is cutting. The circumference of the rod must be evenly cut, the depth of which does not exceed 1/3 of the diameter of the thickness of the rod. This is necessary for the formation of radiant light.
Next comes the installation of homemade angel eyes in the headlight. The rod must be positioned so that the diodes are not conspicuous. The rings do not require fasteners - they are pressed against the glass.
The Lada Kalina headlights have a fairly simple structure, and if necessary, any car owner can carry out their own repairs. Maintenance and timely troubleshooting are the key to long-term operation of the machine’s lighting equipment.
Which optics is better to choose
While using the machine, the lights are subject to sudden temperature changes, impacts from stones and small grains of sand. These factors negatively affect glass, reducing its transparency, worsening light characteristics.
High-quality headlights that meet safety requirements are installed from the factory. Unofficial replacements are equipped with xenon lenses, “angel eyes” and modified reflector geometry. These lights look beautiful, but wear out faster due to poor quality materials and can fog up in humid weather.
When choosing new optics, it is better to trust the official ones. When purchasing, it is important to clarify the modification of the body and the year of manufacture of Kalina. Depending on the configuration, there are darkened masks or improved lighting characteristics.
Depending on the body type, Kalina has different parts installed:
- sedan, hatchback – standard optics;
- sport, station wagon - are equipped with a more elongated reflector with an increased area to increase the lighting area by 20%.
To connect improved optics to Kalina, you do not need to lay additional wires or change contact connectors. The optics are no different in mounting points and shape.
When purchasing flashlights, you should pay attention to original parts with improved performance. This will improve the characteristics of the beam without interfering with the wiring or altering the standard fasteners.
When buying new PTFs, it is better to choose from original parts. Standard lights are equipped with durable glass and a high-quality reflector that directs the beam in accordance with GOST.
Fog lights for Kalina are produced by:
- Bosch;
- "Kirzhach".
The models differ in the shape of the glass, but there is no difference in quality. The headlights are connected to the standard wiring and installed in the mounts on the bumper. There are no fog lights in the basic trim levels. To connect them, you will have to additionally purchase a button for the interior, a PTF relay, and remove the bumper plugs.
In stores you can find modernized flashlights with lenses for gas-discharge lamps or LED modules. Such products are not certified for use in Kalina because they do not meet transport safety requirements. For such parts you can receive a fine and an order to eliminate the malfunction within 10 working days.
Useful tips
The main and fog headlights are often configured according to a single scheme, although these options have their own characteristics and require an individual approach. For independent adjustments, the help of a second person is desirable and a level surface is required.
Marking a wall is not fun, it is mandatory. Without markings, it is virtually impossible to make precise adjustments. At the end, be sure to check the adjustment screws on the optics.
Sometimes problems in Kalina are caused by the light module - it’s worth checking it
Disassembling lanterns
To disassemble headlights of any brand on a Lada, you will need:
- hair dryer (household or industrial);
- flat screwdriver;
- stationery knife.
To separate glass or polycarbonate, you will need to remove the material's fastening brackets. After this, heat the sealant that holds the glass or polycarbonate in place with a hairdryer. Next, the softened sealant can be cut off. This makes it possible to remove the glass with a flat screwdriver.
Author: Baranov Vitaly Petrovich
Education: secondary specialized. Specialty: car mechanic. Professional diagnostics, repair, maintenance of passenger cars of foreign production 2000-2015. Extensive experience working with Japanese and German cars.
4 comments
- Makar says:
I'm interested in the design of the headlights - I had to disassemble them, but I couldn't find any latches. I recently got a car - I’m a newbie, I went to the forum, and they laughed at me. Tell me how to disassemble them - are there screws or clamps? And where are they located?Emin says:
There are no screws or fasteners - they are glued together with sealant. So it's no surprise that you didn't find the latch.
Makar says:
How to take them apart then? Pry with a knife or screwdriver? Won't I break it?
- Ekaterina says:
Good afternoon. Heat the connecting seam with a hairdryer, pry it with a screwdriver and separate the body - the sealant will warm up and it will be easy for you to separate the halves.