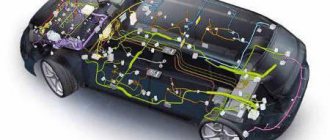
A modern car is a high-tech device. Just look under the hood and under the panel: sensors, wires, control units and other electronics are installed everywhere. The more expensive and presentable the car, the more it is stuffed with all kinds of equipment. As a rule, the more electronics there are, the more problems there are with this.
In any car, and the Lada Kalina is no exception, the electronics are controlled by a small box - an electronic control unit, or simply an ECU.
Design and purpose of the Lada Kalina ECU
The electronic control unit is also called a controller. Its main task is to collect information from all sensors, process it and then issue appropriate commands to the executive nodes. The ECU is an element of the on-board network; it continuously exchanges data with other systems, for example, APS (traction control system), automatic transmission (automatic transmission), security system, air conditioning system, etc.
The controller is a visually small chip, but its structure is quite complex. The ECU has several types of memory:
- PROM. Contains all executive control circuits and is responsible for fixing commands in accordance with a certain sequence. This memory contains calibration data or a standard for setting up the operation of all processes depending on the power and type of power plant, as well as other parameters (weight, transmission, etc.). The EPROM does not depend on external power sources; even if the on-board network is completely de-energized, all information will be saved.
- RAM. Memory, which is completely dependent on the on-board power supply, if this condition is violated, all information is deleted. As a rule, these are diagnostic codes and data necessary for the ECU to carry out calculations.
- EPROM is an electrical programmable memory device. Immobilizer combination codes are stored here. If this data is not in memory, starting the engine will not be possible. The system does not depend on power, information is saved permanently.
The controller is a multifunctional device. It not only controls the operation of the engine, but also protects the car from unauthorized access.
How to remove the brains of a Priora?
To replace the electronic control unit, you will need a Phillips screwdriver.
- Disconnect the wire from the negative terminal of the battery.
- Remove the right floor tunnel lining.
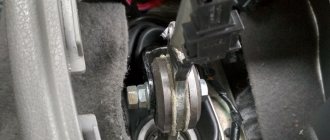
- Grasp the two protrusions and slide the retaining bracket along the plane of the connector until it stops.
- Disconnect the block with wires from the ECU.
Interesting materials:
How does the internal energy of a body change when it heats up and cools down? How is height measured? How to measure distance without a ruler? How to measure body temperature with a smartphone? How to measure the temperature in the refrigerator compartment? How to measure stress level MI Band 5? How was lipstick invented? How was the Magnifying Glass invented? How was lipstick invented? How do Catholics respond to Christ is Risen?
Location of the ECU in Lada Kalina
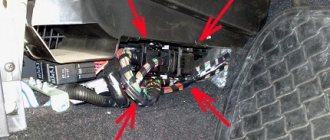
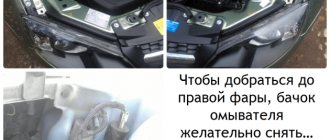
The electronic control unit is located under the center console on the driver's side. To access it, just remove the protective panel. It is worth noting that the location for the ECM was chosen very poorly. The ECU under the console often fills with coolant, because the heater radiator and hoses are in close proximity. Therefore, many motorists strive to move it to a safer place as soon as possible.
Location
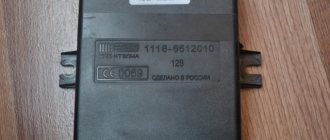
The ECU on the Lada Kalina is located under the center console of the car. You can see it by removing the side cover of the front passenger's footwell air duct. The block is attached to a bolted connection and securely fixed in its place. The connectors of the unit are also tightly inserted into their place and secured with a special lock, which prevents the connector from spontaneously disconnecting from the ECU.
It is quite difficult to call this location of the engine control unit successful, since it is located exactly under the heater radiator and if there are leaks in the heater radiator, the coolant gets directly onto the engine block, which causes irreversible consequences and, of course, a breakdown or short circuit.
In some cases, there is a coolant leak at the ECU, it can be repaired, but most often it is necessary to replace the unit.
How does the ECU work?
The data that comes from sensors contains various characteristics. For example, a mass air flow sensor (MAF) collects and transmits data on the volume of air entering the system - the more air the engine consumes, the higher its dynamic characteristics. If the indicators are overestimated, this will inevitably lead to increased fuel consumption. The ECU on the Lada Kalina is able to track such deviations and report a malfunction to the owner, although it will continue to issue commands based on incorrect data.
The controller collects information about the following processes:
- position of the crankshaft and camshaft;
- incoming air temperature;
- error reset;
- vehicle speed;
- amplitude of body vibrations;
- on-board network voltage;
- coolant temperature;
- content of impurities in exhaust gases.
The ECU also transmits data about throttle position, fuel consumption, ignition angle and much more.
Diagnostics using equipment
Error number “4” that appears during self-diagnosis of Lada Kalina
If you check your car for errors using special equipment, then, as stated above, the combinations will be four-digit, and the code will be preceded by a letter.
First, let's look at what the letters and numbers mean.
- B - indicates a malfunction of the body, that is, we are talking about airbags, central locking, electric windows. Of course, this is true for Lada Kalina cars equipped with these devices;
- C - means an error in the operation of the chassis;
- P - indicates a malfunction in the functioning of the engine or automatic transmission.
What does the second number mean:
- 0 – common code for OBD-II;
- 1 – number of the car manufacturer;
- 2 – number of the car manufacturer;
- 3 – reserve code.
The third symbol directly indicates the type of malfunction:
- 1 – malfunction of the fuel system or air supply;
- 2 – malfunctions in the fuel system or air supply are also reported;
- 3 – malfunctions in the ignition system were detected;
- 4 – auxiliary control;
- 5 – malfunctions in idle speed;
- 6 – malfunction of the ECU or its circuit;
- 7 and 8 – errors in the operation of the transmission system.
Check Engine Light - starts flashing on the dashboard when any problems occur
| Code | Decoding |
| P0036 | Errors reported. It is recommended to check the device for operability, and also check the circuit for opens and short circuits. |
| P0102 | This error code tells the driver about a malfunction in the mass air flow sensor. It's also worth checking the chain. |
| P0441 | Incorrect air flow through the canister purge valve was detected. You should check the valve itself, as well as the entire gasoline vapor recovery system. |
| P0444 | The control unit registered a break in the wiring of the canister purge valve. The circuit should be checked. |
| P0445 | The on-board computer reports a short circuit in the control wiring to ground or the on-board circuit. |
| P0480 | A broken fan relay wiring has been detected. This code can also directly indicate a relay failure. |
| P0504 | A problem has been reported with the brake pedal sensor. |
| P0830 | Malfunctions have been reported in the operation of the clutch switch. It is necessary to diagnose the clutch and identify the breakdown. |
| P2187 | Literally means: the fuel supply system is too lean at idle. Here, first you need to adjust the idle speed. If this does not help, then look for the problem in the fuel supply system itself. |
| P1115 | Incorrect data was recorded in the operation of the oxygen level control sensor. The circuit should be checked. |
| P1123 | In idle mode, the on-board computer registered a too high combustible mixture index. |
| P1124 | At idle, the on-board computer reported that the fuel mixture was too low. |
| P1127, P1128 | The control unit reports too high or too low a fuel mixture indicator in partial engine load mode. |
| P1135 | The Lada Kalina control unit has detected a short circuit or an open circuit in the heater circuit of the oxygen level control sensor. |
| P1136, P1137 | The fuel mixture level is too high or low in low load mode. The internal combustion engine should be checked. |
| P1141 | The on-board computer detected malfunctions in the functioning of the heating device of the oxygen level control sensor. |
How to clear/reset the Check Engine error on Lada Kalina cars - this question often worries owners of VAZ cars. The fact is that most Lada owners have encountered such a problem when, for no apparent reason, the “chek” error lights up.
New Lada: Kalina drives jerkily, jerks when moving slowly (solved) - 2 answers
Here many people immediately panic. Don't worry, there's nothing wrong with it. Firstly, this error appears when any sensor fails.
Secondly, this error appears when the wrong mixture enters the combustion chamber. This can happen in two cases: some sensor is not working correctly, or low-quality gasoline. Try using higher quality fuel the next time you fill up.
Main malfunctions and their causes
There are not many problems with the ECU. Basically, controller failure occurs due to a power surge in the network. Other possible system problems:
- The device often fails due to mechanical damage. For example, the device received a strong blow or prolonged vibrations were observed, which caused cracks to appear on the soldered contacts and in other places.
- The controller overheats due to strong temperature changes. For example, in winter, some motorists start the engine at high speeds, trying to ensure it starts, which results in overheating of the ECM.
- Corrosion. Oddly enough, rust appears on the module due to frequent changes in air temperature and, as a result, the occurrence of large amounts of condensation.
- Depressurization. For this reason, moisture gets inside, which leads to failure of the device.
- Lack of communication with the control unit. Occurs after interference in the control system from the outside. This often happens when they try to “smoke” another car with a dead battery from one car. It is possible that while the engine is running the battery terminals are reset or the polarity is incorrect when connecting (the terminals are reversed). Less often, lack of communication occurs due to the starter starting without connecting power to it.
If the device fails for some reason, repair or replacement should be carried out only after comprehensive diagnostics have been performed. The nature of the malfunction may indicate problems associated with the functioning of other systems. If they are not corrected in a timely manner, repairing or replacing the module with a new one will lead to repeated failure.
How much does a new ECU cost? What block is on Kalina? Interchangeability.
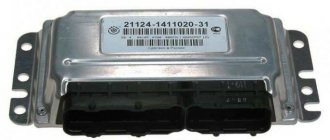
The first thing you always want to know after a car part fails is how much the same new one costs to replace it. And after the electronic unit breaks down, you want to know this even more, since every car enthusiast understands that doing this is far from cheap. So, depending on the store and model, the price of the Lada Kalina ECU ranges from 5,000 rubles to 8,500 rubles. On the secondary market, this price starts from 1000 rubles and up to 3500 rubles. What is the reason for such a range of prices, you ask. Let me explain. Different cars have the brains of different manufacturers (M73, January, Bosch). So, for some reason, a Bosch ECU costs on average 3,000 rubles more than its analogues. How this is explained is not clear. But avid chip tuners say that it is no better than its counterparts. The only difference is that with the brains from Bosch, the car consumes 0.5 liters of gasoline less, but at the same time it drives a little dumber. My personal opinion is that it is not reasonable to overpay 3,000 rubles for an effect that may not exist. Therefore, if you have a Bosch unit and the price for it is about 8 thousand, then you need to look for an analogue. I'll tell you how to do this below.
I will give a table of interchangeability of Kalina ECU
. This data was not verified by me personally, but by one authoritative master. The interchangeability of these blocks applies only to blocks with factory firmware (that is, after installation there is no need to reflash the block for your engine and sensors). So, in each line there is a block marking, firmware version and toxicity class. Bosch 21114-1411020-40 with B104CR01(02) Euro3 software (in my cases it was this one) can be replaced with: Bosch 21114-1411020-40 with B102CQ05(CR06) Euro3 software; Bosch 11183-1411020-02 with software B101CR01(02) Euro2. There is one peculiarity here. If your car has an air conditioner, then the firmware version must be B104CR02 and no other, otherwise the engine will not compensate for the load from the air conditioner. But since in this article we are talking about a car without it, you can ignore the last 2 digits of the firmware. All of the above Bosch blocks can be replaced with domestic Janvr7.2 and 7.2+ blocks. Domestic blocks are all Euro 2, with the exception of M73 blocks - they are Euro3. Blocks January 7.2 and 7.2+ manufacturer Avtel or Itelma (Euro2) for Kalina 1.6l 8V: 7.2 11183-1411020-21(22) with software A(I)201CO56(57)(58); 7.2+ 11183-1411020-21(22) with software A(I)201CP57. These blocks do not support air conditioning, as I understand it. And, in fact, the M73 blocks, which are suitable for Kalina. These units are all Euro 3: M73 21114-1411020-41 with software A303CE05(CF06) Euro3 (support air conditioning); M73 21114-1411020-42 with software I303CE05(CF06) Euro3 (support air conditioning). Thus, all of the listed ECUs with Euro3 toxicity class can be changed and can be changed among themselves without hesitation (only if they have factory firmware). It is also possible to replace a block with Euro 3 class with a block with Euro 2 class, but vice versa is not possible. All markings are located on a white plate glued to the ECU cover.
Next, I consider it necessary to consider the option of replacing the unit with a used one that was installed on a car with an activated immobilizer, since in this case there is one unpleasant feature.
Symptoms of ECU malfunction
If the device is not working correctly or there is no connection at all, then you can notice this by the following signs:
- If there are obvious malfunctions, the Check Engine icon on the instrument panel does not light up or flashes intermittently at varying frequencies. You must first make sure that the light bulb is working properly and that it has power, and only then can you diagnose the ECU module.
- When connecting a diagnostic scanner to the connector, the latter produces incorrect data that raises serious doubts. Simply put, the data is completely different from what it should be. If the controller fails, the scanner may not connect at all.
- Engine malfunctions, tripping, the car does not start or starts with difficulty. However, there are no objective reasons for such phenomena.
- Misfires when the ignition system is in good condition.
- The fan in front of the radiator turns on spontaneously.
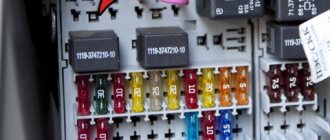
- For no apparent reason, fuses burn out, and different ones. Usually fuses blow due to voltage surges in the on-board network or a short circuit in the circuit, but if the diagnostics do not reveal such problems, then the problem is with the ECM.
- Pulses from the sensors do not arrive or arrive, but unevenly.
- Incorrect operation of the gas pedal. This is especially true for the electronic pedal: when the driver presses it, it either does not respond or does so late.
- Damage to the device body or contacts, for example, traces of burning on the terminal blocks.
A malfunction of the controller may be indicated by the absence of control signals for the ignition system, IAC, fuel pump and other devices whose operation is regulated by the electronic control unit.
Prevention measures
What preventative measures should be taken to prevent problems in the operation of the electrical circuit:
- Use only original instruments and devices - the use of cheap Chinese analogues can lead to voltage surges or short circuits. For example, a splitter in a cigarette lighter. As you know, it is designed for a certain power. By connecting two or more devices instead of one (using a splitter), the load on the node increases significantly. This can cause a short circuit and even a fire.
- Solve problems that arise in the operation of electrical appliances as quickly as possible. If the faults continue to accumulate, it can lead to more serious problems later.
- At least twice a year, it is necessary to carry out scheduled maintenance for the battery. It is recommended to do this before the onset of cold weather and with the arrival of spring. Check the electrolyte level in the banks, charge the battery to replenish the lost charge, and also regularly conduct visual diagnostics of the device body.
- Use only original fuses; using homemade fuses can lead to serious problems.
Loading …
How the firmware is installed
The firmware process (software update) is as follows:
- First, a complete diagnosis of the engine is carried out; if the engine is faulty, the firmware will do more harm than good.
- The original firmware is saved and a modified one is selected based on it.
- Using an adapter, new software is written to the ECU through the OBD II diagnostic connector (observing the pinout) using a special computer program.
- The controller is rebooted and the functionality of all systems is checked.
At first glance it looks quite simple, but flashing the control unit on the Lada Kalina without special knowledge and skills is highly not recommended. In addition, you need equipment and the ability to choose the firmware so as not to cause harm. By contacting specialized organizations, you can not only get diagnostics and firmware, but also a guarantee of performance.
How to independently diagnose the unit?
At first glance, it may seem that diagnosing an ECU is a difficult task that not everyone can handle. Indeed, checking your block is not so easy, but having theoretical knowledge, it is quite possible to apply it in practice.
Required tools and equipment
To check the functionality of the module yourself, you will need to perform a number of steps to connect to the ECU.
To perform the test you will need the following devices and elements:
- Oscilloscope. It’s clear that not every car enthusiast has such a device, so if you don’t have one, you can use a computer with the necessary diagnostic software pre-installed on it.
- Cable for connecting to the device. You need to select an adapter that supports the KWP2000 protocol.
- Software. Finding diagnostic software today is not a problem. To do this, just monitor the network and find a program that is suitable for your vehicle. The program is selected taking into account the car, since different control units are installed on different cars.
1. Laptop for testing
2. Connection adapter
3. KWP_D diagnostic software
Algorithm of actions
The diagnostic procedure for the electronic control system is discussed below using the Bosch M 7.9.7 module as an example. This control unit model is one of the most common not only in domestic VAZ cars, but also in foreign-made cars. It should also be noted that the verification process is described using the example of using the KWP-D software.
So, how to check the ECU at home:
First of all, the adapter used must be connected to a computer or laptop, as well as the ECM itself. To do this, connect one end of the cable to the output on the unit, and the other to the USB output on the computer. Next, you need to turn the key in the car's ignition, but you do not need to start the engine. By turning on the ignition, you can launch the diagnostic utility on your computer. After completing these steps, a window with a message should pop up on the computer screen, which confirms the successful start of diagnosing malfunctions in the controller. If for some reason the message does not appear, you need to make sure that the computer successfully connected to the controller
Check the quality of the connection and connection of the cable to the unit and laptop. Then a table should be displayed on the laptop display, which will indicate the main technical characteristics and operating parameters of the vehicle. At the next stage, you need to pay attention to the DTC section (it may be called differently in different programs). This section will present all the faults with which the power unit operates
All errors will be displayed on the screen in the form of encrypted combinations of letters and numbers. To decipher them, you need to go to another section, which is usually called Codes, or use the technical documentation for your car. If there are no errors in this section, then you now don’t have to worry, since the vehicle’s engine is working perfectly (the author of the video about ECU repair at home is the AUTO REZ channel).
But this verification option is most relevant if the computer sees the block. If you have problems connecting to it, then you will need an electrical diagram of the device, as well as a multimeter. The tester or multimeter itself can be purchased at any specialty store, and the electrical circuit diagram of the ECM should be in the service manual. The diagram itself needs to be studied most carefully; this will be required for verification.
In the event that the ECM points to a specific block, and does not show erratic data, then in accordance with the diagram it needs to be found and called. If there is no accurate information, then the only way out is to diagnose the entire system; as we said above, breakdowns are considered one of the main faults.
After the breakdown is found, it is necessary to check the resistance and determine exactly where the cable is fixed. You will need to solder the corresponding new wire parallel to the old one; if the reason lies in the breakdown, then these actions will eliminate the problem. In all other cases, only qualified specialists can solve the problem.
ECU transfer
Every owner of a Lada Kalina car, especially those who have owned it for several years, is familiar with the problem associated with flooding the controller with coolant. Any leak in the heater core or loose connection of the hoses leads to antifreeze getting into the ECU. Even if such problems have not arisen until now, this does not mean that this will not happen at any time. Therefore, it is better not to wait for such troubles and move the control unit to a safer place in advance.
This is not difficult to do; all you need is a screwdriver and a few keys. The most common transfer locations are as follows:
- Attach under the insulation just above the rug on the front left.
- On the air duct above the glove compartment.
As a last resort, you can wrap the controller more tightly with plastic film or seal it with sealant. This option is not the most successful, since condensation will accumulate inside and the ECU will fail.
What to do if the block burns out
It happens that a breakdown in Kalina is discovered very late, when the engine practically does not work.
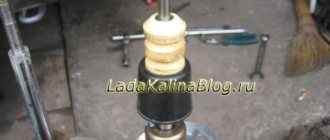
In this case, you can take out the ECU and assess its condition. The key may be broken, or the board may simply be burned out. In the first case, the board can be brought back to life by replacing the key, in the second - only by replacement.
If you are lucky, then the antifreeze did not completely burn the board, but simply prevented the contacts from working properly. In this case, the board must be wiped and dried.
When the ECU is replaced with a similar used part, its firmware will be needed, since the “old” car remains in the memory.
The new part does not require firmware. Specialists can reflash such parts for a fee in the region of 1000-2000 rubles.
Due to design flaws, many Lada Kalina drivers are faced with the problem of a leaking radiator, which causes the ECU to burn out. There is only one way to prevent this - by changing the location of the part. If this is not done, sooner or later after using the oven the control unit will burn out, and then it will have to be completely replaced.
tweet
back Installing a trunk with your own hands on a Kalina sedan
Next How to replace the heater radiator in Lada Kalina?
Tags: transfer, repair, ECU
Removing the ECU and installing it in a safe place
The whole job will take no more than an hour. Armed with a screwdriver and a 10mm wrench, we proceed to dismantling:
- Remove the plastic cover on the front passenger side.
- The controller is immediately accessible, but removing it is not so easy. First, unscrew the self-tapping screw with a screwdriver and try to pull the ECU towards you. If that doesn’t work, remove the cover from the driver’s side and apply pressure from that side.
- After removing the ECU, you need to unscrew the mount on which it is fixed.
- Now you can install it in a new location. As an example, the place under the glove compartment shelf was chosen.
- Make three holes in the shelf for 5mm bolts in the same places as on the ECU. After this, screw the controller to the shelf.
When installing, you need to be careful not to damage the wires. In this simple way you can avoid possible flooding of the electronic control unit and problems associated with this nuisance.
The controller, or in common parlance the “brains,” on Kalina is one of the most important components of the car, it’s not for nothing that it received such a nickname. Without it, it is impossible to imagine the normal functioning of all vehicle systems. In addition, the ECU significantly facilitates monitoring the operation of the engine and on-board network, helping to timely identify faults and eliminate them.
VAZ Kalina cars, on which the engine control unit is structurally located under the interior heater radiator. The most common malfunction of the units is a leak in the interior heater in the place where the engine ECU is installed. The result of this not very successful design solution may be complete failure of the control unit. In practice, the penetration of antifreeze into the ECU causes oxidation of the contacts and pins of the microcircuits, which manifests itself in the inability to start the engine, problems with the immobilizer, if the car starts, the engine starts to stall, etc.
Other most common malfunctions of electronic control units VS 5.1, January, Bosch, M73, M75 of VAZ cars of the 2110, 2114, Kalina, Priora family are associated with the failure of the power MOSFET keys for controlling the ignition coils, the K-line driver, and the injector driver microcircuit.
The main signs of a faulty ECU of VAZ cars:
- lack of spark in one or more cylinders;
- no control of one or more nozzles;
- there is no control of the fuel pump relay;
- there is no control of the idle air regulator (IAC);
- the car does not go to diagnostics;
- when the ignition is turned on, the starter does not work, the fuel pump does not pump;
- control program checksum error.
Of course, for any malfunctions of this nature, you must assume that the ECU is operational and first check the fuses, wiring, relays, sensors, injectors, ignition coils, ignition module, etc. Most likely the reason will not be in the ECU and it is working properly. But if all options have been exhausted, contact us, we will carry out high-quality repairs of electronic control units with a guarantee.
Computer diagnostics of the Bosch M7.9.7 in this case may show the following errors:
- P0201, P0202, P0203, P0204 - Open circuit in the injector control circuit of the 1st, 2nd, 3rd, 4th cylinder;
- P0261, P0264, P0267, P0270 - Short to ground in the injector control circuit of the 1,2,3, 4th cylinder;
- P0262, P0265, P0268, P0271 - Short circuit to the power supply of the injector control circuit of the 1,2,3, 4th cylinder;
- P0336 - Crankshaft position sensor - signal out of acceptable limits;
- P1135 - Circuit of the oxygen sensor heater to the converter: open, short to ground or to +12V;
- P1501, P1502, P1541 - Fuel pump relay control circuit;
- P0342, P0343 - Camshaft Position Sensor - Voltage Level Low or High.
Computer diagnostics of the Bosch ME17.9.7 in this case may show the following errors:
- P0201,P0202,P0203,P0204 - Checking the injector control circuit for open circuit;
- P0261 - Checking the short circuit of the injector control circuit to ground;
- P0136, P0137, P0138 - Diagnostic oxygen sensor. The voltage is less than the lower threshold value or greater than the upper threshold value;
- P0300-P0304 - The number of misfires in cylinders 1-4 is greater than the threshold value;
- P0351, P0352 - Ignition coils. The primary circuit current is less than or greater than the threshold value;
- P0627, P0628, P0629 - Fuel pump relay. Checking for open circuit;
- P1578 - Throttle valve actuator. Adaptation value is out of range;
- P1545 - Throttle valve drive. The deviation of the actual throttle position from the desired one is greater than the threshold value;
- P2103,P2102,P2100 - Throttle valve actuator. Checking the short-circuit circuit for the on-board network, ground and open circuit;
A rare malfunction, but also found on ECU January 7.2/7.2+, M73 of VAZ cars of the 2110, 2114, Kalina, Priora family. It manifests itself in the fact that the car suddenly stalls at full speed after some time of operation. As a result of checking all the actuators, relays, immobilizer, nothing suspicious can be found. In such incomprehensible situations, replacing the ECU with a known good one helps determine the cause. As a rule, we can successfully restore an ECU with such faults!
Replacing the water pump Lada Kalina
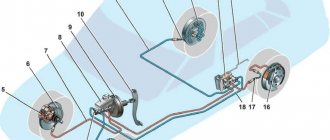
On an 8-valve VAZ-21114 engine, the average service life of the water pump is about 70-100 thousand km, and if it starts to make noise or leak, it must be replaced. It should be noted that on all models 2108-15, Lada Priora and Kalina with an 8-valve internal combustion engine, the pump is changed according to the same principle.
The water pump is replaced as follows:
- drain the antifreeze from the cooling system;
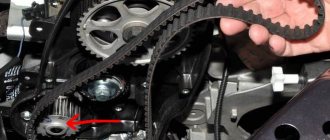
- remove the plastic timing belt cover;
- if the timing belt does not need to be changed, then we do not remove the crankshaft pulley; accordingly, there is no need to dismantle the right wheel;
- set a mark on the camshaft - it should coincide with the ebb on the rear timing case;
- loosen the tension roller, remove the belt from the camshaft;
- Unscrew the three pump mounting bolts with a hexagon and remove the pump;
- put the new pump in place, put on the belt, tighten it with a tension roller, check the alignment of the marks, on the crankshaft the mark is located on the flywheel, under the rubber plug of the gearbox housing;
- fill in antifreeze, start the engine, check if the antifreeze is leaking and if the pump is noisy. If everything is in order, put the timing case back in place.
What to do if the ECU does not work?
When a source of coolant leakage appears in the designated radiator, it gradually flows onto the electronic module housing. This eventually leads to a short inside the unit and it fails. The intensity of the leak affects the duration of operation of the electronic device until a breakdown occurs.
The owner of the Lada Kalina begins to see an activated indicator, indicating an error in the engine. This can happen for several weeks and at one point the car will stop because the brain has stopped functioning. If the leak intensity is high, then smoke may emanate from under the panel in such an emergency situation. Here, the owner will be required to respond quickly, regardless of the scale of the leak that caused the device to break down.
When it turns out that the brain is filled with liquid, it will need to be examined immediately. The unit is located in the lower compartment of the center console. If the owner is unable to immediately detect the device, we provide a hint in which we localize the search zone: between the interior heating radiator and the floor of the Lada Kalina.
The fastest way to get to the “damaged” module is from the passenger seat. Here we remove the plastic plug on the side surface of the console. It is secured with one screw. After unscrewing, we move this trim to the side (along the direction of the car). Next, we proceed to the direct dismantling of the ECU itself.
The order of manipulations here is as follows.
- Remove the terminals from the battery.
- We unscrew a couple of screws, one of which is located on the motor side.
- Carefully pull the module towards the passenger side.
- For convenience, remove the carpet from the interior for a short time.
- Remove the supply cable harness. Here we use a gentle pulling action, where we grasp the connector latches.
Primary localization of the problem
If any malfunctions occur in the radiator, then antifreeze dripping directly onto the body of the Lada Kalina ECU becomes the cause of lengthy repairs. It can take a long time from the start of a leak to the first signs of a malfunction. Depending on the intensity of the leak, the Lada Kalina will react differently.
In most cases, the driver sees a constant light on indicating an engine error. After a few weeks, the failure of the brains on Kalina will cause the vehicle to stop. If antifreeze leaks quickly, smoke may come out from under the car's dashboard. Regardless of the reason, the car owner needs to react quickly.
If the ECU is flooded, it is necessary to immediately carry out a visual inspection. It is located at the bottom of the instrument console. If you can’t find it the first time, then you can use the area between the floor and the heating radiator as a guide.
After unscrewing, it must be moved in the direction of travel of the vehicle. If everything is done correctly, then it completely disengages. To carry out further work, the unit itself must be dismantled. The procedure here is as follows:
- be sure to remove the terminal from the battery;
- Carefully unscrew 2 screws (one of them is located on the Kalina 2 engine side);
- slowly pull the block towards the passenger door;
- if this does not work, you need to temporarily remove the carpet from the car;
- Removal of the wires is carried out using a slight pulling movement of the connector latches to the side.
Diagnosing the block
After dismantling the liquid-filled module, we inspect it. To do this, take a screwdriver with a star tip and unscrew the 4 small screws. Next, we slowly remove the control board, with which we also perform a thorough visual inspection.
The most common reason for device failure in such a situation is a burnt-out output key of the Lada Kalina ignition coil control circuit. Repair won't help here. After such a malfunction occurs, the engine begins to function on only two cylinders, and in some situations it is not able to start at all. This is where qualified service will come to the rescue. Specialists will dismantle the damaged component, wash and dry it.
The second common cause is burnout of the board itself. This fact is revealed quite simply. There will be a characteristic darkening of the surface of the board, which will eliminate all doubts.
Will repairing the ECU help in this case? The answer can only be heard in a specialized workshop. From experience, we note that the probability of help from repairs tends to zero. Will need replacement.
Sometimes there is a situation related to minor damage to the ECU circuit. In this case, the owner can get away with little expense. To “reanimate” the module, you will need to perform a number of repair procedures, namely:
- wipe the device with a dry cloth;
- apply repeated washing with WD-40 and blow with a stream of compressed air;
- rinse again, but with alcohol and also blow with an air stream;
- Dry (thoroughly) for at least 2 hours.
Some Lada Kalina owners believe that replacing the ECU is a faster and more cost-effective process compared to washing and drying. Experience has shown that the situation is the opposite. Here the determining role is given to the price factor. The new ECU will require considerable financial resources from the owner of LADA Kalina. The situation is aggravated by the undesirability of installing used “brains”. Often, a used version of the unit will be cheaper, but there is a likely risk of it not working.
General diagram of VAZ-1117, VAZ-1118, VAZ-1119
1 — right headlight;
2 — engine compartment lamp switch; 3 — sound signal, 4 — Lada Kalina starter; 5 - battery; 6 - generator; 7 — windshield wiper electric motor; 8 — left headlight; 9 — power window switch of the right front door (passenger); 10 — power window motor of the right front door; 11 — right front door lock; 12 — connection block to the right front column; 13 — windshield washer motor; 14 — air temperature sensor; 15 — connection block to the injection system wiring harness; 16 — left front door lock; 17 — brake fluid level sensor; 18 — connection block to the left front column; 19 — right front door power window switch (driver); 20 — left front door power window switch; 21 — door lock switch in the switch block; 22 — electric window motor of the right front door; 23 — mounting block; 24 — immobilizer; 25 — power accessories control unit; 26 — instrument cluster; 27 — right side turn signal; 28 — glove compartment lighting lamp ; 29 — glove compartment lamp switch; 30 — brake light switch; 31 — ignition switch; 32 — lighting control module; 33 — steering column switch; 34 — left side direction indicator; 35 — connection block to the right rear column; 36 — rear door lock; 37 — rear window heating switch; 38 — reverse lock switch; 39 — alarm switch; 40 — heater motor switch; 41 - additional resistor; 42 — heater electric motor; 43 — block is connected to the left rear column; 44 — electric fuel pump with fuel level sensor; 45 — reverse lamp switch; 46 — handbrake sensor; 47 — cigarette lighter; 48 — reverse lock; 49 — connection block to the radio device; 50 — backlight lamps for heater control levers; 51 — Kalina illuminator; 52 — control unit for electromechanical power steering; 53 — interior lighting unit; 54 — right rear light; 55 — trunk locking motor; 56 — switch in the trunk lock; 57 — license plate lights; 58 - additional brake signal; 59 — rear window heating element; 60 — trunk lighting; 61 - left rear light Elements of the instrument panel harness connection diagram
1, 3, 4, 5 — blocks of the tidy wire bundle to the front harness; 2, 8 - the same for the rear “pigtail” of wires; 6, 7, 9, 10 - continuation of the direction to the assembly unit; 11 — power supply for the lighting control device; 12 — set of instruments; 13 — toggle switch for the electric motor of the stove; 14 — power supply to the air supply box; 15 — ignition switch Lada Kalina; 16 — immobilizer block; 17 — block of the dashboard wiring harness to the ignition system wire bundle; 18 — cigarette lighter power supply; 19 — alarm switch; 20 — rear window heating switch; 21 — brake light switch; 22 — alarm light breaker; 23 — adjustment of computer modes; 24 — windshield wiper control; 25 — VAZ horn switch; 26, 27 — heating and ventilation control lighting lamps; 28 — glove box lighting; 29 — power supply to the on/off button in the glove compartment; 30, 31 — pinout for the standard radio; 32 — power supply to the electric motor of the stove; 33 — heater resistor network; 34 - electric amplifier control unit.
Let's sum it up
If symptoms appear, the owner of LADA Kalina should contact service as soon as possible, because the cost of repairs can be significantly reduced. It is advisable to independently carry out the procedures we have indicated if the owner of LADA Kalina has a sufficient level of experience in dealing with automotive electronic devices. To do this, at a minimum, you need to know where the ECU is located, as well as how to remove the ECU. However, a 100% positive outcome of the event should not be expected. In case of failure, we recommend contacting the service specialists.
Help me find out the ECU number
- Thank you
- I do not like
Ur-Al April 16, 2014
Tell me, how can I find out the ecu number for a 2007 Kalina 8 valve Euro-2 (the sticker is missing on the ecu)? diagnostics shows January 7.2 but there is no number. In the store they say there are several types. How to determine which one to get?
- Thank you
- I do not like
111 April 16, 2014
“Diagnostics” should still show the software (firmware) version in the ECU! You can navigate it! Has the ECU "drowned" in antifreeze? Instead of “Y7.2” you can put “Bosch7.9.7(+)” (a universal ECU fits almost all cars with the installation of the appropriate program) and M73 (IMHO I don’t really like it) You can select it for your car here
here here It is necessary to check the number of oxygen sensors (Euro standards): 1 DC - "E2", two DC - "E3". And use them to select the ECU.
- Thank you
- I do not like
Ur-Al April 16, 2014
“Diagnostics” should still show the software version (firmware) in the ECU! You can navigate it! Has the ECU "drowned" in antifreeze? Instead of “Y7.2” you can put “Bosch7.9.7(+)” (a universal ECU fits almost all cars with the installation of the appropriate program) and M73 (IMHO I don’t really like it) You can select it for your car here
here here It is necessary to check the number of oxygen sensors (Euro standards): 1 DC - "E2", two DC - "E3". And use them to select the ECU.
No, it didn’t flood with antifreeze. While overtaking, I hit a hole and it shook, after which the injector in the fourth cylinder stopped working. Engine 1.6 l. eureka 2nd.
- Thank you
- I do not like
Ur-Al April 16, 2014
“Diagnostics” should still show the software version (firmware) in the ECU! You can navigate it! Has the ECU "drowned" in antifreeze? Instead of “Y7.2” you can put “Bosch7.9.7(+)” (a universal ECU fits almost all cars with the installation of the appropriate program) and M73 (IMHO I don’t really like it) You can select it for your car here
here here It is necessary to check the number of oxygen sensors (Euro standards): 1 DC - "E2", two DC - "E3". And use them to select the ECU.