If, when the car is moving, an unpleasant noise is heard in the area of the wheel, which may disappear when entering a sharp turn, then this indicates a malfunction of the VAZ 2110 wheel bearing.
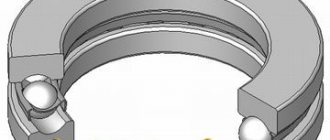
Front wheel bearing
This is a fairly common malfunction; it occurs on every fourth car with high mileage. It’s not difficult to correct the situation; you just need to have a garage with a pit and detailed instructions for work.
Experienced technicians recommend not delaying the replacement of this component in order to avoid unnecessary troubles.
How to replace the front wheel bearing
Before starting repairs, it is better to put the car in 1st gear and install small supports under the wheels. For more comfortable work, you will need an inspection hole, since it is not easy to get to some of the mechanism’s fastenings. From the tool you need to prepare:
- A puller to remove the bearing itself from the assembly.
- A cut of a pipe of a certain diameter, with the help of which the hub will be knocked out.
- Socket wrenches for 17 and 19.
- 30mm head with a good wrench.
Don't forget to purchase new bearings from the store. It is better to give preference to original spare parts that meet all quality standards.
Methods and options
Let's start the preparatory work. They are necessary in any situation.
- Slightly press out the wheel bolts.
- Using a 30 mm wrench, unscrew the bearing nut.
For alloy wheels you will need to remove the front wheel completely. Press the wheel bolt to gain access to the caliper - We press the caliper using a screwdriver and unscrew it from the front knuckle.
Using a screwdriver, press the caliper and remove it - Next, remove the brake disc from the hub.
Further replacement work can take place in several ways. Each of them has its own advantages and disadvantages. Choose the one that is best for you based on the availability of the necessary equipment and tools.
- Replacing the bearing without dismantling the steering knuckle. Its advantage is that we do not need to remove the camber adjustment bolt. But at the same time, the process itself will not be entirely convenient, and you cannot do without a good inspection hole. To knock out the hub and remove the bearing itself, you will also have to put in more effort. This method is often chosen by experienced mechanics to save some time. It requires good practical skills.
- The second method is more convenient and is suitable even for beginners.
Unlike the first, the camber adjustment will be disrupted and additional adjustment will be required after replacing the front wheel bearing. We make notches for further camber adjustment - The third method will take you the most time; it involves completely dismantling the front strut and replacing the bearing using a vice. To do this, you must first unpress the steering tip and remove the bolts securing the mechanism to the body.
This is interesting: The engine began to boil. What to do?
We will dwell in more detail on the second method, since it is best suited for novice car enthusiasts:
- remove the steering knuckle by first unscrewing the two bolts on the stand and the two bolts securing the lower ball joint;
Remove the steering knuckle by unscrewing the bolts - Using a pipe of the required diameter, we knock the hub itself out of the bearing;
We knock out the bearing with a pipe of suitable diameter - remove the bearing using a vice;
- We clean the seat from dirt and old grease;
- press the bearing in and secure the retaining ring;
Press in the bearing and install the retaining ring - We fix the steering knuckle together with the new part on the hub;
- Further assembly is carried out in reverse order.
Diagnostics
The wheel hub contains single row roller bearings . There are 2 of them. They require care while the vehicle is in use. This maintenance includes changing the lubricant and adjusting the gaps.
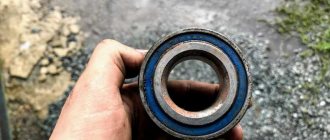
To check the clearance or play, you need to hang the wheel and rock it a little. A simple adjustment does not always get rid of the backlash. If noise occurs when the wheel rolls, most likely the front wheel bearing on your VAZ 2110 needs to be replaced because it has failed. It is not uncommon for two bearings to break at once.
Check whether the bearings rotate freely on the axle, whether there are any jams, and there should be no signs of wear or chipping on the rings. If this is available, you should definitely figure out how to change the bearing.
Inspection of the hub and further actions
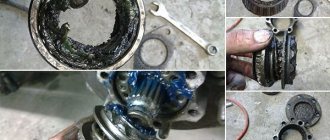
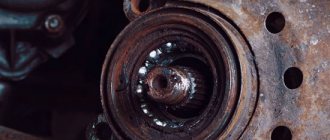
After removing the part, you must immediately check the condition of the trunnion. If it is seriously damaged, you will have to replace it too. For minor scratches and dirt, it is enough to remove everything with sandpaper. The front hub itself undergoes the same inspection. The presence of cracks and deep potholes indicates the impossibility of its further use. Minor scratches allow the part to be reused.
To remove the bearings, first remove the O-rings on both sides. Then there are the bearings themselves. A special mandrel, hammer and drift will help here. The main thing is not to distort the outer ring to avoid damage to the inner surface. Bearings are removed in a similar way when repairing the rear hub. When both bearings are removed, you need to clean and inspect the inner surface of the part.
If there is serious damage, a new spare part must be installed. If, as a result of an external inspection, it is determined that the cause of the malfunction was the bearings, and the hub itself does not have serious damage, then we install new bearings in the old part after cleaning and lubrication.
If necessary, we purchase a new hub into which we press both bearings. This is done using the same mandrel
Next, we reassemble the entire assembly in the reverse order, paying attention to the wear and performance of the remaining elements of the front suspension. You need to know that the procedure for removing and installing the rear hub is significantly different from the one suggested
If you have ABS, it is important not to forget to check the performance of the gear and install the sensor
What can a malfunction lead to?
The hub bearing is one of the most important elements of the chassis system, where all parts are interconnected. For example, you may not replace the oil seal in a timely manner, and in a month or two you will have to buy a new bearing.
If you ignore problems with the bearing, then after a while you will have to spend money on replacing the entire rack.
And every time the problems become more and more serious. Therefore, make timely repairs and avoid causing problems. Only in this case can you avoid more significant breakdowns or even accidents.
Necessary tool
Before you start work, you need to prepare all the tools and assemble them in one place:
- Special puller for bearing removal.
- Collar.
- Head at "30".
- Keys or sockets for “17” and “19”.
- Mandrel for knocking out the hub.
- New wheel bearings.
The tool is assembled and ready to use
Preparatory work
Make sure that the workplace is well lit, and it is best if it is on a viewing hole or a lift. Because this is the only way to talk about high convenience when carrying out such work. It would also be a good idea to familiarize yourself with the detailed diagram of the location of the bearing on the front hub of the VAZ-2112.
Thanks to this illustration, the diagram becomes very clear.
Step-by-step work order
First of all, we place the car in a stationary state, put on the handbrake, and, if desired, install wheel chocks. And while the car is on the surface, we tear off all the bolts on the front wheels.
We unscrew the torn bolts and put them aside. We remove the wheel.
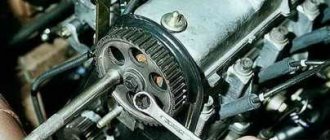
Next, we need to use a “30” wrench to unscrew the hub nut
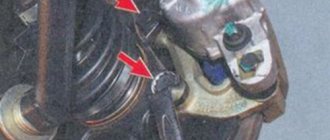
Please note that during its dismantling, you will have to press the brake pedal, and for this we will need an assistant. Then, using a screwdriver, press out the calipers. When this operation is completed, having the key at “17” at hand, unscrew the calipers from the steering knuckles.
Then, using a screwdriver, press out the calipers. When this operation is completed, having the key at hand at “17”, unscrew the calipers from the steering knuckles.
- Carefully unscrew the brake disc from the hub.
- Then, making gentle blows, we release the hub.
- And then the CV joint from the bearing.
Replacing the wheel bearing
Then, when access to the hub bearing is completely open, there are several ways to replace it.
First way
In this case, it is necessary to have a special puller to remove the bearing.
- First you need to take care of removing the stopper.
- Using this device, you simply remove the old bearing and install a new one in its place.
- After this, we carry out the entire assembly process in the same order as removal.
- The advantages of this method include the fact that during this work there is no need to touch the wheel alignment bolt, therefore, you will not have to add additional work.
- The disadvantages of this method include inconvenience during the process. Because you have to contrive and take an extremely uncomfortable position.
Second way
To carry out this work, it is necessary to carefully dismantle the steering knuckle and completely remove the hub.
- Moving to the workbench, we replace the wheel bearing.
- To do this, dismantle the retaining ring and knock the bearing out of its seat, or press it out.
- Next, we perform the installation in reverse order, having previously cleaned the surface of the hub.
Advice! Before you begin removing the alignment bolts, mark their position with a marker or chalk. In this case, the marks should indicate the current position of the bolt on the rack and the previous location of the knuckles. Thanks to such marks, during assembly it will be much easier to navigate the position of these bolts. Although it will not be possible to return to the previous state, it will still be possible to minimize it.
Putting marks
- We put marks.
- We knock out all the bolts from the fist.
- Remove the mounting bolts on the lower ball joint.
- This will knock the bearing out of the hub.
- Remove the retaining rings.
- Press out the bearing.
- We mount a new bearing, having previously cleaned the space of the hub and generously coated its surface.
This repair method will be very effective when not only the wheel bearing is subject to repair, but also most of the VAZ-2112 chassis. Such elements include the replacement of steering tips, silent blocks of levers and ball joints.
Third way
To perform work using this method, it is necessary to remove the entire rack completely.
The stand has been dismantled.
- Next, using a vice, we replace the wheel bearing.
- Because this is how the replacement will happen quickly and efficiently.
After dismantling the bearings, we install everything in the reverse order, assemble the rack and mount it on the car.
Do we make the puller ourselves or buy it?
If you do not want to knock out the bearing, you can purchase a special puller in stores, since the entire process of working with such a device becomes easier and the time required for work is reduced. This also applies to bearing installation work.
Hand-made hub puller
Stages of work
Work begins with the car being placed in a comfortable position and in first gear. To prevent it from rolling, it is better to install special wheel chocks under the wheels.
Now you can go down into the inspection hole and begin actions that are carried out in the following order:
- Using a wrench, unscrew the wheel bolts, followed by unscrewing the bearing nuts from the front wheel hubs with a 30mm wrench. It is worth noting here that if a VAZ 2110 car has alloy wheels, you will have to remove the wheels. In order to turn the front hub nuts, you must press the brake pedal at the moment of turning, so an assistant is needed here;
- Now you need to use a screwdriver and use it to press out the calipers;
- As soon as they are pressed out, you need to use the 17th key to unscrew the calipers from the steering knuckles. As a result of these manipulations, the caliper may hang on the brake hose; to prevent this from happening, you must carefully tie it up;
- Next, you need to carefully unscrew the brake discs directly from the hubs.
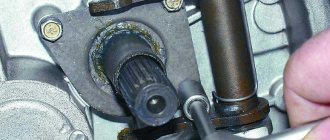
Remove the cap
Press the hub into the bearing
Unlock the nut on the hub
In addition to the listed types of work, you may also need to remove:
- Trunnion assembly;
- Hub cap;
- Retaining ring.
After this, the hub part is available to the master and can be replaced. There are several options for reinstalling a component, so a few words should be said about each.
Tools and spare parts
The fact is that the VAZ 2110 wheel bearing is a small part, and in order to work with it, you need sufficient lighting and some convenience. Therefore, a car prepared for repair should be driven into an inspection hole and sufficient light access should be created to the repair unit.
Before going down into the pit, you need to prepare all the tools and materials. It should also be noted that replacing the front wheel bearings is much more difficult than doing the same work on the rear components.
Therefore, you need to start work from the front node.
Front wheel hub diagram
A list of required tools should be provided:
- A special puller to remove the bearing;
- The so-called mandrel, that is, a pipe cut of the required size. This device is used to knock out hubs;
- Head 30, equipped with a high-quality wrench;
- Socket wrenches 19 and 17 sizes.
In addition, you need to purchase new suitable bearings that will be needed for replacement. For a VAZ 2110 car, you should choose Russian-made bearing parts rather than giving preference to Chinese analogues. The difference in price for these products is small, so there is no need to experiment.
Nuances
In the process of reassembling the entire node, you must proceed as follows:
- Press in the bearings;
- Install retaining rings;
- Collect your fists;
- Mount new bearing components on them;
- Mount the assembly on the hub;
- Using a mandrel, you need to drive the hubs until they stop.
You can use a puller or press to press in bearing parts. But in no case should you use a hammer, since in this case cracking of the component will inevitably occur. The forces should be directed to the outer rings.
It should also be noted that double-row ball bearings are installed in the hubs, which do not require lubrication and adjustment measures.
Due to the lack of such care, the VAZ 2110 bearings will certainly be destroyed when removed from the hub, so this measure should only be resorted to for a complete replacement.
How to adjust the differential preload of a VAZ 2114
It happens that the blocking begins to lag or does not work at all. The reason is that the preload decreases or disappears altogether. In this case, you should not rush to change the entire assembly; it is recommended to try to increase its value (preload) yourself. To do this, you need to select the required thickness of the adjusting ring and install it in the gearbox housing socket. The whole procedure is quite labor-intensive, so it is recommended to use the vehicle’s operating instructions.
Causes of malfunctions
Due to the design features of the differential and its operational purpose, destructive processes occur due to friction, force loads and other reasons. As a result, active wear of the unit and its elements occurs. The main causes of malfunctions are as follows:
- Bearing wear and damage to their integrity;
- Damage or wear of oil seals;
- Insufficient amount of oil in the transmission, as well as its poor quality;
- Other reasons.
The first signs of problems in the operation of the VAZ 2114 differential:
- Increased noise in the bridge or box;
- Oil leaks;
- Bridge jamming;
- Plays and knocks during inspection;
- And other non-standard operation of the unit and its components.
If you observe abnormal operation of the differential mechanisms, the first thing that is recommended to do is to check all the connections of the unit for tightness and no oil leakage. If the integrity of connections and fastenings is not broken, and signs (noise or disruption of functionality) are present, dismantling and disassembling of the unit is required to identify and eliminate the causes.
1.6.3 Fastener dimensions
Fastener dimensions
For many reasons, vehicle manufacturers are using metric fasteners more and more widely. However, it is important to know the difference between the sometimes used standard (also called American, or SAE standard) and the more universal metric fasteners in the system of measures, since, despite the external similarity, they are not interchangeable.
All bolts, both standard and metric, are classified by diameter, thread pitch and length. For example, a standard 1/2 - 13 x 1 bolt is one-half inch in diameter, 13 threads per inch, and 1 inch long. A metric bolt M12 - 1.75 x 25 has a diameter of 12 mm, a thread pitch of 1.75 mm (the distance between adjacent turns) and a length of 25 mm. Both bolts are almost identical in appearance, but are not interchangeable.
In addition to the characteristics listed, both metric and standard bolts can be identified by inspection of the head. For starters, the distance between the flats of a metric bolt head is measured in mm, while that of a standard bolt is measured in inches (the same is true for nuts). As a result, a standard wrench is not suitable for use with metric fasteners, and vice versa. In addition, the heads of most standard bolts usually have radial notches that determine the maximum permissible tightening force of the bolt (strength rating). The greater the number of notches, the higher the permissible force (on cars, bolts with a strength rating of 0 to 5 are usually used). The strength class of metric bolts is determined by a numerical code. The code numbers are usually cast, as for standard ones, on the head of the bolt (on cars, bolts of strength classes 8.8, 9.8, and 10.9 are usually used).
| Marking of bolt strength class (top - standard/SAE/SS, bottom - metric). |
Also, standard nuts can be distinguished from metric ones by strength class marks. To identify the strength of standard nuts, dot marks are used that are stamped on one of the end surfaces of the nut, while metric nuts are marked using numbers, again. The greater the number of points, or the higher the digital code value, the higher the permissible tightening force of the nut.
The ends of metric studs are also marked according to their strength class. Large studs are marked with a digital code, while smaller ones are marked in the form of a geometric figure.
It should be noted that a significant part of the fasteners, especially those with strength classes from 0 to 2, are not marked at all. In this case, the only way to distinguish a standard fastener from a metric one is to measure the thread pitch, or compare the thread with a uniquely identified one.
Standard fasteners are often also called, in contrast to metric, SAE standard fasteners, however, it should be remembered that only small fasteners fall under the SAE classification. Large fasteners with non-metric threads are American Standard (USS) fasteners.
Since fasteners of the same geometric size (both standard and metric) can have different strength classes, when replacing bolts, nuts and studs on a vehicle, attention should be paid to whether the strength class of the new fastener being installed matches the strength class of the old one.
Strength class markings for standard hex nuts
| Strength class | Class Identification |
| Hex nut - strength class 5 | |
| Hex nut - strength class 8 |
Strength class markings for metric hex nuts
| Strength class | Class Identification |
| Hex nut - strength class 9 | |
| Hex nut - strength class 10 |
Marking of strength class of metric studs
Standard (SAE and USS) bolt dimensions/markings
| G - Strength Marking L - Length (in inches) T - Thread Pitch (threads per inch) D - Nominal Diameter (in inches) |
Dimensions/markings of strength class of metric bolts
| P - Strength class L - Length (in mm) T - Thread pitch (distance between adjacent threads in mm) D - Nominal diameter (in mm) |
Metric thread sizes
| M-6 | 9 - 12 N•m |
| M-8 | 19 - 28 N•m |
| M-10 | 38 - 54 N•m |
| M-12 | 68 - 96 N•m |
| M-14 | 109 - 154 N•m |
Pipe thread sizes
| 1/8 | 7 - 10 N•m |
| 1/4 | 17 - 24 N•m |
| 3/8 | 30 - 44 N•m |
| 1/2 | 34 - 47 N•m |
American Standard Thread Sizes
| 1/4 — 20 | 9 - 12 N•m |
| 5/16 — 18 | 17 - 24 N•m |
| 5/16 — 24 | 19 - 27 N•m |
| 3/8 — 16 | 30 - 43 N•m |
| 3/8 — 24 | 37 - 51 N•m |
| 7/16 — 24 | 55 - 74 N•m |
| 7/16 — 20 | 55 - 81 N•m |
| 1/2 — 13 | 75 - 108 N•m |
Detailed instructions for replacing the rear wheel bearing
Replacing the rear wheel bearings of a VAZ 2110
- The car stops at the front.
- Wheel bolts break off.
- The nut in the center of the hub breaks off, and you must first remove the cap.
- The required side is jacked up and the trestles are positioned.
- The wheel is removed.
- The area for installing the disc brake is filled with WD-40 or other special liquids.
Replacing the rear wheel bearing of a VAZ 2110
Carefully remove the brake drum. If removal is difficult, you need to screw special bolts into the threads on this drum, tighten it and lightly tap it with a hammer. Usually such measures produce positive results.
Rear wheel bearing VAZ 2110
- The hub tightens. If one of the bearing races remains on the axis, you need to move it out of place using a puller or sharpened chisels.
- The axle is inspected for the presence of marks from bearing rotation; if such marks are present, the assembled hub will need to be replaced.
- The brake cylinder is assessed for leakage, and the pads are assessed for wear.
- The retaining ring is removed from the hub using pliers or screwdrivers.
- The edge must be cleaned of rust, after which it must be moistened with WD-40 or a similar liquid that is at hand.
VAZ 2110 rear wheel bearing
- There are three ways to press out a bearing: using a special press, a puller or a heavy hammer (sledgehammer). The third method may seem aggressive, but it is preferred by most service station technicians, so let’s look at it in more detail.
- The hub is securely installed on a hard surface, and the bearing is dislodged from its place through the mandrel with several blows of a hammer or sledgehammer. After this, the hub is installed on a vice.
VAZ 2110 rear wheel bearing
- The bearing seating surface must be carefully inspected, any existing rust should be sanded off and lubricated with plain motor oil.
- The purchased bearing must be screwed using a selected bolt through a washer, which must be selected in accordance with the internal races. Since the bearings are double row, they will have to be disassembled during installation.
- The hub is installed on a hard surface.
- A twisted bearing is installed on top, but first you need to lubricate its installed plane with oil.
- Use a one-kilogram hammer to slightly level the element in a plane.
- Take a suitable mandrel, for example, a pry bar, which is used to hit the part to press the bearing.
Brand rear wheel bearing VAZ 2110
- When the bearing is about halfway through, you can hit harder.
- When reaching the cut part of the hub, you need to use the old clip as a mandrel.
Easy to replace rear wheel bearing
Bearing assembly procedure
Now it's time for assembly, the hub is put on the axle, and you need to remove the bolt used to tighten the cage.
Wheel bearing rear
- The central nut is tightened and tightened as much as possible. In this case, it means installing a new nut. We also install a thrust washer.
- The previously removed brake drum and wheel are put on and screwed on.
- The rotation is evaluated, if there is no noise, then all actions were performed correctly. The car is removed from the jack.
- The wheel with the central nut is tightened.
- The hub nuts are closed and the wheels are tightened securely.
Final tightening of wheel nuts
For a better explanation of the process, it is recommended to watch the video. A photo will also help as a visual aid. Using step-by-step instructions, you can quickly and easily replace the rear wheel bearing with your own hands, without spending money on repairs at a service station. By doing everything as required by the instructions, you can even save a lot of money, because the price of repairs in this case will be much lower. You can also find out about replacing the front wheel bearing on our website.
Stage-by-stage work
Replacing the front wheel bearing, as mentioned earlier, should be carried out in stages:
- The VAZ-2110 needs to be put in 1st gear;
- stops are placed under the wheels of vehicles so that the car remains in a constant position;
- Use a wrench to unscrew the wheel fastenings in the form of bolts and nuts. If the VAZ-2110 has alloy wheels, then the wheels must be removed completely. It is recommended to use the help of an assistant when turning the nuts that act as a lock for the front car hub, since unscrewing the part is much easier if you hold the brake pedal;
- use a reliable screwdriver to press out the calipers;
- using a 17 key, unscrew the calipers, which are fixed to the steering knuckles. To avoid damaging the caliper when unscrewing, this element should be tied to the brake hose;
- By using the car key, the VAZ-2110 brake discs are unscrewed from the hub itself.
Methods for replacing the front wheel bearing on a VAZ-2110
The replacement procedure is not the easiest, but you can save a thousand or one and a half thousand. This is exactly the amount they ask for just for work at a service station.
For everything to go smoothly, we will need a wheel bearing puller 2108-2112. Unfortunately, without it we will not be able to remove or press in a new bearing. The screw puller is very simple in design and costs about 300-380 rubles, so it will not become a burden on the budget and will come in handy more than once. We also need a 30 mm wrench or socket and a standard set of tools.
The technology for replacing a bearing depends on whether we will carry out incidental repairs or replacement of suspension elements, braking system or steering. You can go one of three ways:
- Removing the bearing without removing the steering knuckle. The fastest and easiest way. You don't even need a viewing hole. It is also good because we do not violate the set wheel camber. The downside is that pressing out the clips while hanging is not very convenient.
- Replacement with removal of the fist. There is a lot more work, but the bearing itself can be removed in a vice on a workbench.
- Dismantling the hub assembly with the strut. This option is the most labor-intensive and is used when we simultaneously change the strut, silent blocks, ball bearings, strut swivel bearing or other parts. Completely removing the strut to replace the bearing is irrational and time-consuming.
If you remove the fist, you can press out the bearing without a puller.
Replacement algorithm
Having all the necessary tools, you can start working without delay. We will replace the bearing following the first algorithm, that is, without disassembling the strut and knuckle
- We place the car on a flat surface, tighten the handbrake and put stops under the rear wheels.
- Remove the protective cap of the bearing nut.
Remove the protective cap.
We place a support under the bottom of the car.
We move the caliper to the side.
Unscrew the nut completely and remove the washer.
Screw in the bolts to the full depth of the hub.
By sharply hitting the bolt heads with the brake disc, we press out the hub.
We unscrew the ball joint bolts and remove the CV joint from the bearing hole.
Use pliers to pull out the retaining ring.
Use a puller to remove the old clip.
Reassembling the front hub is carried out in the reverse order. Strong chassis and smooth roads to everyone!
After assembly, we tighten the new bearing nut until it stops, put the wheel on, lower the car, tighten the nut with a good lever and lock its side.
What do we need?
As a tool we will need:
- The most common jack for lifting car wheels;
- Wooden beam;
- Balloon wrench;
- Special puller for the hub;
- Pliers (useful for removing retaining rings) or a special puller;
- Socket wrench (“30”);
- Socket wrench (“12”);
- Hammer.
Since the tightening torque of the main nut is serious, it is advisable to prepare a pipe as an extension for the socket wrench. A pry bar and chisel may come in handy. Well, it would be a good idea to invite a partner - to support, help and chat.
Replacement procedure
Lubricate
So, we have determined that this cannot be done with a little blood, and the car really needs to replace the bearing. Therefore, we adhere to a clear procedure and begin work.
- Remove the brake drum. There should be no problems with this, since it is fixed quite simply on the rear wheel.
- Pry up the hub cap using a flathead screwdriver and remove it.
- Now, using a narrow chisel, straighten the collar of the nut, which was jammed in two places at once. Don’t be afraid, it wasn’t you who did something, such a jam is provided at production so that the element does not fly out of its rightful place.
- Use a 30mm socket to unscrew the fastening nut.
- Remove the unscrewed nut and also dismantle the thrust washer.
- Arm yourself with a three-legged or two-legged puller, which will allow you to remove the hub from its place.
- If you don't have a three-jaw tool, press out the hub using two bolts or screws. As the practice of craftsmen has shown, bolts for fastening the head of a power unit are excellent for these purposes.
- Screw the screws into the opposite holes for fastening the wheel and rest their ends against the heads of the bolts securing the hub axle to the rear suspension beam of your car.
- Try to tighten the screws evenly to allow the hub to press out. There is no need to remove the pads.
- As a rule, the inner race of the bearing should remain on the hub axis.
- Secure the ring using a puller, then remove it.
- If you don’t have a puller, you will have to additionally dismantle the brake pads and use a chisel to mix the ring to the axle.
- Next, the ring moves. Two mounting blades will help you with this.
- Do not be afraid that after processing with a chisel, some kind of defects or nicks will form on the hub axis. This is not terrible, but it is highly recommended to process them with a needle file.
- Arm yourself with pliers, thanks to which you can carefully remove the retaining ring.
- Using a piece of suitable pipe, also carefully knock out the bearing, leaning on the inner ring.
- Another option is to press it out using a wheel bearing puller.
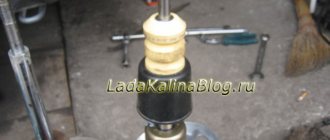
- Clean and effectively lubricate the hub into which the new rear wheel bearing is pressed with a puller or vice. The pressing force must be applied to the outer ring. It will be most convenient for you to do this using the outer ring from an old bearing.
- Install the new retaining ring in its proper place.
- Using light blows on the inner ring, press the bearing onto the axle. Drive until deep enough to fit the nut.
- Full pressing is carried out with the nut already on.
- Be sure to use only the specified torque to tighten the fastener.
- Press the collar of the nut into the two grooves of your hub axle to restore the element to its original appearance.
This procedure cannot be called incredibly complicated, but you will have to “tinker” in your garage. But this is better and more cost-effective than going to a service station and entrusting your car to unknown specialists.
The good thing about the VAZ 2110 is that you can easily repair it yourself. A number of works are carried out on the basis of the operation and repair manual. But if you do not have experience, or the breakdown is too serious, contact the professionals. It may cost more than doing the repairs yourself, but the quality of the work is above all. This is a guarantee of the safety of your car and your own safety on the road.
Loading …
Adjustment
Checking its functionality and adjusting it is carried out as follows:
- Raise the front wheel using a jack;
- Remove the wheel;
- Using a chisel, remove the protective cap on the front hub bearing;
- Remove the brake pads;
- The indicator holder should be secured to the steering knuckle;
- Place the leg of this indicator against the hub, as close as possible to the adjusting nut;
- Rings of spanners are placed on the studs and the nuts are tightened. While holding them, the hub rotates and moves in the axial direction;
- Using the indicator, the movement or gap indicator is determined. If it is more than 0.15 millimeters, the gap must be adjusted;
- Reinstall the wheel without using the protective cap. Secure it with two bolts screwed in diametrically;
- Using a chisel, straighten the flange on the bearing nut and remove the nut with a 27mm (socket) wrench;
- Using a torque of 2.0 kg-cm, tighten the new adjusting nut;
- Loosen the nut, then tighten it again, but now with a torque of 0.7;
- Slowly release the adjusting nut 25 degrees and turn the wheel in a vertical plane. There should be a slight play;
- Check the gap. Its indicators should be in the range from 0.08 to 0.02 millimeters;
- In this position, lock the nut with the collar caulked in special grooves. They are located on the steering knuckle at the end of its axle;
- Remove old grease from the protective cap and apply new one. About 25 grams. Experts recommend using Litol 24, although there are worthy alternatives;
- Install the protective cap on the bearing;
- The wheel is installed in its rightful place.