According to the regulatory documentation provided by the manufacturer, the hub diameter on the VAZ-2114 is 58.5 mm.
Thus, the bolt-to-bolt size is 4x98 , which allows you to install wheel rims with sizes R13, R14 and R15 . To secure the wheels to the hub, use bolts measuring M12x40 mm .
Standard stamping for factory hub
In order to choose non-standard stampings, but, for example, non-standard alloy wheels, it is necessary to change the size of the hub and the inter-bolt space. Of course, the manufacturer and car enthusiasts do not advise doing this unless absolutely necessary, so you should think several times before taking this action.
The most common size on European cars is 4*100 . Therefore, many people want to install just such disks. This is the hub size for Hyundai Accent and Renault Logan.
Catalog of VAZ-2114 hubs
Hub made by AvtoVAZ
2108-3103012 – original catalog number of the front wheel hub manufactured by AvtoVAZ. Using this article, you can determine a list of analogues that are suitable for installation on the Lada 2108-21099 and 2113-2115 family of cars.
Standard stamping on the rear wheel, hub diameter 4*98
So, using the catalog number, it is determined which hub becomes available for installation.
What is the diameter of the hub (exact factory data)
According to the regulatory documentation provided by the manufacturer, the hub diameter on the VAZ-2114 is 58.5 mm.
Thus, the bolt-to-bolt size is 4x98 , which allows you to install wheel rims with sizes R13, R14 and R15 . To secure the wheels to the hub, use bolts measuring M12x40 mm .
Standard stamping for factory hub
In order to choose non-standard stampings, but, for example, non-standard alloy wheels, it is necessary to change the size of the hub and the inter-bolt space. Of course, the manufacturer and car enthusiasts do not advise doing this unless absolutely necessary, so you should think several times before taking this action.
The most common size on European cars is 4*100 . Therefore, many people want to install just such disks. This is the hub size for Hyundai Accent and Renault Logan.
Catalog of VAZ-2114 hubs
Hub made by AvtoVAZ
2108-3103012 – original catalog number of the front wheel hub manufactured by AvtoVAZ. Using this article, you can determine a list of analogues that are suitable for installation on the Lada 2108-21099 and 2113-2115 family of cars.
Standard stamping on the rear wheel, hub diameter 4*98
So, using the catalog number, it is determined which hub becomes available for installation.
VAZ-2109 wheels
The desire of the owners of the domestically produced VAZ-2109 car to replace factory rims with elements with a different diameter is extremely clear.
Modern lightweight designs can improve the car's handling characteristics and fuel consumption, but, as a rule, the reason for such replacement is a simple desire to improve the appearance.
ATTENTION! A completely simple way to reduce fuel consumption has been found! Don't believe me? An auto mechanic with 15 years of experience also didn’t believe it until he tried it. And now he saves 35,000 rubles a year on gasoline! Read more"
Such an operation is not difficult to perform.
True, depending on the chosen replacement options, this is either carried out without problems, or such a procedure requires intervention in the design of the car.
conclusions
In this article, the diameter of the VAZ-2114 wheel hub was determined, as well as the bolt-to-bolt distance and fasteners with which the wheels can be attached to this unit. Many motorists practice replacing the hub in order to change the size of the disks, but not everyone takes into account that it is also necessary to change the steering knuckles.
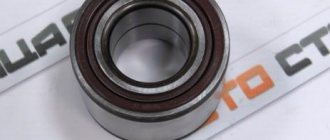
The wheel bearing ensures uniform rotation of the wheel around its own axis. Of all the elements of the car's chassis, it is the first to meet and distribute shock loads, so the main requirements for this part are strength and durability.
In this article we will talk about what a rear wheel bearing is on a VAZ-2108. We will look at the design of this device, its dimensions, and also understand the process of replacing it.
Drawings and diagrams of rear wheel hubs
To make replacement and removal easier, let's now learn what the rear wheel hub looks like: drawing
drawing of the hub and rear spacers for extending the wheelbase of the VAZ 2108-21112
Rear wheel hub ZIL 5301
Rear wheel hub with brake drum, shoe brake Hub of the rear (drive) wheel of a mini-tractor.
Design Features
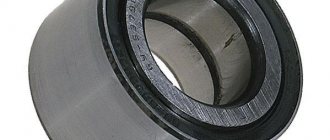
The rear hubs of the V8 are equipped with sealed angular contact ball bearings. Each of them has two rows of balls. This makes the structure as resistant to loads as possible, and also allows them to be distributed with the greatest efficiency.
The rear wheel bearing of the VAZ-2108 is made of heavy-duty steel. Its service life, declared by the manufacturer, is 90-120 thousand kilometers. By the way, these are not empty statements. Oddly enough, VAZ wheel bearings actually last a very long time and, if used correctly, can last twice as long as the stated mileage.
What drives can be installed
When planning to replace old steel wheels with alloy wheels, you should choose either original products or products from well-known manufacturers who care about the quality and safety of their products.
Alloy wheels combine the following useful properties: they are lightweight, practical to use, endowed with sufficient strength and have an attractive appearance, which is aimed at transforming the entire appearance of the car.
The most common among alloy wheels are aluminum products. This is due to the fact that they are resistant to corrosion, meet strength requirements and, in comparison with other alloy wheels, remain relatively inexpensive.
Titanium alloy is the most expensive option. It also meets all the technical specifications, but at the same time has a more attractive appearance. In third place is the option using a magnesium alloy.
The latest models from AvtoVAZ use wheels with a 4x100 mounting pattern. When installing them on a 4x98 hub, you should use studs with an eccentric to compensate for the difference of 2 mm. To install disks with other mounting patterns, you will have to use the appropriate adapters (spacers).
You must understand that installing wheels larger than 15 inches is impossible without interfering with the car’s design.
Main characteristics and varieties
The rear wheel bearing on the VAZ-2108 is produced under catalog number 256706. It has the following technical characteristics:
- weight, g – 400;
- number of balls, pcs. – 28;
- ball diameter, mm – 9.525;
- static load capacity, KN – 25.9;
- dynamic load capacity, KN – 30.1;
- rated rotation speed, rpm – 6500.
The VAZ-2108 rear wheel bearing number may be different. If a store offers you a product marked 537906, don’t be surprised. This is a high-load bearing. Some of its characteristics differ from the characteristics of the standard spare part:
- weight, g – 511;
- static load capacity, KN – 90.1;
- dynamic load capacity, KN – 64.8;
- rated rotation speed, rpm – 5000.
As you can see, the reinforced rear hub bearing on the VAZ-2108 has increased resistance to loads. But at the same time, its rotation frequency should not exceed 5 thousand rpm. Such products, when properly used, can “walk” freely up to two hundred thousand kilometers.
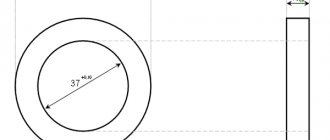
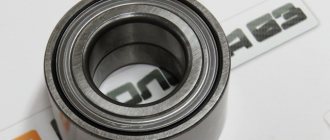
Bearing Specifications
The product catalog number is 256706, it has the following characteristics:
- The diameter of the inner race is 30 mm.
- The diameter of the outer ring is 60 mm.
- Weight – 400 gr.
- Bearing width – 37 mm.
- Inside there are 28 balls with a diameter of 9.525 mm.
- Dynamic load capacity of at least 30.1 kN.
- Static load capacity 25.9 kN.
- The bearing operates normally at 6500 rpm.
Rear wheel bearing VAZ-2108: dimensions
As for the size of the wheel bearing, they are the same for both modifications:
- outer diameter, mm – 60;
- internal diameter, mm – 30;
- width, mm – 37.
If you are offered a rear wheel bearing for a VAZ-2108, the dimensions of which do not correspond to those specified, it is better to refuse this purchase. All the above parameters are provided for by GOST 520-2002. Foreign analogues of spare parts are manufactured in accordance with the requirements of ISO 15:1998 and have the same dimensions.
Standard disk sizes
The main technical characteristics of the rims of any car, including the VAZ-2109, are expressed by the following parameters:
- Diameter. This refers to the size of the rim in inches, excluding the tire.
- Rim width is the size of the tire seat in inches.
- The size of the central hole for the hub.
- Bolt pattern is a parameter indicating the number of holes and the diameter of the circle connecting their central points.
- Overhang is the distance between the hub mounting surface and an imaginary plane passing vertically through the middle circumference of the disk.
For the VAZ-2109, two parameters were always the same:
- The central hole is 58.5 mm.
- Bolt pattern - 4x98.
The wheels are manufactured in three versions: R13, R14 and R15. Other factory parameters, taking into account the corresponding tires, are shown in the table.
How to understand that it is time to change the wheel bearing
A failed VAZ-2108 rear wheel bearing may indicate a malfunction:
- the appearance of a characteristic hum from the wheel;
- uneven rotation of the wheel;
- backlash formation.
If you notice that there is a hum coming from one or both rear wheels, rush to diagnose the wheel bearings. You can do this right in your garage. Simply jack up the rear wheel and turn it by hand. It should rotate easily and evenly without making any sounds. Next, grab it with both hands and try to shake it from side to side in a horizontal direction. If the wheel rotates unevenly and you feel play when it becomes loose, get ready for repairs.
How to recognize malfunctions
There are many signs that help identify a breakdown:
- uneven wear of tires;
- increased vibration;
- the appearance of extraneous noise;
- overheating of the disk (this means that the bearing is not working properly);
- the car deviates to the side from a straight path and the body sways (these signs are explained by the fact that a working wheel ensures smooth movement, and when a breakdown occurs, imbalance occurs).
The easiest way
If all of the above is not picked up by the hearing and vestibular apparatus, then there is an optimal method. You need to push the tire with your foot to identify any play.
Features of choice
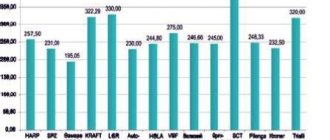
When buying a rear wheel bearing for a VAZ-2108, pay attention to the manufacturer. Currently, more or less high-quality domestic parts are produced by the following enterprises:
- SPZ (Saratov Bearing Plant);
- SPZ-4 (Samara);
- VBF (GPZ-23, Vologda);
- GPZ-20 (Kursk).
It is believed that the best domestic manufacturer of bearings is the Saratov plant. His products are very reliable, but not very expensive. Thus, a rear wheel bearing for a VAZ-2108 manufactured by SPZ costs between 400-450 rubles.
VBF products are also highly reliable and are slightly cheaper. Bearings SPZ-4 and GPZ-20 are designed for those who are used to saving on spare parts. Their cost is even less, but the quality leaves much to be desired.
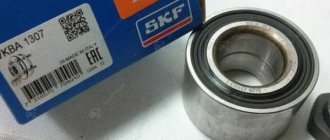
There are also imported analogues on sale. They are, of course, expensive, but their quality is beyond doubt. For example, a SKF VAZ 2108 rear wheel bearing, produced in Sweden, costs about 900 rubles. The Japanese equivalent, NSK, will cost about the same.
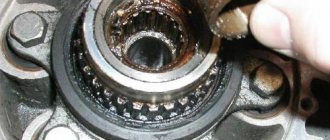
Installing a new bearing
Before installing a new element, it is necessary to inspect the entire internal surface. There should be no nicks or damage on it. To make installation a little easier, you can place the new bearing in the freezer for several hours and warm up the hub. But please note that it should not be heated to very high temperatures.
Otherwise, when installing a new bearing, its seals will melt, which will significantly reduce the life of the element. The bearing must be pressed in using a puller or using a clip from an old element. Be sure to secure the position of the bearing with the circlips, making sure they fit into their grooves.
What tools will you need?
Before you begin repair work, make sure you have the necessary tools and supplies:
- wheel chocks;
- jack;
- wheel bolt wrench;
- chisel (core);
- some object to fix the position of the car body when jacking up (a stump, several bricks, etc.);
- hammer;
- spacer made of wood (block);
- head at “30” with an extended handle;
- key to "7";
- vice;
- a piece of pipe for the outer diameter of the bearing;
- long nose pliers;
- special puller for the hub;
- special pliers for retaining rings;
- anti-rust liquid.
If you decide to change the rear wheel bearing on a VAZ-2108, also replace the hub nut. At least that's what the car manufacturer recommends. The fact is that the nut has a special edge that bends during installation and gets knocked down during disassembly.
Diagnostics, signs of malfunction, causes of failure
With proper operation, the ball bearing itself can last a really long time - about 100,000 kilometers. However, there are a number of reasons why a part may become unusable much earlier. Among them:
- frequent driving at high speed on bad roads;
- improper installation without lubrication (resulting in overheating and increased wear);
- prolonged exposure to an aggressive environment (water, dirt, other abrasives or liquids that get inside);
It is easy to understand that the ball bearing has failed - a distinct noise or buzz appears in the area of the rear wheels. If you ignore the problem, vibrations will appear on the body, and in critical cases, a grinding noise in the rear, indicating that the assembly has simply fallen apart. It is simply unacceptable to wait any longer - the wheel may simply become blocked while driving, so it is necessary to immediately replace it.
Changing the rear wheel bearing with your own hands
Replacement of the VAZ-2108 rear wheel bearing is carried out in the following order:
- We install the car on a flat surface, fix the front wheels by placing wheel chocks under them.
- Remove the cap covering the hub nut.
- Using a chisel (core), we bend the bent edge of the hub nut so that it does not interfere with its unscrewing.
- Using a 30mm socket with an extended handle, unscrew the nut. If it does not give in, treat the threaded connection with anti-rust liquid.
- After unscrewing the nuts, unscrew (not completely) the wheel mounting bolts.
- We lift the body with a jack, fix its position with stumps (bricks), and unscrew the wheel bolts. We dismantle the wheel.
- Using a key set to “7”, unscrew the guide bolts on the drum (2 pcs.).
- We remove the drum. If it is not removable, we treat the place where it fits onto the hub protrusion with a rust-fighting liquid, and then knock it down using a hammer and a wooden spacer.
- Now completely unscrew the hub nut.
- Using a special puller, we dismantle the hub, grasping it with “paws” and rotating the nut. If you do not have such a device, take the removed wheel and screw it to the hub with the back side. Use the wheel as a lever.
- Remove the hub from the axle.
- Using long-nose pliers or special pliers, remove the bearing retaining ring.
- We place the hub in a vice and, using a hammer and a piece of pipe, carefully knock out the bearing.
- When the bearing is knocked out, lubricate the inner surface of the hub with grease.
- We install the new bearing without removing the hub from the vice.
- We place a wooden spacer on top of the bearing and, hitting it with a hammer, hammer the part into the hub until it stops.
- We put the locking ring in place.
- We put the hub with the new bearing on the axle. If she sits down tightly, we help her sit down using a hammer and a spacer.
- Screw on the new hub nut. We tighten it until it stops. The hub should still move inward.
- Install the brake drum and secure it with guide bolts.
- We mount the wheel.
- Remove the jack and tighten the hub nut completely. If you have a torque wrench, observe the tightening torque (186.3-225.6 Nm).
- We bend the edge of the nut, fixing its position.
- We put a cap on the nut.
- We jack up the body, check how the wheel rotates and whether there is any play. It is also recommended to check the operation of the parking brake.
wwss75 › Blog › Front wheel spacers for maintenance-free bearing 2108
I rewrote it, corrected it, added it. part 1. HURRAY! It’s done, I’m holding the spacers in my hands. I've been wanting to make one for myself for a long time. It’s extremely difficult with a budget and purchasing via the Internet is no longer necessary. I couldn’t find it on sale in St. Petersburg and heard a price tag of 2,000 rubles. I contacted turners a couple of times and was shocked by their price of about 6,000 rubles. for work. Andryukha's old friend came to the rescue. I found the time and, according to the drawing, turned it out of 45 steel, accurate to the hundredth. I didn’t take the money :)) FRIEND! :)) I took the drawing from timur911, here is the link at www.drive2.ru/l/4438002/ In my drawing, 2 dimensions have been changed for a tighter fit of the spacer on the axle. Plus, the manufacturing accuracy of the two seating surfaces is 0.01-0.03 mm. (When making the inner surface, the turner makes dissatisfied faces and says that it is lazy and difficult to do) So, my version is a trial one! The final dimensions will become clear after installation on the car. I'll definitely write back. (A year and a half later, everything is EXCELLENT! Everything works! The drawing was corrected and correct 09/07/16.)
Methodology and algorithm of repair work
Replacing a hub or bearing on a VAZ-2108 car is a clear technological process in which certain procedures will have to be followed. The first stage in the replacement process is preparatory. It is necessary in order to correctly assess the upcoming scope of work, prepare the site and the appropriate tools.
- Jack. In order for the problem unit to be replaced, you must first hang the wheel, removing the weight load from it. To do this, the vehicle is raised with a jack. If the replacement is carried out in a car service center or a specially equipped garage, then use a lift that will allow you to raise the car to a comfortable height.
- Puller. Replacing a hub or bearing on a VAZ-2108 requires the use of two different pullers, the sizes of which - 3 and 6 cm - correspond to the diameters of the rotation support races.
- Pliers.
- Wrenches for 12 and 30.
Under any conditions, replacing the rotation support begins with dismantling the hub unit.
- The front wheel is removed from the side of the defective unit. To do this, the car is secured with the handbrake and the mounting bolts are loosened. Then, on a jacked-up VAZ-2108, the bolts are completely unscrewed and the wheel is removed.
- The brake disc is removed.
- The caliper does not unscrew completely. It will have to be secured in this position, for example, with wire.
- After this, using a puller, we dismantle the hub along with the bearing.
The algorithm for further actions depends on which of the two units requires repair. In any case, the bearing will have to be pressed in, otherwise manipulations with the hub are impossible. Assembly of the unit occurs in the reverse order.
Replacement procedure
DIY stand for storing car wheels drawing
Lubricate So, we have determined that this cannot be done with a little blood, and the car really needs to replace the bearing. Therefore, we adhere to a clear procedure and begin work.
- Remove the brake drum. There should be no problems with this, since it is fixed quite simply on the rear wheel.
- Pry up the hub cap using a flathead screwdriver and remove it.
- Now, using a narrow chisel, straighten the collar of the nut, which was jammed in two places at once. Don’t be afraid, it wasn’t you who did something, such a jam is provided at production so that the element does not fly out of its rightful place.
- Use a 30mm socket to unscrew the fastening nut.
- Remove the unscrewed nut and also dismantle the thrust washer.
- Arm yourself with a three-legged or two-legged puller, which will allow you to remove the hub from its place.
- If you don't have a three-jaw tool, press out the hub using two bolts or screws. As the practice of craftsmen has shown, bolts for fastening the head of a power unit are excellent for these purposes.
- Screw the screws into the opposite holes for fastening the wheel and rest their ends against the heads of the bolts securing the hub axle to the rear suspension beam of your car.
- Try to tighten the screws evenly to allow the hub to press out. There is no need to remove the pads.
- As a rule, the inner race of the bearing should remain on the hub axis.
- Secure the ring using a puller, then remove it.
- If you don’t have a puller, you will have to additionally dismantle the brake pads and use a chisel to mix the ring to the axle.
- Next, the ring moves. Two mounting blades will help you with this.
- Do not be afraid that after processing with a chisel, some kind of defects or nicks will form on the hub axis. This is not terrible, but it is highly recommended to process them with a needle file.
- Arm yourself with pliers, thanks to which you can carefully remove the retaining ring.
- Using a piece of suitable pipe, also carefully knock out the bearing, leaning on the inner ring.
- Another option is to press it out using a wheel bearing puller.
- Clean and effectively lubricate the hub into which the new rear wheel bearing is pressed with a puller or vice. The pressing force must be applied to the outer ring. It will be most convenient for you to do this using the outer ring from an old bearing.
- Install the new retaining ring in its proper place.
- Using light blows on the inner ring, press the bearing onto the axle. Drive until deep enough to fit the nut.
- Full pressing is carried out with the nut already on.
- Be sure to use only the specified torque to tighten the fastener.
- Press the collar of the nut into the two grooves of your hub axle to restore the element to its original appearance.
This procedure cannot be called incredibly complicated, but you will have to “tinker” in your garage. But this is better and more cost-effective than going to a service station and entrusting your car to unknown specialists.
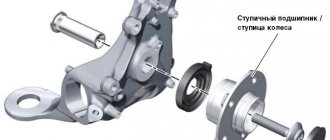
Structure
The part has a fairly simple structure. Essential elements:
- outer rim (used for screwing in bolts);
- internal part (for bearings);
- holes with slots (for CV joint);
- protective caps;
- sensor (it is sometimes included in the design).
CV joints are constant velocity joints; their main task is to transmit torque.
Note!
The set of fasteners for this part consists of two nuts and one washer.
Hubs for different purposes have different technical characteristics. Hubs for passenger cars have the form of a hollow, lightweight cylinder, while for “heavyweights” the diameter of the part is larger.
Causes of problems
The hub is a very durable part of a car disk, so breakdowns rarely occur. But still sometimes deformation of the spare part occurs. In addition, the rear hub is more wear-resistant than the front hub, since it is less subject to heavy loads.
You may be interested in About knocking noises in the wheel when turning the steering wheel while driving
"Road factors"
Ingress of moisture and dust eventually displaces the lubricant, and the disc begins to overheat as a result of excess friction.
Insufficient lubrication
It ranks first among the causes of failure of this spare part.
Important!
Sometimes it is caused by poor-quality lubricant material.
Excessive loads
In the average area this is unlikely. Usually found in mountainous areas.
Strong “tightening” of fasteners
It often happens that the bolts are screwed in more than necessary - this is how the threads wear out.
Important!
If the hub and bearing are an inseparable connection, then there is almost no risk of wear of such a structure.
Rear suspension parts
1 – wheel hub; 2 – suspension arm mounting bracket; 3 – silent block; 4 – shock absorber casing; 5 – compression stroke buffer; 6 – casing cover; 7 – support washer; 8 – shock absorber cushions; 9 – spacer sleeve; 10 – shock absorber; 11 – rubber gasket; 12 – rear suspension spring; 13 – lever connector; 14 – lever of the rear suspension beam; 15 – shock absorber mounting bracket; 16 – lower spring support cup; 17 – rod; 18 – upper spring support cup.
Maximum and minimum acceptable parameters of non-standard disks
The size of the wheel arches on the VAZ 2109 limits the possibility of installing wheels with a diameter larger than R15. It turns out that any non-standard specimen must fit into the dimensional frame of 13-15 inches. It is impractical to look for something smaller, and to install a larger diameter, you will need to increase the wheel arch, that is, change the body structure.
Limiting yourself to the given parameters of the arch, you need to look at the other indicators of the non-standard disk. To connect parts with different bolt patterns, you can use adapter spacers. In this case, the problem of incompatibility of the disk with the hub according to the holes is quite easily solved.
The main thing is to choose suitable fastenings. The width of the rim, according to the limits set by VAZ designers, is limited to 4-7 inches. Exceeding these parameters may impair vehicle handling and raise questions during registration.
The permissible disc overhang is directly related to its width and design. In the factory assembly, this figure ranged from 30 to 45 mm. You can change the offset using spacers.
But you need to remember that as the offset decreases, the track width increases, and wide tires may exceed the established overall dimensions of the vehicle. The central hole of a non-standard disk must be at least 58.5 mm.
Although the options for replacing disks on a VAZ-2109 are limited to certain parameters, there are still quite a lot of them
But, first of all, you should still pay attention to original products that are maximally adapted to the given car. It’s easier, safer, and more profitable from a financial point of view.