The lock cylinder (lock cylinder) is a type of lock security mechanism, in the form of a cylinder, the working part of which can be rotated in the body only when a key is inserted into the cylinder hole. The uninterrupted operation of the lock cylinder protects the car from unauthorized entry and protects the owner’s property. Therefore, a malfunction of the lock cylinder is a serious concern that requires an immediate solution, and many car enthusiasts are seriously thinking about how to change the lock cylinder of a VAZ 2114 with their own hands.
Causes of problems opening the door
If incorrect operation of the VAZ 2115 design is noticed and the rear door does not open from the outside, then the reason lies in the locking mechanism or poor adjustment of the door fragment. The following factors indicate the need for repairs:
- the door slams loudly when closing;
- an unpleasant creak appeared;
- there is a rebound from the car rim;
- the door leaf has shifted;
- an increased gap appeared between the body and the door rim;
- subsidence, sagging, movement of the door pillar to the side;
- when closing there is a sharp kickback because the backlash is set incorrectly;
- the door closes only after a strong push;
- the lock is broken or blocked, the handle (external, internal) does not work;
- There was a crackling noise in the door panel while the vehicle was moving.
Special attention is required to the gaps, hinges, internal filling of the door, lock and handle. The exterior of the vehicle is inspected in a closed and open state. It is also determined whether there is any distortion or other changes in the body shape. The doors should be at the same level, the diameter of the gaps should be no more than 1–2 cm. Having examined the condition of the hinges, a search for mechanical damage is carried out, the functionality of the opening mechanism and the operation of the lock cylinder are checked.
How to replace the door handle, also known as the outside handle, on a VAZ 2110-VAZ 2112?
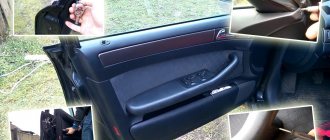
Removal: 1) On all cars, from classics to front-wheel drive, door handles are removed the same way, first you will need to remove the trim from the door (For information on how to remove the trim, read the article: “Replacing trim on cars”), well then access to the handle fastening nuts will open; on the tenth family, the handles are attached to two nuts (see photo below, the approximate location of the nuts is indicated by blue arrows, and a more detailed location is shown in the small photo and the nut on it is indicated by a red arrow) by unscrewing them, The handle can be easily removed from the car, but before doing this, disconnect all the rods from the handle, more on this in point 2 below.
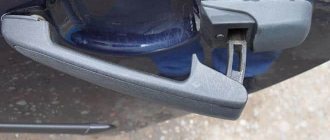
2) Now about the rods, firstly, if you have a plastic film hanging, then remove it (see photo 1) because it covers the inside of the door and if you do not remove it, it will be difficult to get to the door handle, then disconnect it from the handle itself either by hand or carefully pry the rod with pliers (see photo 2), then using a wrench with a cap on it, unscrew the two nuts securing the handle (see photo 3), and finally remove the handle from the car door.
Removal
3. On the connecting blocks of the wiring harness laid in the door, mark the color of the insulation of each wire connected to it.
4. Disconnect the wiring harness block from the windshield wiper gear motor block (see “Rear window wiper - removal and installation”). In the block that supplies voltage to the gear motor block, use a slotted screwdriver with a thin blade or an awl to tighten the locking tendrils of the wire tips. Disconnect the wires from the block.
5. In a similar way, remove from the block the tip of the wire that supplies power to the additional brake signal (see “Spoiler - removal and installation”).
7. Disconnect the wire of the door glass heating element (see “Tailgate glass - removal and installation”).
8. Pull the wires out of the tailgate.
9. Inside the car, after removing the decorative trim, use a 17 mm
Unscrew the upper seat belt mounting bolt.
Warning! Be careful not to lose the spacer located under the bolt.
10. Using a Phillips screwdriver, unscrew the two self-tapping screws securing the rear pillar trim.
11. Release the trim from under the glass seal and move the upper part of the trim away from the pillar. We remove the trim on the other side of the car in the same way.
12. Remove the rear handrail trim. Use a Phillips screwdriver to unscrew the rear handrail fastening screw.
13. Remove the handrail support plate.
14. Similarly, disconnect the rear fastening of the handrail on the opposite side of the ceiling.
15. Using a puller or a slotted screwdriver, remove the clamps of the three holders of the rear part of the headliner.
16. Take out the holders.
18. We move the edges of the upholstery out from under the glass seal and move the back part of the upholstery away from the ceiling at a distance of 5-7 cm.
Warning! To avoid bending the headliner, do not apply force.
19. Under the headliner with a 10 mm
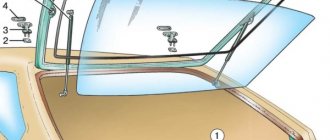
Using a ratchet, unscrew two nuts securing the door hinges to the car body and remove the tailgate.
Warning! One of the nuts on the left loop secures the tip of the “mass” wires. When installing the door, do not forget to connect them!
10 mm socket wrench
Unscrew two bolts securing the hinges to the door frame and remove the hinges.
How to change Euro handles on a VAZ 2114
Euro pens “LYNX” to match the body color cost 1,500 rubles. Plus installation 1500 rub. 1 year warranty. All popular colors are available. Installing Euro handles on a VAZ 2114 takes 40 minutes. When installed correctly, these handles will serve you for quite a long time. Silent locks with handles installed will cost 500 rubles. all doors. Adjustment of doors, alarms (locking and unlocking) - free of charge. In addition to eliminating sagging and opening a jammed door. When installing euro handles, the smooth opening of the door without any problems is taken into account, the soft closing of the door, the precise operation of locking and unlocking from the key and from the alarm key fob, both the front and rear doors of your car, are also taken into account. When installing euro handles, if the car is not new, It may be necessary to change some spare parts in order for the door to work properly, such spare parts as external locks (chocolate bars), internal mechanisms, alarm motors. We have all spare parts for doors in stock.
Elimination of door sag from 200 rubles.
You can sign up for installation by phone. 89372817000. auto repair shop Br-Gavs
The video shows the “TuneAuto” handles, they are slightly different from the “Lynx”, they have three attachment points, and only one handle, the driver’s handle, has a hole for the lock cylinder. The hole for the lock cylinder is always oval. If you insert a cylinder with a key into this hole and twist the key, it will rotate very tightly, since the hole in the handle itself is oval)), but if installed correctly they last quite a long time, they should be installed on 1-3 year old cars, since these handles have weaker design; when installing “TuneAuto” euro handles, it is often necessary to replace some tired external locks (chocolate bars) with new ones to make it easier to open the door; in principle, such replacements of “chocolate bars” often occur when installing “Lynx” euro handles, because with any installation of euro handles the quality of the installation also depends on the locks and mechanisms on this car; if the locks or internal mechanisms are worn out, this often happens with the driver’s door, because it “suffers” the most - it is used, you will have to replace one or another mechanism so that this door no longer bothers you.
The video shows how the handle works, when opened it returns back to its place, there are zero gaps, it works clearly, this is how the TuneAuto euro handles should open the door, by and large the Lynx euro handles open the door just as clearly, returning after opening to its place, with proper installation.
This video shows how to install the Euro handle “LYNX” in the door.
The following video shows how the Euro handles “LYNX” are opened
silent locks in combination with euro handles
The design of external door handles on VAZ 2113, 2114 and 2115 cars is quite reliable if we consider the old-style handles. But there are often problems with new, so-called Euro pens. But in this article we will look at the replacement of external handles using the example of old-style cars.
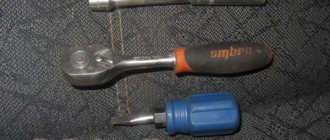
In order to make this repair yourself, you will need the following type of tool:
- 8 mm head
- extension
- ratchet handle or crank
- screwdriver short flat
Adjusting the trunk lid
Having talked about how to replace a door with your own hands, we’ll also tell you how to adjust the trunk lid on a VAZ 2114 after installing it.
To do this you will need:
- in the closed state, outline the approximate location of the symmetrical location of the lock and its latch;
- loosen the fasteners, and then fix the lock and its counterpart in the new position (you should not tighten the fasteners “to the fullest” - it is enough only for the lock parts to maintain their position);
- check the functionality of the trunk - if it opens and closes, unlocks and locks without problems, then you should finally fix the position of the lock, but if difficulties arise or a misalignment is observed, the fasteners should be loosened and the position of the lock and latch should be adjusted, and then repeat the check.
Thus, almost every driver can independently repair or replace the trunk lid of a VAZ 2114. The most important thing is not to put off this event “for later”, because when the first signs of distortion or difficulties when locking appear, you can get by with simply adjusting the lock, whereas if the latch bursts, the entire device will need to be replaced.
Lada 2114 › Logbook › Euro handles: Installation
twist the plastic tip,
to adjust the gap in the handle
and put it on for traction. DMMC has just such a problem, we will fix it as soon as possible. The handles have such a principle of operation that when you pull on it, the rod goes down, pressing on the lever that opens the lock; when you release the handle, the lock lever rises along with the rod and the higher the rod rises, the smaller the gap will be or not It will be possible if you configure everything correctly. The back door was dismantled together, and I was the one who installed the handle. I found on the Internet how to remove the window handle, I’m posting it here in case it comes in handy for someone.
It's pretty clear what's what.
The process is the same, remove the old handle and install a new one. We adjust the rods and see that they, by the mother of their feet, are 2.5 cm longer than they should be! And even if you tighten the tip, the situation cannot be corrected. The desire to do something was completely repulsed. I put the old pen back and went home. I couldn’t sit quietly - I started reading the drive, maybe someone had already encountered this - no, no one had. I decided to bend the urge,
It doesn’t look strong, but I couldn’t bend it, I asked my father, he bent it, then they adjusted it several times by bending it in place and installed this handle at night.
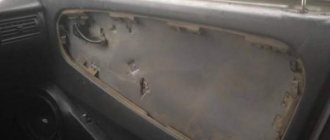
Three days passed, I was again able to get to the car in the literal sense of these words. Already with another friend I began to remove the trim from the driver's door.
I began to tear off the vibration with a screwdriver, the paintwork was not damaged much, but I managed to tear off the vibration without casualties.
There are two rods in the driver's door, one from the lock cylinder, the other from the handle.
We disconnect them with a knife.
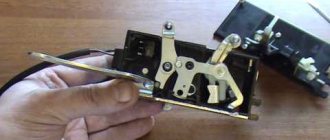
Now you need to rearrange the cylinder, if you did “One key for the whole car”, then you know how to do this, if not, then read and watch. First, we knock out the pin that holds the round piece of plastic, then we disconnect the spring with pliers, insert the key into the cylinder and pull it out.
READ How to install a motorcycle suspension yourself
We insert the larva into the new handle, and perform all the actions in reverse order. Then we insert the handle and hook the rods to the lock levers.
Well, before that I bought vibration sheets and stuck them on the front passenger door,
where I tore it off on Sunday. And then I put on the trim, otherwise it’s not cool to drive without one column. Ready.
And now about the effect. I'm happy. It doesn’t look familiar, holding the handles and opening the door is also unusual, but it’s convenient. Finally, my friend opens the door with ease; before she didn’t have the strength to press the hook of the handle. Everything works perfectly!
Source
Varieties
The Lynx Euro pens have a factory designation, which determines the differences between the sets.
- IN 1. This designation indicates that the package contains four handles - two rear and two front. In this case, the front larvae do not have.
- AT 2. There are also four handles, a pair for the rear and front doors. Only here the larvae are present.
Which one should I choose? The question is purely individual. On the one hand, B1 have a solid, smooth structure that is not spoiled by key holes. For external tuning they are simply perfect.
Article on the topic: Find out what and how to clean the VAZ 2114 mass air flow sensor: 3 best options
The second option is preferable for those who value quality, visual appeal, but at the same time reliability. After all, the presence of a cylinder will give you the opportunity to open the car with a key if problems arise with the alarm or key fob.
Preparation for installation
We purchase a lock kit. There are a lot of manufacturers of auto parts on the market now, but there are no special differences between the kits
It is important that the device has a warranty card and instructions for use and connection. Also in the box you will find:
Additionally, you need to stock up on a set of standard tools: pliers, screwdriver, screwdrivers, multimeter, drill with carbide drill bit. In addition to the standard accessories, immediately buy additional wires; it is quite possible that the length of those you find in the box will not be enough for you. Black heat-resistant insulating tape, corrugated tubes, and clips for fastening the trim will also be useful, since very often the trim of car elements is attached to disposable ones.
Installing euro handles on a VAZ 2114
Locking mechanisms, handles and other elements of VAZ 2114 cars, to put it mildly, do not have a very attractive design. One such example is standard door handles. Fortunately, on the market for spare parts and auto accessories you can select and purchase Euro handles for the VAZ 2114.
How are they different from the original ones, you ask? There are differences, here are some of them - smooth operation of the product, excellent appearance and more convenient design. In addition, it is worth noting the higher quality of the materials from which the modified handles are made.
As a result, they will last much longer than stock ones.
Varieties
Today, the most popular products on the auto goods market are: - Euro handles Lynx VAZ 2114. Products from this manufacturer are in greatest demand in Russia. Great demand is due to their stylish design, quality of materials used, trouble-free operation and proven durability of use;
— Prosport. They are slightly inferior to the previous brand, but in terms of quality they are significantly ahead of stock products from AvtoVAZ.
Installing euro handles on a VAZ 2114
Now let's look at the whole process of self-replacement. To carry out the work you will not need any special tools, lifting mechanisms or other favorable conditions. All you need is:
- flat and Phillips screwdrivers;
- key to "8";
- spare clips for fastening the casing (may be useful if you damage the old fastenings);
- a couple of hours of free time and a little patience.
So, the whole stage includes the following steps:
The first, rather lengthy and responsible job is removing the door trim. First we need to remove the so-called card. It is better to start work from the front doors. First, use a Phillips screwdriver to unscrew several screws around the perimeter of the bottom of the door (storage niche). To remove the trim, you will need to disconnect the window handles and door handles. Disconnect the contact chips
Try to remove the trim carefully, gradually snapping the clips off the fastenings and metal of the doors. It happens that some clips get damaged, so stock up on a small amount in advance. Now that the door card has been removed, we can observe the entire interior space
We are, of course, interested in the handle mount. So, we take a regular “8” key and unscrew the nut from inside the door, while at the same time holding it with our hand (so that it does not fall into the internal cavity). The second fastening nut is located at the very edge of the door, above the locking unit. As in the first case, unscrew it. Next, you need to remove the two internal rods from the handle. From the outside of the car, pull the door handle towards you, while rotating it so that the rods come out of the hole in the metal. Take a new product and transfer the internal contents from the factory handles (locking mechanism, cylinder and rods) onto it. Sometimes certain models of Euro handles are equipped with their own rods. At the replacement stage, it would not be superfluous to lubricate the internal parts of the lock with a special product. In addition, the places where the handles are attached must be cleaned of dirt or dust. Rear handles are much easier and faster to change (they do not have a locking mechanism or cylinder). Install everything in the reverse order. Before installing the cards on the doors, it is very important to make sure that the mechanism is working. Check each door individually; opening and closing should be done without any complaints.
Now the question of how to install Euro handles on a VAZ 2114 will not cause you confusion or any difficulties.
Replacing the cover yourself
To remove the trunk door you will need:
- knob;
- set of socket heads;
- slotted screwdriver;
- set of open-end wrenches.
Replacement procedure
The replacement of the VAZ 2114 trunk lid itself is carried out in the following order:
- Open the tailgate and secure it with a suitable size prop.
- Using a flat-head screwdriver, pry the mounting location of the upper hinge of the gas-filled stop, press it inside the trunk and disconnect it.
After the trunk door is removed, you should carefully inspect the condition of its hinges - if they or their fastening elements are skewed or have cracks, then they should be replaced.
It is produced as follows:
- Remove the gaskets from both hinges.
Reassembly and installation of the tailgate is carried out in exactly the same order as disassembly, but in reverse order.
Door opening method
If the VAZ-2109 door does not open from any side, then the cause of the breakdown is difficult to determine, since there is absolutely no access to the lock mechanism.
A somewhat simplified version of the breakdown occurs when the door does not slam shut completely and gets stuck in that position. Then it is possible to reach the latch from the outside with a sharp object.
To open a jammed door, you must first perform the following steps:
When simple means do not produce results, the door will have to be opened from inside the cabin, which will require removing its trim.
In practice, this is not easy to do, because the casing is pressed by the sash and it is difficult to pull it out without damage. But there is still no other way out: it is better to damage the inner panel than to mutilate the door itself.
To dismantle the decorative panel, you need to unscrew the armrest handle with a screwdriver, and then the storage shelf located at the bottom of the door card. Then the button that secures the lock from above is unscrewed and removed.
Lastly, the window lifter handle and the opening handle frame are removed. Now you need to carefully separate the lining from the body using a pair of flathead screwdrivers and another suitable tool.
You may be able to remove the trim without visible damage.
When the decorative panel is removed, access to the lock mechanism from the inside opens, although getting to it is inconvenient. Immediately check whether the rod running from the handle to the lock has fallen off. This is a fairly common malfunction that can be fixed with little effort. Put the rod in place and open the door.
If there are no visible reasons for the breakdown, simply try to open the door from the inside by working on the mechanism with various tools. If necessary, enlist the services of an assistant who will press or pull the door from the outside. Experience shows that such procedures for opening jammed doors can take a lot of time, so you will have to be patient.
How to lubricate ball joints before installation
Causes of malfunctions
There are several types of malfunctions that prevent the doors of a VAZ-2109 from opening from the outside or from both sides:
The latter malfunction sometimes occurs due to the fault of the car owner himself, who has decided to change or repair the door lock. Having put it in place and not fully tightened the screws, the owner of the VAZ-2109 accidentally slams the door, after which it will not be possible to open it with the handle.
Troubleshooting
If a key or silumin rod breaks, you should not immediately buy a new block with a handle. On sale you can find special repair kits for VAZ 2108-099 door handles, which contain these parts in 2 copies.
This way you will save money and easily change the key yourself by removing the handle using the following sequence of actions:
- Remove the decorative panel.
- Disconnect the rod connecting it to the locking device from the handle mechanism.
- With the glass fully up, unscrew the 2 fastenings of the handle to the door card.
- Remove the handle, replace the parts and put it back.
If the rod is disconnected, then you need to remove the inner lining and put it in place, as described above. Using the moment when the facing panel is removed, check what caused the disconnection of this rod so that history does not repeat itself when the door is slammed.
Malfunctions of the locking mechanism can only be eliminated by removing it. In a situation where the device has a lot of wear, as happens on the driver and front passenger doors, it is recommended to replace the lock with a new one.
After installing it in place, adjustment will be required to ensure precise alignment of the locking parts. To adjust, the lock will have to be fixed in different positions, achieving the optimal one.
Installation instructions for the electric trunk lock
If you are lucky with the standard lock, it locks and holds the tailgate well, then there is no need to change it.
In this case, you must have with you:
- window lifter roller;
- door activator;
- steel cable;
- wires with terminals;
- relay with four contacts;
- 10 A fuse.
To automate the opening of the trunk, it is necessary to ensure that the lock latch is pulled. For this purpose, a special roller is installed on the wiper gear housing. The steel cable is pulled through the roller and secured with conventional clamps. Experienced riders often use a bicycle cable because it is durable and flexible. Using it you can quite easily connect the door activator to the lock tongue.
You can connect the entire structure to the cigarette lighter if you do not have the proper knowledge of the car's electrical circuit. You just need to connect the plus from the cigarette lighter to the button and then to the lock. The negative comes from the taillight. Or carry out the operation of the trunk lock 2114 using a special relay.
Replacing the Internal Door Handle of a VAZ 2114
Replacement of all door locks on VAZ 2108, VAZ 2109, VAZ 21099
First, before starting work, from the car door on which you are going to replace any lock, first remove the trim; you will find information on how to remove the trim from a car door “in this article”!
Replacing the outside door handle:
1) First, disconnect both rods from the inner lock of the outer handle, to do this:
1. First, use a screwdriver to pry up the “door handle trigger rod” and then disconnect it.
2. Then, in the same way, disconnect the second rod “door lock switch rod” from the internal lock.
For more details on where both rods of the internal lock are located, see the photo below!
3) And after unscrewing the inner nut, completely unscrew the last nut, which is located on the edge of the door and also holds the outer handle.
4) And then remove the outer door opening handle, together with the rods, from the car door.
Replacing the lock cylinder:
1) First, remove the outside handle from the car door, if you still have it removed. (see "Removing the outer handle")
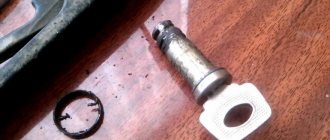
2) After removing the handle, using an awl or a thin screwdriver, push out the locking pin of the lock.
3) And then, on the back side of the handle, remove the lock leash.
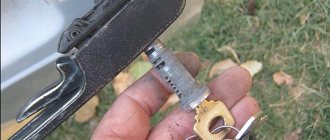
4) Next, use a screwdriver to pry the spring of the outer handle cylinder.
5) And then remove it.
6) To complete the operation, insert the door opening key into the cylinder, and then remove the cylinder from the handle.
Replacement of external and internal door lock:
Replacement of external door lock:
1) In order to remove the external lock from the car door, read a separate article about this, published earlier on our website, the article is called: “Replacing an external lock”
Replacing the internal door lock:
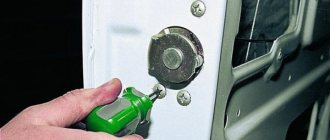
1) First, use a screwdriver to remove both screws that secure the exterior lock to the car door.
It is best to unscrew these two screws with an impact screwdriver, but if you don’t have one, then use a regular screwdriver! (If you do not know about such a screwdriver or do not know how to use it, then look at the article entitled: “What is an impact screwdriver and how should it be used?”)
2) After unscrewing the screws, remove the outside lock from the car door.
4) After removing the internal lock, remove from it using a screwdriver the lock washer that locks the “internal drive rod”.
5) And after disconnecting the lock washer, remove the “internal drive rod” from the lock.
6) Next, disconnect the plastic clamp that secures it from the “lock release button drive rod”, and then remove the rod from the lock.
Replacing the inner door handle:
1) First, use a screwdriver to unscrew both screws that secure the door handle to the car door itself.
2) Then put your hand into the inside of the door, and then remove the door handle from there.
3) After removing the handle from the inside of the door, disconnect the traction cable from it, and then remove it from the car.
Replacing the lock retainer:
1) First, use a hammer and an impact screwdriver to unscrew the central screw securing the lock retainer.
https://youtube.com/watch?v=DwqqeLoUXlw
If you do not have an impact screwdriver, then unscrew the central screw securing the lock retainer using a regular screwdriver!
2) After unscrewing the screw, remove it from the retainer.
3) Next, unscrew in exactly the same way as the central screw, two more screws that secure the clamp, and then remove the clamp from the car body.
Before removing the latch, we recommend that you circle the place where the latch was installed with a felt-tip pen, so that when you reinstall the latch, the adjustment of the door lock is not disturbed!
Trunk
When the car is moving, noise from the muffler and the road is transmitted through the trunk floor into the cabin. Therefore, it will not be superfluous to soundproof the trunk of a VAZ 2114. The design feature of this model is that the luggage compartment is located directly inside the cabin.
Soundproofed trunk on a VAZ 2114
The whole process can be divided into several stages:
- Pasting the trim and luggage compartment lid;
- Processing of metal components;
- Application of bitoplast;
- Assembly.
Now let's look at each stage in more detail:
- Remove all trunk trim elements to remove dust, dirt, and grease from the internal surfaces.
- Be sure to treat the surfaces with special anti-corrosion compounds and white spirit.
- Small elements of soundproofing materials should be glued to the casing. It is not recommended to use too much, as this will noticeably make the structure heavier.
- The lining of the entire trunk, including the area for the spare tire and the lid, is treated with sound-absorbing materials. Experts advise using Accent or Bitoplast. But in the spare tire area, use Splen.
- Now let's move on to the metal parts of the body. They need to be cleaned and then covered with sound-absorbing materials. Gold is well suited for the VAZ 2114 because it weighs a little but effectively copes with its task. Try to prevent air bubbles from appearing between the sound insulation material and the body.
- Next comes Bitoplast. It plays the role of a noise-absorbing material. It treats the entire surface of the trunk, excluding the spare wheel compartment. There, as you remember, Splen is used.
- You can then use a layer of Splen around the entire perimeter, applying it on top of the sound absorption material. In this case, Splen will play the role of a thermal insulation coating. Please note that you should not install a lot of noise, since you simply may not be able to install the casing back.
- The process is completed by assembling the entire structure. This is not difficult to do, just follow the instruction manual, try to work carefully with all fasteners.
https://youtube.com/watch?v=ll4YG8vvNrU
VAZ 2114 external door handle
External euro door handles Lynx in body color for VAZ 2109, 21099, 2114, 2115
External Euro door handles Tune-Auto in color for VAZ 2109, 2114, 21099, 2115
External euro door handles Lynx unpainted for VAZ 2109, 21099, 2114, 2115
Euro door handles Tune-Auto in body color for VAZ 2108, 2113
External euro door handles Lynx for VAZ 2108, 2113 in body color
Euro door handles Lynx unpainted for VAZ 2108, 2113
External euro door handles Tune-Auto for VAZ 2109, 21099, 2114, 2115 unpainted
Set of protective films against scratches for car door handles
Rear left outer door handle for VAZ 2109, 21099, 2114, 2115
Euro door handles Tune-Auto unpainted for VAZ 2108, 2113
Front left outer door handle for VAZ 2108-21099, 2113-2115
Front right outer door handle for VAZ 2108, 2109, 21099, 2113, 2114, 2115
Rear right outer door handle for VAZ 2109, 21099, 2114, 2115
External euro handles on the doors of VAZ-2114, VAZ-2113 and VAZ-2115 are a worthy alternative to factory handles.
- Firstly: aesthetics. External euro handles on the doors of VAZ 2113, 2114, 2115 give the car a more attractive appearance and make door opening softer.
- Secondly: reliability. The Volzhsky Automobile Plant, trying to reduce the cost of its cars, did not develop new external handles; it simply transferred them from previous models that were more than a quarter of a century old.
One of the common “diseases” of the Lada Samara 2 family and earlier VAZ 2108, 2109, 21099 cars is broken keys (triggers) of the external handles. Often such breakdowns occur in winter. During daytime temperature changes or after a car wash, moisture gets into the door lock mechanism, the mechanism freezes, and it is impossible to open it. Trying to open the door, we apply force, breaking the trigger. This will not happen with euro pens. They have an improved direct grip mechanism. This creates a stronger lever arm, which prevents the handle mechanism from breaking. This technology is successfully used on European cars. The handle itself is made of heavy-duty plastic (glass-filled polyamide).
Currently, Russian developers are represented on the market under the trademarks “Lynx” and “Tune-Auto”. Which produce European-class handles for VAZ 2108, 2109, 21099 and, of course, VAZ 2113, 2114, 2115, both painted in body color and unpainted. Rubber gaskets included. To increase the reliability of fastening, the gaskets are usually coated with sealant.
Any car enthusiast can buy and install external euro door handles. Replacement will not take much time and effort. To do this, you need a screwdriver and a key size 8. First, from the interior side, you need to remove the window lifter handle and the lock release button. Then unscrew the screws on the armrest handle and remove the handle. Next, remove the door trim. Having gained internal access to the standard door handle, dismantle it through the mounting window by unscrewing two 8-point nuts, not forgetting to remove the rod from the leash. Installation of the euro handle on the door of a VAZ 2113, 2114, 2115 occurs in the reverse order. The scheme for replacing Euro handles on VAZ 2108, 2109, 21099 is identical to the previous one.
Many owners of Lada Samara and Lada Samara 2 have a positive attitude towards euro handles, and without waiting for a breakdown, they replace the factory handles with euro ones. By purchasing external euro door handles for VAZ 2113,14,15 from and Tune-Auto, you will forever forget about repairing external door handles, make your car bright, and opening doors comfortable.
VAZ-2114 owners have repeatedly faced the problem of replacing a door handle. This process is quite simple, but people often get confused with it and, out of ignorance, damage the element itself or a neighboring one. The article will tell you how to replace a door handle from the outside without much effort.
Video about replacing the inside rear door handle (carefully mat):
VESKO-TRANS.RU
replacing trunk lock
for VAZ 2113, VAZ 2114, VAZ 2115
Welcome! Luggage compartment lock. it is responsible for closing and opening it, so the luggage compartment also remains in the closed position, and until you want it, it will not open, but eventually the lock will wear out or the luggage compartment lid will be replaced last, in this case the first. you will need to adjust and lock it if it is worn out and replaced with a new one, otherwise the trunk lid will not open (it will be a clamp, this is the worst case scenario), or will not open to itself (when moving over the shocks).
The note! To replace your trunk lock, stock up on the following tools, including: a set of screwdrivers, wrenches, and spanners; in addition, shims can also be helpful, but this is only if you need to adjust the lock and it needs to be adjusted. New castle castle!
Where is the download block? Any car has a trunk on the trunk, it doesn't play any role and it doesn't make sense, but if you also install a lock on this lock (every car also has a lock), then when you close the trunk lid, the lock will be engaged by this, the lock and the lid are locked, these two parts are located as follows, namely, the lock itself is located in the center of the rear of the trunk lid, as shown in the large photo, and the lock is not placed on the hood, but on the car body (see small photo), and when The trunk lid is closed, the lock has been cleaned in the latch and the lid is secured.
Product delivery options
Note! Below are the shipping methods available specifically for this product. Payment options may vary depending on the delivery method.
Detailed information can be found on the “Delivery and Payment” page.
Parcel by Russian Post
Available payment methods:
- Cash on delivery (payment upon receipt)
- Using cards Sberbank, VTB, Post Bank, Tinkoff
- Yandex money
- QIWI
- ROBOKASSA
Shipping throughout Russia. Delivery time is from 5 to 12 days.
Parcel by Russian Post 1st class
Available payment methods:
- Cash on delivery (payment upon receipt)
- Using cards Sberbank, VTB, Post Bank, Tinkoff
- Yandex money
- QIWI
- ROBOKASSA
Shipping throughout Russia. Delivery time – from 2 to 5 days. More expensive than regular delivery by Russian Post, approximately 50%. Parcel weight up to 2.5 kg
Express Parcel EMS
Available payment methods:
- Cash on delivery (payment upon receipt)
- Using cards Sberbank, VTB, Post Bank, Tinkoff
- Yandex money
- QIWI
- ROBOKASSA
Shipping throughout Russia. Delivery time – from 3 to 7 days. More expensive than regular delivery by Russian Post, approximately 100%.
Transport companies
Available payment methods:
- Using cards Sberbank, VTB, Post Bank, Tinkoff
- Yandex money
- QIWI
- ROBOKASSA
Delivery is possible to any locality where there is a representative office of the transport company. Delivery time – from 2 to 10 days. Sending large parcels is approximately 50% more profitable than by Russian Post.
Courier delivery in Togliatti
Available payment methods:
- Cash upon receipt
- Using cards Sberbank, VTB, Post Bank, Tinkoff
- Yandex money
- QIWI
- ROBOKASSA
Delivery time from 1 to 12 hours.
Pickup from our warehouse
Available payment methods:
- Cash upon receipt
- Credit, installments
- Using cards Sberbank, VTB, Post Bank, Tinkoff
- Yandex money
- QIWI
- ROBOKASSA
Pickup times must coincide with store opening hours.
Every car owner's vehicle contains myriads of small parts that, if they break down, do not deserve due attention, although they have a significant impact on the smooth operation of all vehicle mechanisms. For example, the strength of sound depends on the frequency and speed of vibration of small particles propagating in a certain composition of the medium: liquid, gas, solid. Likewise, in a car, any inconspicuous detail fulfills its purpose in a complex of auto elements that form a single body, subordinate to a specific goal: calm and comfortable movement in various climate conditions. Car door handles are not an exclusive element from the general composition of transport components.
The car handles on the outside of the body follow the contour of the vehicle’s body. The doors of expensive cars have chrome door handles. Modern luxury cars are equipped with an electronic access system that requires scanning the owner's thumb to open the car door. Owners of domestic cars are taking small steps closer to luxury and style, replacing old handles with external euro handles, made with the latest technology and appropriate design, which will serve their purpose perfectly, providing comfort and convenience to the owner of a VAZ 14-15 vehicle.
The thought of replacing the door handles of a VAZ 14-15 comes only when they break down or components break, leaving the car owner with a non-functional door. Such a small thing can cause serious inconvenience due to a faulty door handle mechanism, be it an internal or external door handle. This element is usually made of plastic and metal, representing a curved plate that provides access to the car. It's worth considering simple door handles as one of the most commonly used car components. They may not be able to withstand harsh tugging, door slamming and other unreasonable behavior, which will result in serious inconvenience with access through a window or side door, and even worse, through the trunk. Taking care of door handles is as important as changing the oil. The price is affordable, and the benefits of unhindered access are invaluable.
Since 2005, it has been allowing you to experience the wonderful moments of a luxurious exterior when driving vehicles of the 14 and 15 VAZ models. Replacing the handles with euros will provide minor luxury, comfort and reliability in the same style and color scheme. The company has been manufacturing high-quality parts for many years, constantly testing the resistance to external influences and durability of the coating of external Euro door handles of VAZ, which indicates their reliability, high strength and carefree driving
The company's specialists pay special attention to details in the production of any product. That is why all handles are easy to install, without adjustment or alteration
How to lift a door
If the structure continues to sag, it needs to be raised. We list the main methods:
- Open the door, loosen the hinge bolts. Grasp the edge of the body with your hand. Gradually lift until the fragment is in place. Tighten the hardware.
- Use a jack to raise the blade and then lower it with a sharp movement.
- Buy washers with a diameter of 20x10 mm. The greater the sagging, the greater the width of the part should be: from 1 to 2 cm. The screw of the lower hinge is unscrewed, a washer is inserted onto its post, and the mechanism is tightened.
An integrated approach is recommended during adjustment, so you should carefully study all the information before undertaking independent repairs.
Causes of malfunction
If the product begins to work incorrectly, the part must be repaired or replaced. Sometimes it is enough to carry out preventive actions to avoid a malfunction. Car enthusiasts tighten the bolts of the internal mechanism, lubricate or adjust individual elements. In any option, disassembly of the door is provided to gain access to the metal of the body. Reasons for dismantling:
- Defects found: scratches, abrasions, chips, microcracks.
- Required tightening of fasteners.
- It takes force to open the door. Insufficient adhesion to the body part was noticed.
- Adjustment required.
- There was a breakdown inside: the hardware came off, a gap appeared between the door and the handle, and the device began to wobble.
- Mechanical damage was detected.
- An intruder tried to open the car.
- Due to improper operation of the handle, the door does not close properly.
- The external manipulator is damaged.
- The body was deformed as a result of the accident.
If the cause of the breakdown is related to an accident, then preventive repairs will not help. The handle consists mainly of plastic. The material is durable, but not strong enough to withstand a strong blow.