Rear window replacement
Replacing the rear window of a VAZ 2109
You can replace the rear window of a VAZ 2109, as mentioned above, yourself. Before installing new glass, you must remove the old one.
Removal
To do this, you should:
- Take a screwdriver and insert it into the seal that holds the glass. It should be inserted approximately 5 mm.
Note: it will be possible to insert the screwdriver deeper, but you should not do this, as you may make a hole that is too deep.
- Push the seal out. First you need to pull out a small piece. The downside is that you cannot pull out the entire seal by pulling it. It's just quite fragile, so it breaks quickly.
- Carefully move the screwdriver a few cm. Tear off another piece of the seal.
- Step by step you can get rid of everything.
Note: since the glass is secured with a seal, as soon as it is gone, it will begin to wobble. Therefore, you need to get rid of the seal slowly and carefully so that the glass does not fall out before it is needed.
- After the seal has been removed to the upper side corner, you can begin to remove the glass itself.
Replacing glass on a VAZ 2109
Don't try too hard when removing the glass. Usually it cannot be kept completely intact.
It certainly cannot be reused. The main thing is not to damage the body of the vases, otherwise additional repairs will be required.
Preparing for installation
Before you begin installing new glass, you must do the following:
- Wipe the edges with degreaser to make it easier to install the seal. That is, the cleaner the glass, the better the seal will fit.
Note: If the old seal was removed carefully, it can be reused. However, in order to remove it carefully you will have to suffer. Therefore, it is advisable to use a new seal.
- Put on the seal. First, it is distributed in the corners, and then pressed against the sides of the glass.
- After this, you should install a lock, which is a small wedge that looks like the letter P. It needs to be inserted so that it is in the center of the seal, but runs along the entire perimeter.
Note: The wedge should be stretched slightly before installation. If you don't do this, then there simply won't be enough. Usually you can stretch it up to 20 cm!
- The wedge is installed as follows: first you need to insert the long part, then the short one. This needs to be done around the entire perimeter of the glass. If a small part of the lock remains intact (that is, it is redundant), then it must be cut off, otherwise it will interfere with subsequent actions.
Installation
Replacing glass on a VAZ 2109
Installing the rear window may be necessary when replacing it, or when tinting it. Although usually, tinted glass is new, since, as stated earlier, it is almost impossible to remove the rear window without damaging it. In order for the installation to be completed successfully, you should find a rope that is long enough to completely surround the sides of the rear window. It should be quite tight, since it cannot be allowed to tear. If part of the rope remains in the seal, it will be very difficult to pull it out. The installation of a new rear window should be done as follows:
- Determine where approximately the middle of the rope is. Insert this part into the upper side of the seal.
- The seal has two grooves. You need to find the one that is closer to the top of the glass.
- Use a screwdriver to insert the rope into the groove until it stops. You need to insert the rope to the middle of the glass area. We need to stop there. One end of the rope should hang freely on one side. In this case, the second one must be stuck into the seal.
- On the opposite side, you should also insert the rope until it intersects with the end of the previous rope.
- When they intersect, the end of one must be placed on the end of the other.
Note: the ropes must overlap each other. The overlap should vary between 5-10 cm.
- The free ends of the rope should be pulled into the cabin.
- Only after this can glass be placed in the opening. It is advisable to have someone help, as it is quite heavy and can be accidentally dropped. The bottom of the opening should fit into the outer groove.
Replacing glass on a VAZ 2109
- You need to press lightly on the glass. At the same time, it should press even better into the seal. In addition, this way it will sit in its place much better.
- The rope should be pulled towards you from both sides (as if you need to tie a knot).
- Stretch half the rope to the bottom corners of the glass.
- After this, smoothly seat the glass.
- To make it easier to pass the left corners, you need to “twist” the rope clockwise, and the right corners – vice versa.
Note: Since the rope is quite tight, this process will happen very slowly. However, the end result will please you. After all, in this way the insulation will fit well on the opening and will hold up well afterwards.
- While pulling the rope, you need to carefully seat the glass in the opening. There is no need to hit the glass, as it is still sitting very precariously, so it may fall out.
- When the rope has completely come out, you should carefully check the interior. After all, the seal could come out slightly. To fix this, you should drive it into the opening using a flathead screwdriver.
- At the end, you should shrink the glass all the way. To do this easily, you need to place your hand on the top edge, lightly hitting it with your second hand. The same should be done with the rest of the glass area.
Usually the glass shrinks to its maximum after 3-4 days of driving. This is facilitated by the constant vibrations that the car undergoes while driving. If you want to save time, you can take the car to a car dealership, where the price for this work will be rather high. However, you can carry out repair work yourself and at home. Of course, before this you should review various photos and videos on this topic. And if you come across instructions somewhere on the Internet, you should not neglect them.
You can also learn about windshield replacement on our website.
How to find a breakdown
To find out exactly what the reasons for the failure are, you only need a standard voltmeter, which every self-respecting car enthusiast should have. By simple manipulations with this measuring device, the problem will be identified very quickly.
You should start checking the heating element filaments with the following steps:
- the metal tips of the probes are wrapped in tin foil (this will avoid damage to the tracks);
- turn on the ignition;
- check whether the heating button is pressed;
- one probe is applied to the plus of the heating element mounted on the rear window;
- the second is installed approximately in the center of the thread.
If the device shows 6 volts, this means that there is no damage in this area. If the tester produces 12 volts, the gap is located somewhere in the segment between the probes.
If there are 10 volts, we can confidently say that the gap is located between the minus and the center of the track. In this situation, connecting one probe to the negative output will allow you to more accurately determine where the damage is located. At the same time, the second one must be carefully guided along the thread from the plus to the opposite end. Finding the exact location of the break is indicated by an increase in voltage from zero to 5 volts.
If you don’t have a voltmeter at hand, then the break will also be easy to find visually. To do this, you will need to wait until the windows in the car fog up, and only then turn on the heating. Where the track remains operational, the moisture will begin to evaporate noticeably. Condensation will remain in de-energized areas. It is these sections of the heating element that will need to be examined in detail. To do this you will need a magnifying glass.
If the heating is completely out of order, it can be replaced with a removable model, which is attached to the glass using special suction cups. It is connected to the car's electrical network, like many other devices, through the cigarette lighter.
There are also modifications on sale in which an additional fan is installed. But this option is not very practical because it requires too much electricity.
Design and dimensions
Consumables that do not match in size are one of the reasons for rapid breakdown. To prevent troubles, take the choice of a new part more seriously.
Head-on
The dimensions of the windshield of the VAZ 2115 are 1400×662 mm. The dimensions of the windshield on the VAZ 2114 and 2113 have the same dimensions, which makes it easier to find a new spare part.
It is multi-component: two glass layers and a film between them, the so-called triplex. This structure prevents fragments from scattering when damaged.
Rear
Cracks or chips on parts are rare. The size of the rear window of the VAZ 2114 is 1210x656 mm.
The parameters need to be known if the driver wants to tint the car.
How to do it correctly: REPLACE THE TRUNK GLASS FOR VAZ 2108/09 ALSO 2114 ETC.
To watch online, click on the video ⤵
How to remove and replace the rear trunk door glass VAZ 2108-09-099-014-015/demontaz szyby klapy tyl. More details
Replacing the rear window on a VAZ 2114. How to remove the glass of a VAZ 2114/2109. . Dagestan, Khasavyurt Read more
Rear window replacement 2109 More details
Removing the rear window of a VAZ 2109 by Serega))) Read more
How to install the rear door glass of a VAZ 2109 2110 2111 Read more
Replacing the trunk lid 2114 More details
Remove and install rear door glass of VAZ 2114 Read more
removing glass from the trunk lid 2109 2114 More details
We install the rear window in a VAZ 21099 car Read more
We are changing the REAR FOREHEAD TO NINETY! (VAZ 2109) More details
Replacing the trunk lid of a VAZ 2114, bomb-like appearance. More details
Replacement of door glass on VAZ 2114, 2115, 21099 and 2109 Read more
REPLACEMENT OF WINDSCREEN VAZ 2108, 2109, 21099, 2113, 2114, 2115 | HOW TO CHANGE YOUR WINDOWS WITH YOUR OWN HANDS More details
PUT OLD SCHOOL VENTS! More details
VAZ 2114#Replacing the windshield frame#How to remove the windshield on a VAZ 2108,09,13,14,15 Part 1 Read more
How to install insert window VAZ 2108-09-099-014-015/montaz tylnej szyby LADA SAMARA! More details
How to properly remove the glass of a VAZ 2113 Read more
How to choose
Don't buy cheap copies. Products with a suspiciously low price are either made of low-quality materials or are sold as disassembled parts. An inexpensive consumable will require replacement after just six months of use.
It is advisable to find an original spare part. It will definitely fit the car, and the quality will be higher than that of its analogue.
Inspect the part carefully. The surface must be smooth, without scratches, even and transparent. The reflection must be clear and clear. If it is cloudy, do not rush to shell out money.
Check markings, manufacturer and type. Information must be clearly written. Blurred markings are one of the main signs of a fake.
The price of consumables ranges from 1000 to 3000 rubles.
Economy segment
Xyg (China) - the best Chinese parts on the market. Pass ultraviolet rays. The material is not of the best quality: poor visibility, the image is distorted. Weak structure. This consumable will have to be changed twice a year. Overall, the price is reasonable.
Borovskoye KMK (Bor, Nizhny Novgorod region). The spare part is made of soft material, chips and scratches quickly appear. Doesn't take punches well. Cheap, but short-lived.
Premium segment
Pilkington (UK). European quality. Resistant to scratches, chips do not appear the first time. Will last a long time.
Borovskoye AGC-glass (the plant was purchased by the Japanese Company AGC-Glass). Decent choice. Japanese quality, quite high price. The company provides energy-saving, multi-layer shock-resistant and colored lacquer-coated glass.
Dismantling
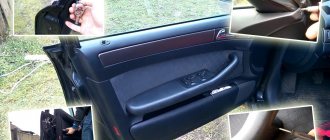
So, to change the door trim, the first step is to remove the door components and get rid of the old trim material. Basically, all you need to get started is a set of screwdrivers and a good mood.
- First remove the podium. To do this, there are three mounting bolts under the podium, which can be unscrewed with a simple Phillips screwdriver.
- Remove the podium carefully, take your time. Otherwise, there is a risk of damaging the wiring from the power windows.
- Disconnect the connector with wires from your power windows.
- Now you need to remove the door handles. Pry off the covers with a flat-head screwdriver. Under them you will find mounting bolts. They are unscrewed with the same screwdriver, after which the handles are easily removed.
- The next step is removing the door opening mechanism trim. To do this, you need to carefully pry off the cladding using a flat-head screwdriver and remove the element.
- There are locking mechanisms on top of the doors. Plastic pins. They have a hole where a Phillips screwdriver fits perfectly. The stoppers are removed by simply unscrewing them with a screwdriver.
- There are probably speakers on the front doors. To remove them, simply unscrew the mounting bolts. If these are not standard speakers, the dismantling procedure may be slightly different.
- Carefully remove the speakers from the casing and disconnect the wiring. Do not pull anything sharply until you are sure that all wiring is disconnected.
- Remove the plastic lever that adjusts the side mirrors and get rid of the decorative moldings.
- Now you can remove the casing itself. It is held in place by plastic pistons, which are inserted directly into the metal part of the doors.
- Using a flat-head screwdriver, pry up the trim, smoothly detaching the material from the surface.
- Don't be afraid to break the caps as they are consumables. New ones will cost a small amount of money.
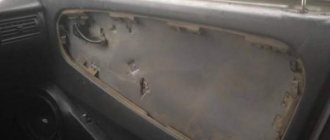
Dismantling is in full swing.
Each door will take you about 30 minutes, maybe more. It all depends on the skill and level of preparation.
Sheathing
The doors have been stripped of everything unnecessary, so you can start covering them.
Clean the surfaces, get rid of traces of rust, debris, and damage. Once you have disassembled the doors, it would be a good idea to check the condition of the metal and carry out a number of preventive maintenance works; If you want to increase the soundproofing properties of the door, you can glue foam rubber under the new cladding material; Cut out the new trim pieces. To do this, you can use a pattern or simply attach the material to the door cards and cut out the necessary elements; Do not forget to provide allowances around the perimeter of the sheathing material so that it can be bent; Cut holes in the material for handles. Leave a little more so that when installing the handles, they will pull the material along with them, and you will not have any traces of cutting on the outside; Apply glue to the base of the sheathing material
The choice of adhesive largely depends on the type of sheathing you are using; In the case of the VAZ 2114, special attention is paid to the armrest, where careful and thorough tension is required; Straighten out any irregularities and make sure there are no wrinkles. To do this, it is better to use glue that does not dry instantly.
This will give you the opportunity to correct unevenness; Perform the procedure for reassembling the door elements when the glue is completely dry.
Replacement example
The work is completed. There is nothing particularly complicated about door trim. The only most problematic parts are the door disassembly stage. But if you have at least a little experience, you can easily cope with the task.
Loading …
Causes and consequences of damage
Driving on poor quality roads in Russia forces car owners to look for a new windshield at least once every year and a half. Even a very small pebble flying from under the wheels of a car can lead to damage to the part.
There are two types of damage:
- Chips. If only a chip appears on the surface, the driver is lucky. This means that the first layer is damaged; it is not necessary to install a new spare part.
- Cracks. You can't hesitate. At any moment, glass can crumble into pieces due to a hole in the road, and this will lead to an accident.
What can you do
If the driver fails to change it in time, there are several popular tips:
- Using a glass cutter, make perpendicular cuts 0.5 cm long along the edges of the “web”.
- Drill small holes with a thin diamond drill bit. The work requires accuracy, patience and attention.
- “Weld” the crack. It's better to contact specialists. Without experience it will be difficult.
Dismantling of air ducts
Sometimes, in addition to removing the deflectors, you also have to remove the air ducts themselves (this may be necessary if they are damaged or severely clogged).
Heater device with air ducts VAZ 2114
In order to dismantle them, you need:
- remove the deflectors (how to do this was described above);
- remove the dashboard by unscrewing the fastening screws;
- disconnect the side air ducts (left and right) by unscrewing two screws securing them to the central air duct;
- disconnect the central air duct by unscrewing three screws - one in the center and two at the edges.
After the air ducts have been cleaned or replaced with new ones, their installation and assembly is carried out according to the specified scheme, but in the reverse order.
Replacement
There are two options for replacing the windshield on a VAZ 2114:
Contact a car service. Fast, simple, but expensive. On one's own. If you have experience in repair work of this kind, time, patience, and an assistant, then dismantling is possible in your own garage.
How to remove
The work begins with the fact that we remove all unnecessary things. Side trims, wipers - this interferes with dismantling. Now we remove the old glass: starting from the top corner, squeeze it out along with the rubber. It is advisable to have someone help. If you pry the seal with a flat screwdriver from the inside, it will be easier to remove the headband.
You need to work with gloves, taking safety precautions.
Clean the grooves. The replacement now needs to be replaced with a seal. If the rubber is cracked, it is also advisable to replace it.
How to replace frames and seals
Replacing the windshield frame requires more effort, but this operation can be done at home.
We measure the frame. Its width is 680 mm in the center and 1378 mm diagonally. Further actions:
- We weld the fasteners on the sides.
- We make an amplifier, weld it to the frame from the outside.
- We clean the frame and the cavity for the wipers.
- We prime it twice.
- Apply adhesive sealant.
- We evenly coat the frame and cavity with paint and weld it.
The seal needs to be replaced as it wears out. If it has shrunk in places and lost elasticity, then it is advisable to install a new one in the near future. To replace the front window seal of a VAZ 2114 you will need:
- a set of flat screwdrivers;
- stationery knife;
- putty knife;
- solvent for nitro paint;
- adhesive sealant.
To make installation easier, apply lubricant to the rubber seal and soap solution to the lower groove. You need to put a thin, strong rope inside the seal. Place the new seal on the glass. We pull the ends of the cord in the center of the bottom of the material. It is advisable to soak the cord with detergent.
We are installing new glass
Let's start by placing a rubber band on the new glass. Then put another rubber band in place called the lock. It is executed brilliantly, so drivers know. Why is the blocking applied before glass installation and not after? Because it is much faster and, as practice shows, more convenient. After installing the lock, the most important thing. install rear window
in its place. For this we need a cord length of two meters (in general, it is better to have a cord, a screwdriver and a friend on a plate to cook in advance).
We insert the cord into the seal groove, but not along the entire length, but only for the upper and side stays of the groove. The remaining ends of the cord should be approximately the same length. We will then take the glass and insert it into the bottom groove as if we were wiping it so that the seal is flat. Then, calling on a friend for help, we begin to press ourselves against the glass, pulling the cord out of the groove. The cord simultaneously pushes the rubber band and allows the glass to take its place .
This operation should be performed slowly, alternately pulling the cord from the right side, then from the left side. When the cord is fully extended, the glass with elastic bands will fit completely into its grooves. And this will mean that you have succeeded.
The windshield on a VAZ 2114 cracks twice as often as the rear one, as it is more susceptible to mechanical stress. Replacing it does not require Herculean efforts or special education. You can do this yourself without contacting a service station.
How to put
During installation you will have to resort to outside help. The glass is inserted into the lower groove, and only then carefully around the entire perimeter. As you insert the windshield, pull out the cord to fit the seal tightly and efficiently.
Be careful when pulling the rope at bends! In the side parts it slides with difficulty and can tear; press harder from the outside of the car.
It is advisable to fix the rubber with glue-sealant, and attach the glass to the roof and sides with tape overnight.
Replacing the rear window of a VAZ is carried out in the same way. If you installed a windshield, you can install this, although removing the rear window is a more difficult task. To insert the rear window, ask a friend for help, as you will have to pull the rope and press on the consumable at the same time.
Modifications of VAZ 2115
- engine with a displacement of 1.5 liters with a carburetor power supply system (the car of this configuration received the VAZ 2115-01 index);
- an engine of the same volume with distributed fuel injection VAZ 2111 and electronic control (the car of this configuration received the VAZ 2115-20 index).
The car uses a single-wire circuit, in which the negative pole of the power supplies is brought to ground, and the “+” is supplied by a separate wire (see also VAZ 2112 injector wiring diagram).
- the VAZ 2115-20 model has larger wiring harnesses due to the installation of additional sensors and electronic devices;
- The connectors of some electrical circuits have also changed;
- The layout of some of the wires has changed.
Car electrical protection
The exceptions are:
Protection is realized using a fuse box assembled in the engine compartment. All powerful consumers, such as the starter, wipers and high beam lamps, are connected to the on-board network via a relay and are located in the mounting block.
The graphic diagram of the mounting block below the symbols shows:
For reference: the incandescent fog lamps in the rear lights, together with the power indicator lamp, are protected by a separate fuse. It is located in the cabin under the dashboard in the wiring harness near the fog light switch.
How to change the rear window of a car with your own hands
Of course, it's not often that a car's rear window cracks. But still, many car enthusiasts are worried about such a breakdown. After all, sometimes they have only one option left - replacing the rear window. We list the situations in which it is necessary to replace the rear window:
- consequences of a traffic accident;
- a stone flying from under the wheels of a speeding oncoming car created a very large crack on the highway;
- reinstallation of a standard window with a similar one from another modification of the car;
- Body repairs are being carried out, while the glass element interferes with the work.
Next, we will consider several cases of replacing a defective rear window, applicable to both domestic and imported cars.
Let us first note that with this repair there are certain difficulties associated with the rubber seal or the adhesive seam.
The trunk lid of the VAZ 2114 rattles - the solution
And so, as I wrote earlier, for me, like all Samaras, the rear of the car produces characteristic creaks, knocks, etc.
I spent a week surfing the net, searching for this terrible creak for a week. Someone said that the handbrake cable was rubbing the beam, someone said that the bushings should be coated with silicone, etc.
I myself sinned that it was a stand. But looking under the car I saw that the cable was rubbing against the bottom. As advised, I sprayed these places and bushings with silicone, but there was no result. And today, having agreed with my friend, I decided to take a ride in the trunk. It was fun, there’s enough room for two more: D (this is just in case for carrying corpses, etc.)
Well, my ride for a couple of minutes in the luggage compartment gave results. As it turned out, the trunk door creaked. It seems that the sound was in the area of the left pillar... but oh well, the main thing I found was that it was creaking.
The lock is new, adjusted, but to no avail :(
Once I saw a friend’s lock on the fifth door. The old owner of the car placed it at an angle. At first I laughed, but then I thought, I need to do the same. But there was no case.
Today, when I was riding in the trunk, I remembered about his lock, and started doing the same for myself. And you know, the old owner of his car is a genius. The door is firmly seated. I myself did not expect such results. One minute job!
If anyone has the same problems with the door, do the same. The effect will please you.
How to reinstall a VAZ element
If we describe the replacement of the rear window on a VAZ 2106, then we must take into account that the “six” does not have window heating. To work here, in addition to an assistant, we need:
- flat screwdriver;
- blanket;
- nylon cord 5 m;
- soap solution, brush.
Also read about repairing a crack in a car windshield and replacing a rear engine mount.
Begin.
- From the trunk side, use a screwdriver to pry up the trim trim in each of the lower corners and remove it.
- We remove from the inside, in the cabin, all decorative trims covering the edges of the window.
- Starting from one of the lower corners, bending the seal with a screwdriver, gradually squeeze the glass out along with the seal. The bottom corner of the window is released first, and then everything else.
- We pull out the glass by the bottom and side parts. Having taken it out completely, remove the seal from the middle to the edges.
- We inspect the seal and also clean its drainage holes with a screwdriver.
- We put the seal on the new part removed from the blanket, first moving along the bottom side, then along the side, then along the top side and again along the side.
- We insert the rope into the groove of the seal intended for the edge of the body along the entire perimeter, and at the end of the process there should be ends of the rope of 20 cm each.
- We coat the upper part of the seal and the edge of the body on which the rubber element will be placed with a soap solution.
- We place the part of the window where the ends of the rope come out onto the edge of the body. The assistant goes into the salon and begins to carefully pull out the ends of the rope. At the same time, we press on the outside and tap on the glass with our hand. As a result, the window should sit in its place along with the seal.
- We put everything that was removed back in place.
Types of automobile glass
Automotive glass for modern VAZ 2109 cars is manufactured using high technology. They differ from simple glasses in their high strength and design features, which allow all road users to be protected from injury during an emergency. There are two types of technologies for making windshields:
- Triplex. This technology is most often used for the manufacture of rear, windshield, side windows and hatches. Translated from Latin, triplex means “triple”, and the design involves the production of multilayer glass: more than two layers of silicate or organic glass. At the time of manufacture, they are glued together with a special film and then pressed at a certain temperature. When broken, the broken parts of the glass remain on the film rather than breaking into shards with sharp edges.
- Stalinite. The technology of its manufacture is that the glass is tempered: first it is heated to a certain temperature, and then it is cooled evenly and gradually in the air flow. When glass breaks, it breaks into a large number of fragments with blunted edges; in the event of an accident, they cause minimal harm to the driver and passengers harm. On modern cars they are used less often, but the temptation of installation elements is the lower price.
Tip: When buying glass, you need to carefully consider its markings. It is applied by chemical etching, located at the bottom right corner, and has a black color, as shown in the photo.
VAZ 2109 windshield markings
How to remove the windshield of a VAZ 2109
Replacing a windshield is mainly necessary after an accident or unexpected damage to the old one.
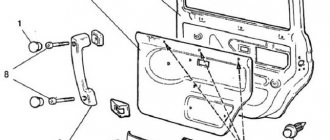
Installing a windshield on VAX 2109
- 1 – rubber seal.
- 2 – windshield.
- 3 – window opening flange.
Before removing the windshield on a VAZ 2109 you need to:
- At the top of the windshield, insert a screwdriver into the seal five millimeters.
- Push out the seal so that part of it can be pulled out.
- Move the screwdriver to the side five centimeters.
- Thus, consistently get rid of the sealant.
Advice: Operations should be done gradually, without jerking, and make sure that the glass does not fall out.
After removing the seal to the upper side corner, the glass can be removed. This is done in two ways:
- By squeezing out from the inside. To do this, gently press on the upper corners of the glass, which is then squeezed out.
- Pull the glass towards you. At the same time, you need to pull it up slightly.
Removing the windshield
After this, the rubber seal is removed, and the installation groove of the window opening is cleaned of dirt around the entire perimeter. Even professionals practically cannot keep glass intact, but old glass is usually not removed to preserve it.
Advice: It is better not to throw away damaged old glass, but to use it to cover the car when painting the body.
Preparing new glass
The instructions indicate that before installing the windshield on the VAZ 2109 you need to purchase:
- New windshield.
- The seal is rubber.
- Decorative strip for the lock.
- Nylon cord. Its thickness is up to four millimeters, length is approximately 4 meters.
The glass installation sequence is as follows:
- The seal is put on. You can use old glass that was previously removed from old glass. This element is more elastic and easier to install in place.
- Installing a new seal becomes more difficult. It must be placed on all corners of the glass.
- A locking strip is inserted into the corresponding groove in the rubber seal.
- A nylon cord is strengthened along the entire perimeter of the seal at the end of the glass. It fits into the deepest groove with a tight tension in the corners. In this case, the ends of the cord should meet at the bottom of the glass.
- The glass is taken and mounted with the lower edge into the groove of the window opening for installing the glass.
- With light pressure, the glass is completely inserted around the entire perimeter into the window opening.
- The assistant gets into the car and pulls out the cord.
- From the outside, you need to lightly press the places from which the cord is removed.
- You need to remove the cord to the upper corner, first in one direction, then in the same way in the other. Then the cord needs to be removed completely.
- After removing the cord, the glass is firmly and gently pressed into the window opening.
Tip: The cord should be pulled out slowly, in a circular motion, so that the rubber seal is not damaged.
You can watch the video on how to change the windshield on a VAZ 2109. Timely protection of a damaged windshield is the key to safe and comfortable driving.
Replacing the rear window on a VAZ-2109
The rear window of a car is a real assistant for the person behind the wheel. It is through it that you can see everything that is happening from behind and correctly assess the situation. But glass is a very fragile material and if a stone or other heavy object hits it, it can crack or crumble into many tiny pieces. As a temporary solution, you can seal the opening with thick film. But this, of course, is not a solution - in the future, the rear window still needs to be replaced.
Many car enthusiasts put off this work until later, fearing serious costs. In fact, all that is needed is to find money to buy new glass and glue. The rest of the work can be done with your own hands within 1-2 hours.
Replacing the rear window on a VAZ-2109
Before starting work, go to the store or market and get a new rear window for your car. It is important that it clearly fits your model (pay special attention to heating and its design features).
After this, prepare the necessary tools. To work, you will need new glass (this is logical), special glue (the best option is a 2-component composition), a new rubber seal (you will have to throw away the old one), a string for cutting glass, special suction cups (necessary for holding and lifting the glass). In addition, you will need tape, a knife, sandpaper and solvent.
It is advisable to work in a well-lit room with sufficient space for maneuver. If the weather is good outside, you can set up right next to the garage. The help of a partner when replacing the rear window is very desirable. It is extremely difficult to cope with such work on your own.
So, after carrying out the preparatory activities, you can proceed directly to the work. Here you need to go through three stages:
- Remove old glass. This work is done in the following sequence:
– take a flat-blade screwdriver and press it into the rear window seal about 4-5 mm. Act without fanaticism - there is no need to insert the screwdriver deeper (this will only complicate the task);
– gradually move the screwdriver around the perimeter. Walk a distance of about 4-5 centimeters and stop;
– tear out a piece of the seal;
– gradually, step by step, go through the entire area of the seal, pulling it out in small pieces;
– as soon as you have completely “exposed” the upper part of the side corner, you can actively pull the elastic band;
– after removing the seal, pierce the glue with a string and pull it with an assistant along the entire perimeter;
– if the glass is damaged, be very careful when removing it. Please note that reuse of the product (for example, if you remove it due to cloudiness or a small crack) will not be possible.
When performing work, be very careful and try not to touch the car body (otherwise you will have to restore it as well).
- Prepare the opening for installing new glass
Once the old glass has been removed, do not rush to immediately “sculpt” a new one. It is advisable to perform several useful manipulations:
– treat the edges with a degreaser. This will allow you to thoroughly clean the opening and prepare it for installing a new seal. Remember that the cleaner the installation site, the better;
Design
We have already talked about sizes. You all know that windshields have increased strength. This is not the usual glass that is installed in windows with wooden frames.
In the case of the VAZ 2114, the front cover has a three-layer structure - triplex. Two layers of glass are separated by a transparent film. It is this that prevents fragments from scattering to the sides during collisions and impacts.
Removing old glass
You should start replacing the rear window in VAZ cars with the grooves of the seals. To do this, you will need a flat blade screwdriver to pry the seal lock from the inside of the glass. After that we just pull it out.
Then, using a screwdriver, we move away, as it may be, the frame seal from the outside of the glass. After this, we do the same on the inside of the frame. Having freed the glass, we begin the extrusion process. Why do we call for help from a friend smoking on the sidelines and ask him to hold the glass from the outside. We ourselves squeeze out (push carefully, but with force) the rear window from the inside.
Glass selection
When choosing a new windshield for your VAZ 2114, focus on several main criteria. This will allow you to purchase a really good product that will last as long as possible.
| Selection criterion | Nuances |
| , but there are also more expensive ones - about 3 thousand rubles. Too expensive is also not an option, since even it can be damaged by an accidentally dropped heavy object. Look for a middle ground - 1500-2000 rubles | |
| Manufacturer | Take only original spare parts. Avoid analogues from third-party manufacturers and do not buy glass from dismantling shops |
| Surface | Before purchasing, check the condition of the glass surface. It should be smooth, transparent, no distortion |
| Marking | All glass is marked. From it you can determine what type of product it is and who made it. |
When replacement is required
Sometimes car owners are faced with the need to replace windshields. There can be many reasons for this, since you never know what will fly into the front of your car.
READ How to Clean a Car Cooling System
The main reason for damage to the lobovka is the condition of the roads. Sometimes all it takes is one pebble flying off from under the wheels of the car in front to require glass replacement.
Having received damage to the frontal part of the car, you have to deal with repairs and restoration of the integrity of the glass. And how to do it? Only by replacement.
Chips usually involve damage to the outer layer of triplex, so such a defect does not cause serious problems. But if a crack has formed on the windshield, immediate action should be taken. Otherwise, the glass may soon fall out, which will lead to accidents and more.
Example of chips
Your actions in case of damage depend on the type of defect.
| Type of damage | Actions |
| Formation of chips on the surface | You can continue to use the car |
| Appearance of cracks | Apply temporary measures to prevent the glass from falling out, and then replace it with a new one. |
Crack on the forehead
Replace the rear window on a VAZ-2109
It is important that it fits your model correctly (pay special attention to heating and design features)
Then prepare the necessary tools. To get the job done you need. new glass (this is reasonable), special glue (ideally a two-component composition), new sealing rubber (you will need to throw the old one), a string for cutting glass, special suction cups (necessary for holding and lifting the glass). Additionally, tape, a knife, sandpaper and solvent are useful.
It is best to work in a well-lit area with sufficient maneuverability. If the weather outside is perfect, you can stay right next to the garage. Helping your partner replace the rear window is highly desirable. It is difficult to cope with such work without outside help.
What you need after the previous steps, start specifically. There are three steps here:
- Remove the old glass. This work is performed in the following order:
even a schoolboy can control the trunk lid.
You may not be able to free the glass from the frame the first time. There is no need to despair and freak out, but you should go through the seals with a screwdriver again. Later, try again to squeeze out the glass. It will resist as before, but in the end it will pop out. Having briefly rejoiced at this circumstance, we proceed to installing new glass.
Replace the rear window yourself
If you have ever watched how a specialist changes the windows on a Veil, it doesn’t matter whether it’s the rear or the windshield, changing the rear window yourself will not be particularly difficult. Well, if you’ve never seen this, that’s also okay.
By replacing glass yourself, you will acquire a skill that will be needed in the future. For example, your friend will ask you to change the glass. And you will do this to him out of a friendly disposition. If a friend or stranger asks you, you can even earn money.
Sources:
https://infokuzov.ru/remont/zamena-stekla-vaz-2114 https://momotuning.ru/diyrepair/ustanovka-zadnih-bokovyh-stekol-2114.html
Replacement of side glass on VAZ 2113, VAZ 2114, VAZ 2115
Side glass performs important functions in a car:
- Firstly, it significantly reduces fuel consumption on the highway when driving at high speed. Try opening the window of your car completely at a speed of over 100 km/h and look at the consumption according to the on-board computer. The difference between driving with the window closed will be within 1-3 liters depending on the speed of the car.
- Secondly, it protects your car from bad weather: rain, snow, hail, strong wind.
- Thirdly, it often protects the car from robbers. Not everyone is ready to break glass to get something out of the car. The likelihood of a car being robbed with open windows increases significantly.
Note! You will need the following tools: a screwdriver, wrenches or socket wrenches, and new glass. We remind you that take the new glass together with the frame, otherwise, if you buy it separately, you will be tortured by installing the frame on the glass and aligning it.
Clip location
Placed at the bottom center (indicated by the blue arrow, and the glass is shown by the red arrow). The frame is inserted into the glass, over time it weakens and there are even cases when the glass fits askew into the door. The weakened clip does not hold the glass; it dangles in the door. The glass is attached to the window lifter using this clip. In general, the detail is necessary and irreplaceable. In the event of a fault, there are two options:
- buy a new one and install it;
- remove the old one, apply marks with a felt-tip pen, carefully crimp it using pliers without damaging it, and apply a strip of raw rubber soaked in gasoline to the place where the clip is installed. The strip can be found at a car dealership or cut off a piece from another rubber. ,The length of the strip must be selected so that it extends beyond the holder by 2–3 mm. Now the clip will press firmly against the glass and hold it accordingly.
When should you replace your side glass?
In principle, the time of replacement is a personal matter for each owner. Some people change glass for aesthetic reasons, others because of damage. However, there are a number of recommendations:
- The primary reason for replacement is severe deformation and, as a result, loss of visibility. Driving with such glass is by no means safe - you will not see a car or pedestrian approaching from the side.
- The second reason is the presence of chips and cracks. Over time, if you hit a decent bump, the glass will simply burst.
Doors
Sound insulation of doors has a direct impact on the level of comfort inside the VAZ 2114 car. If you carry out similar work, you will simultaneously solve several problems:
- Get rid of some of the noise that comes into the car from the outside;
- You will be able to eliminate squeaks and knocks that are typical for the VAZ 2114 due to the peculiarities of the skin and the location of internal parts;
- Improve the sound quality of your audio system. Sound insulation of VAZ 2114 doors is especially important if speakers are built into the doors.
As in the case of the trunk, door processing includes several stages:
Disassembly. First, remove the door trim. Just do it carefully, be sure to write down or very carefully remember the dismantling sequence. This is the first and most important condition for successful reassembly. Surface cleaning. After removing the factory noise and other elements, clean and degrease the metal. Be careful with the paint and do not damage it with tools. The bottom of the doors does not need to be treated with degreasing compounds. Applying the first layer of sound insulation. To cover the walls that go outside, I use vibration damping material. The elements are cut along the contour of the compartments and glued. The work is quite difficult, since you need to manage to paste the surfaces through small holes. Wear gloves when performing noise to avoid injuring your hands on metal components. If you are gluing not a solid piece, but small pieces, do it overlapping. Fighting knocks and squeaks. Wrap wires, rods, and other parts that are possible using Madeline. This will avoid knocking noises when the car is shaking.
Pay attention to the areas where the parts come into contact with the body. A double layer of material is allowed here
It would not be superfluous to make a continuous gasket of the same material along the entire contour of the doors where the trim is attached. Vibration isolation protection for technical holes. Technological holes should be treated with pieces of Vibroplast. A useful measure that gives good results in protecting against vibrations and their consequences for a comfortable ride. The metal surfaces of the door on the trim side are treated with Accent. This is a sound-absorbing material. If it is not there, use Bitoplast. Only the thickness of such material should not be more than 10 millimeters. Sheathing processing. To prevent the casing from resonating and vibrating, apply Vibroplast Gold vibration damping material to its surface. It is not necessary to cover the entire surface, since this will make the doors noticeably heavier. The most important thing is the joints of the sheathing elements and wide, even elements. Assembly. Before you begin assembly in accordance with your instructions, make sure that the window regulators and other elements located in the door are in good condition.
https://youtube.com/watch?v=3MWu65qmOfY
This technology for protecting doors from noise on the VAZ 2114 is especially relevant for those who install fairly powerful speakers in the doors. If you are not particularly interested in loud and high-quality music, and you are not going to install speakers in the door, the soundproofing process can be significantly simplified. Although there will definitely not be any unnecessary noise, even in the absence of an impressive audio system.
The best sound insulation is comprehensive. Therefore, it is still recommended to protect your VAZ 2114 from internal and external noise. Start small, gradually working on the roof, hood, fender liners and other elements. By doing this, you will be able to achieve amazing comfort and silence in the interior of your car.
Loading …
Replacing side glass on a VAZ 2113-VAZ 2115
Removal
1) The glass on the front and rear doors is removed in almost the same way. We will look at both options, but start with the front. You will need the help of an outsider. Have a helper hold the glass to prevent it from falling. And you lift the glass all the way up and unscrew the bolts securing the window regulator to the glass frame. Just in case, we will analyze the situation without an assistant. Then, at the beginning of the operation, the side window is blocked with a screwdriver, preventing it from falling (photo 1), then the door trim is completely removed (read more in the article: “Replacing a door on a car”, from point 1 to point, and the two bolts securing the clip to the window lifter are turned out ( photo 3). Having unscrewed the bolts, carefully begin to remove the seals in the door in which you are replacing the glass (photo 2). Please note that you will have to remove the screwdriver to remove the seal from the glass, remove it carefully and hold the glass. After these operations, tilt the glass in side and remove (shown in the fourth picture).
Note! When working with an assistant, there is no need to insert a screwdriver. Immediately remove the seals from the door and unscrew the cage bolts, and let an assistant hold the glass. After unscrewing the bolts, roll the glass on its side and remove it from the car door!
2) With the rear doors, the procedure is similar: insert a screwdriver, remove the trim from the door and unscrew the two bolts (photo 3) of the cage. Then the rubber seals are removed from the door (photos 1 and 2), the glass is rolled on its side and removed from the car door (photo 4).
The new part is installed in the reverse order of removal. If you bought glass without a frame, you will definitely have to install it. Take soap or WD-40 and coat the inside of the clip, then install the clip on the glass. Place the glass in the sun to dry quickly. Be sure to monitor the drying process, wet lubricant will not hold the clip, it will be removed from the glass and it will fall.
Additional video Attached below is a video on today's topic using the example of cars of the Samara and Samara 2 families, we recommend that you watch it.
How to dismantle central deflectors and install new ones
Removal of deflectors may be necessary in one of the following cases:
- they are clogged and require cleaning;
- a deeper cleaning of the system with removal of the air ducts is necessary;
- the deflectors were pressed into the air duct;
- The deflectors are broken and need to be replaced.
In any case, whatever the reason for dismantling them, it is quite simple to do and does not require a lot of free time or special tools. The entire process of removal and reinstallation takes place in just a few steps, the first of which is removing the dashboard panel.
In order to do this, you need:
- disconnect the battery;
- remove the receiver/radio tape recorder, disconnect the cable harness from it;
- remove the center console screens;
- remove the cigarette lighter by disconnecting the harness of suitable wires;
- remove the ashtray light bulb and disconnect the wires that go to it; remove all protruding buttons and adjustment knobs (to do this, carefully pry them off with a screwdriver);
- Use a Phillips screwdriver to unscrew the screws holding the instrument panel panel (one each on the left and right);
- Unscrew two screws located above the dashboard and two screws located under it;
- pry and remove the rear window heating plug;
- Unscrew the self-tapping screw located under this plug with a Phillips screwdriver;
- move the panel back and to the right;
- disconnect all blocks with wiring harnesses from the switches and on-board computer.
Once the panel is completely detached, the deflectors themselves can be removed.
To do this, you need to unscrew the three screws responsible for fastening the central deflectors. One of them is located under their body, the other two are on its sides. After this, all that remains is to remove the deflector, clean it (if necessary), and install it back. Assembly of the front panel and its installation are also carried out according to the above described scheme, but in the reverse order.
Before installing the deflectors in their place, it will be very useful to cover their perimeter with sound-absorbing material, such as modelin.
How to remove
The disassembly process is the same for all doors, including the driver's door. To replace the casing, you will need to remove interfering structural elements and remove old material. You need to prepare a set of screwdrivers.
Initially, the podium is dismantled. There are three screws underneath, which can be easily removed with a standard Phillips screwdriver. You need to remove it carefully and with feeling. Otherwise, you may break the wires supplying the power windows. After dismantling the podium, you will need to disconnect the terminal from them.
Next, remove the inner handles
The pads must be carefully pryed off with a flat screwdriver or knife. The bolts are hidden behind them
After unscrewing them, the handles themselves are removed.
Then it will be necessary to dismantle the lining of the closing mechanism. It is pryed off with a flat screwdriver. Then comes the turn of the stoppers - these are plastic pins located on top. Unscrew with a Phillips screwdriver.
We should not forget about the speakers, usually located in the front doors. They are secured with screws. It is worth noting that if they were not installed at the factory, the latches may be non-standard. Having pulled out the speakers, you need to disconnect the wires leading to them. You shouldn't pull them sharply, as they are quite thin and tear easily.
After this, remove the lever that moves the side mirrors. Then you can remove the decorative moldings as well. Only after this will it be possible to remove the old cladding material. It is held in place by plastic caps. They are attached directly to the metal of the doors. The casing is pryed off with a knife or screwdriver, after which it is detached from the base. There is no need to worry about breaking the caps - they cost mere pennies and are sold everywhere.
There is no point in replacing Euro screws with self-tapping screws in the future if they reliably fix the upholstery. On average, one door takes about half an hour. If you have minimal experience, you will have to spend significantly more.