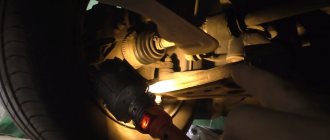
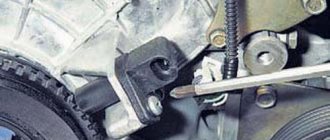
Malfunctions of a car generator are conventionally divided into two groups: electrical and mechanical. In the second case, this is usually wear of the rotor shaft bearings.
It would seem that the question is not worth a damn: remove and replace the unit with a working one. However, factory-pressed bearings are dismantled using special equipment - a puller. In a garage environment, you don’t always have the right tools, not to mention repairs on the road or in the field. How to remove a bearing from a shaft without a puller? We adopt experience from home-grown craftsmen.
How to remove a bearing with a puller and without
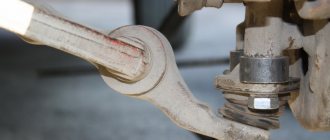
A bearing is an important element of machines and mechanisms, designed to reduce friction and extend the service life of equipment parts. To remove the bearing, if necessary, without damaging the surface of the shaft, cover, or housing, it is recommended to use tools specifically designed for this purpose - pullers.
How to choose the right puller?
To conveniently carry out bearing dismantling work, it is necessary to select the appropriate tool correctly. Based on the type of drive, there are mechanical and hydraulic devices. The former have a simpler design, but it is much more convenient to work with hydraulic models. Their functional purpose is the same, but hydraulic pullers can provide much greater force. For accurate work, devices with a fuse are suitable, which is destroyed when excessive force is applied. Hydraulic tools have two types of hydraulic drive – remote and built-in. Models of the second type are easy to use, but are somewhat more expensive than analogues with a remote hydraulic drive. The removable handle, capable of rotating 360°, significantly increases the convenience of work and allows you to find the most comfortable position for gripping.
When choosing a suitable tool, take into account the dimensions of the part, which determine the requirements for the puller in terms of diameter and gripping depth, as well as the gripping method - internal, external, combined. Each tool has a certain number and type of grips, and the stability of the structure when gripping depends on these parameters. There are two- and three-jaw tools. Models with adjustable angles of L-shaped grips are convenient. For dismantling parts installed with interference, which do not require significant force, screw-type self-centering pullers are indispensable, two-jaw models of which are often used to remove hub bearings.
If the shape of the parts does not allow the use of pullers of a conventional design (with L-shaped grips), then use hydraulic models with a clamp that provides a reliable grip.
Stages of working with the puller
After choosing the appropriate type of tool, start working:
- Bring the puller to the worn bearing.
- Clamp the part with a puller.
- Begin smooth rotational movements. There should be no special pressure, as it can damage the system elements.
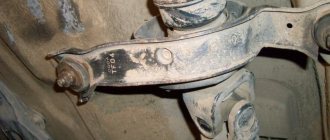
Types of designs of the front wheel hub assembly
The first generation (HUB I), second generation (HUB II), and third generation (HUB III) hub assemblies differ from each other in the bearings and peripheral components they use.
In addition, their designs are classified by operating conditions (rotation on the outer or inner ring) and the location of the components (for driven or non-driven wheels). In addition, cars with hub units consisting of two single-row bearings are operated and produced, but this will be discussed later.
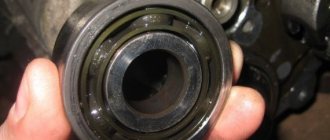
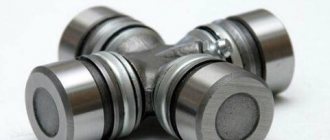
Double row ball or roller bearing (HUB I)
Front wheel hubs have different types of bearing units. Let's consider a design where the outer race is common to each of the rows of the bearing block (rollers or balls), and the inner race is divided into 2 parts.
The type of maintenance-free front wheel hub bearing eliminated regular lubrication and play adjustment. Factory sealing rings seal the separator and balls from dirt, dust, and water. Available with or without built-in ABS rings. Photo 1.
The assembly consists of: a common outer ring, two separate inner rings with separators. The spare parts kit includes:
- retaining ring,
- axle nut,
- cotter pin,
- wheel hub bolts.
2-row bearing design
Found on the front wheels of VAZ, UAZ Patriot, and older Fiat models. Used on rear-wheel drive cars with low torque on the axle. They are serviceable bearings and require periodic adjustment and lubrication.
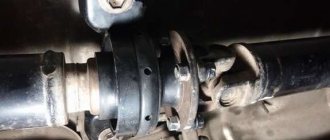
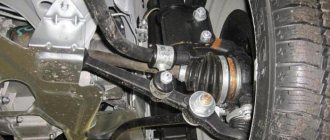
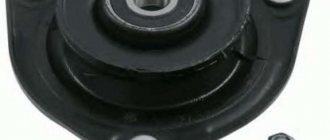
The bearing is combined with the hub in one housing (HUB II, HUB III)
In modern cars, the wheel bearing is maintenance-free. The inner and outer races are located in the hub body and are integrated into the flanges. One is attached to the knuckle, the second is fitted with a brake disc and wheel bolts. Photo 3.
This design is used for both driven and non-driven wheels. Attention! When used with a drive wheel, the inner ring (race) is splined to engage the drive shaft.
Also, built-in ABS/speed sensors are added to the design of these bearings.
Yan-4ik Blog DIY separator puller
Basic methods of pressing a bearing out of a blind hole
METHOD 1. “Displacement”
Prepare the main surface for repair, fix it in a vice and carefully fill the blind hole where the bearing is located with solid oil to capacity. Then gently hit with a hammer - and the bearing race should come out of its seat
In the first minutes, it may seem that the replacement part does not want to give in, but with diligence and caution you will achieve the expected result.
METHOD 2. “Removing the covered bearing”
We use oil. It should leak under the bearing base. We create internal pressure with hammer blows, and the bearing should be pushed out. Try to be careful not to damage the socket.
METHOD 3. “Force”
Sometimes you have to forcefully drag a bearing if it is firmly seated in the socket and does not give in, but on the contrary, somehow “sags”. It will have to be partially destroyed. To do this, you will need a small chisel, which you will use to separate the balls of a small part into two groups. Insert bolts of suitable diameter into the freed space. Then the “jewelry” begins - sawing off the caps, so that the structure is not damaged, and the cap fits in and takes the place of the ball. Then we turn the metal “gimlet” almost ninety degrees. The main task of the manipulation is to ensure that the head catches on the groove in which the bearing balls roll. In the end, the master’s task is to apply force and pull the “turnip” out of the planting nest. Of course, the third method is energy-consuming and a little destructive, but still, it is often used.
METHOD 4 “Using a tool”
Those who are thinking about how to knock out a bearing, not for the first time, and are already tired of difficulties and unforeseen circumstances, have long ago purchased special pullers for bearings. It is also sometimes called collet.
How is the collet used? It is installed in a bearing, then a calibrated rod is placed inside, which will prevent the collet from deforming when force is applied to it. A blow, and the problem is solved successfully, how to pull a bearing out of a blind hole.
Thus, from the many existing ways to remove a bearing, find the most suitable option. It will be technically simple for you, that is, one that you can successfully use and safely repair your car. We wish you success in your endeavors and aspirations to master the auto business.
Displacement method
This old-fashioned method is suitable for removing a bearing from a blind hole. Moreover, it should be seated with a slight interference fit. Usually it is extremely difficult to pick it out from there - the seat of the assembly has no gaps. The part can be removed using compression pressure from inside the seating pressure. For the operation we will prepare:
- any thick lubricant - grease or cyatim will do;
- a mandrel with a diameter slightly less than the seat.
Fill the hole with grease to the end, trying to fill it completely. With small blows of the mandrel we ensure that the oil flows under the balls. Having driven the lubricant inside, with small sharp blows we drive it into the seat with a mandrel. At first it will seem that everything is useless - the bearing is standing, but the oil disappears inside. But as soon as you carry out a series of filling with lubricant and sharp blows, the part will be squeezed out of the blind hole. The best result is achieved by driving in a mandrel with a minimum gap and a length of at least 3 bearing thicknesses.
Instead of oil, wet paper or plasticine is often used.
The bearing fell apart. I show you how to get a clip without a puller in a matter of minutes
Today, I will tell you how to remove the bearing race from its housing. The method is very simple and does not take much time.
For example, I took a bearing from a chainsaw crankcase. Over time, it often crumbles, but getting it out is not an easy task. Usually, all kinds of pullers do not help in any way to get the clip. But how do you get a broken part?
Disassembling the bearing
We need to find a bearing of the same size. To make it more convenient, it can be secured in a vice. Now you need to disassemble the old part. Don't know how to do this? Now we'll tell you.
We expose the bearing by removing the boot from it. Using a drill, make a hole in the bearing cage. The drill should go right through. Another option is to use a punch or impact screwdriver.
We pry the separator with a screwdriver and pull it out. You can help with pliers.
We collect the balls in a pile (it should turn out something like a crescent). Next, use any tool to push out the sleeve inside the bearing.
Everything is done, but what to do next?
Assembling the bearing
Lubricant must be applied to the fixed holder. Solid oil or lithol are excellent. The lubricant acts as glue. Glue the balls onto the holder and insert the inner ring.
Use a thin screwdriver to push the balls apart over the entire plane.
Now all that remains is to knock out the bearing using a hammer and a regular tube. That's all, see how simple it is?
Do you have any questions or something to add about the article? Write in the comments, perhaps this will greatly help readers in the future. Also subscribe to our channel in ZEN .
Reasons for replacement
The bearing fixes the position of the shaft, ensuring its uniform rotation. These small parts take on the entire load.
If you are wondering how to remove a bearing from a washing machine, then you suspect that it has become unusable. The reason for this could be a damaged oil seal, which, having lost its tightness, began to leak water. The lubricant was washed out, which led to corrosion and wear of the bearing.
Most users download SMA based on the “as much as it will fit” principle. This is wrong, because over time, overload leads to wear of parts, including bearings. You can notice this by the characteristic grinding sound. It can be heard when spinning or when turning the drum by hand.
Another sign of a bearing problem is leaking. If you find that water is accumulating under the bottom of your washer, it’s time to check.
Untimely replacement can lead to damage to the tank by the drum, wear of the cross and shaft. And this already threatens a major overhaul, which will require installing a new tank and drum.
How to remove a bearing from a power tool armature: some practical tips
Today, many home craftsmen and professional craftsmen have a whole arsenal of power tools that help them cope with household and repair and construction tasks. Hammers, jigsaws, grinders, drills - all of them significantly simplify and speed up work. However, it happens that a power tool breaks down. Don't rush and throw it in the trash because of this. Due to intensive use, parts wear out, and therefore the equipment cannot operate in normal mode. If you know how to remove the bearing from the armature of a power tool, you can extend the life of your “assistant”. Timely replacement and lubrication of parts allows you to operate the device for a longer time.
How to remove a bearing from a shaft without a puller?
Bearings are used very widely today. Their varieties can be listed for a very long time. There are structures that can simultaneously ensure the distribution of not only radial, but also axial loads. Naturally, the resource is developed faster at increased mechanical stress. Sooner or later the time comes to replace the bearing with a similar one. Let us remind you that if corrosion pits appear on the bearing tracks or wear is visible to the naked eye, restoration is strictly not recommended. In any case, such a bearing will not be able to provide the original characteristics.
The difficulty lies in the fact that it is not always possible to find a bearing of suitable dimensions on the market. Here, thrust radial bearings are presented in the entire range of standard sizes. All that remains is to purchase the one you need and replace it. However, experience shows that removing an outdated bearing is not as easy as it might seem at first glance.
Should I use a puller?
Pressing the bearing onto the shaft is quite simple. By and large, this can be done without special tools. The situation is completely different with the dismantling of radial bearings.
Today the market can provide a special tool.
It allows you not only to quickly dismantle the part, but also without damaging it.
Let us recall that in our case we are talking about replacing a bearing as a result of its technical wear. Therefore, preserving its structural properties makes no sense.
All that is required is to remove the bearing from the shaft without damaging the shaft itself or its geometry. The point is that blunt hammer blows will only make things worse. There is a more technologically advanced way to remove a bearing without using special pullers.
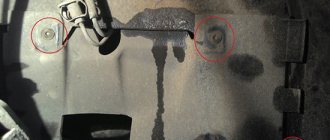
Can't do without welding
It is important to note that it is not always possible to use a bearing puller, even if you have one at hand. The general design of the mechanism does not allow access with a puller.
It is recommended to proceed as follows:
- an eye is welded onto the outer ring of the bearing;
- it is important to put a steel chain link on the eye in advance;
- Be sure to protect nearby structural elements of the mechanism from hot drops of metal during welding.
All that is required now is to attach the opposite end of the chain to something very solid (weighing at least 50 kg) and pull off the bearing with progressive, sharp movements in the axial plane.
The video clearly demonstrates the above method for dismantling any radial bearings:
Briefly about prices
When you understand that changing bearings is inevitable, then you should not despair, even if you are not able to do it yourself. In service companies, such repairs will not cost you that much:
- for front-loading machines - 1-2 thousand rubles;
- for vertical - 1500 rubles;
- replacement in the forecastle - from 2 thousand rubles.
Prices by region may differ, but not by much; exact prices can be found in the service centers of your city.
If bearing failure leads to water leakage, the heating element may burn out, then the cost of repairs increases. The worst case scenario is that the electronics system burns out, then buying a new machine is inevitable, the old one will only be suitable for disassembly for spare parts.
Source
What device will help you remove the bearing from the crankshaft without any problems if you don’t have a chisel and a hammer?
The bearing is considered the most important part of the crankshaft, performing the lion's share of the work. So, it is the bearing that takes the load and transmits it further to the moving unit of the crankshaft. That is why the working condition of the product is so important for the operation of the engine, and any malfunctions lead to troubles and stop the operation of the entire structure. However, repairing and replacing bearings often becomes a difficult task. The problem lies in the rather complex system for removing the bearing from the crankshaft. So, it fits so tightly to the crankshaft that it is not possible to simply pry it off and remove it. Car enthusiasts often resort to the method of breaking the product using a hammer and chisel. But today there are more humane methods and devices that allow you to remove the bearing without extra effort.
Bearing pullers
In the modern automotive market, special devices are offered - pullers, with the help of which the process of removing the bearing is greatly simplified. The tool is made of durable metal using power bolts. Often such pullers are equipped with a hydraulic motor, but such devices are usually used by professional auto mechanics and at service stations.
Types of pullers
Depending on the design features, the tool comes in the following types:
- Universal;
- Sliding;
- Turning;
- Conical;
- With separator.
Self-disassembly
Having completed the preparation, you can begin disassembling the SMA. Whatever brand your car is, the repair principle remains the same.
Top and front panel
In some washing machines, it is not necessary to remove the front panel to remove the tank. But we will describe the most difficult disassembly:
- Using a Phillips or hex screwdriver, remove the two bolts on the back of the top cover. Push it forward and remove it from the body.
- Move to the front. You need to pull out the dispenser tray, which is used to pour in the powder. Press the latch in the center and at the same time pull the tray towards you.
- Remove the screws securing the control panel.
- Using a flathead screwdriver, pry open the plastic latches.
- Without unfastening the wiring from the control unit, place the panel on top of the housing. If you decide to put it aside, first take a photo of the location of the connectors and then disconnect it.
- Open the hatch door. Bend the edge of the sealing rubber - behind it there is a clamp. Pry it with a screwdriver and pull it out of place.