No matter how much money you spend on your vehicle, over time, like everything else in our world, it becomes unusable, and cars suffer the same fate. For every car enthusiast, there are moments when your car brings you to tears. There are many such moments, but a tightly stuck steering knuckle is one of those times when your car makes you cry. Today you will learn how to ease your suffering and still do everything to ensure that your parts fall into place correctly.
How to check tie rod ends?
The first method is for an assistant to sit behind the wheel and turn the steering wheel left and right.
And at this moment you crawl under the car and look from under the car to see if there is play on the steering tips.
If there is no assistant, you can crawl under the car yourself and pull all the steering ends, rods - everything you can.
If the play of the steering tip is already significant, then it will be impossible not to notice it.
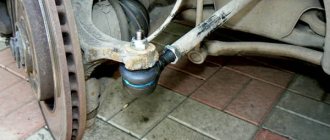
Look how my tie rod is hanging out. It can be seen that it is broken and dangling very much.
While driving, a strong roar can be heard from inside the car.
If you have neither a pit nor an assistant, then this is not a problem.
The steering tip can be checked by simply jacking up the front wheel and shaking it from side to side.
We take the suspended wheel with both hands and push it first with one hand, then with the other. With these movements we check the backlash.
As you can see, there is a huge gap here, you also saw it from the pit. If you talk too much, you can even hear the tapping of the steering tip.
After you have discovered the play, remove the wheel and get to the very tip.
It is necessary to find out what specific type of tip is installed on your car, since there are two types of steering tips on the Chevrolet Aveo in the T250 body.
After dismantling the wheel, you can clearly see how the steering tip dangles. The play is already quite significant, which means that it needs to be changed urgently.
You cannot drive with such a tip, because it may even tear off. If you suddenly fall into a hole, the wheel will jerk and the impact may cause the steering wheel ball to fall off.
That is why you should never drive for a long time and severely break the steering tips. If you hear something rattling, go immediately and check where it’s rattling.
So that after replacing the steering tip there are no problems with toe-in and camber - by the way, there is no camber here.
It is factory-made and not adjustable, but the toe-in is adjusted using the same steering tip and tie rod - we take a tape measure and measure from some fixed part.
In this case, I measure from the boot clamp to the center of the bolt, or to the edge of the bolt, if convenient, I measure along the edge of the bolt on this side.
Here I get 25 cm and 8 mm. I write down this value so as not to forget, and remove the steering tip.
Some repairmen advise counting the thread revolutions - how many revolutions the tip itself has been unscrewed.
But you yourself understand that the tips are always bought from an unknown company, it is not clear who made them and where, for what car.
In this case, you can see the letter L on this steering knuckle. This means that this steering knuckle was installed on some car on the left side.
But it fits the Chevrolet Aveo and is installed here on the right side, so I believe that the length of the tip itself - from the bolt to its threaded edge - may be different.
And if you count on the old tip how many times you unscrewed it, then on the new tip everything may not match.
You can tighten it, correctly calculate how many turns, but in fact the wheel alignment will come apart and you will not be able to drive normally.
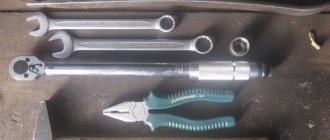
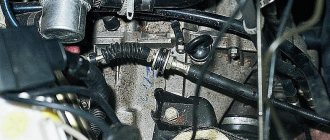
Using a 19mm socket, unscrew the steering tip nut.
The steering tip pin began to rotate, now there is no way to unscrew it, since there is nothing to grab from below to hold the steering tip bolt itself.
Replacing the boot
A malfunction of the boot leads to rapid failure of the articulated joint, and as a consequence of the entire tie rod end.
Therefore, the importance of timely replacement of the boot is obvious. This work can be carried out without completely dismantling the steering rod.
To do this, you need to remove the sealing ring.
Next comes the spring ring, which we also remove.
Remove the old one and apply a new layer of lubricant. If you notice dirt penetrating inside the hinge, replace it as described above.
Before installing a new boot, add 0.5 of its volume of lubricant (solidol, litol-24, etc.) into it.
Having installed the boot in the same position as the old one, install the spring ring in the reverse order, then the sealing ring.
The steering linkage is installed on VAZ 2108, 09, 099 cars in the reverse order as it was removed. In this case, you should pay attention to the tightening forces of the bolts with which the tie rods are attached to the steering mechanism (8 kgf-m).
Be sure to secure the bolts with a locking plate.
Important to read: Replacing the boot of the internal CV joint, popular car models.
Replacing the tie rod end with an experienced driver, if he has the necessary tools (puller, vice, keys), will take up to 20 minutes.
After this, do not forget to perform a wheel alignment, although many drivers ignore this work, which leads to rapid wear of the front tires.
Replacing the tie rod end of a VAZ, do it yourself - video.
There are three options for getting out of this situation
The first option is to cut off the nut with a grinder.
The second is to place a second jack under the tip itself and press the steering tip pin to the steering knuckle.
Since it is conical, it will clamp and you can further unscrew the nut.
If you don’t have a grinder or a second jack, you can place a stump or some kind of stand under the steering tip and slightly lower the jack on which the car is currently standing.
Since I have a second jack, I will use it, try to press the steering pin a little against the steering knuckle and unscrew the nut.
There is no need to lift the car too much. The spring is pressed in a little and this will be enough for the nut to unscrew.
Symptoms of a problem
Damage and the need to replace the right or left steering tip can be judged by several signs. Among them:
- beating in the steering wheel, which is more felt when cornering;
- large play in the steering wheel;
- atypical sounds that are clearly audible while driving over uneven surfaces.
You can identify this malfunction in the steering of a car in the following ways.
- One person sits in the driver's seat and turns the steering wheel from side to side. At this time, his partner is under the car, observing and recording the presence of play on each tip.
- In a situation where there is no one to help the car owner, he himself is able to determine the presence of a defect. To do this, the driver should manually check the condition of the rods and ends. Significant play in these elements will be noticeable to the naked eye.
- The easiest way involves lifting the car with a jack. In this position, you should shake the wheel, determining the presence of play.
Detected play is the main symptom in which the steering tips must be replaced.
How to remove a tie rod without a puller
Let's first look at the stages of removing the steering tip:
- The first stage is lifting the front of the car on a jack. For the safety of the car and the owner, we place reliable stands under the thresholds.
- We remove the wheel. To do this, unscrew the mounting bolts.
- Next, you need to clean the steering column. We do this with a stiff brush - we remove dirt, rust, dust. We treat the stand with a small amount of diesel fuel, kerosene or WD-40 and wait a few minutes. Thanks to this we will be able to unscrew the nuts more easily.
- After the preparatory procedures, we first loosen the tie rod end nut. Only after this action do we move on to the nut securing the ball pin of the steering tip.
- Unscrew the steering tip nut. In this case, it is advisable to turn the steering wheel in the opposite direction of the rack that you are pulling out - this will make the work process easier.
- Using a caliper, we measure the distance from the center of the steering tip to any mark on the tie rod (we ourselves put a mark on it somewhere). This is necessary in order to correctly align the new steering tip. This event must be approached as responsibly as possible. If you don't have a caliper, use the method from step 8.
- Now we need to knock out the steering tip itself. If you don’t have a special puller, you can get by with a hammer and some kind of strong lever (for example, a crowbar). We insert the lever between the rod and the protrusion of the stand connecting to it. We press the lever and at the same time hit the end of the steering tip.
- After the steering tip is knocked out, we simply unscrew it from the steering rod. At the same time, if we want to maintain an approximate camber, but, for example, we don’t have a caliper, or we just want to play it safe, we need to accurately count the number of revolutions when unscrewing and write down this number.
- We have removed the steering end, what should we do now? We put the new one, very important, on the right side, since they come in right and left ones. It is installed in the reverse order as we removed the old one. We screw it into the steering rod, and be sure to check the data from the caliper or the number of turns that was originally.
- When everything is screwed on, we install the entire structure in its original position and tighten all the nuts and bolts. After all the purging manipulations, we be sure to check whether the elements converge everywhere - this is very important for the safety of the car.
the video for more details on how to remove the steering tip without a puller :
There are times when everything does not go according to a good scenario, but, so to speak, with difficulties. This can be for many reasons, such as: broken threads on the nut, various types of rust, bends of an element due to external influences and other not very pleasant things. What to do in such cases?
Replacement procedure
Since there are many brands of cars, we will analyze the procedure for replacing the tie rod end on the most popular popular cars VAZ 2108, 09, 099.
- To stop the car, use the handbrake. For reliability, install chocks under the rear wheels;
- Using a jack, lift the front wheel and support it for safety;
- Remove the wheel;
- If necessary, clean everything from dirt;
- If it is impossible to unscrew the tie rod nut, use WD-40 or similar auto chemicals.
Replacing the tie rod end.
Loosen the nut that secures the ball joint to the tie rod from the retaining cotter pin.
Unscrew the nut shown above.
Using a special puller, press the ball pin out of the steering knuckle.
The steering rods are attached to the steering mechanism using bolts. The bolts are not immediately noticeable, since they are secured with special locking plates. To get to them, bend these plates with any tool that allows you to do this.
In other car models, bolts may be locked differently.
The bolt that secures the steering rod is turned out completely, but the second bolt is only loosened.
By loosening the second bolt, you can now turn the locking plate to the side and completely disconnect the tie rod.
You can see a hexagon on the tie rod. Clamp it in a vice and loosen the locknut.
The tie rod end can be unscrewed, but before that, take a piece of paper and a pen to write down the number of revolutions or remember them, and also put a mark where it was located, this is important.
Install the new tip by tightening it the same number of turns that you remembered. For precise installation, use the mark.
How to unscrew the steering wheel nut
If there is a broken thread that cannot be unscrewed, there are three ways:
- You shouldn’t immediately take a radical approach to this matter; perhaps not everything is as bad as you think and just simple manipulations are enough. First, let's clean the entire surface on which we will work with a wire brush and drop a little penetrating lubricant. If you do everything described above, then there is a chance that a regular spanner will help you to unscrew a bolt or nut with torn edges. If not, there are other ways. You can try to simply tap the ill-fated object (but not too hard!).
Lubricating a soured nut with WD-40
Cutting the nut thread with a grinder
Try our service station selection service
Creating an application is absolutely free and will take you no more than 5 minutes
Good day, dear ones. Is it possible to remove ball and steering joints without special tools? Smnikov? if not, which ones would you recommend? 1. Steering tips.
Unscrew the nut, but not completely level with the thread of the hinge pin, and place a hammer or other similar tool on the nut. The object and hit it with a sledgehammer (sledgehammer or heavier hammer, object). With a good hit, you can dream of it the first time. 2. Ball. Unsplit and unscrew the nut.
Elimination of parts deformation
When bending any element, there are two ways:
- It is trivial to take and cut it in half and thus create freedom of action for yourself. A radical method, of course, but you should understand that parts with defects should be replaced in any case, because this greatly affects your safety.
- Heating a part to deform it to its original position. With this method, you still need to understand that you need to do everything carefully, because you don’t want to damage parts that are in good condition or remove the paint from the car under the influence of high temperatures. After this, it is also still worth replacing the part, since it will no longer perform all its functions and may behave extremely unpredictably.
Device
- Insert made of Teflon;
- Ball pin with threads cut on it;
- Housing with lid;
- Anther;
- Finger nut.
Over time, wear of the Teflon liners leads to increased play in the steering rods, which means the car's controllability decreases, and this, in turn, affects driving safety.
Therefore, it is necessary at least once every 10–50 thousand km. mileage (depending on what roads you drive), carry out diagnostics of the steering and, if play is detected in the tip, urgently take measures that include completely replacing it.
Also, such work is carried out when rust appears on the parts of the tips and when the pin is bent, which can be formed as a result of a powerful, unpleasant for the driver, impact of the wheel on an obstacle.
Caring for steering wheel parts
The first and, it may seem to you, the most banal advice, but, unfortunately, it is often neglected - this is the banal dryness of the room in which the machine is located. Most garages have extremely damp spaces, which is not very favorable for the steel and other parts that are in the car. Due to the prolonged presence of the car in a damp room, parts become susceptible to external influences, and metals oxidize over time.
It is recommended to store the machine in a dry place
The second point is one that you can influence extremely minimally, but you still can. This means trying not to drive on roads with poor surfaces, off-road conditions and, of course, being wary of potholes. Yes, all these insidious surprises on the road can damage literally any part of the car.
Design
Externally, the tip is a steel rod, at one end of which there is a hinge, at the other there is a thread that serves for connection to a rack or gearbox. The tip pin is inserted into a special hole in the fist and secured with a nut and cotter pin. In more detail, the rod end consists of:
- a metal cylinder closed at the bottom with a plug;
- a compression spring placed between it and the heel;
- ball pin;
- a cover (boot) made of silicone or rubber;
- plastic liner.
The last element is necessary so that the pin rotates freely in any direction, and thanks to the spring, the backlash that occurs during operation of the car is eliminated for some time. If the tip fails, the part is replaced entirely, since it has a non-separable design. There are also composite parts that were once popular in the Soviet Union (due to a shortage of spare parts), but they are practically not used today due to low reliability.
Some tips and tricks
In conclusion, I would like to say a few very important points. Remember that if you have the opportunity or desire to entrust all manipulations to specialists, then you should do so. Your safety and the safety of your passengers will depend on this decision. You cannot save any money on your security. History has many examples when people, due to their carelessness, got into accidents, which sometimes ended in failure. But if you still decide to do everything yourself, then double-check that you have tightened all the bolts and nuts all the way. After all, there is nothing more scary than an out-of-control car rushing at high speed.
Also, do not buy extremely cheap spare parts. As you know, original spare parts are used by the manufacturer himself when assembling a car. These parts are best suited for your car, since the manufacturer always tests its products for wear resistance under extreme conditions, and, most importantly, they are designed specifically for your car. If it is possible to get original spare parts, this should be done. Original spare parts have special markings that you will not find at the auto market seller in your city. All these spare parts were created at the automaker’s own plant, which naturally speaks of the quality of the products. Although they are expensive, they are durable, since the manufacturer himself is interested in their high quality. Each manufacturer of such parts always provides a guarantee on them.
It is recommended to use only original parts instead of inexpensive Chinese analogues
Duplicates or non-original spare parts are also produced by factories, but not by the manufacturer, which indicates questionable quality in most cases. They are made by other companies that may not even be licensed by the original manufacturer. Usually this is all due to the fact that the manufacturer either does not have time for their own production, and they order parts from the outside, or they are completely satisfied with this policy. At the same time, there is always a risk that, under the guise of a duplicate made at the factory, parts simply made in a garage will go on sale. Of course, you cannot buy such parts; always try to make purchases from reliable sellers.
>
| SHARE: |
Suzuki Grand Vitara immobilizer problems
Good morning/afternoon/night, dear subscribers and readers of my car stories. On the agenda of the day, a story about a rather atypical case with a 2013 Suzuki Grand Vitara. A client contacted me with a complaint that while driving in the yard, the car stalled and stopped starting. After some time the car started again, but the problem reappeared. Looking for floating faults is such a pleasure, but if you look only for minor faults you will not gain experience. So let's get started.
Based on the input data, we analyze the situation. The car stalled while driving and the customer claims that after trying to start it again, he noticed that the immobilizer light began to flash. In my experience while driving, the immobilizer cannot block and turn off the engine for safety reasons. Let's say you are driving along the highway and then problems arise with the immobilizer and the car stalls. In my experience, cars with immobilizer problems did not stall while driving, but let’s return to the car. Arriving at the car, I begin diagnostics with fault codes. I connect through an adapter that controls the voltage and notice a strange thing: the voltage shows 3 volts. I connect the launch and the voltage becomes 12 volts and somehow I gave up on it. I go to immo and see an error
P0620 - GENERATOR CONTROL CIRCUIT
p1623 - UNREGISTERED TRANSPONDER
Strange. While the device was connected, the car started and everything was ok, but as soon as I disconnect the launch, the car stops starting. Selling him the device and leaving was the worst idea.