VAZ 2110 cars, also known as Lada 110, have gained popularity among many car enthusiasts both in our country and abroad. These cars were produced in Tolyatti from the mid-1990s until 2007. They were produced abroad, under license, until 2015.
The VAZ 2110 was designed in the second half of the 1980s, back in the Soviet Union. Its release was planned for 1990, but due to financial disasters in the post-Soviet space, it took place five years later. For its time, this car was an excellent representative of its class and price category. And despite a number of complaints about build quality in the 1990s, the VAZ 2110 has earned a reputation as a reliable and inexpensive car with a modern design.
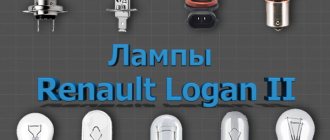
Types of headlights for VAZ 2110 (Lada 110)
Content
For VAZ 2110 cars, two main headlight designs are available:
- from "AL-Automotive Lighting" - these headlights are produced under license from Bosch in the city of Ryazan. The design is unremarkable. The block of high and low beam lamps is covered with a glass cap with notches. Material: glass. Fastening is on brackets, which is convenient for repairs and routine maintenance.
- from ZAO Avtosvet Plant - production is located in the city of Kirzhach, and car enthusiasts themselves often call the design by it. The design is distinguished by the presence of lenses for the high beam lamp, while the cap opposite the low beam lamp is standard - corrugated. Material: impact-resistant glass. The fastener is not very successful - sealant. This creates difficulties during repairs.
Alternative
Today, for example, LED low beam lamps cost 12 - 13 dollars each.
- first of all, LED devices last much longer than Kirzhach (twenty times);
- they consume very little energy, again - compared to halogen ones, thus also saving gasoline;
- These are not the LED lights that many people put on the dashboard, making angel eyes out of them, etc., but specially designed to replace the usual ones;
- they come with two types of base; they can be used for both low beam and PTF, since they have high “piercing” ability;
- they showed themselves especially well on the VAZ 2110, in which a regular halogen Avtosvet lamp often first blinks, then burns out, and the relay “flies” with it;
- LED lamps with a total brightness of 195 lumens will help make the low beam better. One W is equal to approximately 11 L;
- as practice shows, relays do not suffer from this, but last even longer;
- give a light angle of 320 degrees. They have adjustments just like regular ones.
LED low beam lamps
Although it would seem very tempting to replace the standard ones with LED ones, many fear that there may be problems with the traffic police. Still, such lights for the VAZ 2110 have not yet been legalized.
But, judging by the reviews of motorists, LEDs make the dipped beam better, but not blinding, closer to daylight, they do not cause complaints from the traffic police.
But it’s up to you to decide what’s best for you, the main thing is that you’ve made a decision: the replacement should make the backlight better. And we will tell you how to do it according to the rules.
Types of lamps
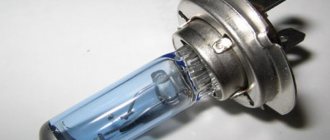
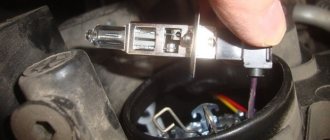
For the VAZ 2110, the manufacturer provides for the installation of only one type of lamp - halogen. Structurally, they are a glass container filled with iodine or bromine gas (these chemical elements belong to the halogen group, hence the name of the lamps). The gas in the cylinder is under pressure, this guarantees against air getting inside and premature failure of the lamp. The light is emitted by a tungsten metal spiral. Currently, this type of lamp is considered obsolete.
You can familiarize yourself in detail with the types of lamps used and their characteristics in the table below.
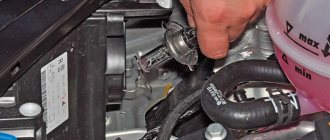
Changing lamps
Remember: when working with electrical appliances, first of all we disconnect the battery. Even if we just change a light bulb in a headlight or PTF. It is better to protect yourself from discharge.
- remove the casing from the engine compartment;
- disconnect the wire block;
- remove the spring that secures the light bulb;
- rotate the holder and remove the light bulb;
- This is followed by replacing it with a new one, and putting everything back together in reverse order. If it is halogen, you should not handle it with bare hands - it will burn much faster. Use gloves. If you do touch the flask, wipe it with alcohol.
Comparison of halogen, xenon and LED lamps
From the point of view of purely consumer properties, the primacy of automobile lamps is as follows:
- LEDs are the most modern automotive lighting products. They surpass their competitors in all respects - durability (capable of operating with a reduction in the brightness of the luminous flux by a maximum of 10% for more than 25 thousand hours), energy efficiency (consume a minimum of energy, most of which is converted into light radiation), cost (initially they were expensive, but Now they are significantly cheaper than competitive designs).
- Xenon - they are also called gas-discharge. Outwardly, they are similar to halogen ones, but they differ sharply in the principle of operation and internal design. In xenon lamps, the interior of the cylinder is filled with the noble gas xenon (hence the name), and the light does not arise from the glow of a metal arc, but as a result of the glow of the gas in the cylinder. The difference between the operation of xenon lamps is the release of a significant amount of heat and light radiation from that part of the spectrum, which leads to burnout of the reflective coatings of the reflectors. The service life of these lamps is about 4-5 thousand hours; their installation requires a headlight of a special design with a lens, position corrector and washer. The cost is significantly higher than halogen ones. It is true that the brightness of the light flux, and therefore the range of the illuminated section of the road, is higher.
- Halogen - this type of lamp was originally provided by the manufacturer of the VAZ 2110. Both manufactured headlight designs were designed for halogen lamps. The service life is quite modest - about 500-1000 hours. The brightness and range of illumination are also much inferior to competitors. The advantages are proven design and affordability.
Important! In the late 1990s and early 2000s, it became popular among many car enthusiasts to install xenon lamps that were not provided for in their headlights. It was enough to purchase an installation kit and use the simplest tools. The brightness of the headlights increased significantly, but due to the unforeseen nature of such an upgrade, the risk of blinding oncoming drivers and oneself during snowfall increased, and visibility decreased (to a level below standard halogen ones) during rain and fog. Now such a replacement is directly prohibited by law and can lead to serious consequences for the car owner.
Xenon light
These lamps have been able to win the hearts of the majority of foreign car owners and domestic cars over the past 10 years, and so much of them in action. There is a wide range of light bulbs on the market. Xenon products are significantly brighter than traditional halogen lamps. Among the shortcomings. difficulties during the installation process, the need to purchase and install an ignition unit. The price of the kit starts from one and a half thousand rubles without installation. The xenon lamp provides significantly better visibility for the driver of the car, which means it increases the level of safety. The luminous flux intensity of such optics will be 2.8 times higher than that of a halogen lamp. At the same time, energy consumption is one and a half times less. Xenon light is as close to natural light as possible (it has no visible yellow color). The service life of such gas-filled products is 5 times longer than that of a conventional lamp. This light not only improves safety, but also attracts the attention of other road users. And one more advantage. The headlight shines with a pure white beam, not a yellow beam. This emphasizes the car from the flow.
See:
Lamp manufacturers - the choice of users and experts
As of the beginning of 2022, the following brands of lamps for VAZ 2110 headlights are available on the Russian market (in descending order of quality and cost):
| Philips X-treme Vision +130% - the luminous flux, according to the manufacturer, is increased by 30%, there is a so-called xenon imitation. Price - from 800 to 1000 rubles. |
| OSRAM Nightbreaker UNLIMITED + 110% - this lamp has a luminous flux increased by 10%, its cost is about 900 rubles. |
| OSRAM ULTRA LIFE - lamps are characterized by durability and a price from 500 to 650 rubles. |
| Beacon H1 12V 55W Super Light +50% - the manufacturer positions its products as an affordable product for a wide range of car enthusiasts. The luminous flux is sufficient. The cost ranges from 250 to 350 rubles. |
Other faults
It is not so rare that the culprit of a problem is the two relays responsible for the headlights. The most common reason leading to relay malfunctions is contact oxidation. In this case, most often the lamp does not burn steadily, but blinks.
It is enough to clean the contacts, and the relay will work properly again. If the reason is burnout and failure, such a relay is replaced with a new one.
Low beam relay
Another possible problem is in the network. You need to check all the contacts of the wires going to the headlights, PTF, as well as instrument lighting.
If this does not help, then remove the switch - the headlight dimmer, then the exterior lighting control and check their contacts.
How to replace lamps on a VAZ 2110 (Lada 110)
It is quite easy to replace the lamps in the headlights of a VAZ 2110 yourself.
To do this you need to follow a simple algorithm:
- Open the hood and find the headlight housings.
- Carefully open the dust covers by pressing the latches (they can be either plastic or rubber).
- In the opened cavity of the headlight, loosen the latch on the large terminal.
Important! Under no circumstances should you remove the lamp by its wires!
- Remove the lamp to be replaced. Clean the internal cavity from dust.
- Insert the new lamp and secure it with the latch.
- Return the protective covers to their place.
Still have questions about replacement? Then watch a video on replacing all the light bulbs in a VAZ 2110 car:
Currently, on the VAZ 2110 the law allows the installation of only halogen lamps - with a power of 55 W, a voltage of 12 V and an H1 base. Xenon ones are directly prohibited, and LED ones are not prescribed by law in any way. The latter does not guarantee the absence of claims from regulatory authorities. Despite the fact that halogen lamps are already obsolete, they are distinguished by ease of installation, low cost and proven design.
How to adjust headlights
Adjusting the headlights after changing lamps, if necessary, is best done by a professional service center. However, if someone does not have such an immediate opportunity, then an approximate adjustment of the optics can be done with your own hands, following the instructions:
- Place the machine perpendicular to a flat, light wall on a level place five meters away.
- Turn off all additional light sources, except for the low-beam headlights - side and running lights.
- Place an assistant in the driver's seat or place ballast weighing 70-80 kg there.
- If the beam of light from a headlight with a replacement bulb does not coincide with the other, you need to use the adjustment screws on the optics housing and adjust the lighting.
How can you improve your headlights yourself?
Only after the luminous flux has been adjusted can you, with simple modifications, independently improve the illumination of the headlights on your car. Initially, the headlight is removed, and the improvement is carried out in the following sequence:
- The protective glass is removed. To make it easier to remove the protection, it is recommended to heat the glass using a regular hair dryer. A warm air flow will heat the sealant, after which the panel can be easily separated from the headlight using a sharp knife;
- the reflective pad is carefully removed;
- Using the appropriate tool, you need to move the lens approximately 15 mm towards the reflector or slightly shorten the modular ring on a lathe.
Such actions will help not only improve the light of the headlights, but also increase the luminous flux and even make it several times wider. Both adjusting the headlights and improving the luminous flux, as you can see, is a fairly simple process that every car owner can do.
Causes of poor headlights
This is what we should strive for
You need to look for the reason:
- Faulty lamp.
- Dirty glass.
- damaged or peeling reflector.
- Insufficient voltage.
- The direction of the light flow is not adjusted.
Replacing a dim lamp
The lamp is replaced with a screwdriver (thin) or an awl. The protection box is removed by unscrewing the screws on the headlight unit. Under the cover you can see the holder mechanism and the three-pin block.
Changing the lamp
The procedure begins by disconnecting the terminal block . Next, pressing on the fastening spring, the lamp is removed and then replaced. At the same time, condensation is removed from the reflector block. The presence of this disables the lighting device. Moisture is removed through the drainage duct, after preliminary cleaning. Installation of the lamp, assembly is carried out in the reverse order.
Dirty headlights and cloudy windows
Dirty headlights reduce road illumination by 50%! Moreover, glass ages and becomes cloudy over time. Wiping with a dirty cloth contributes to this, which causes microscopic scratches.
The brightness of the car light is 50%! Depends on the condition of the headlight glass
We recommend: Tinting of front windows is allowed - is it true?
It is possible that there are cracks that allow dust particles and water to pass through (during washing). They settle on the outer and inner surface of the glass, the reflector and lead to low transmission of light rays.
An irreparable mark on the glass is left by specks of dust, grains of sand, and pebbles flying out from under the wheels of oncoming or passing cars. Scratches and microcracks refract and scatter light in different directions , as a result of which the direction of the beam is lost.
Replacing glass in headlights
The option of gluing with transparent film is not a technical solution. The obvious solution is to replace the glass.
Lamps and glass cannot produce any effect if the reflector has peeled off due to prolonged use. On domestic VAZ-2114 cars, it is possible to replace the reflector, for which you should:
- Disconnect the battery and remove the headlight unit (see “Removing the headlight on a VAZ-2114”).
Front view, headlight mounts
- Remove the glass from the sealant, having previously heated it with a household heating element, if there is no construction heating element.
Unfasten the fastening latches and, cutting off the layer of sealant, remove the glass
- Unscrew the lamp, remove the defective reflector, replacing it with a new one. Fresh sealant is applied to the grease-free ends of the glass and the assembled headlight is mounted in place.
We mount the assembled headlight in place
Lamp voltage low
Low voltage at headlight terminals can cause dim light
Low voltage occurs due to a malfunction of the current generator, oxidation or broken contacts . When checking this unit, you need to ensure that the voltage, including at the lamp contacts, is 13.8÷14.2 V. Low voltage can be detected by ringing the circuit and finding a defect and eliminating it.
A typical cause of dim headlights is often the xenon lamps used on the car.
Distorted headlight position
The wrong direction of the beams is due to the distorted position of the headlights.
This happens as a result of a minor impact, even a light touch of the bumper, for example, with a wall when parking, a tree or a curb.
Adjusting the headlights is accompanied by placing the car on a flat area in front of a smooth wall at a distance of 7–10 meters. The accuracy of the direction of the rays can be obtained provided that the tank is filled (more than 50%!) and tires are inflated to the required standard. The machine is loaded as it is normally used.
Two headlight adjustment screws
On the wall, draw with chalk the center of one headlight (the other is covered, for example, with a piece of cardboard) and the center of the body. A second line is made 12 cm lower. The third line is drawn 22 cm below the first. Based on these three projections, a vertical line is drawn covering the center of the headlight and the body. One of the two screws located inside the headlight adjusts the tilt of the light, and the second forms a directed beam .
Turning on the low beam will result in a projection on the second line. Having completed the procedure with the second headlight, you get an adjusted low beam. In this case, the high beam will also be adjusted.
Standard head optics of the VAZ 2110 car
As a rule, it does not shine with variety. Of all the well-known manufacturers, the VAZ line is limited to two main positions:
- Kirzhach headlights, produced by the Avtosvet plant. Such headlights can be easily purchased for a price range of 2500-2700 rubles;
- Bosch headlights, the price of which is much lower.
It is worth noting that most drivers, first of all, care about the low beam, which should be bright. Kirzhach headlights are equipped with a low beam lens, and a reflector is used for high beam. As for Bosch, they use reflectors in both cases.
Difference between reflector and lens
Halogen lamp for VAZ 2110
It lies in the fact that the lens has a much clearer light line. Reflectors, on the contrary, are dependent elements, although they have weak illumination from the side under the low beam. This has a better effect on the quality of light in cloudy weather. As for the use of headlights at night, in order for the lighting to be as productive as possible, most experts recommend, first of all, adjusting the headlights correctly, and secondly, using halogen lamps instead of traditional ones.
Advantages of halogen lamps compared to conventional ones
Halogen lamps VAZ 2110
Long gone are the summers when people preferred traditional bulbs used in headlights. Today, new generation halogen and xenon light bulbs have almost completely replaced the old ones and are successfully used in the automotive industry. So:
- Halogen lamps, in particular, give drivers excellent visibility of the road at night. And this is a huge plus, which gives the driver not only comfort and the opportunity to travel on highways at night, but also a high degree of safety.
- Halogen lamps for cars are a special bulb consisting of heat-resistant quartz glass. The flask is filled with a mixture of gases of a special type, which are also called iodide or bromide. Thanks to such gases, filaments are capable of self-healing.
Note. The halogen coil heats up to 3000 degrees Celsius, giving a more powerful luminous flux than traditional lamps. In addition, the service life of halogen lamps is 550 hours.
- The latest version of halogen bulbs produced by manufacturers produce high brightness white light. It is this type of light bulb, better known among motorists as pseudo xenon, that is in great demand.
Fine-tuning headlights on Lada 2110
This can be done without disassembling the headlight, but simply by adjusting the curtain. When the location of the curtain changes, the light also changes.
If you cannot achieve the ideal effect right away, you can experiment, for example, turning the curtain while the headlights are on. At the same time, remember at what position of the curtain the light emitted by the headlights suits you best.
As you can see in the photo above, it is necessary to perform various manipulations with the curtain in order to achieve the highest quality light and remove all unnecessary “tails” and “rainbows”.
By following all the recommendations, you can achieve the highest quality light and ensure a good view of the route at any time of the day and in almost any weather conditions. At the same time, spending only 5,148 rubles on such lighting.
After you have set up the light, you need to move on to working with the mask, by which time the paint should already be dry. I would like to add that you need to approach the process seriously, do everything carefully and do it with love. Approximately all work with headlights will take about 4 days.
Installing angel eyes headlights on fret 2110
We move on to the final stage of work - this is the actual installation of the headlights. Before installation, you must carefully check the headlights for flaws and defects. Since it is much easier to find flaws at this stage, because if a defect is discovered after installation, then many problems will arise associated with disassembling the headlights. Installation should begin by drilling 22 mm holes in the covers. This is necessary to remove the wires from the xenon. It happens that it is not always possible to drill holes all the way, so the missing length can be made with a knife.
We insert the wires into the holes and install the lamps in the desired position.
2 xenon lamps and 2 blocks will cost approximately 1850 rubles. You can install them according to the example in the photo below.
We connect all the necessary elements, if difficulties arise with one of the headlights due to a mismatch in the sizes of the holes and fasteners, it can be installed a little lower, since there are usually additional holes for fasteners there.
An example of headlights in the daytime.
An example using xenon during daylight hours.
Example in the dark.
Only “angel eyes” are included, without the use of low beam.
Only the right headlight is on.
Only the left headlight.
Both headlights are on.
Work is done! As we can see, installing Kirzhach headlights using xenon lamps and LED strips on a Lada 2110 car is not an easy task. However, anyone can cope with it. The main thing is to pay attention to the little things, double-check the dimensions of the workpieces, identify the presence of flaws and defects, take the work seriously and do it with love. If you follow all the recommendations given in this article, you will become the proud owner of a car with “angel eyes”. And in gratitude for your work, you will receive a comfortable stay on the highway at any time of the day and in any weather conditions, since the use of Kirzhach headlights in combination with LED strips and xenon gives a very large viewing radius on the highway. This reduces the risk of getting into an emergency and also gives you greater confidence when driving. And as we said earlier, the safety of you and your passengers is the most important thing on the highway.
Model features
Experts assessed possible headlight options for VAZ according to several parameters:
- ensuring excellent visibility at night. At the same time, the light should not blind oncoming drivers. In this parameter, both Kirzhach and Bosch are approximately the same;
- features of reflectors. The German analogue of the headlight has reflectors for low and high beam, while the domestic one has a lens for low beam and a reflector for high beam. This ensured almost the same level of illumination during the tests. The lens, which is installed in the headlights of the Russian manufacturer, provides better brightness (helps create clear lines of light, and is also suitable for installing xenon optics). In addition, some drivers note that the illumination is not very high-quality when the low-beam headlights are on; the product, due to the reduced lighting area, does not have such a drawback.
Differences between the “Kirzhach” headlights
Another feature of the “Kirzhach” headlights is that you can easily buy it in stores in the city, because the sales market for such headlights is in Russia. This and other features of the headlight make it more attractive to VAZ 2110 drivers and determine a slightly higher price for components from this company.
Sometimes it happens that, having purchased new headlights from a Russian one for your VAZ, you notice that their glow is not very good. Inexperienced drivers may attribute this to a defect or poor quality of the purchased product.
However, most often the problem is in the usual setting of the headlights. It is advisable to adjust the new lighting components that you install in place of the optics you just removed.
To do this, you will need, in addition to the skill of a draftsman, a flat surface. But if you do not have the necessary skills and time, entrust the adjustment of the Kirzhach headlights to specialists.
Removing a headlight from a VAZ 2110
We carry out preparatory work for installing headlights on fret 2110
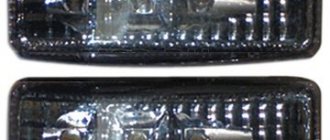
Initially, you need to disassemble the turn signals and separate the glass from them. To do this, you can use a stationery knife with a retractable blade.
The difficulty is that the manufacturer solders the glass with the turn signal and separating them is quite problematic. Therefore, this process may take some time, most often from 40 minutes to 1 hour.
Using a utility knife, you need to make a gap between the glass and the turn signal. This must be done carefully so as not to damage the glass. Next, you need to insert a screwdriver into the resulting hole, while continuing to cut the gaps with a stationery knife. The next step is to remove the headlight mask; to do this, insert a utility knife into the hole and cut through the sealant. The procedure is not complicated, and in a few minutes the mask will be in your hands. When working with a stationery knife, you must follow safety precautions to avoid injuries and cuts.
In the process of work, we need a battery; if necessary, it must be recharged.
The masks are coated with chrome plating; sandpaper can be used to remove it; when cleaning the masks, all chrome plating must be removed as much as possible. Let's move on to painting. First you need to prepare and arrange a place for painting masks; any basement is perfect for this. Before painting, seal the glass of the headlight mask with masking tape.
It is better to paint turn signals in several layers; the best result will be obtained by painting in 3 layers. Leave for some time for the paint to dry. We assemble the turn signals and attach the glass to them, we use liquid nails for fastening, this is very convenient in our case, since in the future we will have to re-disassemble the headlight to implant a yellow LED strip into it, or, as it is also called, “angel eyes”.
The work with the turn signals is completed at this stage. Next, it is necessary to fine-tune the headlights, since most manufacturers do not always pay due attention to this small but very important aspect. In the photo below you can see how the new factory headlight shines before fine tuning.