A special sensor is responsible for measuring the speed of the car. It is he who transmits information to the ECU and thanks to this sensor we see the speed of our car. If you suddenly notice that the speed on the speedometer is lower than that of your car, the sensor may have failed and needs to be replaced.
You can replace the speed sensor on Kalina yourself, without the help of specialists, and we will describe how to do this below.
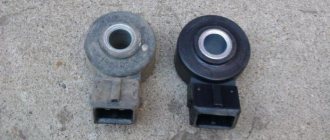
Speed sensor, photo
Checking and replacing parts
To make sure that the problem is a breakdown of the Lada Kalina speed controller, you need to use a tester.
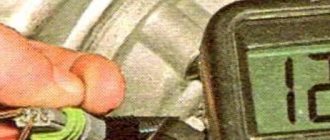
We remove the device and find the pulse contact using a multimeter. Next, connect the negative probe to the motor, and the positive probe to the impulse wire. We put a small tube on the axis of the device and scroll it. In this case, a multimeter should be ready to immediately measure the voltage that arises. For a working sensor, the voltage should change from 0.5-0.6 V to 9.9-10 V. The speed sensor is replaced as follows. We will need two keys, 10 and 21. Now we need to disconnect the battery from the network, and then the sensor connector. Now you can begin dismantling the defective device.
I encountered the following problem - the speed sensor on Kalina quickly failed. More specifically, in about a year and a half I replaced 3 speed sensors. Moreover, the latter did not work even a day. This arrangement of events did not suit me and, to be honest, I was a little fed up. I decided to figure out the reason for such a quick “demise” of the sensors.
A speed sensor can break down mainly for 3 reasons - the first, and most common, is liquid (water or antifreeze) getting on the sensor contacts. This occurs due to leaking pipes or driving through a large puddle. The second reason is transmission oil getting inside the sensor. This is due to the design features of the sensor itself. And third, the speed sensor chip may begin to melt; no one knows for sure why this happens.
The first time my speed sensor failed was due to antifreeze getting on it. I fixed the leak (the pipes leading to the stove were leaking, just above the sensor) and replaced the sensor. The second time the speedometer stopped showing after a trip in rainy weather, although it didn’t seem to drive through puddles
The third time I didn’t understand at all why it stopped working, perhaps the microcircuit itself burned out, but this is no longer so important
Speed sensors for Kalina have three varieties 1118-3843010-00 (02, 04). That is, they differ only in the last two digits. Sellers at the market claim that you only need to install the one that was there before. So it is (verified personally). Sensors ending in 02 and 04 are interchangeable in terms of seats, but if you install 04 instead of 02 (or vice versa), it will not work (or it will, but only for a couple of hundred meters, as happened to me). Sensors with the ending number 00 cannot be installed at all instead of 02 or 04 due to the different shape of the seats.
Speed sensor-1118-3843010-02 (Kaluga) is also different from -04. It looks better quality when you pick it up and it's noticeable. It has an oval shape, not angular. The bottom of the sensor is not made of plastic, but is filled with a substance like epoxy resin (I don’t know exactly). I originally had the same sensor. Why I didn’t buy the same one right away, I don’t know.
So this is what I'm getting at, buy the sensors that you had. Come to the AvtoVAZ branch and ask for a speed sensor, they will offer you a branded, high-quality sensor of the required type. And there is no need to conduct “experiments” by installing everything. Just waste your money.
Another reason could be rotting (damage) of the contacts on the connector itself or a break in its wires.
In this case, you will have to buy a new connector. Changing it is quite simple - cut off the old one and screw (solder) a new one in its place. Be careful with the order of the wires, do not mix them up.
Measuring the speed of a car has long been carried out non-mechanically. A speed sensor is responsible for this, the operating principle of which is based on the Hall effect. This sensor supplies the controller with electromagnetic pulses, on the basis of which the latter calculates the speed of the machine.
Vehicle speed is measured as follows. For each kilometer of distance traveled, the sensor sends a fixed number of pulses to the controller - 6004. The faster the car moves, the higher the transmission frequency. Thus, the controller calculates the speed based on the time interval between pulses.
In addition to its main function, this sensor indirectly helps the car owner save fuel. When the car is coasting at a speed of over 20 km/h, the controller, based on sensor readings, does not open the fuel supply.
Priora speed sensor: replacement, location, malfunctions
If the engine stalls in idle mode on the Priora, you should check several sensors. The “culprit” may be DPKV, DFID, IAC, DAS or TPS. In this review we will talk about the speed sensor (DSA). Before changing this component, it must be checked. The DSA is located in the upper part of the gearbox housing. A faulty sensor transmits erroneous information, and as a result, the operation of Lada Priora components, including the engine, is disrupted. Here's how it happens:
- The DSA sends a signal to the component responsible for idling the engine;
- This component works together with the PPX, which supplies air to the throttle valve;
- Increasing vehicle speed increases the number of these signals.
Checking the vehicle speed sensor (VSA)
The easiest way to identify a malfunction of this element will be for owners of a Lada Priora with an on-board computer - a message will appear on the display stating that there are no signals to the speed sensor. Without the BC, you can also understand that malfunctions have appeared in the operation of the DSA: at idle, the power plant is unstable, engine thrust is reduced, the speedometer gives incorrect data, fuel consumption has increased. Now let's look at three verification methods. Usually the test is carried out on a removed DSA; detailed instructions for dismantling this component are provided at the end of the article.
First method (without removal)
The Lada Priora must be raised so that only one wheel does not stand on the surface. The sensor contacts must be connected to a voltmeter. Now we move on to the raised wheel and begin to rotate it. If voltage and frequency appear on the tester, then the sensor is working.
Second method (with removal)
We dismantle the component we need. Using a voltmeter, you need to determine where the terminal that sends the signals is located. We connect its incoming contact to the meter, the second contact of the voltmeter must be grounded to the body of the Lada Priora or its engine.
Rotate the DSA, this way you can understand whether there are signals in the duty cycle. In this case, it is necessary to measure the output voltage. We put a piece of tube on the DSA axis; it must be twisted at a speed of approximately 4 km/h. As the rotation speed increases, the frequency and voltage readings on the meter display should increase.
Third way
Here we need control. The impulse terminal should be disconnected from the component we need. We start the ignition and find the “minus” and “plus” using the control. We hang the Lada Priora wheel as in the first verification method. We fasten the signal wire with a control and manually turn the wheel. The “minus” should be lit on the measuring device - this indicates that the DSA is working properly.
As an alternative, you can use a simple light bulb with a wire. You can check the DSA as follows: one end is connected to the battery positive, and the other to the signal input. If the light flashes when the wheel rotates, then faults should be looked for in other components.
Replacement
Prepare a ratchet handle, a set of screwdrivers and a 10mm socket wrench. The Lada Priora should be on a flat surface; we begin work by disconnecting the negative terminal of the battery.
The replacement takes place according to the following scheme:
- For convenience, we dismantle the injection pipe coming from the air filter. To do this, you need to unscrew the bolts located on each side of the pipe. Then we remove the fastening of the thin hose and remove the pipe; Unscrew the fastenings of the pipe and loosen its clamps
- Now you can see the DSA. Disconnect the wiring going to the power connector. It is necessary to unscrew the nut on the stud - a 10 socket socket will help us with this;
- Pull the speed sensor housing towards you. It may be tight in the mount, in which case use a flathead screwdriver; We remove the wiring from the sensor
- Carefully pry the housing from below and remove it from the gearbox;
- We mount the new component and securely fix it, now we connect the wires. It is recommended to lubricate the rubber seal; Pry up the sensor housing with a screwdriver if it cannot be pulled out manually
- We return the air duct pipe to its normal place, tighten it with clamps and connect the negative terminal to the battery;
- Replacement is complete.
Now you need to check the operation of the speed sensor in motion. Start the engine and drive for a few meters, while studying the data on the odometer and speedometer. If the devices produce real indicators, then the problem has been resolved.
Contact sensors based on the Hall effect
Sensors of this type are based on the Hall effect: if a flat conductor, through two opposite sides of which a direct current is passed, is placed in a magnetic field, then an electric voltage appears on its other opposite sides. The DSA is based on a Hall chip, into which a plate (usually made of permalloy) and an amplifier circuit are already integrated. In the sensors, the microcircuit and magnet remain stationary, and the magnetic field changes due to a rotating “curtain” - a ring with slots. The ring is connected to a drive cable or shaft, from which it receives rotation. The output signal from the DSA is supplied to the speedometer or controller through a standard connector, through which power is supplied to the Hall chip.
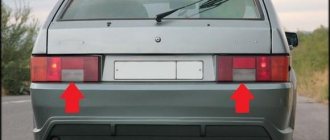
Why does the speedometer not work on the Lada Grant, Kalina and Priora, and how to deal with it?
If the speedometer on a Lada Granta does not work, then the driver will not be able to assess how fast the car is moving, which can lead to a violation of the speed limit and, accordingly, fines. The article discusses the types of devices, the main faults, and provides instructions for replacing the device on a Lada Kalina.
There are currently three types of speedometers:
- mechanical;
- electrical;
- electromechanical.
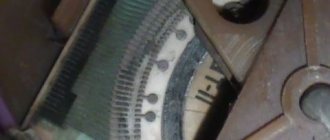
On a mechanical type device, speed is transmitted from the gearbox using a cable. The distance traveled on the odometer is set by measuring the revolutions. Each revolution corresponds to a certain amount of mileage. The mileage traveled is reflected on the dial.
Mechanical device dial
In the electromechanical version, improvements have been made that eliminate the shortcomings of the mechanical device. The mechanical flaw was the cable, due to which the information was often incorrect. The electromechanical device is supplemented with a speed sensor, the signals from which are transmitted to the electric motor that rotates the gearbox.
All modern cars are equipped with an electronic device. The electronic speedometer measures the number of revolutions of the wheel. The mileage traveled is calculated by analyzing the wheel circumference and the number of revolutions. The information is reflected on the display.
Possible device malfunctions: signs and causes
One of the reasons for speedometer and odometer malfunction is a broken cable. This can be detected by the characteristic sound that is heard in the area of the shield. After a break, the steel ends of the cable touch the sheath, and noise appears.
If the pointer is faulty, the needle either shows incorrect readings or it lies down and does not rise. The cause may be the speed sensor. If it is broken, you need to replace it.
If the speedometer on a Priora does not work, first of all you should check the fuses, they could have blown. In addition, you need to test the wiring and make sure the quality of the contact connections. If the device does not work, it must be replaced.
How to check the device for functionality?
Before changing or repairing the speedometer, you should find the reason why it is not working. First you need to diagnose the speed sensor, since it is most often the cause of the pointer not working.
First of all, you should inspect the regulator for mechanical damage. In addition, you need to check the integrity of the wires and the quality of the connections. In the event of electrical failures, a “Check” warning is usually displayed on the dashboard.
It is difficult to check the functionality of the controller board at home, since special equipment is required. You can check the condition of the gears. If there are nicks or chips, parts need to be replaced (the author of the video is Avtoelektika HF).
Instructions for replacing the device yourself
Replacing the drive on Kalina is simple, you need to perform the following steps:
Using a wrench, unscrew the screw securing the device to the gearbox. Next, use a screwdriver to carefully pry the hole and remove the speedometer. At the next stage, the removed drive should be inspected for defects and contamination.
It is also necessary to check the seat and clean it of dirt. When inspecting, pay attention to the gearbox. If oil stains are found, the O-ring must be replaced. We install the repaired or new speedometer in its original place. We assemble the drive in the reverse order of removal.
After final assembly, the operation of the drive should be checked.
Removing the pointer from the panel
What to do if the instrument panel fails?
If the speedometer on the Lada Kalina does not work, this may be due to a breakdown of the instrument panel. It is supplied to the automotive market only assembled, so it needs to be changed completely.
Before replacing, you should check the reliability of the fasteners that go to ground; this may be the cause of the breakdown.
The procedure for removing and replacing the instrument panel consists of the following steps:
- The steering wheel must be moved to the down position.
- Next, the mounting bolts are unscrewed.
- Then, overcoming the resistance of the latches, we pull the cover towards ourselves and remove it.
- Use a Phillips screwdriver to unscrew the center console mounting bolts.
- Having tilted the shield, we disconnect the connector with wires from it. To do this, you need to move the latch.
- We carry out the installation in reverse order.
The procedures for replacing the instrument panel and speedometer are simple and can be done independently. Thus, there is no need to waste time and money visiting a service station.
Loading …
Video “Visual guide to replacing the controller”
To avoid mistakes when replacing the sensor, we recommend that you additionally read the detailed instructions for replacing it yourself (the video was published by the Alexandr V channel).
When the speed sensor on a Lada Kalina is faulty, the speedometer needle begins to twitch or does not move at all, the reading error is high, the power steering does not work. The article discusses the signs and causes of the malfunction and provides instructions for replacing the device. In addition, photographs and a demonstration video are included.
The speed sensor (DS) is an element of the fuel system of engines with an injector. Its purpose is to determine the rotation speed of the front wheels of the car and transmit the received data to the electronic control unit. The controller analyzes the received information and sends it to the instrument panel. In addition, these data are used to calculate the required proportions of fuel and air to form a high-quality fuel-air mixture, which is supplied to the cylinders of the power unit.
Checking the speed sensor
First you need to find out whether there is grounding and 12 V voltage in the contacts. These contacts are wired, and the contact with pulse signals is tested by torsion.
The voltage between the pin and ground should be in the range from 0.5 V to 10 V.
Method 1 (check with a voltmeter)
- We remove the speed sensor.
- We use a voltmeter. Let's find out which terminal is responsible for what. We connect the incoming contact of the voltmeter to the terminal that outputs pulse signals. We ground the second contact of the voltmeter to the engine or machine body.
- By rotating the speed sensor, we determine whether there are signals in the operating cycle and measure the output voltage of the sensor. To do this, you can put a piece of tube on the sensor axis (twist at a speed of 3-5 km/h). The faster you rotate the sensor, the higher the voltage and frequency in the voltmeter should be.
Method 2 (without removing from the car)
- Place the car on a jack so that one wheel does not touch the ground.
- We connect the contacts of the sensor with a voltmeter.
- We rotate the wheel and diagnose whether voltage appears - if there is voltage and frequency in Hz, then the speed sensor is working.
Method 3 (check with a control or light bulb)
- Disconnect the pulse wire from the sensor.
- Using the control, we look for “+” and “–” (after turning on the ignition).
- We hang one wheel as in the previous method.
- We connect the control wire to the “Signal” wire and rotate the wheel with our hands. If “-” lights up on the control panel, then the speed sensor is working.
If you don’t have a control at hand, you can use a wire with a light bulb. The test is carried out as follows: connect one side of the wire to the battery positive. Another signal to the connector. When rotating, if the sensor is working, the light will blink.
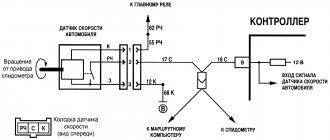
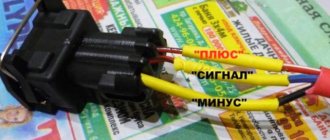
Connection diagram
Checking the DS with a tester
Diagnostics
Checking the controller can be done in several ways; we recommend that you familiarize yourself with each of them in more detail. For the first two methods you will need a voltmeter.
- First, the sensor must be removed. Find its installation location, disconnect the connected connector, unscrew the fixing nut and remove the device from the mounting location.
- Then take a voltmeter and figure out the pinout of the connector. The connector has three contacts, the first of which is usually a positive contact, the second is an output signal, and the third is a negative contact. One of the tester probes should be connected to contact number 2, and the second probe should be grounded - connected to the engine body or car body.
- Afterwards, you need to rotate the controller to determine whether there are pulses in the operating cycle and measure the output voltage. To do this, you need to install a piece of pipe on the sensor axis and rotate the device at a speed of approximately 3-5 km/h. The voltage and frequency in the tester depend on the rotation speed of the controller (the author of the video is Artem Kulzhanov).
The second diagnostic option is performed without dismantling the sensor:
- You need to put the car on a jack. You need to jack up the front of the car so that one of the wheels is hanging out and not in contact with the ground.
- After this, the tester probes must again be connected to the contacts on the device connector.
- The hanging wheel must be rotated and at the same time monitor the readings on the tester display. If, as a result of rotation, voltage and frequency appear, measured in hertz, then this indicates the operability of the device.
There is another checking option; to perform it you will need a light bulb or control.
Diagnostics is performed as follows:
- First of all, you should disconnect the plug and wiring from the sensor.
- Using the control, you will need to find the plus and minus, before that you need to turn on the ignition.
- Next, as in the previous method, you need to put the front of the car body on a jack and hang one wheel.
- Now you should connect the control pin to the pulse contact of the sensor (usually it is the middle one) and rotate the wheel by hand. If at the same time the minus lights up on the control panel, this indicates that the device is working. Alternatively, instead of a control, you can use a light bulb with a connected wire, one of which is connected to the battery, and the second to the signal connector. If the light begins to blink when the wheel rotates, then the controller is working (video shot by Alex Kov).
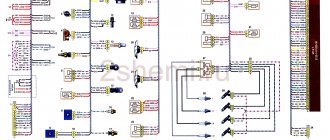
General diagram of electrical equipment of Kalina
On the electrical circuit of the Lada Kalina model, the pinout of connectors is carried out in several stages. According to the factory drawings, the general position of the elements is initially revealed, then each node is deciphered separately.
- Right front headlight assembly.
- Sensor indicating the position of the hood lock.
- Powering the horn.
- Starter terminal block.
- Battery power cables.
- Generator working unit.
- Voltage supply terminal for the wiper drive.
- Left head optics contact block.
- Right door lift chip.
- Likewise for the glass lift gearbox.
- Output to driver's door speaker.
- Driver's door lock drive.
- Windshield washer reservoir motor.
- Overboard temperature meter sensor output.
- Standard ECM connection connector.
- Same as 12 for the front passenger.
- Indicator of the remaining brake fluid in the expansion tank of the system.
- Same as 11 for the front passenger.
- The front passenger door power window switch, located in the driver's control unit.
- Driver's door window lift key.
- Lock button.
- Power supply for the lift gearbox for the front passenger door.
- Input of the mounting assembly.
- Anti-theft control unit.
- Likewise for signaling.
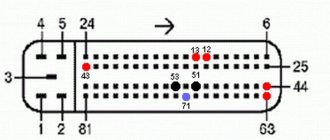
- Pinout on the dashboard.
- Right turn.
- Glove compartment lighting.
- Glove box light switch.
- Stop key switch.
- Anti-theft ignition switch terminal.
- Headlight design.
- Supply current to the steering column lever connector.
- Left turn signal.
- Right rear speaker block.
- Rear right door electric lock drive.
- Window window heating unit.
- Reverse blocking.
- Hazard breaker.
- Adjusting the stove fan.
- Auxiliary resistor for the stove.
- Stove motor.
- Power supply for rear left speaker.
- Rear left door lock terminal.
- Power supply for fuel pump and float.
- White reverse lamp switch.
- Stop button.
- Cigarette lighter power supply.
- ZX blocking – solenoid power supply.
- Chips for a tape recorder or speaker system.
- Illumination of used ventilation and stove.
- Supplying voltage and signals to the EUR.
- Interior lighting lamps.
- Rear right lampshade.
- Power to the trunk lid lock.
- Cargo compartment lighting drive.
- State license plate illumination.
- Auxiliary stop lamp.
- Directly heated windshield.
- Cargo compartment illumination lamp.
- Left stern light.
The following is the pinout of the first generation Kalina wires for each section individually. This was done due to the increased complexity of the main circuit, where all elements of the on-board circuits are indicated at once. An inexperienced user will not be able to navigate the generalized instructions.
How to identify a malfunction
Like any electronic equipment, the speed controller fails from time to time. How to determine the problem on a Lada Kalina car? Firstly, a breakdown in the sensor is reflected in the inability to determine the speed. If this is observed, then repair will no longer help; an urgent replacement of the part is needed.
Failure to display information is the last stage; in such a case, the device cannot be repaired. But how can you determine that a node is approaching the extreme limit of its performance? Possible signs of malfunction:
- interruptions in the Lada Kalina engine can indicate various problems, one of which is sensor failure;
- if increased fuel consumption is observed, this may also indicate a defect in the device in question;
- if there are interruptions in the pulses coming from the speed sensor, the power unit of the Lada Kalina cannot develop full power;
- unstable, stalling motion, decreased controllability and dynamics.
If the car belongs to the category of modern, highly equipped, then the sensor failure will be indicated by error code No. 24 displayed on the on-board computer, or the Check engine light will come on. In relation to Kalina, if the device breaks down, the electric power steering also refuses to work.
As a rule, breakdowns in the sensor occur for several main reasons. For example, as a result of an electrical circuit failure
This is why it is so important to regularly monitor electronics, as the most vulnerable system of a car. If any contacts become oxidized or even just a little dirty, this can also have a very negative effect on the operation of electronic devices
To fix the problem, in this case you just need to clean the contacts and coat them with any special lubricant for electrical wiring, which can be purchased at car dealerships. Their cost is low, so such prevention is affordable for every car owner.
Often, electrical wiring failure occurs in the exhaust manifold area. The collector itself should also be checked, since it directly affects all other electronic systems. And the last thing is a defect in the speedometer cable. If there is even a tiny crack or even a burr on it, there is no doubt that the sensor will immediately fail.
If the sensor has completely failed, then it cannot be repaired, you can only replace it. Replacement is carried out quickly. And the price of the device is low: starting from a couple of hundred, depending on the manufacturer’s brand.
What to do if the sensor has already broken its function?
Let's try to figure out the possible causes of the malfunction.
Of course, there are many reasons why a sensor may fail. Therefore, we will consider the most popular of them.
- The first reason is a malfunction of the Lada analyzer itself as a result of mechanical damage.
- The second reason is liquid getting on the chip and breaking the tightness of the conductors.
Signs indicating a malfunction of the Lada speed sensor:
- No response from the speedometer needle.
- Malfunction of the electric power steering wheel.
- Active indicator indicating the need for engine diagnostics.
- The odometer function is malfunctioning.
- Increased sensitivity of the fuel sensor to fluctuations in the mixture in the fuel tank.
Despite its small dimensions, the analyzer performs a very important function in the vehicle control system. In this regard, the impaired function of the element interferes with the correct operation of the vehicle and requires prompt diagnosis of the analyzer.
If these malfunctions occur, do not rush to immediately change the Lada speed analyzer. First of all, you need to clean the contacts and recheck the functionality of the device. In some cases, cleaning the contacts allows you to restore the functionality of the analyzer, while the car enthusiast was sure of the need to replace it. If this operation does not bring the desired results, you must proceed to changing the device.
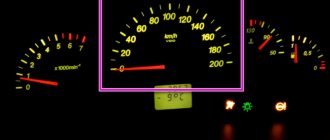
Signs of a malfunctioning speed sensor
The arrow lies at zero.
If the DS is faulty, then the following signs appear:
- incorrect speedometer readings, the needle moves chaotically, complete speedometer failure;
- increased fuel consumption;
- The power steering refuses to work;
- the power unit check sign is on;
- The car odometer does not show mileage;
- the arrow indicating the fuel level fluctuates, making it impossible to correctly determine the level;
- the engine does not pull or has lost throttle response;
- The engine stalls at idle.
The listed symptoms can be caused by a breakdown of other devices (the author of the video is Autoelectrics HF).
https://youtube.com/watch?v=qiDmZLUuTMI
Removal and installation instructions
Before changing the DS, you should first carry out a number of preventive actions that can eliminate the malfunction:
- clean the contacts: they may have oxidized;
- Clean the pad, which may have gotten dirty.
The sensor should also be removed, cleaned and checked for functionality.
The check can be performed in three ways:
- Using a multimeter. The positive wire of the removed DC must be connected to the central contact, and the negative wire must be leaned against the body of the car. If the DC is exposed to slight vibration, the readings on the tester should fluctuate from 0.5 to 10 V.
- To check the second method, the device does not need to be removed from the gearbox. You should hang the front wheel, then start rotating it and attach a multimeter in the same way as the first method. If after connection the tester changes readings, then the device is working properly.
- If you don't have a multimeter, you can use a 12 V test light in the socket. The minus must be connected to the signal contact of the DC, and the plus must be connected to the battery. When the light comes on, it indicates that the device is working properly.
If the DS is faulty, it must be replaced.
To replace the DS, you need to prepare the following tools and materials:
- key or head to “10”;
- flat screwdriver;
- Phillips screwdriver;
- rags;
- new device.
Priorovsky and Kalinovsky speed sensors
Depending on the version, different DS are installed on the Lada Kalina:
The listed DS speeds can replace each other. They can be installed on the following versions of Kalina: 1117, 1118 and 1119 with 1.4 and 1.6 liter engines. The sensor from Lada Priora is suitable, but it cannot be used as it gives incorrect readings.
To carry out the replacement procedure, the car should be put on the handbrake and the hood opened. Replacing the speed sensor on Kalina consists of the following steps:
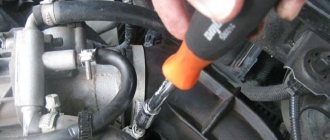
- To access the speed sensor, you need to either remove the air duct that goes to the air filter or move it to the side.
The process of unscrewing clamps with a screwdriver
- Disconnect the wire block connector from the sensor.
- Using a “10” wrench, unscrew the nut that secures the device. It may be difficult to unscrew the nut, since it is in an inconvenient place. You should find a stop to apply enough force to unscrew.
Unscrewing the nut with a wrench Using a flat-head screwdriver, you need to disconnect the old device from the box and remove it. Next, you should clean the installation site with a rag. Next, you can install a new device.
DS for Lada car
After installing the new device, you need to return the air pipe to its place.
After replacing the device, all signs of its malfunction disappear. Thus, it is not difficult to change the speed sensor on Kalina. Even a novice car enthusiast can handle this, thereby saving on visiting a service station.
Features of the switching mechanism
If we recall the design and principle of operation of VAZ gearboxes for the Samara series, then the shift mechanism in them was from below and immersed in an oil bath. After parking in the cold, the oil in the gearbox thickened and the gears shifted very, very slowly until the engine and gearbox warmed up. At the bottom of the gearbox, clamps for the fork and reverse gear rod, a reverse sensor, and a gear selection seal were installed - each element was a potential source of oil leakage. Sealants helped with this, but they did not radically solve the problem. And at AvtoVAZ they decided to move the mechanism up.
The new switching mechanism in the VAZ-1119 (“Kalina”) is a special separate unit. It can be installed and removed without the need to disassemble the gearbox. This is an excellent solution and is useful not only for fast and cheap production, which is also appreciated by repairmen. Now repairing the switching mechanism has become much easier. Thanks to the use of a selector grid, all gears are switched on much more accurately. The mechanism also has a lock against engaging reverse gear - reverse gear is only available from neutral.
The icing on the cake, or rather in the box, is the special selector plate. It was she who influenced the accuracy of gear shifting. The plate replaced the previously standard locking and return springs. To develop the plate, it took a long time to analyze the work of a person with a gearbox selector. The force on the lever was calculated using a special software package.
Main causes of damage
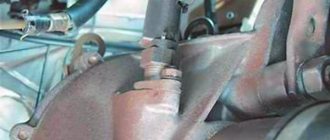
The place where the Kalina speed sensor is located is not very well chosen. Located at the gearbox, under the cooling system pipes, the DS is exposed to dust and aggressive liquids. Despite the boot on the terminal block, antifreeze and oil get onto the sensor contacts, causing contamination and corrosion. Most often this is the cause of damage to the DS. Contacts become heavily oxidized and sometimes even break off. As a result, the DS does not work correctly.
Much more often than the sensor contacts, the terminal block oxidizes. It is frankly rusting from the inside, and it is almost impossible to eliminate it. Moreover, there are often cases when a car owner changes the DS, but the speedometer still does not work. I have to change the block. This is not difficult to do. The block is sold with wires of different colors. It is enough to cut off the old one and connect it to the corresponding wires of the new one. There is one more nuance here. If you remove the block during diagnostics and then put it back and the speedometer's performance is temporarily restored, then the problem is almost certainly in the terminal. True, there are often cases when the contacts oxidize both on it and on the sensor itself.
Another reason that the controller stops working is the wires. They are quite long and not secured in any way. As a result, the insulation is frayed and one of the conductors is shorted to ground, which naturally disrupts the operation of the DC.
If we analyze the main causes of damage, it becomes clear that replacing the Kalina speed sensor is not always necessary. Sometimes a visual inspection is enough to check all the conductors and also clean the contacts. As a last resort, change the pad first, which is three times cheaper. True, if it is definitely established that the sensor is to blame, then, of course, you cannot do without removing it.
Causes of DSA failure
There are not many reasons for the failure of the Kalina speed sensor, but there are several similar reasons due to which the sensor fails.
- Shavings. The speed sensor has magnetic elements. When the gearbox shafts and gears rotate, chips are formed that can become magnetized to the sensor, making it difficult to operate. Such a malfunction is not a breakdown; it is enough to simply dismantle the sensor and clean it of adhering chips.
- Oxidation of contacts. This failure is due to the fact that the sensor is located in the gearbox housing and is often exposed to moisture. Moisture falling into the sensor connector oxidizes its contacts and even leads to corrosion. It is best to replace such a sensor with a new one.
If the instrument panel is faulty
Very often, in addition to a broken speed sensor, a blown fuse designated F1, or poor wire contact, the speedometer installed on the Lada Kalina refuses to work because the instrument panel has failed. It can only be replaced as an assembly. The spare parts store does not sell individual parts of the instrument panel.
However, before proceeding with the replacement, you first need to make sure that the wire going to ground is securely fastened. Perhaps this is the reason for the breakdown. Of course, the design of the speedometer is based only on electronics, but motorists can cope with some of its malfunctions on their own. To locate the sensor under the hood and replace it, you must first perform several operations.
It is necessary to remove the inlet pipe connecting the air filter to the throttle assembly. To do this, you need to release three clamps. After which the pipe can be easily removed. The gearbox housing is now visible. The speed sensor will be attached to it together with a suitable plug with wires. In order to replace it, you need to have a small supply of tools:
- flat screwdriver;
- Phillips screwdriver;
- spanners;
- head;
- ratchet.
First, the wires supplying power to the sensor are disconnected. For this purpose, use a flat screwdriver to pry off the plastic retainer that secures the plug. Without releasing the latch, it is slowly pulled up. The plug does not offer much resistance and can be easily removed.
Then the nut that secures the sensor we are interested in is unscrewed. This work is best done with a ratchet wrench. Due to the fact that the sensor seat is made very tightly, it needs to be pryed off with a thin flat screwdriver. After which it can be easily removed from the gearbox of the Lada Kalina.
The new part is mounted in its original place. Before installation, all free spaces in front of the hole must be thoroughly wiped and free of dirt. In this case, you can be sure that no debris has entered the gearbox. The new sensor is inserted all the way until there is a loud click. Only then can you tighten the nut.
The cost of a Lada Kalina speed sensor in spare parts stores reaches a maximum of 400 rubles. Almost every car enthusiast can afford to purchase a new sensor. Replacing the device does not cause any particular difficulties, so such repairs are usually done independently.
The Lada Kalina speed sensor is a device that is intended not only to measure the vehicle's speed, but is also an important link in interacting with other systems in the car. The principle of its operation is based on electromagnetic pulses, with the help of which the vehicle’s speed is analyzed and calculated.
The device readings are taken into account when calculating the quantitative parameters of fuel supply by the engine control unit
Therefore, if the speed measurement device breaks down or malfunctions, the control unit does not receive information important for the engine. The question of where the Lada Kalina speed sensor is located is of interest to many car owners who are faced with the incorrect operation of this device
The location is the gearbox assembly in the speedometer drive area. The most convenient way to access the mechanism is by opening the hood and removing the air pipe that is attached to the throttle assembly. Thus, you will provide a good overview and space for a comfortable dismantling process.
Device
Cars in the first generation were equipped with a five-speed manual transmission VAZ-2181, with five forward gears and one reverse gear. The mechanism is based on the well-known gearbox from the VAZ-2108 with minor upgrades. The gearbox is combined with the main gear and differential.
The Kalina gearbox is designed as standard. It consists of the main drive gear, secondary and input shafts, gear forks, reverse sensor, housing, gear shift mechanism and central lock.
Manufacturers thought for a long time about what and how to improve in the gearbox mechanism, as a result they decided not to interfere with the gear mechanism, otherwise huge costs would be required to launch the gearbox into series. Without the necessary equipment, it is impossible to obtain the proper quality of gear engagement and synchronizers.
The VAZ-1117 (“Kalina”) gearbox is the first for which AvtoVAZ specialists made a computer calculation of each part in the mechanism that is subject to loads. Crankcases, forks, levers and other elements were calculated and simulated using special software. Thus, the design was not only optimized, but also more reliable.
Replacing the speed sensor
If at least one of these signs is detected while driving a Lada Kalina, usually the speed sensor is immediately replaced with a new one. It should be a sensor with the same number that is applied to the surface of the old one. Before visiting a car shop for the necessary spare part, it would not hurt to carry out a control check of the existing one for oxidation of the contacts and the presence of breaks in the supply wiring. Sometimes the problem lies in the banal ingress of metal dust, which accumulates in abundance in any transmission that has been in operation for a long time. How to check the speed sensor in the Lada Kalina at home to definitively determine whether it is faulty or not is described below. There are several ways to check whether there is voltage in the contacts, of which we will consider two that involve the use of a voltmeter.
Testing with a multimeter and dismantling is performed in the following sequence:
- Remove the sensor (more about this in the video at the end of the article).
- Connect the first contact to the pulse signal terminal.
- The second contact is connected to the ground of the machine.
- Scroll the speed sensor, simultaneously observing the receipt of signals and the level of output voltage. The rotation of the sensor axis is carried out through a tube placed on it. It will be quite sufficient to rotate it at a speed of up to 5 km/h - the voltage value displayed by the voltmeter will depend on the speed.
An on-site test with a multimeter, without removing the device, is done as follows:
- Place the car on a jack with one wheel.
- Attach the voltmeter probes to the contacts of the speed sensor.
- Rotate the wheel hanging on the jack, checking the voltage readings. For a working sensor, regardless of the measurement method used, the voltage fluctuates in the range of 0.5–10 V.
Checking the speed sensor revealed a malfunction. This means that you need to find a similar one (with the same number), dismantle the used one and exchange it for the purchased one. Replacing the speed sensor on Kalina requires certain tools - a six key and a Phillips screwdriver
Sensor designs vary in type and each has a specific code designation, which is also extremely important to consider when searching for the right new part. The procedure itself is relatively simple and Lada Kalina has 8 valves and includes five stages:
- Unscrewing the bolt.
- Retract the corrugated pipe from the area of action and release the latch.
- In the same way as with the pipe, you need to proceed with the block and supply wiring.
- Unscrewing the fasteners and dismantling the old device.
- Install the new device in the reverse order to that described above.
Thus, by performing some simple manipulations, you can not only return the former smoothness of speed measurement in your Lada Kalina, but also achieve the usual reliability of the speedometer readings without changing anything. Thanks to the more or less convenient location under the hood of the car of the element responsible for measuring speed, in practice its repair/replacement turns out to be feasible for a car owner with any level of knowledge.
Types of automotive engine speed sensors
There are several types of automotive engine rotation meters based on the principle of creating and recording changes in a sensitive environment.
Induction (inductive)
Inductive engine speed synchronization sensors are the simplest, most common, and cheapest, but this does not reduce their effectiveness.
The main element of induction detectors of the number of rotations of internal combustion engines is a coil that magnetizes the core and creates magnetic fluxes.
In the following explanation, digital links to the figure below. The inductive synchronization sensor is installed immediately opposite the gear ferromagnetic part of the HF (7). It also has a small air gap (the place where there are no protrusions). The sensor inside consists of a magnetized steel core (pole contact rod, 4), with a winding of thin copper, insulated enamel wire (5), similar to that of transformers. This element is connected to a permanent magnet (1).
Work algorithm:
- The pole contact pin spreads the magnetic field, which passes onto the gear shaft.
- The teeth touch the magnetic flux passing through the coil, its properties at the protrusions and depressions change. At first, this scattered flow becomes more concentrated (beam). On the second, on the contrary, this phenomenon is weakened.
- The above transformations induce an output alternating voltage with a certain sinusoid on the turns of the winding. The value is proportional to the speed and number of revolutions (Fig. 2). The amplitude grows rapidly as they increase (from several mV to 100 V and more). A sufficient value is generated starting from a minimum number of rotations of 30/min.
Optical
The design consists of an IR LED with a receiver installed opposite it. Between the elements are the crankshaft teeth. The emission line is crossed by these protrusions, which detects the receiver and sends a corresponding pulse to the ECU. Used less frequently.
Active
Next, we will consider the so-called “active” motor rotation sensors, operating using the magnetostatic method. With them, the amplitude of the output pulse is not affected by the number of revolutions, so measurements of the intensity of HF turns become available with an extremely low number of them (quasi-static monitoring). Such products are much more advanced, with expanded capabilities.
Motor speed sensors with differential Hall detectors
On a conductive plate that transmits magnetic induction in the vertical direction, a so-called Hall voltage proportional to its direction can be recorded transverse to the current flow.
A diagram of this option is shown above. In such a DPKV differential sensor, the field is created by a permanent magnet (1). Two Hall sensors (2 and 3) are placed between the magnet and the pulse-producing ring (4). Changes occur in the magnetic flux depending on what appears on it - a depression or a tooth. The difference between the signals of the two sensors reduces disturbance and the level of deviations, and improves the signal-to-noise ratio. Side sections of the signal can be analyzed without digitization directly on the control unit.
Synchronization gears can be not only ferromagnetic, but also multi-pole, where a non-magnetic metal carrier is equipped with a piece of special plastic, which is alternately magnetized. The north and south poles of such an element act as divisions.
AMR
The sensitive part of the AMR vehicle speed synchronization sensors is made of a magnetoresistive compound.
AMP - anisotropic magnetoresistive. The first term means that the electrical resistance of this material depends on the direction of the acting magnetic field. Such a sensor is installed between a magnet and a pulse disk (analogous to a gear one, as with inductive sensors).
When the pulsed active disk rotates, the field lines change their parameters, which forms a sinusoidal voltage, amplified by the data processing circuit, which is converted into a pulse of rectangular geometry.
GMR
In this case, the innovative Giant Magneto-Resistance technology is used. This sensor is much more sensitive than AMR - significant air gaps are possible here.
GMR engine speed sensors are used for difficult conditions; high sensitivity creates less noise and signal errors.
Advanced GMR detectors are equipped with two-wire ports; they are also sometimes found in Hall rotation sensors.
Basic faults
The Lada Kalina speed sensor can easily fail. Every car enthusiast can notice the problem. The main “symptoms” indicating the development of the problem are identified, including:
- lack of movement of the arrow (it just lies there);
- the pointer makes sharp jumps;
- the arrow freezes at speed even in the absence of movement;
- The electric power steering fault icon is on.
If the speedometer does not work, the most common reason for this phenomenon is a malfunction of the speed sensor. It is located on the gearbox, secured with one screw. There are three main wires connected to it. If it is a Lada Kalina with a 16-valve engine, you can find the device on the washer side. In the version with 8 valves, it is necessary to remove the bellows of the engine air filter.
To determine the device number, simply remove it and rewrite the numbers. There is no need to rush into buying a new part; first you need to check all contacts. In some cases, the malfunction is due to oxidation of the wires or damage to the wiring. Perhaps the problem is hidden in the presence of metal shavings or other particles.
Often the speedometer stops working due to a malfunction of the instrument panel itself. The easiest way to check this is to temporarily connect a known working panel. It is also worth checking the reliability of the contacts on the back of the dashboard. You can also check the vehicle speed readings on the on-board computer.
If the dashboard was tuned (disassembled), then the arrow motor may have been damaged during the work, or the speed arrow is set too deep (the arrow touches the panel trim).
Have you encountered speedometer problems? How did you manage to solve it? Let us remind you that solutions to other faults can be found in the category repair and operation of Lada Granta, Lada Kalina or Lada Priora.
The course of action is as follows.
- Turn off the ignition.
- Remove the air filter. This will make it easier to get to the DS.
- Using a wrench, unscrew the screw that secures the device. Pry it slightly with a screwdriver and remove it.
- Carry out a thorough inspection of the gearbox. If you see oily spots on it, this is a signal that the O-ring needs to be replaced.
- Install a new sensor.
- Reassemble in reverse order.
Pay attention to the appearance of the sensor. In this Lada car model, it has its own number, and only the first four digits are taken into account (for example, the native sensor of the Lada Kalina has the number 1118)
When choosing a replacement DS, you must find a device with an identical code.
A speedometer malfunction should be taken seriously. After all, this device is necessary not only for displaying speed. All car mechanisms work in a system, and the failure of one of them will inevitably lead to the failure of others.