The car engine vibrates during operation. If this phenomenon is not eliminated, it will create significant discomfort for the driver and passengers. But the most important thing is that this negatively affects the car itself. Special cushions dampen vibration. They can wear out and fail. Therefore, it is worth knowing when and how to replace engine mounts.
We also recommend reading the article about why engine vibration is transmitted to the body or is felt at idle. From this article you will learn about various reasons why vibration from the internal combustion engine may increase at idle speed.
Excursion into the materiel
For the first time, measures to reduce engine vibration were taken back in 1932 on Plymouth cars produced by the Chrysler Corporation. At the suggestion of lead engineer Frederik Zeder, rubber gaskets began to be installed between the engine and the frame. Owners of old Soviet-made cars, for example, the Moskvich model, can still see something similar today.
Engine mounts (also called engine mounts) today come in several types:
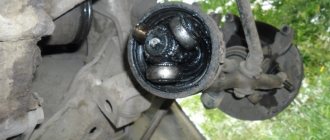
Rubber-metal. They consist of two metal plates and a rubber cushion placed between them. Some manufacturers use polyurethane instead of rubber, which is more durable. In addition, the structure can be reinforced with springs to improve shock absorption. These supports are either collapsible or non-dismountable. Widely used due to simplicity and low cost of production. The service life of rubber-metal supports is 100,000 kilometers.
Hydraulic supports. They are used in more modern and expensive cars, being more progressive and efficient. They can be mechanically or electronically controlled. The design consists of two chambers, between which a membrane is located. There is a special working fluid inside the chambers.
Of course, those car enthusiasts who prefer to do everything with their own hands for one reason or another most often deal with rubber-metal cushions. This especially applies to owners of domestic vehicles. The number of supports depends on the type of engine. For example, the eight-valve engine of a VAZ 2110 car uses two side valves and one rear valve. And on the sixteen-valve version there will already be five supports. Those who are planning to replace the engine mount on a VAZ with their own hands should take this fact into account.
Articles
The choice of parts should be taken seriously since engine mounts play an important role. Let's look at the original catalog numbers of the engine mounts that are installed on the Hyundai Accent:
- 21830-25010 — left
- 21810-25110 - right
- 21930-25010 - rear
- 21910-25010 — front
When do you need to change engine mounts?
As already mentioned, the service life of the supports is quite long. Especially if the motorist takes good care of his car. But, nevertheless, nothing lasts forever. That’s why these car parts sooner or later get damaged: from small cracks to ruptures. When this happens, extraneous noise appears in the cabin, such as a rumble, and vibration is also felt under the hood when the engine is running under load.
We also recommend reading the article about diesel engine vibration at idle speed. From this article you will learn about the various reasons for the increase in vibration levels in this type of DV.
There is a very simple way to check the pillows and determine the cause of the symptoms that appear. True, it is advisable to have a partner. So, you need to get behind the wheel and start the engine. The hood is open. Next, putting the car on the handbrake, you need to try to move a couple of centimeters forward and backward. During these actions, your partner will see engine vibrations. A deviation from the norm is that the motor can tilt strongly and rather slowly take its original position. In addition, characteristic jerking may occur in the gearbox. If such moments are present, then it is worth doing a visual inspection of the pillows by driving the car into the inspection hole. After this, it will become completely clear: replace the engine mounts or the old ones will still serve. The following can be considered characteristic external signs:
- cracks or other damage to rubber parts;
- separation of rubber parts from the metal base;
- fluid leaks from hydraulic bearings.
These troubles occur due to exhaustion of the service life, loss of rubber elasticity under the influence of temperature changes, as a result of mechanical damage, exposure to chemically active liquids, etc. Now let's talk about what to do if the pillows are faulty and your goal is the lowest cost, that is, how to carry out this repair on your own.
Reasons for failure
Among all the reasons for the failure of engine mounts, the most basic can be identified:
- Spent life of engine mounts due to mechanical impact.
- Wear of rubber elements due to constant changes in ambient temperatures.
Before you go to the store, you should determine whether it is worth changing only the cushions or the entire support assembly. Depending on the condition of the metal supports and the absence of damage on it, you can replace only its rubberized component.
- The price of a set of pillows for a 16-valve VAZ-2112 is about 1,500 rubles, and the assembled supports are 3,000 rubles.
- Work on replacing pillows in car services varies within 500 rubles per piece, however, we believe that this is a waste of money, and we suggest that you carry out this work yourself, since no special skills are required for this.
Do-it-yourself engine mount replacement
In principle, there is nothing complicated in this procedure. And it doesn’t matter whether you intend, for example, to replace the rear engine mount or all at once. The difference will be in which side you will have to act from (the rear airbag is removed from the bottom of the car, while the others are removed from above). The tools you will need are a jack; you may also need a wooden block or a thick board to go with it, which will be used as a spacer.
It is also necessary to have open-end and socket wrenches for 13, 15, 17, 19 and others, which depends on the design features of the mounting of a particular internal combustion engine. It is not necessary to drive the car into a pit or overpass, although if engine protection is installed, it will be more comfortable to remove it in the pit.
- To begin with, the car must be installed level, eliminating tilts and distortions. Be sure to put chocks under the rear wheels. Next, as already mentioned, the engine protection (if any) is removed, as well as the generator belt. To remove the belt, first unscrew the tensioner bolt. To do this, you will most likely need a 13 key.
- Now comes the jack. It is installed under the engine and the engine is raised using a spacer. This removes the load from the front airbags. Now you can unscrew them, after which you can proceed directly to replacing them. If you need to work on the rear cushion, then the jack is installed in the area of the gearbox. When replacing not one, but several pillows, this is done one by one. As already mentioned, there are more supports on a sixteen-valve engine. But the essence of the process of replacing them will not change.
After completing the repair, you must start the engine. If the supports are installed correctly and well secured, then engine vibration will be minimal or absent altogether.
If the driver replaced the engine mounts and vibration appeared after starting, then it is necessary to once again check the accuracy of installation and the quality of fastening, and also rule out other possible causes.
Lada Priora (2013+). Removal and installation of the VAZ-21126, -21127 engine
We carry out work when it is necessary to repair the engine or replace it.
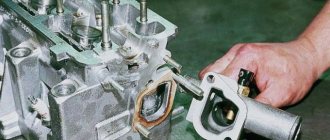
Relieve the pressure in the engine power supply system (see “Replacing the fuel filter”) and disconnect the fitting of the fuel supply tube to the ramp from the tip of the fuel hose (see “Removing the cylinder head”).
Disconnect the wire terminal from the negative terminal of the battery. We drain the engine oil (see “Changing the engine oil and oil filter”) and coolant (see “Replacing the coolant”).
We disconnect the engine control system wiring harness block from the canister purge solenoid valve, remove the valve from the plastic engine cover (see “Removing the canister purge solenoid valve”) and move the valve to the side without disconnecting the hoses from it.
We remove the air filter along with the mass air flow sensor (see “Removing the air filter”) and the air supply hose to the throttle assembly.
Disconnect the end of the throttle drive cable from the drive sector (see “Replacing the throttle drive cable”).
Remove the vacuum brake booster hose from the intake manifold (see “Removing the intake manifold”). Remove the fuel vapor supply hose from the throttle assembly fitting (see “Removing the throttle assembly”).
We disconnect the wiring harness blocks of the engine control system from the idle speed regulator and sensors: oxygen concentration, detonation, low oil pressure indicator, coolant temperature, coolant temperature indicator, phases, crankshaft position, throttle position, rough road (see the corresponding chapters : “Engine”, “Power system”, “Engine control system”).
Remove the rough road sensor together with the bracket from the right mudguard cup (see “Removing the rough road sensor”).
We remove the generator (see “Removing the generator”). Remove the crankcase ventilation idle circuit hose from the cylinder head cover fitting and disconnect the engine management system wiring harness brackets from the cylinder head cover (see “Removing camshafts and replacing valve lifters”).
Unfasten or cut two layers of mass clamps securing the wiring harness of the engine management system to the rear timing cover (see “Removing the coolant pump”).
Disconnect the end of the ground wire of the engine management system wiring harness from the cylinder head and remove the end of the ground wire coming from the battery from the thermostat housing mounting stud (see “Removing the cylinder head”). We move the wiring harnesses away from the engine to the side.
We disconnect the pipe of the additional muffler from the catenary collector (see “Replacing the gasket in the connection between the catalytic collector and the additional muffler”). We remove the gearbox (see “Removing the gearbox”), the “basket” and the driven clutch disk (see “Removing clutch parts”).
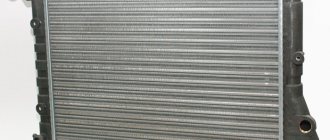
Use a Phillips screwdriver to loosen the clamp securing the radiator supply hose...
...and remove the hose from the thermostat housing pipe. Similarly, remove the radiator outlet hose from the thermostat cover.
Use a Phillips screwdriver to loosen the clamp securing the inlet hose of the expansion tank...
...and remove hose 1 from the thermostat housing pipe. Similarly, remove the heater inlet hose 2 from the thermostat housing pipe, and the heater outlet hose 3 from the coolant pump inlet pipe.
Having removed the hood stop from the socket in the fender, and placing a rag between the hood and the windshield, set the hood to a vertical position.
To attach the lifting chain...
Having tightened the chains, we remove the adjustable stop from under the engine, which supported it when removing the gearbox.
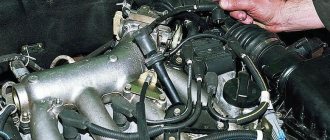
Disconnect the front and rear supports from the engine brackets.
We unscrew the three bolts securing the right support bracket to the body side member without disconnecting the support from the engine bracket (see.
“Removing the power unit supports”).
Before removing the engine, you need to check that all hoses, tubes, and wires are disconnected from the engine and laid aside.
Using a lifting device, remove the engine from the engine compartment. We install the engine on the car in reverse order.
Video on the topic “Lada Priora (2013+). Removal and installation of the VAZ-21126, -21127 engine"
Source
FakeHeader
Comments 29
And also on pillows. When they changed the rear one, they didn’t unscrew the rack, but in my opinion they just lowered the subframe a little.
Actually, in order not to bother with the subframe, they wanted to remove the rack bolts. In any case, the engineers, when developing the design of the car, approached many issues from a marketing point of view - the more complex the work, the more working hours it requires and the more a person will pay...
This is where I beg to differ with you. Our Nissan is not the worst car when it comes to repairs. There are cars on this side that are much more interesting, so to speak. This is especially true for new cars. I once watched how they changed the air filter on a BMW X6 (I could be wrong). There were such dances with a tambourine that Alla’s wind ballet was just nervously smoking on the sidelines.
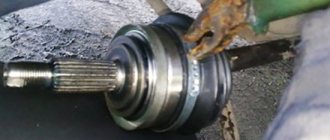
no one argues about new cars) nevertheless, it’s a shame that even a simple operation to replace the oil pressure sensor requires certain dexterity skills, at least because its location is not entirely successful... well, also, take the levers, whose ball joints quickly die and everything is just assembled or a cardan shaft, the outboard one also comes only assembled with a cardan and costs not a lot, not a little - 30 kilos of rubles... if I could still put up with levers, then I can no longer put up with a cardan...
The hinged one can be replaced separately, just like the crosspieces, I won’t say exactly how, but I know what we do. A friend has the same Nissan; they replaced, or rather restored, the entire driveshaft. Now he drives, and everything is okay. Moreover, on our models, the driveshafts move quite a lot. But on T31, maximum 100 t.km. Information from servicemen who do this. They have the T30 as a rare guest. And as for the balls in the levers, the guys here on the forum also changed them. But when I changed it, I bought it assembled.
I also restored the cardan and crosspieces, but due to the non-dismountable design, the price of this pleasure is 14,500. I read a lot about redrawing the levers, but I didn’t want to take the risk myself, especially since they are made of aluminum, and it is not a very strong material.
Good day to all. Very familiar procedures. The vibration was such that the jaw popped out onto the panel. So, I replaced all 4 pillows. Moreover, first the two lower ones, this did not give any effect, since it turns out that the engine on the new lower cushions rises and it begins to wobble from side to side. Then I replaced the top two. And lard makes me happy. The only thing is that I changed (not at the service center myself, since a good press is needed) only the salen blocks themselves, and left the old clips, since they are in good condition. Salenblocks were taken from one company. As a result, as you can imagine, it was a great price winner. But there is also a dangerous moment. If a master who sticks out the old sales block and pushes the new one in with his hands from the old one, then this can aggravate the situation by the fact that the vibration will remain, and may even intensify. So be careful when you trust your horses in the wrong hands. It’s better if these are proven hands. All the best and good luck on the roads!
You are the second person who writes that all 4 pillows need to be changed in order to completely get rid of vibration, but my side ones are visually in good condition and I’m not sure that they should be changed...
I thought so too. And I’ll say more, when they were removed, visually they were in good condition. I'll say even more. When replacing, they changed the left one for me first, since there wasn’t enough time for the right one that day. I drove for a couple more days and there was still vibration. And then they replaced the right one. And only after that the vibration, especially when driving backwards and at traffic lights, almost disappeared. What remains is most likely not from the pillows, but is connected with engine adjustments through the brain. But the fact that she is not there now is certain. Everyone decides for themselves. Here we can only not give advice, but simply share personal experience.
How to change supports
To replace, you will need to purchase front, left and rear airbags. Experts advise replacing the entire set during repairs, since after replacing one part, another one may break after a while. The average cost of parts is 2000 rubles. If you have the necessary tools, you can do the repair yourself and save on car service.
List of tools
To replace the pillows we will need:
- 2 good jacks;
- metalworking tools;
- scrap;
- steel rope;
- glue.
Tip: At some stages you will need to lift a lot of weight, so it would be a good idea to invite a neighbor or a fellow car enthusiast here.
Replacing the front airbag
The repair of each support has its own characteristics. Replacing the front airbag is carried out as follows:
- Put the car in 1st gear or the handbrake so that it does not move.
- To gain access to the support, remove the upper engine protection.
- Raise the engine with a jack. To avoid damaging its lower part or other elements, place a wooden board underneath.
- When we have freed the support from the load, we can unscrew the bolt that connects it to the bracket.
- We unscrew the bolts connecting the pillow to the motor.
Removing the bolt that secures the cushion to the engine - We remove the old part and install the new one.
Replacing the rear cushion
Here we will need a steel cable to make it more convenient to work with fasteners.
- We hook up the gearbox with a cable and install a jack under it.
- Slightly press out the bolt connecting the gearbox to the support.
- Unscrew the nuts securing the support to the body.
Loosening the nuts that connect the cushion to the body - Raise the gearbox and unscrew the nuts and bolts.
Unscrew the bolt and nuts - We replace and reassemble in reverse order.
When replacing the side airbag, you will need to perform the same steps. If you have a large starter installed, it will need to be removed to get to the bolt. It is better to coat rubber products with a special protective substance - this will ensure a long service life of the parts. After completing the repair, do not forget to test the car. If during movement the knocking stops and the vibration becomes almost unnoticeable, then everything was done correctly.