Despite the huge amount of criticism against the Lada Priora, this is one of the most popular cars that have come out of the AvtoVAZ assembly line in recent years. The Priora is equipped with a fairly successful engine with good dynamics, and the interior is very comfortable. And the maximum trim levels offer useful options. But at the same time, from time to time the car brings minor problems to its owners. One of the most popular malfunctions is that the Priora engine (16 valves) is tripping. The reasons for this phenomenon are quite unpleasant. And besides, the motor eventually overheats.
When the driver starts his car in the morning, the engine does not run smoothly as before, but intermittently. At this time, dull sounds are heard from the exhaust pipe. At the same time, a persistent and strong smell of unburned fuel is felt. Vibrations are constantly increasing, and this is fraught with cracks in the pillows. This is how the engine runs when cold.
Trouble the engine: why is it dangerous?
This is a rather critical phenomenon, especially if the unit begins to vibrate during acceleration.
This behavior of the engine is especially dangerous when the driver decides to overtake, but there are cars in the oncoming lane. In the process, while the motor is running, the engine power is significantly reduced. The compression ratio decreases - there may not be enough dynamics to successfully complete the maneuver.
Considering that the Lada Priora has been manufactured since 2007, there are often instances where the engine knocks like on an old car 20 years ago. This is an engine running on three cylinders. It may have the latest firmware, but if the engine of a Lada Priora car is running rough and the check light is on, then such a car will not have much life left.
Signs of engine tripping
If the Priora’s engine starts to stall, it’s hard not to notice; the car will show the following signs of a malfunction:
- Loss of vehicle traction;
- Gases will come out of the exhaust pipe unevenly, and small pops will be heard;
- On the dashboard, the “CheckEngine” lamp will initially flash, and then remain on. The engine control unit will record an error about misfire in a certain cylinder.
- The engine will take longer to start or you will need to press the gas pedal to start the engine;
If your car shows such signs of malfunction, then most likely one of the cylinders in the car is not working.
Supply system
If the Priora engine (16 valves) is tripping, the reasons may be trivial. When there is no flash in the cylinder, perhaps there is simply no fuel there. If it has a normal compression ratio, it is worth diagnosing the power system. You should pay maximum attention to the air filter and the pipe. It is necessary to make sure that the clamps are securely tightened, whether the purifier body itself is intact, and whether there is any air leakage from the outside. Also pay attention to the tubes. They must be tightly secured to the throttle assembly. Fuel leaks, cracks, and broken plastic may indicate that some parts are faulty.
Checking the air filter
If the spark plugs and high-voltage wires appear to be in full working order, and the engine still runs, you should check the air filter. Sometimes this element may simply become clogged, as a result of which less air will flow into the engine, which will cause the analyzed breakdown. According to experts, there is no point in cleaning the air filter from contaminants, because the cost of a new element is quite acceptable, so it is better to simply replace the filter that has become unusable with a new one.
Nozzle failures, clogging
When the Priora engine (16 valves) fails, the reasons often lie in the injector.
It may be faulty or simply blocked. Beginners and those who like to pour various injector cleaning fluids into the tank often encounter this problem. All this leads to the fact that the dirt first peels off in the tank, then in the fuel line. And eventually it will end up in the injectors, where it will happily get stuck.
Reason 1 – spark plugs
Spark plugs are the first thing to check when the Priora jerks while driving. If they were rarely changed and the car was filled with low-quality fuel, carbon deposits could appear on the electrodes. This leads to misfires, as a result of which the car begins to twitch while driving.
The cost of candles for Priora varies greatly depending on the manufacturer. The simplest ones cost 250 rubles for four pieces.
You can change it yourself if you have a spark plug wrench, or contact service. The service costs from 400 rubles depending on the technical center.
Also read: Don’t be shy: who should buy a used Daewoo Matiz
Poor quality fuel
This is one of the possible reasons why the engine stalls at idle or while driving.
To return to normal operation, you can try changing the gas station. This usually helps clear up a lot of misunderstandings. It is better to fill the 16-valve Priora engine with good 95-octane gasoline. It's not worth pouring something with a higher octane number. This will only lead to overheating. You can also try replacing the air and fuel filters. Sometimes this solves the problem.
Content
- Reason 1 – spark plugs
- Reason 2 - ignition coils
- Reason 3 – injectors or throttle body
- Reason 4 – fuel filter
- Reason 5 – mass air flow sensor or ECU firmware
- What to do to prevent the Priora from jerking
“Help, my Priora car is shaking while driving. What to do? What could be the problem?" – a car enthusiast wrote on one of the forums. This problem often occurs in domestic cars, and there may be several reasons for its occurrence. Let's figure out why the Priora twitches, how to solve the problem and how much it costs.
Ignition system
An experienced car enthusiast who is faced with an engine running on three cylinders immediately begins to diagnose the spark plugs. The Lada Priora must cool well, otherwise there is a risk of getting burned when unscrewing it. If after a few seconds you turn off the ignition and check the spark plugs, one of them will be wet with gasoline. It is also recommended to separately check each part for the presence of a spark.
In case of malfunction, the problem is solved by replacing the spark plug. Sometimes it is enough to press down a potentially faulty one with a cap and the machine will resume normal operation. In general, the ignition system in this car is the most problematic part. If the Priora engine (16 valves) is malfunctioning, you can look for the reasons for a very long time, and diagnostics will not yield anything, even if it is done correctly. And only by replacing all elements can a positive result be achieved.
see also
Comments 12
it was about the same thing, the oxygen sensor died! just unplug the plug and check if it works or not. but the check engine light comes on!
This happened to me: the coil died, the next day I replaced it with a new one, but the black smoke due to overflow never stopped coming out of the exhaust pipe. I unscrewed the spark plugs, they were covered in black soot, replaced them with new ones, it didn’t help. Then I unscrewed the oxygen sensor, and it was also very heavily carbonated. After replacing the DC everything became normal.
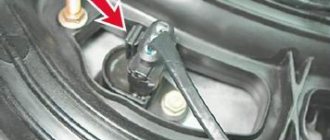
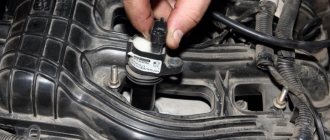
Checking the ignition coil - Disconnect the ground wire from the battery. — Remove the cover from the ignition coil and disconnect the wire from it. — If the plug comes out of the coil, replace the coil. — Check the coil for cracks, replace if necessary. — Measure the resistance of the primary winding of the coil by connecting an ohmmeter to the contacts. — Measure the resistance of the secondary winding of the coil by connecting an ohmmeter to the contacts. — Connect the wires to the ignition coil. — Install the coil cover. — Connect the ground wire to the battery. If you are going to replace the ignition coil, do not install a regular coil controlled by the ignition chopper under any circumstances, otherwise the control computer will be damaged.
Many Lada Priora engine owners have experienced the engine starting to misfire. What are the reasons for this effect? Let's consider the main ones, as well as methods for troubleshooting.
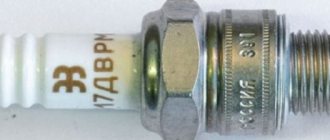
Diagnostics of spark plugs by plaque
When the engine starts cold or hot, you can check the carbon deposits on the spark plugs. If the coating is white, then this indicates a lean mixture and overheating of the engine. A black tint indicates a rich mixture. In both the first and second cases there are problems with the operation of the electronics. This is either installing new firmware, or replacing the ECU. A normal candle has a brick color. By the way, the engine may stall at idle if the part is damp. This also significantly increases the warm-up time. In addition to the spark plugs, the ignition coil may also be acting up. Priora (8 valves) is equipped with distributor ignition. Overheating of the coil is often observed. You can restore the operation of the motor by simply replacing the element.
Troubles when pressing the gas pedal sharply
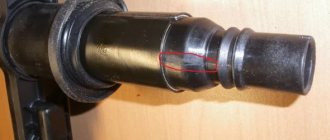
When the Priora engine stalls when the throttle is opened sharply, this indicates a breakdown of the insulation of the individual ignition coils. The IKZ has rubber seals that isolate the cap of the coil and spark plugs, thereby preserving the spark from breakdown; when this cap wears out or is damaged, the spark can go to the engine body, thus, when the gas pedal is pressed sharply, it will pierce the body, which is why the internal combustion engine will triple.
Checking the ignition coil
There is simply no special method by which you can check the operation of parts. The instructions for the car indicate one of the methods for self-diagnosis. So, with the ignition turned off, check whether the ignition coil (Priora is no exception) is firmly attached to the engine.
Then they look at the reliability of electrical connections in the low-voltage circuit. If everything is in order, then check for a spark. To do this, the ignition coil is removed. A test plug is inserted into the tip and pressed against a metal part of the engine. Next, turn the starter. If there is no spark, replace the coil. If there is a flash, but the engine does not start, change the spark plug.
Troubles when cold - Community "Lada Priora (Lada Priora Club)" on DRIVE2
Hi all! I recently wrote a post about a stuck pump, and so, the valves still had to be changed (( We changed all 16 valves, oil seals, and at the same time the injectors, because two had a burst housing, and the mileage was 111 thousand, the car definitely started to drive more cheerfully .But today I start it and it starts up. And I held it at 2-3 thousand revolutions, it works more or less, I release the pedal - it starts and the check blinks, and then goes out. As a result, I kept it at 2 thousand until 90 degrees, the work leveled off, I released the pedal - that's it normal. And all evening I drove everything was fine. I started it when it was hot, no problems. Right now I decided - let me check. The engine has cooled down. I start it - it troits. First - I determine the cylinder - the second. I change the coils, remove the terminal - it still troits 2. I cleaned the throttle, no changes. I just recently changed the spark plugs. Unfortunately, I don’t have a scanner at hand, but even without it it’s clear that there are misfires in cylinder 2, but here’s why? In theory, if the valves weren’t seated well, it would be misfiring all the time, right? By the way, the hydraulics are rattling alone, have you heard that they can also cause triple noise?
Thanks to those who can help with advice in advance!
PS I’ll delete the topic myself) Photo before renovation)
Interruptions in the operation of the VAZ 2170 Priora engine
- Repair manuals
- Repair manual for VAZ 2170 (Priora) 2004+.
- Interruptions in engine operation
Diagnostics of the engine condition by the appearance of the spark plugs
During interruptions, the engine idles unevenly, does not develop sufficient power, and consumes gasoline increased. Interruptions are usually explained by a malfunction of the injectors or electric fuel pump, see “Power system” ; “Electronic engine control system (fuel injection system)”, spark plugs of one of the cylinders, air leakage into one of the cylinders. It is necessary to find the fault and, if possible, eliminate it.
1. Start the engine and let it idle. Go to the exhaust pipe and listen to the sound of the exhaust. You can bring your hand to the cut of the exhaust pipe - this way the interruptions are felt better. The sound should be even, “soft”, of the same tone. Popping noises from the exhaust pipe at regular intervals indicate that one cylinder is not working due to a failed spark plug, lack of a spark, an injector failure, a strong air leak into one cylinder or a significant decrease in compression in it. Popping noises occur at irregular intervals due to dirty injector nozzles, severe wear or dirty spark plugs. If popping noises occur at irregular intervals, you can try to replace the entire set of spark plugs yourself, regardless of mileage and appearance, but it is better to do this after contacting a car service center to diagnose and repair the engine management system.
2. If the popping sounds are regular, stop the engine and open the hood. Check the condition of the ignition system wiring harness and the fastening of the wire blocks on the ignition coils. If there is damage to the wires, replace the entire ignition system wiring harness.
3. Remove the spark plugs (see “Replacing and servicing spark plugs” ).
4. Carefully inspect the spark plugs and compare their appearance with the photographs given in the subsection “Diagnostics of the engine condition by the appearance of the spark plugs” .
5. If all the spark plugs look good...
| 6. ...check the gap between the spark plug electrodes (with a round feeler gauge only). It should be 1.00–1.13 mm. | 7. If the gap differs from the specified one, adjust it by bending the side electrode. |
8. Reinstall the spark plugs and coils and connect the wiring harness connectors to them.
9. Disconnect the wiring harness block from the cylinder 1 coil. Start the engine. If engine interruptions do not worsen, replace the spark plug in cylinder 1 with a known good one. Attach the high voltage wire and start the engine. If the interruptions intensify, repeat the procedure sequentially with all cylinders to identify the faulty spark plug.
If, as a result of the measures taken, engine interruptions are not eliminated, check the compression in each of the cylinders (see “Checking compression in the cylinders” ). Normal compression is more than 1.0 MPa (10 kgf/cm2), a difference in compression values in the cylinders of more than 0.2 MPa (2 kgf/cm2) indicates the need for engine repair.
↓ Comments ↓
1. Car structure
1.0 Car structure 1.1 General information about the car 1.2 Passport data 1.3 Car keys 1.4. Controls 1.5. Heating and ventilation of the cabin 1.6 Ensuring a comfortable air temperature in the cabin 1.7. Doors 1.8. Passive safety equipment on the car 1.9. Seats
2. Recommendations for use
2.0 Recommendations for use 2.1. Safety rules and recommendations 2.2 Running in the car 2.3 Operating the car during the warranty period 2.4. Preparing the car for departure
3. Problems along the way
3.0 Malfunctions along the way 3.1. The engine does not start 3.2 Malfunctions of the fuel injection system 3.3 Idle speed has disappeared 3.4. Interruptions in the operation of the 3.5 engine. The car moves jerkily 3.6 The car accelerates poorly 3.7 The engine stalled while driving 3.8. Oil pressure dropped to 3.9. Engine overheating 3.10. The battery does not recharge 3.13. Knocks in the engine 3.16. Wheel puncture
4. Maintenance
4.0 Maintenance 4.1. General provisions 4.2. Inspection work 4.3. Lubrication and filling works 4.4. Diagnostic work 4.5. Repair and adjustment work
5. Engine
5.0 Engine 5.1 Design features 5.2 Possible engine malfunctions, their causes and solutions 5.3 Useful tips 5.4 Checking compression in the cylinders 5.5 Removing and installing the decorative engine casing 5.6 Removing and installing the engine splash guard 5.7 Installing the piston of the first cylinder to the TDC position of the compression stroke 5.8 Replacing the drive belt gas distribution mechanism and tension roller 5.9 Replacing the power unit supports 5.11. Replacing engine seals 5.13. Engine cylinder head 5.15. Engine repair 5.16. Lubrication system 5.17. Cooling system 5.18. Power supply system 5.19. Design Features
6. Transmission
6.0 Transmission 6.1. Clutch 6.2. Gearbox 6.3. Front wheel drives
7. Chassis
7.0 Chassis 7.1. Front suspension 7.2. Rear suspension
8. Steering
8.0 Steering 8.1 Design features 8.2 Possible steering malfunctions, their causes and solutions 8.3. Steering column 8.4. Steering linkage 8.5. Steering gear
9. Brake system
9.0 Brake system 9.1 Design features 9.2 Possible malfunctions of the brake system, their causes and solutions 9.3 Bleeding the brake system hydraulic drive 9.4 Removing and installing the vacuum brake booster 9.5 Replacing the brake pedal axle bushings 9.6. Main brake cylinder 9.7. Front wheel brakes 9.8. Braking mechanisms of the rear wheels 9.9. Pressure regulator 9.10. Brake hoses and tubes 9.11. Parking brake
10. Electrical equipment
10.0 Electrical equipment 10.1 Design features 10.2. Battery 10.3. Mounting block (relays and fuses) 10.4. Generator 10.5. Starter 10.6. Ignition switch (lock) 10.7. Electronic engine control system (ECM) 10.8. Ignition system 10.9. Lighting, light and sound signaling 10.10. Windshield cleaner 10.11. Washer reservoir 10.12. Electric fan of the engine cooling system 10.13. Electric motor of the heating and ventilation system fan 10.15. Cigarette lighter 10.16. Instrument cluster 10.18. Electronic anti-theft remote control system 10.19. Immobilizer 10.21. Replacing sensors and switches
11. Body
11.0 Body 11.1 Design features 11.2 Possible body malfunctions, their causes and solutions 11.3 Removing and installing windshield frame lining 11.4 Removing and installing soundproofing upholstery in the engine compartment 11.5. Removing and installing bumpers 11.6 Removing and installing the fender liner and protective wing cover 11.7 Removing and installing the front fender 11.8 Removing and installing decorative sill trims 11.9. Hood 11.10. Trunk lid 11.11. Doors 11.12. Seats 11.13. Seat belts 11.14. Rear view mirrors 11.15. Interior fittings 11.16. Instrument panel 11.17. Heater 11.20. Body care
12. Applications
12.0 Appendix 12.1 Appendix 1. Tightening torques of threaded connections, Nm 12.2 Appendix 2. Fuels, lubricants and operating fluids 12.3 Appendix 3. Nominal filling volumes 12.4 Appendix 4. Basic data for adjustments and monitoring 12.5 Appendix 5. Spark plugs used on vehicles 12.6 Appendix 6. Lamps used on a car 12.7 Appendix 7. What you need to have in a car 12.8 Appendix 8. Tools used when repairing a car
13. Electrical diagrams
13.0 Electrical Diagrams 13.1 Diagram 1. Instrument Panel Harness Connections 13.2 Diagram 2. Vehicle Front Wire Harness Connections 13.3 Diagram 3. Engine Electronic Control System (ECM) Harness Connections 13.4 Diagram 4. Vehicle Rear Wire Harness Connections 13.5 Diagram 5. Light Harness Connections license plate light 13.6 Diagram 6. Left front door wiring harness connections 13.7 Diagram 7. Right front door wiring harness connections 13.8 Diagram 8. Rear door wiring harness connections
Inspection of high voltage wire
Often, the Priora stalls when accelerating due to a malfunction of the ignition system. This is especially true for the condition of the high-voltage wire leading to the spark plug. To inspect it, you will need to remove the tip attached to the spark plug. The structure of a high-voltage wire is as follows: the winding contains the central core of the wire. The tip, which is put on the candle, has a persistent metal penny. The main purpose of this element is to transmit current to the spark plug.
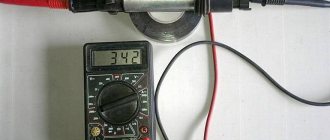
The core of the high-voltage wire should fit as tightly as possible to the “penny” of the steel tip placed on the spark plug. Due to aging, contact between this element and the wire may be lost due to oxidation of the metal. As a result, tripling occurs. The oxidation of the contact is checked as follows: with the second probe of the multimeter, you should touch the central core of the high-voltage wire; if the core of the high-voltage wire burns out along its entire length, then it is possible to identify such a section using a special multimeter tip.
The wire is pierced until the affected area is identified every 5-10 mm. If such a section is detected, it is cut off if the length of the high-voltage wire allows it. Otherwise, it needs to be replaced.