When to change?
VAZ Lada Kalina vehicles use a belt drive for auxiliary units. On cars with air conditioning, the service life of such a belt is no more than 30 thousand km. On simple versions of cars, the strap can last longer, but most owners try to change it after the same 30 thousand kilometers traveled. For various reasons, the belt may fail earlier, so it must be checked periodically during vehicle operation. There should be no cracks on the working track, and delamination on the outer part of the belt is unacceptable. If such defects are present, we immediately change the strap. Another signal to replace this element is a whistle or other noise when the unit is operating.
The process of replacing the belt on a Kalina with air conditioning (sixteen valves) is presented in a video from the user Alexander.
Replacement cost
The cost of changing a belt on a Lada Kalina car depends on the type of engine, range of units and is:
- for a motor without a tensioner - from 300 rubles;
- engines with a tensioner without air conditioning - from 150 to 350 rubles;
- motors with tensioner and air conditioning - from 220 to 400 rubles;
- for unit 21127 - about 600 rubles.
We recommend: The quietest and softest summer tires
Replacing the roller will require an additional 250 rubles. The total amount required by the car owner to purchase spare parts, in the maximum version, will not exceed 850 rubles.
Replacing the belt and generator roller on an 8-valve Lada Kalina is very easy and simple. A wide range of product choices will not suit every consumer's taste. Moreover, even analogues of original parts are of fairly high quality. Diagnosing faults is easy and can be done by any motorist.
Belt and roller selection
Several types of belts are used on Lada Kalina cars.
The type of element depends on the engine model and its equipment:
- The motor version without air conditioning and tensioner has a belt length of 823 mm. Gates (number 6PK823) is standardly used, but such a part is not supplied as spare parts. To replace it, a slightly different strap is used - Gates 6PK823SF.
- The version of the unit with a belt tensioner, but without air conditioning is 882-884 mm. Standard part manufactured by Gates (article 6PK882). In addition to it, straps are often used - Finwhale BP6883, Dayco 6PK888 or the cheapest Balakovo belt BRT882.
- Engine with air conditioning and belt tensioner (motor 11183) - 1018 mm. Standard element manufactured by Gates (number 6PK1018). Alternative options are Dayco 6PK1018 or Continental 6PK1015.
- The 21127 16-valve engine with air conditioning and tensioner uses a 995 mm belt. The Gates part (6PK995) is supplied from the factory, and it is also used as a spare.
Sometimes when replacing a belt it becomes necessary to install a new tensioner. It is the same for all motors, its article number is 2123–1041056.
Replacing the alternator belt tensioner pulley
Problems with the generator can lead to more serious problems. If electric current is not generated by the car, if it runs on one battery, then battery failure is also inevitable. If there is insufficient production of on-board current, as indicated by the corresponding light on the instrument panel, first of all, it is necessary to check the tension of the alternator belt.
In addition, in many cars, the belt drive we are talking about, which, by the way, is driven by a timing pulley, often connects other critical components. These units are also called attachments. In particular, the belt can drive a pump that pumps antifreeze. So loosening the belt can lead to more than just power problems!
It is regulated by a special roller, which is located on the tensioner bracket.
Video “Replacing the belt on Lada Kalina”
The author Kalinin talks about the procedure for replacing the belt on his Kalina with a tensioner.
A few days ago I did a small inspection of my Kalina, and noticed the fact that too much noise was heard from the tension roller of the alternator belt - a kind of rustling sound. It was decided to look at its condition and replace it if necessary. When I loosened the belt and turned the roller by hand, the sound of its operation was too “dry”, and it was heard that it was no longer working as “smoothly” as a normal bearing should work.
In general, it was decided that it was not worth driving further with such a roller and a new one was purchased for 700 rubles, made in Vologda, which is considered a “Factory ORIGINAL” type. But to what extent this is true, I will do a review on my channel a little later, where I will tell in detail and show all the real original spare parts that have been used for more than 50,000 km, and the “original” that is sold in stores.
But for now, let’s look at the procedure for replacing the tension roller. Firstly, it is worth noting that to replace it you will need the following tool:
- 8mm and 19mm wrench (to loosen belt tension)
- 13 and 17 mm wrenches
- Flat blade screwdriver
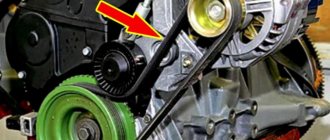
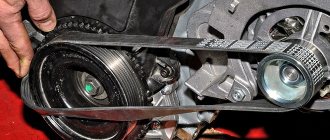
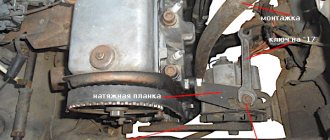
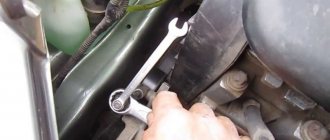
First of all, open the hood and loosen the tension on the alternator belt. To do this, slightly loosen the large nut with a 19mm wrench and turn the rod clockwise until it is completely unscrewed. We tilt it back so that it is not in the way, having first unscrewed the bolt securing it from below, as shown in the photo.
The result is shown below.
After this, you need to use a flat-head screwdriver or a sharp awl to pry off the protective cap of the roller. This is not very convenient to do, but it is quite possible without much effort.
Under it there is a bolt securing the bearing to the bracket. We unscrew it with a key 17 clockwise, since the thread there is left-handed:
And remove it carefully so as not to lose the bolt, bushing and protective washer:
Now we remove all the above parts from the old roller and install them on the new roller.
Then a washer, which is like a protective cap against the ingress of dust and other substances.
Now you can install the new roller assembly in its place:
Tighten the bolt and tension the belt properly. This procedure can be considered complete. After starting the engine, no extraneous noise is heard from the generator, everything works perfectly quietly! Time will tell how long this “factory” video will last! The price, as mentioned above, is 700 rubles.
Alternator belt tensioner Lada Kalina
The generator is used to generate electricity, which powers the entire on-board network in a moving car, including the Lada Kalina. This implies the need for uninterrupted operation of this node. The battery is also recharged through the generator set. The Lada Kalina generator is driven by a belt that requires proper tension.
Operation implies the presence of situations in which the generator belt tensioner ceases to correspond to the required optimal value. This inevitably provokes interruptions in power generation.
In the modern domestic model Lada Kalina, among the most common causes of malfunctions in this system, there is a malfunction of such a part as the generator belt tensioner (roller).
It is this important element of the practical Lada Kalina that will be discussed further.
How does the tensioner work and what is the principle of its operation?
Only at a certain level of tension in the belt drive does optimal operation of the generator occur, which allows the supply voltage to be supplied to the on-board network with maximum efficiency, otherwise tension is required.
The generator belt tensioner we are considering is used for these purposes. Structurally, this is an ordinary bearing, the upper part of which is protected with a plastic coating. The belt moves along the working surface of this roller.
The internal race of the tensioner is presented in the form of a conventional landing sleeve. Its tension must be certain.
Types of rollers according to design principle:
- Eccentric type. This option is the simplest product, whose design is very ordinary and endowed with enviable reliability. The part includes a bearing, bushing and protective pad.
- Bracket view. Here the adjustment process is carried out by moving the tensioner bracket present on the motor. The tensioner bracket is not difficult to find.
Signs of breakdown and vulnerable spots
In any tension roller design, the weakest point is the bearing. The part is subject to loads of a constant nature, in addition to which temperature differences contribute. Under such conditions, element failure can occur quite often.
Let's take a closer look at the list of main signs, due to the presence of which the roller can be considered faulty:
- The battery no longer receives a full charge;
- the car's energy-intensive current collectors began to show disturbances in their functioning;
- a characteristic hum coming from the area where the generator unit is located;
- presence of play during roller operation;
- The working surface of the generator set drive belt shows signs of uneven wear.
Fault diagnosis methods
When checking the correct operation of the tension device in the Lada Kalina, it is recommended to follow the following algorithm of actions:
- First, we carry out visual observation of the belt and the roller itself. To do this, you need to open the hood and start the LADA Kalina engine. When inspecting rotating components, we evaluate them for the presence of vibration.
- We control the tension force of the belt drive. To do this, stop the engine. We take hold of the belt branch with our hand and try to rotate it 90 degrees relative to the longitudinal axis. Rotate clockwise. If this manipulation is successful, then the tension is correct. When the angle obtained as a result of turning the branch is different from the indicated optimal value, further adjustment is required.
- Now you need to check the tensioner itself. To do this, you need to remove the belt. Before direct dismantling, remember the original location of the consumable element. Loosen the adjusting nut on the roller, after which the belt can be easily removed. We scroll through the video and observe the absence of jamming and noise. We inspect the protective cover and check for the presence of play. We pay special attention to the working surface, which comes into direct contact with the belt. It should be smooth, and the presence of deep ditches or other damage is unacceptable. If any of the indicated signs occur, then such a tensioner must be unconditionally replaced.
How to replace the Kalina generator roller?
Here we need the following tools:
- a screwdriver with a flat tip;
- keys whose standard sizes are: “8”, “19”, “17” and “13”;
- awl.
Process.
How to tension the alternator belt correctly step by step:
- First, by opening the hood of the LADA Kalina, we loosen the tension of the belt drive.
- Now we use a wrench set to “19”, with which we loosen the tightening torque of the nut. Rotate the rod in a clockwise direction until it comes completely out of the seat.
- Next, use an awl to pry up and remove the plastic protective cap present on the roller. A screwdriver with a thin and flat “tip” may be suitable for this purpose.
- We find a bolt that secures the bearing to the bracket. To do this, we “arm ourselves” with the key to “17”.
- Now carefully remove the roller. It comes with a protective washer and bushing.
Let's sum it up
This completes the dismantling procedure. Now you know how to tension the alternator belt. The steps for reinstallation are also very simple, so there is no particular need to comment on them.
Upon completion of the entire list of installation procedures, we check the tension level for compliance with the specified requirements. We start the engine and observe the operation of the unit.
If no side factors are detected, then the work was completed correctly.
Also in LADA Kalina it is possible to remake the tensioning device, which is confirmed by this video:
Source: https://Vaz-Lada-Granta.com/kalina/motor-i-korobka/natyazhitel-remnya-generatora-2.html
Determination of malfunction and replacement time
Identifying a damaged alternator belt is quite simple. Let's look at the main indicators:
- Whistle in the space under the engine. Appears after increasing the speed of the gas pedal and increasing the current in the network.
- Tightening the strap did not work; the whistle remained.
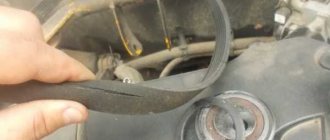
- Cracked or elastic belt Bad alternator belt, bad belt - broken (torn) teeth
- Frame distortion, deviation. The crack in the alternator belt is clearly visible.
Bad alternator belt, bad alternator belt, broken teeth.
The crack in the alternator belt is clearly visible.
All these malfunctions indicate that it is time to replace the alternator belt on Kalina’s car. Otherwise, it may be torn apart at the most inopportune moment.
A torn stripe on one of the Kalinas
Advantages of a tensioner
Why weren't designers happy with the previous adjustment methods? Why did they add an extra video? It's not just about convenience. The tensioner significantly increases the service life of the generator. Without a roller, the entire load falls on its bearings. If the belt is tensioned normally, then there is nothing to worry about. In this case, the generator will last many thousands of kilometers. However, very often car owners overtighten the belt, and this is bad.
The load on the bearings increases many times over, so they quickly fail. In itself, this is not so scary and expensive, although repairing a generator is quite labor-intensive. But the car owner does not always recognize the breakdown in time. The bearings gradually “break”, the rotor moves and begins to cling to the stator winding. The result is the need to purchase a new generator. Of course, the Kalina generator belt tensioner pulley can also fail, which happens quite regularly, but that’s only 400 rubles, not twelve thousand.
Forced tuning
Unfortunately, since 2011, designers have abolished the tensioner on Kalina. They were guided primarily by considerations of economy, but they did this without any modification to the generator. In practice, cases of its premature failure immediately became more frequent. Therefore, owners began to install the tensioner on their cars themselves.
It's not very difficult to do this. True, you will have to purchase not only the tensioner itself, but also the generator bracket. The only problem is the removal of the standard belt. It is very difficult to remove because it is very tight at the factory. You can simply cut it, as you will have to buy a new one. The fact is that the Kalina generator belt without a tensioner has a size of 820 mm, but 880 will be needed.
| Valery user menu |
| View profile |
| Find more posts by Valery |
A whistle appeared near the generator. Checking the belt tension is normal. Suspicion of the pressure roller. A more thorough inspection showed that the belt had jumped 1 groove to the right on the pulley. We loosen, rearrange, tighten - the whistle disappeared.
5000 thousand) At 38000 thousand. It started to whistle very loudly, the whistle did not disappear even after warming up. Upon inspection, it turned out that the belt had jumped one groove towards the engine on the camshaft pulley. We rearranged it, adjusted the tension, after 2000-3000 thousand. history repeats itself. The roller is also skewed. The whole dog is buried in the tension mechanism, or rather in its distortion. I'll try to level it with washers.
__________________ If in a dark alley you suddenly received a kick in the groin, a punch in the stomach and a baseball bat to the head, then the most important thing is not to get confused
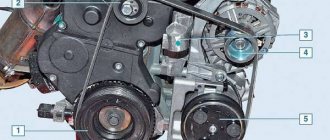
When replacing the alternator belt or when repairing the engine, it is imperative to check the condition of the alternator tensioner roller.
The roller should rotate easily and silently, there should be no traces of grease from the roller
To replace the roller, you need to loosen the tension on the generator drive belt.
Use a screwdriver to pry off the roller cover (shown on the removed tensioner)
Using a spanner wrench or a 17mm socket, unscrew the bolt securing the roller to the lower bracket of the tensioner (the bolt thread is left-handed, so unscrew the bolt clockwise)
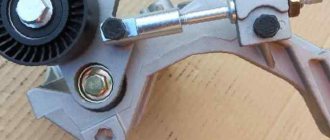
For clarity, we show it on a removed tension device.
We take out the tension roller with the bolt, support sleeve and washer
Install the tension roller in reverse order
To remove the tensioner completely, release the belt tension.
Using a 13mm head, unscrew the bolt securing the upper bracket of the tensioner to the generator bracket.
Remove the washer from the bolt (located on the inside of the tensioner bracket), remove the bolt and bushing.
Using a 13" socket, unscrew the bolt securing the lower bracket of the tensioner to the generator bracket (shown on a dismantled engine for clarity).
We take out the tensioning device assembly.
We remove the bolt securing the lower bracket of the tensioner by removing the spacer and two cup washers from it.
If necessary, disassemble the generator drive belt tensioner.
We assemble and install the tensioner in the reverse order
Source
Snapshot53252323
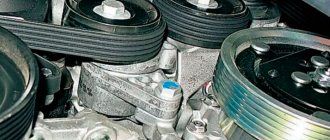
In order to improve visual control, remove the plastic engine casing. To check the condition of the belt, engage fifth gear in a manual transmission, push the car (or rotate the suspended wheel) and inspect the belt along its entire length. On a car with an automatic transmission, remove the right mudguard of the engine compartment and, by rotating the crankshaft by the bolt of the auxiliary drive pulley, check the condition of the belt.
With any of the gearboxes, the following method is also possible: apply chalk marks to sections of the belt and, turning on the starter for short periods of time, turn the crankshaft at small angles. We inspect the belt along its entire length, checking the areas covered by the marks.
Most common faults
During operation, the surface of the roller is constantly in contact with the generator belt. In addition, it is in continuous rotation, which places additional demands on the reliability of its bearings. The tensioner bracket is also subject to heavy load. Hence the main problems:
- Bearing wear. It simply runs out of service life or becomes unusable due to dust and dirt getting on it.
- Damage to the work surface. As already mentioned, the roller itself is made of plastic. Despite its high wear resistance, it often cannot withstand loads. This manifests itself in the form of scratches and chips, which quickly render the alternator belt unusable.
- Misalignment. This means that the belt and tensioner are at a certain angle to each other. Alignment can be disrupted in both the horizontal and vertical planes (due to the curvature of the bracket). This always causes rapid wear of the belt and the roller itself.