Every gearbox has a clutch, but sometimes it fails due to the fork. Its task is to connect and thereby disconnect the torque from the wheels. This is an important thing to do in design.
In principle, all the parts in a car are important and they work together with each other. The motor transmits its torque to the gearbox, and that in turn to the axle. That is why, if something goes wrong, then everything will not work correctly. There is a clutch between the power unit and the gearbox, the quality and serviceability of which affects the speed and smoothness of gear shifting.
The fork itself is designed to help shift gears and often it wears out and needs to be replaced. This is exactly what we will tell you about, but first we will understand the principle of operation, the symptoms of the malfunction, and finally, we will touch on the replacement process.
How to remove
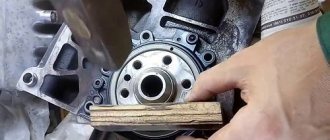
The drive sprocket also serves as a drum.
The coil on the trimmer has stopped rotating in order to remove it. And if it’s behind the clutch cup. One of the main reasons for the breakdown of this block is the grinding of the sprocket teeth. In a solid drum version, the chain may cut through the sprocket during operation. This mechanism requires replacement. If the drum has a replaceable crown, it must be removed and replaced during maintenance. After which the drum can continue to operate. When there is a need for repairs, you should seek help from a service center where experienced specialists work. But if there is no such thing nearby, the question arises - how to remove the clutch without the help of others? If you have the necessary set of tools, you can easily implement your plans. Of course, there are some differences in models from different companies, but the disassembly scheme remains the same:
- First, remove the chain brake cover by turning the lever. Lightly unscrew the nuts to release the tension on the chain. After loosening, you can completely unscrew the nuts and remove the cover;
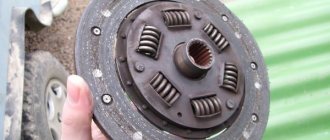
- The chain and guide bar are disassembled, as well as the mechanism is cleaned of dirt;
- The cylinder head spark plug is turned out and the piston is fixed. To do this, the crankshaft must be rotated until the exhaust port is blocked, and then a piece of rope is placed in the cylinder to lock the piston. After completion of the work, the rope is removed from the mechanism;
- The nuts on the clutch are unscrewed using the special wrench included in the kit. In this mechanism they are made with a left-hand thread, and this must be taken into account when dismantling. After this, the mechanism is disassembled and all its parts are inspected for damage. Although I already have it on my trimmer in order to remove the clutch assembly once as in the photo. I hope my tips on how to remove the mowing head on the Black&Decker GL716 trimmer How to replace. Worn parts must be removed and replaced with new ones.
After repairs and replacement of parts, it is necessary to reassemble in the reverse order. The disassembly process is presented in more detail in the video.
In order to independently repair such chainsaws as Shtil, Husqvarna, Partner, Goodluck, you need to know some of the features of the models. For example, some types of saws have a washer installed (between the drive sprocket cup and the motor). During assembly, it must be installed in its original place.
If the model is equipped with a special spring that transmits rotation to the pump drive, then its correct installation after repair is extremely important. Otherwise, the device may be seriously damaged. After preventive and repair work, it is necessary to check whether the mechanisms are working properly.
The concept and principle of operation of the clutch and its components
The clutch is a special system device that connects the engine and transmission. It performs important functions in a car. First of all, it transmits torque. However, in addition to this, it protects the engine and transmission from any damage or stress. Thus, it prolongs their performance.
There are several types of clutch mechanism. The most common type is friction. Its design is quite simple, and the principle is that it works due to friction. There is also a hydraulic mechanism, which is based on a special hydraulic fluid that powers the mechanism.
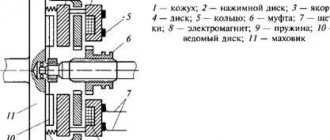
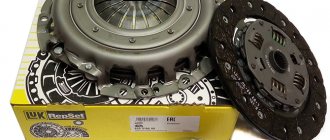
The mechanism of the device consists of such parts as a pressure and release disk. Its other name is a basket, which is placed between a special flywheel and springs. There is a thrust bearing in the center. In addition, there is a driven disk, which is attached with a clutch, springs and friction linings. These are the most basic elements of the system. It also includes clutch pedals, levers and finally the clutch fork.
To transmit torque to the driving wheels of the vehicle from the engine crankshaft, a box is provided, because smooth transmission of torque from the motor to the wheels is unprofitable. The car will not be able to move without a clutch, and the operation of the power unit itself will be ineffective.
For comfortable operation of the power plant, the torque removed from the crankshaft must be changed in advance in the gearbox (gearbox). After which it moves to the driven axle. Since changing gears forces the gearbox gears to spin, which hit each other with force, it can be difficult to change gears. If the box is always connected to the unit, in order to completely stop the vehicle, it will be necessary to stop the motor.
Clutch operation in a Gazelle car
To solve these problems, the car is equipped with a clutch, which is a special box assembly. It promotes temporary separation of the engine and gearbox, which leads to an interruption of torque. By pressing the clutch pedal, you can change gears or stop the car. The clutch allows the car to move off smoothly and accelerate.
The clutch pressure plate, attached to the housing, presses the driven disc against the flywheel. The disk hub attached to the input shaft must be able to move freely along it. The hub body is equipped with damper springs, which act as vibration dampers and ensure smooth operation.
To make the required force when pressing, a spring with petals is provided, which are exposed to the release bearing. It is a connecting link between the drive and the clutch, onto which the fork with the lever is attached. Another lever or cable is attached to its end, leading to the clutch pedal.
Early on a weekend afternoon I replaced the clutch fork.
how to replace the clutch fork of VAZ-2101-2107 cars without removing the gearbox. VKontakte groups for repairs...
Malfunctions
The most common clutch failures occur, resulting in slipping or incomplete disengagement of the mechanism. The second option involves engaging any gear “with a crunch” with the clutch fully depressed. At the same time, the gearbox stroke is increased compared to the standard one. The first option usually occurs due to friction between the disc and the flywheel. In such cases, an unpleasant burning smell also often appears in the cabin. Vehicle acceleration deteriorates and consumption increases.
Is it possible to operate the car with such breakdowns?
If the clutch breaks down according to the options described above, daily use of the vehicle is strictly not recommended. As a last resort, you can drive to the nearest service center. In this case, you need to drive extremely carefully, without accelerating, move off smoothly and carefully change gears. It is best to double release when driving a car with a faulty clutch. This method was widely used on older cars.
Its essence is as follows: to shift to a higher gear, you need to squeeze the clutch and move the lever to the neutral position, then release the clutch, squeeze it again and shift into gear. To change gear to a lower one, you must do the same. These actions run the risk of damaging the synchronizers. To preserve them, it is recommended to increase the engine speed. This method can also be used during normal driving. It greatly facilitates the operation of the gearbox and engine. Double squeezing increases the service life of all components and assemblies, and especially synchronizers, which practically do not feel the load.
Replacing the VAZ 2110 clutch step by step instructions
1. “Tear off” the left wheel mounting bolts, then jack up the front of the car and place it on the sawhorses.
2. Remove the wheel and unscrew the two lower ball joint bolts.
3. Remove the “-” terminal from the battery.
4. Remove the mass air flow sensor, then loosen the clamp securing the mass air flow sensor corrugation and remove the air filter.
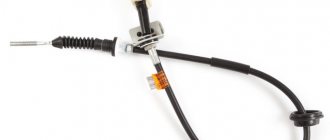
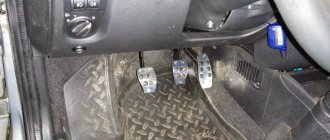
5. Now you need to remove the clutch cable from the clutch fork. Loosen the two mounting nuts that secure the cable to the bracket on the gearbox.
6. Unscrew the bolt securing the starter to the box, then unscrew the first bolt securing the gearbox.
7. Head on “19” amplifier pipe. There is another gearbox mounting bolt nearby.
8. Loosen this nut and the upper starter mounting bolt.
9. Remove the connector from the speed sensor, then unscrew the speedometer cable.
10. Remove the longitudinal brace paired with the lever.
11. Now unscrew the lower starter mounting bolt.
12. Unscrew the 3rd gearbox mounting bolt; in the area of the right CV joint there is another nut that needs to be unscrewed.
13. Unscrew the two torque rod mounting bolts.
14. Loosen the nut located on the clamp of the gearbox control drive rod, then remove this rod from the box.
15. Place a support under the engine, then unscrew the two nuts securing the rear cushion. This is done just in case, so that if the engine lowers too much, your hoses do not break.
16. Carefully move the gearbox away from the engine and lower it to the floor, it will hang on the axle shafts.
17. I recommend replacing the clutch release bearing at the same time.
Assess the wear, replace the disc, and if necessary, the clutch basket, check whether the petals are normal.
Further assembly is carried out in reverse order
Thank you all for your attention, this is actually the simple way to replace a VAZ 2110 clutch without removing the box and draining the oil
How to leave license plates when selling a car? Detailed instructions on how to save car numbers
- Comments 30
- Pingbacks 0
And yet the box was removed, even though it hung on the axle shafts.
And the meaning. The box was eventually removed. What has changed for the better? =))) You still have to lift it and put it back in place, but if you do it alone, then it’s a complete ass. This option is in the trash. I would simply screw in other, longer bolts instead of the original box mounting bolts. Then everything was the same, only I moved the box to the side on extended bolts and that’s it. It would remain suspended and at the exact level of the bolts. I replaced the clutch and moved it back with bolts and that's it. The only thing is that you just need to turn the flywheel a little from side to side so that the splines of the shaft and the clutch driven disc bushing coincide so that the box sits in place. That's it, comrades =)))
Thanks for the comment Max147, maybe someone will like your version more than ours. The long bolt idea is really good!
Longer bolts will not fit there!
Guys, don’t talk nonsense and don’t mislead others, with long bolts the box won’t move the required distance, you comrade don’t even know what you’re talking about. And you obviously don’t understand repairs...
Alternatively, long heels
Yes, they didn’t save much in terms of time or labor costs. Drain the oil - one nut, 5 minutes. Remove the drive - 2 nuts, 10 -15 minutes. As it was rightly noted, pushing the gearbox back together with the drives is still a hemorrhage. And the whole box is covered in oil, the seals may very well be leaking, so you still have to pull out the drive. IMHO, remove completely, wash, clean, replace seals if necessary... And what kind of speedo cable? I haven't seen it on 10s.
They took it off - they didn’t take it off. At least the benefit is that the box is not far away
When you work alone, this is important. The drives center it and make it easier to push it into place
Well, when you remove the drives from the box, you won’t be able to turn anything. Although sliding it along long pins (I don’t know who first came up with it) is even easier. That's what I did. The gap is not large, but the clutch with the basket passes. Shorten the mandrel. You have to work in a gap, but it’s easy to push the box into place without any extra fuss.
Clutch fork fault detection
Every driver should know the signs that can help identify a clutch malfunction. First of all, this is noise or knocking in the mechanism. There may be several reasons, the main ones being disc deformation, weak engine or gearbox mounting. To fix the problem, it is necessary to replace the parts and strengthen the fastening. Also, during operation, a characteristic burning smell may be heard.
In this case, replace the damaged parts. If there is noticeable drag in the clutch operation, this indicates that the cylinders are not working properly or there is a hydraulic fluid leak. As in the previous case, parts are replaced. Another sign of a problem is poor pedal operation. Here, most likely the problem lies in the bearing or levers, and it can be solved by replacement.
The clutch release fork is rightfully considered one of the necessary elements of the entire mechanism. It moves the edge of the spring from the clutch and thus turns off the mechanism.
In addition to the above problems, the clutch fork can also fail. Basically, eliminating a fault is that it needs to be replaced. This procedure is quite simple. Its advantage is that there is no need to disassemble the gearbox. The hatch will serve as a workplace.
First of all, you should be careful when choosing a new part. It must be of high quality and be slightly ground down in order to tighten the bolts neatly and easily
During the work process, it is important to follow the basic rules and carry out actions carefully so as not to damage the parts
The whole process consists of two parts. The first involves removing the old plug. To do this, remove the return spring, bend the cylinder and take out the fork axle. The fork has a special coating that protects it. It is also subject to removal. Now all that remains is to pick up the fork.
The second part of the repair is that we replace and insert a new plug. To do this, insert the end of the spring into the hatch and carefully push it to the end. The part should smoothly and calmly pass past the springs and bearing coupling and reach a special recess where the spring petals will clasp it. To make the work easier, you can use a hammer, but you should not overdo it with the force of its pressure. After this, the entire mechanism is assembled and carefully tightened.
Looking for problems
So, you understand that the fork is an important part and that is why you need to be able to determine whether it is faulty or not. The easiest way is knocking and noise, but it also happens that a burning smell appears
This is due to the fact that the disk has undergone deformation for some reason, but sometimes this is due to poor mounting of the engine and gearbox. Your task is to replace this part and improve the fastening.
Parts that are damaged must be replaced. In the event that there is towing, you can immediately blame the cylinders or fluid. Hydraulic fluid has most likely leaked or there are problems with the correct operation of the cylinders. If you have poor pedal response, the problem is most likely a bearing or lever issue. In this case, only replacement will help.
Boat Maintenance and Operation Manual in PDF format
Magnus, MAN, MarinePower,
Mariner,
Marlin, Mercury,
Mikatsu,
Minn Kota,
Mitsubishi,
MotorGuide, MTR Marine,
MTU
Modern boats use two types of engines - gasoline (ICE) and electric.
Electric motors are lightweight and virtually silent, simpler in design and cheaper to operate. However, due to the fact that powerful electric motors would require too large batteries, they are produced at low power - up to 5 hp. (3677.5 W).
In addition, depending on the battery capacity, the voyage duration is limited.
Electric motors are typically used in bodies of water where the use of gasoline engines is prohibited for environmental reasons or where excessive noise is not desired.
The power range of internal combustion engines is much wider, they are enough even to operate on the fastest and heaviest vessels. The cruising range is much higher than on boats with an electric motor. Such vessels can switch to aircraft mode, which reduces fuel consumption. However, these models weigh more than electric ones. In addition, they are more expensive both in themselves and in the operation.
Engines vary in their purpose. There are classic and auxiliary boat motors.
Classic – used as sources for the main dish.
Using organic clutches
Clutch tuning, conventionally called “friction”, occurs as follows. Special linings (friction) are attached directly to the body of the pressure plate, designed to perform the bulk of the work of connecting the transmission to the engine. Nowadays, a composition of organic friction linings is the most common material and is used in almost all cars; also suitable for VAZ 2110.
The reasons for this phenomenon are the low cost and unpretentiousness of this type of lining; They are perfect for driving with light and medium loads, which is why they are usually installed in more than 90% of production cars. Friction linings make the process of engaging the clutch and starting the car more smooth and soft.
A little about the device
It is difficult to understand the cause of the malfunction if you do not have a minimal understanding of the design and principle of operation of the clutch. It is enough to understand that pressing the pedal provokes movement of the fork and release bearing. The release lever, pressed by the fork, presses on the petals of the diaphragm spring, moving the pressure plate away from the driven disc. The latter, in turn, moves away from the flywheel, thereby stopping the transmission of torque from the crankshaft to the gearbox input shaft.
The shutdown drive can be mechanical or hydraulic. In the first case, the pedal and the release fork are connected by a cable drive. The second type of inclusion requires the presence of a clutch master cylinder. By pressing the pedal, you initiate the movement of the rod, which presses on the piston inside the clutch cylinder. The displaced brake fluid, moving in the lines, presses on the piston inside the working cylinder. The piston, moving, presses the shutdown rod.
What does "leading" mean?
They say that the clutch is engaged if the clutch does not disengage completely. In other words, after pressing the pedal, the driven disk and the engine flywheel are not completely disengaged, which leads to partial transmission of torque to the input shaft of the gearbox.
Symptoms
You can assume that the clutch is slipping based on one symptom - difficulty engaging and disengaging gears. Most often, problems begin with the inclusion of reverse and first gears. The term “difficult” means both the need to apply more force to the gearshift knob and the inclusion with a crunch.
Causes
- Incorrect adjustment of the switching drive. In this case, the useful range of movement of the clutch pedal is not enough to completely separate the flywheel and the friction lining of the driven disc. Often such a malfunction is the result of unqualified repairs. To fix the problem, you need to correctly adjust the pedal free play.
- Deformation of the driven disk. The bending leads to the fact that after the pressure plate is disconnected, the friction lining in the place of the bend continues to touch the flywheel. If there is excessive axial runout, only replacing the driven disk will help. In cases of such clutch malfunction, vibration should be observed when starting to move.
- Weakening or breaking of the diaphragm spring blades. In this case, the force when pressing the clutch release bearing onto the paddles is not enough to completely disconnect the pressure plate from the driven one. As a result, even after pressing the pedal, the clutch is in a partially engaged state. Both manufacturing defects and incorrect adjustment of the release drive (when the clutch is constantly half-squeezed) can lead to breakage of the petals. Natural metal fatigue leads to weakening over time.
- Malfunction of the hydraulic clutch release system. The reason why the crankshaft is not completely disconnected from the gearbox input shaft may be hidden in the working cylinder or hydraulic line. You should monitor the tightness of the system, as due to leakage of brake fluid, the clutch may not disengage completely.
- Cable drive jamming. Over time, the cable may become frayed, which, combined with contamination, leads to limited movement. Therefore, it may seem to the driver that the clutch pedal is depressed, but in fact, the driven disk has not been completely disconnected from the flywheel.
- Difficult movement of the driven disk on the splines. Lack of lubrication, contact with various types of contaminants on the working surface and uneven wear of the splines can lead to the fact that after disconnecting the pressure plate, the gap necessary for separation will not be created between the flywheel and the pressure plate.
- Flywheel malfunction. Severe scuffing and radial distortion will prevent the friction linings and flywheel from completely detaching. The imbalance causes not only poor gear engagement, but also vibrations when starting to move.
- Bending of the fork that moves the release bearing, due to which the stroke of the rod becomes insufficient to bring the release bearing to the petals of the diaphragm spring.
If, after adjustment, problems with gear shifting have not disappeared, it is necessary to disconnect the gearbox and fully diagnose the clutch mechanism. Replacing the clutch cannot be called an easy job, but with proper theoretical preparation and the availability of the necessary tools, you can do it yourself.
Vibration
A faulty clutch can cause vibration, this is not surprising, because the assembly undergoes a rotational movement and imbalance causes vibration.
It happens that after replacing the clutch with a new one, vibration appears. It would seem that everything seems to be new, but when starting off there is some kind of vibration and jerking. Most likely, you came across a restored basket, the so-called refurbished, that is, the clutch is changed at a car service center, the old set is sent to the factory for restoration, and sometimes such imperfections happen. Such a set usually costs less than a new one, but it’s not a fact that they won’t push it on you under the guise of a new one. The box should say refurbished
.
On an old, battered clutch, if when starting off, the damper springs have become loose, or the basket begins to fall apart; if vibration occurs while driving, the basket is most likely torn; a slight vibration may indicate slight wear of the basket, especially if only the disk was replaced at the last time. In general, the clutch is a part that must be dynamically balanced; if the center of mass is suddenly disturbed, then in any case vibration will result at certain engine speeds. The flywheel will not give such a vibration for no reason, it just comes off and punches everything in its path if it is not screwed on properly.
How to replace the clutch fork on a gazelle with a 405 engine
What to do if the clutch fork of your Gazelle car fails? This can happen suddenly and take the car enthusiast by surprise. First of all, try not to panic. You can easily carry out independent repairs even with minimal knowledge. It is enough just to be aware of some nuances.
The clutch fork is, it would seem, not such a significant part of the mechanism. However, its breakdown can paralyze the movement of the car, since this element is part of the transmission. If torque is not transmitted to the wheels, it is impossible to start the Gazelle
That's why it's important to start repairs as soon as possible
How can you tell if the clutch fork is broken? The behavior of the Gazelle itself will “tell” this. If you notice that the pedal does not respond immediately and the engine is running weakly, this may be one of the signs of a faulty element. The fork may become worn or bent. In addition, defects may appear on her paws.
If you have already purchased a high-quality new component, it must be processed before installation. The ends are ground on a stone so that the part fits under the spring. By the way, a hook is made for it, with which it is convenient to lift and insert the clutch fork.
So, the algorithm consists of the following steps.
1. First, the old element is dismantled. Remove the clutch cylinder and move it and the hose it is attached to. Remove the cover protecting the plug. Inspect the element again, and if it cannot be repaired, remove it from the casing.
2. The casing is inspected for dirt and foreign objects.
3. Find the ball-shaped pin of the casing. Petals are inserted under it, with the help of which the latch is attached.
4. Place the pre-sharpened tabs of the element under the spring located on the release bearing hub. The clutch fork should be located between the hub and the spring.
5. Reassemble the elements in reverse order and make sure that the clutch works correctly. Take the Gazelle for a short drive to make sure the clutch fork is installed correctly.
Replacing such an element of a Gazelle car as the clutch fork is a completely simple process if you understand its intricacies. Experts can help with this. From us you can also purchase proven components for your car - domestic or foreign. You will be pleasantly surprised by our low prices and wide range, as well as attentive service.
Source
Tools, accessories, consumables
For work you will need the following materials:
- New clutch fork.
- Grindstone.
- Mount.
- Set of wrenches.
- Flashlight.
- Bricks or other supports.
Chainsaw
The woodworking machine's clutch is centrifugal and automatically engages when the engine speed changes. If the speed is low, the elements of the mechanism are pressed against the shaft. Thus, the rotational motion is not transmitted to the sprocket. As the speed increases, the elements move apart and are pressed against the drum, thereby causing the chain to rotate.
A characteristic feature of this type of device is braking, where the chain slows down. This way it turns out to avoid some glitches. But still, this system is subject to enormous load, so it is necessary to systematically carry out preventive inspection and repair.
Video
- How to identify clutch faults?
- 1. What is clutch?
- 2. Signs of clutch failure
- 3. The most common causes of clutch malfunctions
- 4. Self-diagnosis of clutch faults
- 5. What to do with a faulty clutch?
Regular use of a car sooner or later leads to operational failures of its individual systems, which are often caused by malfunctions of the engine, chassis or any other mechanism. Problems with the clutch also cannot go unnoticed by the car owner, because the appearance of even the slightest malfunction in the operation of this unit is already “felt”.
Changing the clutch fork on a VAZ 2110 yourself
In order for the transmission system to operate without breakdowns, it is necessary to monitor the serviceability of all its components. One of these elements is the clutch fork
It is important to be able to perform repairs yourself. The article describes the function of the clutch fork, how to change it on a VAZ 2110 car
The clutch fork (CL) is an important element of the vehicle transmission system. It is a lever with which the pressure plate is retracted, resulting in the clutch being released. The BC is sometimes called the cut-off plug.
BC is mainly part of a mechanical gearbox, less often in hydraulic drives. The design of the VS in the gearbox on a VAZ 2110 is quite simple: a metal rod on which a lever and two legs are attached.
At number 5 VS
When you press the clutch pedal (CS), thanks to the BC, the release bearing clutch moves, thus, the inner edge of the spring moves forward and the device turns off. Naturally, the correct engagement and disengagement of the clutch depends on the serviceability of the aircraft.
Aircraft replacement is required in the following cases:
- Deformation of the part is detected;
- cracks were detected on the body;
- curvature of the aircraft;
- Defects in the tabs were identified at the points of contact with the release bearing coupling;
- paws are worn out.
The photo shows a broken down aircraft.
Aircraft with a broken lever
If there are cracks on the aircraft, then this reduces the quality of the PS operation, late setting occurs, the machine may slip, and the pedal may sink when pressed. There is a need to regulate free play. Along the crack, the aircraft deviates from the release bearing. Regulation is enough for only a few days, and in case of a significant defect it is necessary to adjust after a few hours
Damage must be corrected immediately, as this can lead to rapid wear. If the aircraft breaks down completely, the pedal will fail and the vehicle will be unable to move.
You can detect a crack by visual inspection, place the car on an overpass or inspection hole, and find the fork protective boot on the bottom of the car. Having moved the boot, you need to inspect the fork for cracks; it is more convenient to use a flashlight.
Replacement process
The difficulty of replacing an aircraft with a VAZ 2110 is that it is necessary to dismantle the gearbox; the procedure for replacing the part itself is simple.
Required Tools
To carry out the aircraft replacement procedure, it is necessary to install the machine on a lifting device or inspection groove. You can lift the car with a jack and place it on supports.
From tools and materials you need to prepare:
- new aircraft;
- a set of keys;
- pliers
- screwdriver;
- flashlight;
- jack.
Having prepared all the tools, you can begin the replacement process.
New replacement part
Stages
In order to change the aircraft to a VAZ2110, you need to remove the gearbox. After dismantling the box, the following steps are performed:
- First you need to remove the clutch release bearing.
- Then, using a screwdriver, you need to pry up the protective cover of the aircraft and remove it. If it has signs of wear, abrasion, or has lost elasticity, it should be replaced.
- Next you need to remove the plastic sleeve BC. To do this, use pliers to squeeze the tabs securing the bushing and remove it.
- Next, you need to assess the condition of the bushing. If there is damage, signs of wear, or the locking tabs are broken, the part should be replaced.
- Then you need to lift the BC and remove it from the bushing located in the clutch housing (CC), and also remove the fork lever from the holes of the CL.
- Next, you need to remove the spring retainer from the aircraft. If it is damaged or has lost elasticity, it must be replaced.
- It is advisable to replace the metal sleeve pressed into the KS with a new part.
- Before installing a new aircraft, all bushings inside should be lubricated.
- Installation of the aircraft is performed in reverse order.
- When inserting a plastic bushing, you need to make sure that the petals securely hold the bushing in the joint.
Thus, replacing the aircraft together with removing the gearbox will take about 3-4 hours. The main thing is to have at least a little experience in locksmith work and know the structure of the VAZ 2110 car.
Preparatory stage
Before changing the clutch on a VAZ 2110, you need to prepare a place for repairs and tools. For this process, the most suitable solutions are: a car lift or an inspection hole. If there are no such conditions, due to a hopeless situation, it is possible to replace the clutch with a 2110 in “Spartan conditions”. It is enough to find a flat surface area in a garage box, a parking space or in the yard.
Clutch diagram for VAZ 2110: 1 - release bearing guide sleeve; 2 — gearbox input shaft; 3 — cable lead; 4 — clutch release fork; 5 — fork axle bushing; 6 — pressure disk assembly (basket); 7 — driven disk; 8 - flywheel; 9 — clutch pedal; 10 — mechanism for automatic adjustment of cable length; 13 — clutch release clutch (release bearing); 14 — lower tip of the cable sheath; 15 — bracket installed on the gearbox housing; A - the displacement distance of the leash, checked when installing the cable (27 mm).