There are no major or minor components and assemblies in a car, but our health and safety directly depend on the failure of some of them. Therefore, stable operation of the brake system, its constant diagnostics, adjustment and timely repair of the devices it consists of should become a priority. Even if you have the slightest suspicion that the working or master brake cylinder is leaking, you should not put off repairs and adjustments, but deal with them immediately. To diagnose, repair or replace faulty parts with your own hands, you need to understand the operating diagram of the entire brake system, what are the signs of possible breakdowns and how to repair the brake master cylinder.
Replacing the master brake cylinder
When you press the brake pedal, pressure is created in the hydraulic brake actuator using this brake cylinder. The separate circuits of the hydraulic brake drive receive fluid from 2 independent circuits.
The main brake cylinder consists of the following elements:
- 2 pistons for brake circuits;
- Return springs;
- O-rings.
If air gets into the brakes, it is necessary to bleed the master cylinder, as well as the entire system. To bleed, you need to use a jack or inspection hole. Air removal is not done immediately, first from the first circuit, and then from the second.
If the cylinder is damaged, it must be replaced.
Master brake cylinder
Replacement procedure:
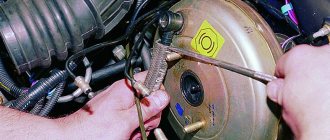
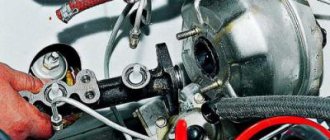
- The vacuum booster, brake cylinder and pipelines must be thoroughly cleaned of dirt.
- The lines need to be removed from the brake cylinder.
- Next, you should unscrew the clamps that tighten the hoses on the fittings and remove them. Using a special wrench, remove the brake pipes.
- To remove the master cylinder, you need to unscrew 2 nuts from the vacuum booster.
- Remove the cap from the filler reservoir and drain all the brake fluid.
- To ensure that there is no brake fluid in the master cylinder, it must be turned so that the reservoir is at the bottom, and when the piston is pressed, brake fluid can flow out of the cylinder.
- It is necessary to remove the tank from the cylinder using a wooden spatula.
- Remove the connecting bushings from the master cylinder shell.
- Using thin pliers, remove the retaining ring.
- Pull out the piston with cuffs and spacers.
- After replacement, all components are installed in the reverse order.
Reasons why the brakes might fail
Any problems during the braking process reduce its effectiveness, which can lead to dire consequences for everyone - the driver, passengers, and other road users.
Very often, problems arise simply because the driver uses low-quality brake fluid. If your car suddenly loses brakes, this may be due to several reasons, the main thing is not to blame the master cylinder for all the problems.
Below are the reasons why the brakes on a car fail:
- One of the main causes is usually a leaking slave cylinder. Gradually, slowly or quickly, all the contained liquid flows out of it.
- You should also check the level of brake fluid in the reservoir and the condition of the main brake.
- If traces of smudges are noticeable on the main brake, then this is the reason.
- Another possible cause of brake failure could be that the brake line is torn. For example, rubber brake hoses could fray, partially rot in some places, or get punctures.
- The working cylinders may have jammed;
If it is nevertheless noticed that the main brake cylinder is not working:
- it will show where traces of brake fluid leaks appeared;
- it will be impossible to press the brake pedal;
- on the contrary, the brake pedal can move on its own without the driver making any effort to do so.
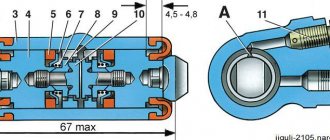
Master brake cylinder with reservoir: 1 — master cylinder body;
2 low pressure o-ring; 3 — drive piston of the “left front-right rear brake” circuit; 4 - spacer ring; 5 - high pressure sealing ring; 6 — pressure spring of the sealing ring; 7 — spring plate; 8 — piston return spring; 9 — washer; 10 — locking screw; 11 — drive piston of the “right front-left rear brake” circuit; 12 — connecting sleeve; 13 - tank; 14 - emergency brake fluid level sensor; A - gap.
Therefore, it is possible to repair the VAZ 2110 brake cylinder, but not always. Most often, if it leaks, a repair kit will help fix the problem and restore the cylinder’s functionality. If the internal mirror in the cylinder is damaged, then, unfortunately, nothing can be corrected, since grinding is prohibited. If everything is not so scary and repairs are possible, you can do it yourself, because the price of the repair kit is quite reasonable, and almost every motorist can afford it.
What tools are required to replace a brake master cylinder?
- key to 17;
- key to 10;
- half-liter bottle of brake fluid;
- syringe;
- brake fluid.
Replacing the front brake cylinder
If the front brake cylinder fails, braking will not be as effective and will need to be replaced. Before starting the replacement, you need to find out which cylinder has failed. To determine this, you need to jack up the car and spin the front wheels. In this case, you must remember to press the brakes. And if the wheel spins a little, then there is a jammed cylinder there.
Procedure for replacing the brake cylinder:
- It is necessary to lift the front of the car and remove the front wheels.
- Next, remove the brake pads.
- In order to unscrew the fitting from the caliper, you need to squeeze the rubber brake pipe with a small vice.
- Remove the caliper by first unscrewing the 2 bolts.
- Unscrew the copper tube that connects both cylinders.
- Next, remove the cylinder, pre-seating the clamps with a screwdriver.
- The new brake cylinder is installed in the reverse order.
On video: Replacing the front brake cylinder of a VAZ
Principle of operation
Single-circuit gas turbine engines, where there was only one piston, are no longer found in cars, so only a double-circuit one is worth considering. It is distinguished by the presence of two pistons, each of which is responsible for the pressure in its own branch of the system.
In this way, the brakes are duplicated, which is required for safety. If a fluid leak occurs, a branch that remains in good working order will allow you to stop the car without using the parking brake or other emergency techniques.
The first piston is directly connected to the pedal rod. Having started to move forward, it closes the bypass and compensation holes, after which the force through the volume of liquid will be immediately transferred to the primary circuit pads. They will press against the discs or drums, and deceleration will begin using frictional forces.
Replacing the rear brake cylinder
In case of problems with the rear brake cylinder, you can see wet spots under the car, and as a result, a drop in the level of brake fluid in the reservoir.
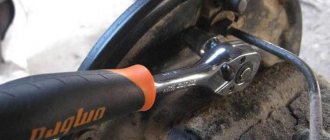
Special wrench for brake pads
Replacement procedure:
- Jack up the car and remove the wheel. At the same time, do not forget to substitute an additional stop (for your safety).
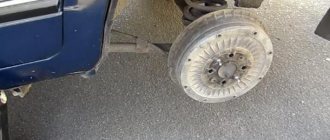
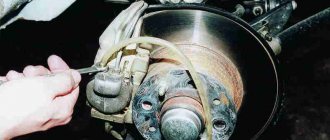
- Remove the brake drum.
- Using a larger screwdriver, remove the brake pads from the lower stops by lightly pressing them from above.
- Lower the stops a little to the bottom so that they release the brake cylinder.
- Unscrew the brake pipe from the cylinder and then plug it to prevent brake fluid from leaking out.
- Use a special wrench for brake pads to remove the tightened fitting.
- Next, unscrew the 2 bolts with a regular wrench and remove the cylinder itself.
- Install the new cylinder and other parts in reverse order.
After replacing the cylinders, do not forget to bleed the brake system!
Source
How does GTZ work?
The functioning mechanism of a classic brake cylinder is as follows.
- When the car pedal is pressed, both pistons move forward. This allows all fluids to be pushed into the circuit tubes. When pressure is applied, the brake wheel cylinders are activated. They compress the pads on the discs.
- The liquid, or rather some part of it that did not have time to penetrate the tubes, flows into the expansion container through special through holes.
- When the driver releases the pedal, the springs push the pistons out in the reverse order. As a result, they acquire their original position. The liquid coming from the tubes and reservoir again ensures that the cylinder is filled.
- To compensate for the expansion that occurs with the brake fluid, the developers create several additional holes that lead to the expansion tank.
If you need to replace the brake master cylinder, you need to contact our company. We employ highly qualified craftsmen to replace this part, who will carry out the work as cheaply and accurately as possible.
Removal process
- Remove the engine cover. Unscrew screw 3.
- Place the air filter housing aside. Remove the battery.
- Remove battery bracket arrows;
- Hang the battery bracket in front on the air duct. To protect against escaping brake fluid, simply place a lint-free cloth in the area under the master cylinder;
- Using the brake bleeder unit -VAS 5234- or the brake bleeder accessory kit -VAG 1869/4-, pump out as much brake fluid as possible from the brake fluid reservoir;
- Clamp the brake fluid supply hose to the clutch master cylinder using 25 mm hose clamps, (3094) ;
- Disconnect the clutch master cylinder hose;
- Disconnect the connector from the contact of the brake fluid level indicator;
- Unscrew brake lines 3 on the master brake cylinder, close the brake lines with plugs from the repair kit;
- Unscrew the mounting nuts 1 of the main brake cylinder. If present, remove the heat shield with holder. Remove the brake master cylinder from the brake booster. Disconnect the brake fluid reservoir from pos. 2 and remove it upwards.
How to remove air from the brake system
When the driver changes the drive cylinder, air enters the brake system. It's almost inevitable. Air bubbles accumulate in the brake hoses, making normal braking difficult. So the driver will have to remove air from the system using the recommendations outlined below. It should be noted here that to perform this operation you will need the help of a partner.
- The front wheel of the car is jacked up and removed. Access to the brake fitting is provided. A piece of plastic tube is put on it. Its second end is directed into an empty bottle. Then the nut on the fitting is carefully unscrewed.
When bleeding the brake system, the second end of the tube is placed in an empty bottle - The brake fluid will begin to come out into the bottle, and it will bubble strongly. Now the partner sitting in the cabin presses the brake pedal 6-7 times. By pressing it the seventh time, he should keep it in a recessed position.
- At this moment, you should loosen the fitting a couple more turns. Liquid will continue to flow out. As soon as it stops bubbling, the fitting is screwed back on.
- The above steps must be done with each wheel of the VAZ 2106. After this, you should add brake fluid to the reservoir and check that the brakes are working properly by pressing them several times. If the pedal does not sink and its free play is normal, then bleeding the brakes can be considered complete.
Installation
Installation is carried out in reverse order, and the following instructions must be observed:
- Replace the lip seal between the brake master cylinder and the brake booster;
- When installing the master brake cylinder, ensure that the pressure rod is in the correct position in the brake booster;
- Lightly depress the brake pedal, this makes it easier to insert the master cylinder into the pressure rod;
- Bleed the brake system: ABS/ESP Mark 60;
- Bleed air from the clutch hydraulic system.
On vehicles with ABS/ESP, carry out basic adjustment of brake sensor G201. To do this, use the VAS 5051 B - or VAS 5052 tester.
Test the chassis and the entire ESP system. To do this, use the VAS 5051 B or VAS 5052 tester.
- Brake system (repair gr. 01; 45);
- 01-Systems with self-diagnosis function;
- 03 — Brake electronics ABS/ESP Mark 60;
- J104 - ABS ASR ESP control unit, functions.
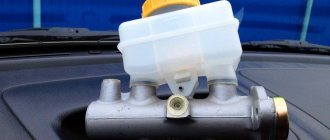
Master cylinder: its purpose and functions
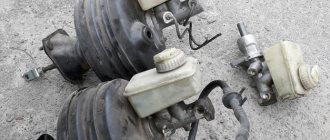
General view of the main brake cylinder
During the braking process, the driver directly acts on the brake pedal, which is transmitted to the pistons of the master cylinder. The pistons, acting on the brake fluid, actuate the working brake cylinders. From these, in turn, pistons extend, pressing the brake pads to the drums or discs. The operation of the brake master cylinder is based on the property of brake fluid not to be compressed under the influence of external forces, but to transmit pressure.
- transmission of mechanical force from the brake pedal using brake fluid to the working cylinders;
- ensuring effective braking of the car.
In order to increase the level of safety and ensure maximum system reliability, two-section master cylinders are installed. Each section serves its own hydraulic circuit. In rear-wheel drive cars, the first circuit is responsible for the brakes of the front wheels, the second - the rear. In a front-wheel drive car, the brakes of the right front and left rear wheels are served by the first circuit. The second is responsible for the brakes of the left front and right rear wheels. This scheme is called diagonal and is most widespread.
Replacing the master brake cylinder
Find out how to properly replace the brake master cylinder yourself. Step-by-step instructions for new car enthusiasts.
Find out how to properly replace the brake master cylinder yourself. Step-by-step instructions for new car enthusiasts.
Do-it-yourself car repair is not an easy job, it requires certain knowledge and skills. But what about a broken master cylinder? Naturally, an urgent replacement is necessary, because without good brakes you won’t go far. And in this article I will tell you in detail how to replace it without resorting to the services of a service station, because it is cheaper, and you will gain new skills in repairing your own car, and faster. In fact, there is nothing complicated; the whole procedure can be done easily in your own garage or on the street.
The entire procedure for replacing the master brake cylinder must be carried out with an assistant (at the end he will need to press the brake pedal several times). You also need to have a standard set of automotive tools (wrenches) for disassembling parts of the brake system and trim, and brake fluid of the same brand (preferably). The diagram of the main brake cylinder will be suitable for those who decide to understand its operation.
Some tips
- If you start having problems with the brakes, first of all you need to carry out an external inspection of the vehicle: check the fluid level in the reservoir, make sure that the front/rear cylinders are not leaking. There should not even be stains of brake fluid in the brake hydraulics.
- “Brake fluid” must be filled with the same brand; it is recommended to completely replace the brake fluid at least once every two years.
- If faults are identified in the gas turbine engine, and it has already served for at least a year, it is more advisable to replace it completely than to repair it. The same can be said about the rear working cylinders.
- Before changing the turbocharger, the brake fluid should be removed from it; this operation is usually done using a syringe.
- Usually a leak in the master cylinder is not visible, but if there is any suspicion that this part is faulty, you should remove the main cylinder - there will be traces of leaks at the rear, and this indicates its faulty condition.
- If, during an external inspection, cracks were found on the brake hoses, it is better not to take risks and immediately replace the defective parts.
Brake master cylinder replacement process:
1. Disconnect the voltage from the battery - just remove the wire from the “–” terminal.
2. Carry out the procedure for removing the soundproofing upholstery of the engine compartment. In principle, there is nothing complicated here, the main thing is to find and unscrew all the fastening bolts, and also unfasten the clamps securing the hoses to the upholstery. Do everything carefully and don’t pull too hard.
3. From the sensor that shows the brake fluid level, you need to disconnect the plug with wires.4. Next, you need to slightly loosen the four nuts that hold the brake pipes.
5. To remove the master cylinder from the studs, you need to unscrew the two nuts that secure it to the vacuum brake booster. After removing it, you need to completely unscrew the previous four nuts securing the tubes. But before doing this, place a reservoir under the master cylinder, otherwise some brake fluid will leak out of it.
6. Now drain all the liquid from the reservoir into the new inverted cylinder.
7. Place the reservoir with bushings on the new cylinder. If you bought a new brake cylinder without a reservoir, then there is nothing to worry about; you can easily install a reservoir from the old one. But also do not forget to remove from the old cylinder the two rubber sealing bushings that secured the brake fluid reservoir. If they are worn out and cracked, then you should buy and install new bushings.
8. Now reinstall the master cylinder to the vacuum booster and tighten the two mounting nuts. Then place the empty reservoir underneath again and fill the reservoir with brake fluid. It is better to pour in the liquid of the same brand as it was, without mixing several types.
9. This is where you need the help of a second person, who will press the brake in the cockpit on command. Close the four brake pipe holes in the master cylinder with your fingers. Now the assistant should press the brake pedal smoothly and slowly until brake fluid comes out of the front cylinder holes.
10. As the liquid begins to flow, you can connect two pipes to the front holes of the master cylinder and tighten their fastening nuts. But at this time the assistant must keep the brake pedal in the clamped position.
11. Install the remaining two tubes to the rear holes in the same way: pinch them with your fingers; the assistant presses the brake pedal; As soon as the liquid flows, insert and tighten the remaining two tubes.
12. Reinstall all the parts that were removed: connect the block with wires and soundproofing padding.
13. Upon completion of assembling the car, press the brake pedal and, if it is “soft”, then you need to bleed the brake system.VAZ
Source
Signs of problems
The main brake unit breaks down under the influence of several factors. And the malfunctions that he experiences are associated with certain symptoms.
- After the driver presses the brake (pedal), the car stops extremely slowly. The reason is that the cuffs lose their sealing properties.
- To slow down the vehicle, apply strong pressure to the brake pedal. This is due to the fact that the rubber elements and fastenings swell.
- The brake pedal has an extremely short travel. This leads to the fact that the liquid inside the cylinder cannot escape anywhere. This leads to breakdowns, as well as the need to replace the unit.
- The brake pedal falls. This indicates that the brake seals are completely worn out. As a result, the liquid is forced to penetrate beyond the piston area and rush into the tank.
- The pads cannot release the brake drums and discs, and during movement they heat up. The piston is probably stuck, or the brake passage is clogged.
Replacement measures are carried out by our specialists in compliance with all safety standards and regulations. We carry out work on any makes and models of cars, including VAZ, Ford Focus 2, etc. If necessary, we can unscrew other nuts of the brake system, cylinder, hoses, and also check the condition of the brakes in general. You will be offered a personal assistant who will check the brakes, as a result, the braking system will function at its best.
We are located in the Chertanovo-Southern Administrative District, so you can get there from the north or south. Nearby is the Prazhskaya metro station and Varshavskoe highway.
Installation and repair of the main brake cylinder on a VAZ 2107 car
To slow down and completely stop the VAZ 2107, traditional liquid brakes are used: disc brakes at the front and drum brakes at the rear wheels. The main element responsible for the reliable operation of the system and timely response to pedal pressure is the master brake cylinder (abbreviated as GTZ). The total resource of the unit is 100–150 thousand km, but individual parts wear out after 20–50 thousand km. The owner of the “Seven” can diagnose the malfunction and make repairs independently.
Location and purpose of the GTZ
The master cylinder is an oblong cylinder with sockets for connecting brake circuit pipes. The element is located in the rear of the engine compartment, opposite the driver's seat. The GTZ is easy to detect by a two-section expansion tank installed above the unit and connected to it by 2 hoses.
The cylinder is secured with two M8 nuts to the flange of the vacuum brake booster. These components work in pairs - the rod coming from the pedal presses on the GTZ pistons, and the vacuum membrane enhances this pressure, making the driver’s work easier. The cylinder itself performs the following functions:
- distributes fluid over 3 working circuits - two serve the front wheels separately, the third - a pair of rear ones;
- through fluid, it transmits the force of the brake pedal to the working cylinders (RC), which compress or expand the pads on the wheel hubs;
- directs excess fluid to the expansion tank;
- returns the rod and pedal to their original position after the driver stops pressing it.
The main task of the GTZ is to transfer pressure to the pistons of the working cylinders without the slightest delay, maintaining the force and speed of pressing the pedal. After all, the car slows down in different ways - in an emergency situation, the driver presses the pedal “to the floor”, and when going around obstacles and bumps, he slows down slightly.
How does the GTZ work?
The unit includes several important elements that need to be taken into account:
- a metal housing containing holes for supplying brake fluid;
- pistons with rubber seals (2 pcs.);
- return springs in the amount of two pieces;
- guide bushings;
- end cap with gasket.
An expansion tank is attached to the top of the brake master cylinder body. Excess (we mean brake fluid) enters it through special compensation holes. And inside the element there are two cylinders equipped with separate pistons located within the same axis. In the cylinder, the blind end of the body part is closed using a plug (threaded). On the other side there is a flange that facilitates attachment to the amplifier from a vacuum.
Design and principle of operation of the unit
At first glance, the design of the master cylinder seems complex, since it consists of many small parts. A diagram and list of these elements will help you understand the device (the positions in the picture and in the list are the same):
- Die-cast metal housing for 2 working chambers.
- The washer is a retainer for the bypass fitting.
- A discharge fitting connected by a hose to the expansion tank.
- Sealing gasket of the fitting.
- Limit screw washer.
- The screw is a piston movement limiter.
- Return spring.
- Support cup.
- Compensation spring.
- Ring sealing the gap between the piston and the body - 4 pcs.
- Spacer ring.
- Piston servicing the circuit of the rear wheels;
- Intermediate washer.
- A piston operating on 2 circuits of the front wheels.
Since there are 2 chambers in the GTZ housing, each has a separate bypass fitting (item 3) and a limit screw (item 6).
At one end the cylinder body is closed with a metal plug, at the second there is a connecting flange. At the top of each chamber there are channels for connecting system pipes (screwed on threads) and discharging liquid into the expansion tank through fittings and pipes. Sealing collars (item 10) are installed in the piston grooves.
The GTZ operating algorithm looks like this:
- Initially, return springs hold the pistons near the front walls of the chambers. Moreover, the spacer rings rest against the limiting screws, the liquid from the tank fills the chambers through open channels.
- The driver presses the brake pedal and selects free play (3-6 mm), the pusher moves the first piston, the cuff closes the channel of the expansion tank.
- The working stroke begins - the front piston squeezes the liquid into the tubes and forces the second piston to move. The fluid pressure in all pipes increases equally, and the brake pads of the front and rear wheels are activated simultaneously.
When the driver releases the pedal, the springs return the pistons to their original position. If the pressure in the system rises above normal, some of the liquid will flow through the channels into the tank.
An increase in pressure to a critical level often occurs due to boiling of the liquid. While on a trip, an acquaintance of mine added counterfeit DOT 4 to the expansion tank of the “Seven”, which subsequently boiled. The result is partial brake failure and urgent repairs.
Video: illustration of the operation of the main hydraulic cylinder
Master cylinder device
The principle of operation and design of the brake master cylinder is similar to the clutch master roller, given that in many cars one mechanism performs double duty. But in many cars, there are two pistons located in the brake drum to operate the front and rear or left and right circuits, depending on the make of the car. After disassembling the brake master cylinder, you can see the following main spare parts:
1, 2 — Tank cover with gasket. 3 - Brake master cylinder reservoir. 4 - Bushings for the bypass fitting. 7 - Tank body. 10, 28 — Return springs. 12, 26 — Internal cuffs. 13, 25 - Bypass valves. 14 - Piston that activates the front brakes. 15, 16 — External cuffs of the front drive brakes. 20, 22 — Outer cuffs of the rear brake drive. 24 - Piston responsible for operating the rear brakes.
Car brake master cylinder diagram
- brake booster rod;
- retaining ring;
- primary circuit bypass hole;
- compensation hole of the primary circuit;
- first section of the tank;
- second section of the tank;
- bypass hole of the secondary circuit;
- compensation hole of the second circuit;
- return spring of the second piston;
- master cylinder body;
- cuff;
- second piston;
- cuff;
- return spring of the first piston;
- cuff;
- outer cuff;
- anther;
- first piston.
In the body of such a cylinder, two pistons (12 and 18) are placed, which are located one after the other. The second piston is freely installed, while the first piston interacts with the brake booster rod, which abuts against it. Rubber cuffs perform the functions of piston seals, which, as is already known, are located in the cylinder body. Return springs (2 pieces “9, 14”) hold and return the pistons.
Which cylinder to install if replacing?
To avoid problems during operation, it is better to find the original Togliatti-made GTZ, catalog number 21013505008. But since the VAZ 2107 family of cars has not been produced for a long time, finding this spare part becomes difficult, especially in remote regions. An alternative is products from other manufacturers that have proven themselves well on the Russian market:
Judging by the reviews of the owners of the “Seven” on thematic forums, defects most often come across among the products of the Phenox brand. Advice regarding the purchase of original spare parts: do not purchase them in markets and unverified stores; many counterfeits are sold at such points.
Defective spare parts were also found during the Soviet era. I remember an incident from childhood when my father took me to drive his first Zhiguli from a car dealership. We covered the 200 km journey all night, because the pads on the rear and front wheels spontaneously compressed and the rims became very hot. The reason was found out later - a defect in the factory master cylinder, which was replaced free of charge at the service station under warranty.
Malfunctions and methods for diagnosing a hydraulic cylinder
Checking the brake system in general and the GTZ in particular is performed when characteristic signs appear:
- the red lamp for insufficient brake fluid level came on on the instrument panel;
- the free play of the pedal has increased greatly or it openly fails;
- to slow down the car you have to press the pedal hard;
- uneven braking - the car pulls to the side when pressed sharply;
- the vehicle slows down with difficulty, the pedal presses to the floor.
The easiest way to diagnose hydraulic cylinder problems is to carefully inspect it for leaks. Usually the liquid is visible on the vacuum booster housing or on the side member under the turbocharger. If the expansion tank is intact, you need to remove and repair the master cylinder.
How to quickly and accurately identify a faulty turbocharger without checking other elements of the system:
- Using a 10 mm wrench, unscrew the brake pipes of all circuits one by one, screwing plugs in their place - M8 x 1 bolts.
- Also plug the removed ends of the tubes with caps or wooden wedges.
- Sit behind the wheel and apply the brake several times. If the hydraulic cylinder is working properly, after 2-3 pumping the chambers will be filled with liquid from the tank and the pedal will stop pressing.
On a problematic GTZ, the o-rings (cuffs) will begin to leak fluid back into the reservoir, and the pedal failures will not stop. To make sure the breakdown is complete, unscrew the 2 flange nuts of the cylinder and move it away from the vacuum booster - liquid will flow out of the hole.
It happens that the cuffs of the second chamber become limp, but the rings of the first section remain operational. Then during the diagnostic process the pedal will fall slower. Remember, a working turbocharger will not allow you to press the pedal more than 3 times and will not allow it to fail, since there is nowhere for the fluid to escape from the chambers.
GTZ malfunctions
The VAZ 2101 brake system has many parts that can fail due to wear, poor quality or untimely maintenance. The following characteristic symptoms of problems can be identified:
- slow stopping of the vehicle after pressing the brake pedal. One of the reasons is that the lip seals of the pistons have become unusable, which led to a loss of tightness;
- high pedal effort. This problem appears when the cuffs increase in size, for example, when installing a low-quality repair kit;
- The brake pedal has a short stroke. The working environment, i.e. the brake fluid, has nowhere to go due to the fact that the compensation hole is clogged. In addition, the canal may be blocked by swollen cuffs;
- The car only brakes when the pedal is pressed to the floor. This indicates a complete failure of the lip seals when the liquid goes into the tank and not into the system;
- Brake pads do not move away from the discs and drums, causing them to become hot while driving. The reason lies in the jamming of one of the pistons or the formation of a blockage in the bypass hole.
These symptoms may also appear in the event of problems with other parts of the braking system . For example, a pedal may fail if there is no fluid in one of the wheel cylinders or if air gets into the system. Therefore, for a final diagnosis, it is necessary to pay attention to additional features of the car’s behavior. For example, there are certain signs that clearly indicate problems with other components of the brake system, and not with the GTZ:
- pulling the car to the side when braking;
- jamming of the brake mechanisms on one of the wheels;
- the appearance of sounds uncharacteristic of normal brake operation (creaking, squeaking, grinding);
- heating of brake pads or discs on one wheel.
Checking the brake master cylinder
The most common cause of GTZ problems is wear of the seals. When replacing cuffs, you need to take into account that repairs only make sense if the piston and cylinder walls do not have wear. Otherwise, replacing the rubber seals will not bring any results and soon you will still have to install a new part. Before you start checking the main hydraulic brake drive, you should make sure that there are no problems with other elements of the system:
- Inspect the wheels from the inner surface to identify any leaks of brake fluid from the brake fluid brake system.
- Check the integrity of the tank and hoses connecting it to the gas turbine engine, as well as the presence of fluid and its level.
A clear sign that there is a problem with the master cylinder is the appearance of liquid on the unit body . A working mechanism should always be dry without a hint of leakage. If the hydraulic drive has lost its seal, it must be dismantled for further disassembly and repair. You can determine that the gas turbine engine bypasses fluid, i.e., it does not enter the system, but returns to the expansion tank when you press the pedal:
- Open the tank lid.
- An assistant is seated in the driver's seat. The engine does not start.
- Your partner presses the brake pedal, and you listen to the sounds coming from the reservoir.
- If gurgling is heard from the container, and the pedal is pressed lightly, it means that the liquid is entering the tank instead of the system. The malfunction lies in the wear of the seals, which are unable to create the necessary pressure in the cylinder circuits.
Repair and replacement instructions
Problems with the main hydraulic cylinder can be resolved in two ways:
- Disassembling, cleaning the unit and installing new seals from the repair kit.
- Replacement of the GTZ.
As a rule, Zhiguli owners choose the second path. The reasons are the poor quality of the new cuffs and the deterioration of the inner walls of the cylinder, which is why the malfunction recurs 2-3 weeks after replacing the rings. The probability of failure of the GTZ with parts from the repair kit is approximately 50%; in other cases, the repair ends successfully.
On my VAZ 2106, which has an identical hydraulic cylinder, I have repeatedly tried to change the cuffs in order to save money. The result is disappointing - the first time the pedal failed after 3 weeks, the second time - after 4 months. If you add up the fluid losses and the time spent, you will get a full replacement of the gas turbine engine.
Repair of GTZ VAZ 2101
There are two ways to restore the operation of the hydraulic cylinder:
- repair the old mechanism;
- install a new product.
Many car owners, when problems arise with the GTZ, simply replace it with a new one. However, there are those who prefer to save money and install a repair kit, doing the repairs themselves. The cost of such a kit is about 100 rubles.
Removal
To dismantle the mechanism you will need the following list of tools:
- open-end and ring wrenches in sizes 10, 13 and 22 mm;
- wrench for loosening brake pipes;
- small flat-tip screwdriver;
- pliers for retaining rings;
- syringe or medical bulb;
- a lot of rags.
The GTZ is removed in the following order:
- Use a syringe to pump out the liquid from the expansion tank.
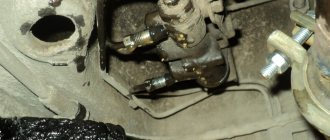
- Using a wrench, unscrew the brake pipe fittings from the hydraulic cylinder.
Disassembly
To repair the GTZ, we disassemble it as follows:
- Use a screwdriver to tighten the boot, which is located on the flange on the side of the mounting holes.
Before installing pistons with new seals, it is recommended to lubricate the inner surface of the hydraulic cylinder, as well as the cuffs themselves, with brake fluid.
Video: replacing the GTZ repair kit on a “classic”
One day I had to change the lip seals on the rear wheel cylinder because fluid started leaking from it. I purchased a repair kit in advance in the hope that the repair would not cause much trouble. Everything would be fine, but when I disassembled the cylinder, removed the old seal and tried to install a new cuff from the repair kit, it simply tore. The element looked more like a product made of fragile rubber. There were 4 seals in the repair kit and all of them turned out to be unsuitable for use. My repair ended with installing the old cuff on the piston, since the nearest store was quite far away. Surprisingly, this brake cylinder still works today without leaking fluid or replacing the seal.
Restoration of working cylinders
The feasibility of replacing the RC cuffs can only be checked during disassembly. If critical wear and other defects are discovered, there is no point in installing new seals. In practice, most drivers change the rear cylinders completely, and only the cuffs in the front calipers. The reason is obvious - the brake mechanisms of the front wheels are much more expensive than the rear wheel brakes.
Characteristic signs of a malfunction of the working cylinder are uneven braking, a decrease in the level in the expansion tank and wet spots on the inside of the hub.
To repair the DC, you will need the above tools, new o-rings and synthetic brake lubricant. The order of work when replacing the front caliper cuffs:
- Raise the desired side of the car with a jack and remove the wheel. Unlock and remove the pins and remove the pads.
- For convenience, turn the steering wheel all the way to the right or left, and use a 14 mm socket to unscrew the bolt that presses the brake circuit hose to the caliper. Plug the hole in the pipe to prevent liquid from leaking out.
It is not necessary to separate the cylinders from the body; this is done more for convenience. To lose a minimum of fluid during disassembly, use the “old-fashioned” trick: instead of the standard expansion tank plug, screw on the clutch reservoir cap, sealed with a plastic bag.
To change the rear brake seals, you will have to thoroughly disassemble the brake mechanism:
- Remove the wheel and rear brake drum by unscrewing the 2 guides with a 12 mm wrench.
If the brake fluid leaked as a result of a malfunction, clean and thoroughly wipe all parts of the brake mechanism before reassembling.
After installation, bleed off some of the liquid along with the air by pumping up the pressure in the circuit with the pedal and loosening the relief fitting. Do not forget to replenish the supply of working substance in the expansion tank.
Video: how to change rear slave cylinder seals
Bleeding the brakes
After repairing the GTZ or RTC, as well as replacing the fluid, brake hoses or pipes, the brakes need to be bled. The essence of the event is to remove air from the braking system. For this procedure you will need:
- 8 (10) mm key;
- silicone transparent tube according to the diameter of the fitting;
- capacity;
- brake fluid.
All classic Zhiguli models use DOT-3 or DOT-4 brake fluid. Its volume in the “penny” hydraulic drive system is 0.66 liters. It is more convenient to bleed the system with a partner.
You need to start pumping the brakes from the right rear wheel . The process consists of the following steps:
- We install the machine on an overpass or inspection hole.
- Unscrew the filler plug of the expansion tank and check the fluid level. If necessary, bring it to the mark on the tank.
If the brakes are pumped correctly and there is no air left in the system, the pedal should feel tight when pressed and braking should be effective.
Video: how to bleed the brake system on a “classic”
I have repeatedly had to bleed the brakes alone, because there is not always an assistant available, for example, if a breakdown occurred on the road. For such situations, I always carry an expansion tank cap with a valve from a tubeless tire in stock. To make such a simple device, just drill a hole in the lid and insert a valve into it. When it becomes necessary to bleed the brakes, I screw this cap onto the reservoir. Using a piece of hose, I connect the valve to the spare wheel, having first unscrewed the valve valve from it. This creates pressure in the tank. Then I bleed the brakes according to the above scheme, ensuring that all air leaves the system, not forgetting to control the fluid level. I bleed the clutch in a similar way.
If there is a problem with the master brake cylinder, as evidenced by characteristic signs, the part needs to be diagnosed and subsequently repaired. If the unit has severe wear, then the problem can only be solved by completely replacing it. To carry out repair work, it is not necessary to visit a service station. It is enough to prepare the necessary list of tools and materials, read the step-by-step instructions and follow them during the work.
2 1 vote
Article rating
Removing air by pumping
If during the repair process a lot of fluid leaks from the circuit and air bubbles form in the system, the repaired hydraulic cylinders will not be able to function normally. The circuit must be pumped using the instructions:
- Place a spanner and a transparent tube directed into the bottle onto the discharge fitting.
Before removing air and during the bleeding process, the tank is replenished with new fluid. A working substance filled with bubbles and poured into a bottle cannot be reused. Upon completion of the repair, check the operation of the brakes while driving.
Causes of malfunction in the GTZ device
If there is a leak in one of the circuits, the pressure between the primary and secondary cylinders is lost. This leads to the fact that the GTZ functions as if it had only one circuit. The pusher will begin to move both pistons in the good circuit until the piston of the faulty one reaches the end of the cylinder body. Accordingly, the required pressure will be ensured in the depressurized chamber. If the idle mechanism is properly adjusted, the vehicle will effectively slow down the vehicle even in conditions of its inferiority.
Here are some signs of a malfunction in the GTZ device:
- depressurization of the cylinder is determined by the presence of a leak in the body and a specific smell;
- brake pad wear is characterized by a characteristic squeak and leakage of brake fluid;
- jamming of the regulator, which distributes the brake force. In this case, it is necessary to clean the cylinder body. There is a low threshold of sensitivity of the brake pedal; it has to be literally “sunk” into the floor;
- the pedal falls to the floor - this damage occurs due to non-working pistons. If they are not able to generate the required pressure, then the pads cannot compress normally;
- An increase in the brake pedal travel is a sign that the vehicle has become airy. Operating a car in this condition is dangerous, since there is a high risk of overheating the vehicle to the point of boiling. Pumping will help eliminate this problem.
If any of the above happens constantly, we can talk about damage to the vacuum booster valve or a complete loss of tightness in the system. If the metal housing itself is damaged or there are scuffs on the piston, a complete replacement of the turbocharger is required. When the gasket wears out, all components of the repair kit (sealing collars, rubber gaskets, springs) are changed.
How to bleed the master brake cylinder? You need to unscrew the air release valve in the cylinder body and press the pedal until a perfectly uniform liquid flows out, without any air. Upon completion, the valve returns to its place and the reservoir must be refilled with liquid. The sequence of bleeding the mechanisms is as follows: 1 - rear right; 2 — front left; 3 — rear left; 4 - front right.
A common cause of malfunction of this element is loss of housing tightness and leakage of brake fluid. The defect that causes brake fluid leakage is a rear cuff leak, which can be determined by the presence of oil at the junction of the turbocharger and the vacuum booster. This may occur due to the breakdown of flexible tubes due to friction with the rotating wheel.
It’s good if, in the area where the highway passes through the arch, it is protected by a special spring that prevents the wheel from rubbing the element. If the fluid level is low, you need to check the tightness of the entire vehicle and replace the damaged tube.