VAZ-2115 dashboard diagram
The controls of the VAZ-2115 passenger car are located in accordance with the UNECE norms and regulations. For greater ease of use of handles, buttons, switches and control devices located on the dashboard, they have graphic symbols indicating their functional purpose.
Rice. 1.1 Instrument panel of the VAZ-2115 (diagram).
The dashboard diagram (Fig. 1.1) includes controls:
1 – lever-switch for headlight or turn signal modes.
2 – nozzle for blowing the front door glass.
3 – instrument cluster.
4 – steering wheel.
5 – button to turn off sound signals.
6 – button to turn off the alarm. Pressing the button causes the warning light and direction indicators to flash.
Photo 1. Hazard switch off button
7 – ignition switch combined with an anti-theft device. Never turn off the ignition or remove the key from the lock while driving, otherwise the steering will be blocked and the vehicle will lose control. The ignition key can have three positions:
- 0 – “disabled”. Consumers are disconnected, the key can be easily removed. When the key is removed, the closing mechanism of the anti-theft system is activated. To guarantee the steering shaft block, turn the steering wheel left or right until it clicks. To turn off the anti-theft device, you need to insert the key into the ignition and, turning the steering wheel left and right, turn the key to position “I”;
- I – “ignition”. The ignition is on, the key is not removed, the steering is unlocked;
- II – “starter”. The key cannot be removed, the steering is unlocked. The position is achieved by turning the key to overcome the elastic force of the spring. The key is not locked in this position; it must be held by hand for the starter to operate. The ignition switch is also equipped with a starter activation unit while the engine is running.
To repeat turning on the starter after a failed start attempt, you need to move the ignition key from position “I” to position “0”, and then again to position “II”.
8 – switch lever for windshield washer and windshield wipers.
9 – immobilizer sensor, transmits a special code from the code key through the immobilizer to the engine control unit.
10 – set of signal lights for the on-board control system. The complex contains (Fig. 1.2): 1 – oil level drop signal; 2 – low level signal in the windshield washer tank; 3 – low coolant level signal; 4 – door open signal; 5 – signal of malfunction of the brake light and side lights; 6 – signal of wear of the linings on the brake pads; 7 – the signal indicates that the seat belts are not fastened.
11 – external lighting switch.
12 – block of keys for turning off fog lights, fog lights, heated rear window.
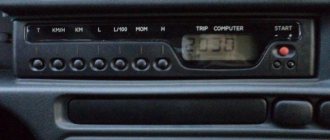
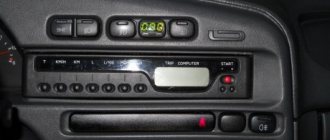
13 – trip computer, installed on some vehicles, designed to display one of the parameters: current fuel consumption (or average total fuel consumption), average speed, distance traveled, current time, time on the road.
14 – plug.
15 – control lamp for anti-lock braking system (ABS). Installed in place of the plug, if equipped with an anti-lock braking system.
16 – airbag control lamp. If the pillow itself is present, it is installed in place of the plug.
17 – central nozzles of the ventilation and heating systems of the cabin.
18 – cover of the glove box (upper). To use the upper glove compartment while the lower glove compartment lid is open, press the upper lid lock lever. The lock lever is located in the niche of the lower glove compartment on top.
19 – side nozzle of the ventilation and heating systems of the cabin.
20 – glove box cover (lower). To open it, you need to press the lock handle to the handle. If the external lighting is turned on, a special illumination of the inside of the box will automatically work.
21 – magazine shelf.
22 – control panel for interior ventilation and heating systems.
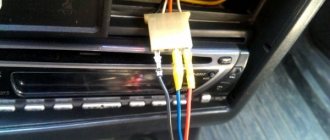
23 – socket for audio equipment. It is planned to install audio equipment that meets international standards in size and mounting principle.
24 – ashtray.
Watch a video of testing the dashboard of a VAZ-2115 passenger car here:
How to remove the dashboard of a VAZ-2115
If you decide to remove the instrument panel and carry out independent tuning or DIY repairs, you will need:
1. — Disconnect the ground wire from the battery.
2. — Remove the fastening screws to remove the steering shaft casing.
3. — After disconnecting the wires, remove the ignition switch.
4. — Remove the handles from the heater control levers
5. — Remove the headlight hydraulic adjustment handle.
Rice. 2.1 Instrument panel and its elements: 1 – instrument panel; 2 – dashboard trim; 3 – bracket; 4 – plug; 5 – ashtray; 6 – right cross member; 7 – right console screen; 8 – instrument panel; 9 – central bracket; 10 – left console screen; 11 – left cross member.
6. Remove the screws and disconnect the right 7 and left 10 screens from the instrument panel panel 8 (see Fig. 2.1).
7. Unscrew the screws securing the instrument cluster.
8. Unscrew the screws connecting the right cross member 6 to the dashboard panel 8.
9. Remove plug 4 and unscrew the screw securing the instrument panel panel 8.
10. Remove the instrument panel 8 as an assembly with switches for instrument lighting, fog lights, rear window heating, hazard warning lights and the cigarette lighter.
11. Disconnect all electrical wires.
12. To remove panel 1 assembled with trim 2, remove the screws securing the instrument panel to bracket 3 and left cross member 11.
13. If necessary, you can remove the screws and remove the dashboard trim, as well as the interior ventilation nozzles and air ducts.
Installation of the dashboard is carried out in the reverse order.
Operating principle of the on-board computer
Cars such as the VAZ-2109 were equipped with devices that acted as routers. Let us remember that these were carburetor cars. But the VAZ-2114 and 2115 began to be equipped with injection power plants, which required the use of a completely different type of device.
Therefore, the main functions of the on-board computer on these cars are diagnostics, as well as control of the operation of almost all vehicle systems.
The principle of operation of the on-board computer on the VAZ-2115 is as follows:
Which bulbs are suitable for the 2114th model
In general, the current legislation provides for quite serious sanctions against motorists who dare to make any changes to the design of the vehicle at their own discretion. In accordance with the rules, they are obliged to replace components and assemblies only with analogues of those chosen by the manufacturer. Failure to comply with this requirement provides grounds for punishment of the driver.
Thus, more and more owners are installing LED lamps on their 2114 Ladas instead of the standard halogen ones. This choice is easy to justify. In particular, they:
- consume approximately 8-9 times less electricity, which means the load on the on-board power system is reduced;
- last 5-10 times longer;
- give brighter light;
- practically do not heat up.
Finally, the dashboard looks much more attractive, because the light bulbs can be of different colors - blue, red, green, etc.
The problem is that LEDs cost about twice as much, but this disadvantage is more than compensated by their longer lifespan. In addition, LED lamps are becoming cheaper every year.
Brief instructions for operating the on-board computer
There is no need to memorize all kinds of error codes. It’s best to simply find the designations of all the errors on the Internet, where, by the way, they are freely available, print them out on a piece of paper and carry them with you in the car all the time. And when you see a particular error code on the computer information board, it won’t take you much time to understand what exactly it means, you just need to look at the previously printed list.
By the way, it often happens that the on-board computer issues a danger signal for absolutely no reason. The reason for this may be the on-board computer processor or some sensor that is not working correctly. Remember, no one is immune from electronic errors. Nevertheless, in the vast majority of cases, the VAZ-2115 on-board computer works quite correctly.
We present to your attention the most common error codes with their interpretation:
If the numbers 4, 6 or 8 appear on the car’s on-board computer while driving, you should immediately stop, fix the problem and only then continue driving. But after this you will need to reboot the processor. The error can be reset by simply holding down the daily mileage key for a few seconds.
Purchase and installation of a new dashboard
The popularity of this method of interior tuning is quite high, which determined the appearance of quite a large number of purchased dashboards. You can find them both in specialized stores and on the Internet.
The features of this tuning method include:
1. There are a large number of dashboards of different designs and capabilities on sale. An example is the installation of a panel that has a built-in screen or electronic dial. When choosing, it is worth considering that unusual versions with additional functions will be quite difficult to install, since you will have to upgrade the wiring. For example, it is not advisable to purchase a model with a screen in this case due to the fact that the car does not have electronic sensors that would display information on the monitor.
2. The process of installing the dashboard, which has all the standard scales, is quite simple. You can carry out the procedure for dismantling the old dashboard and installing and connecting a new one yourself if you have the most common tools.
3. The design of purchased dashboards can be very diverse, which makes the tuning method in question the most attractive.
The only drawback of this method of changing the interior of a vehicle is that the cost of instrument panels can be quite high.
Sidebar: Important: When choosing, you should pay attention only to high-quality options, since cheap ones may not last long: backlight burnout, incorrect readings and other problems will appear gradually.
What to do if the on-board computer on the VAZ-2115 stops working
Of course, you can try to fix the problem yourself. But it’s still much better if a real specialist does this. It is he who will be able to reliably determine the cause of the device malfunction.
But before going to the service center, the first thing to do is check fuse F3, which could simply have blown. It is installed in the power supply circuit of the VAZ-2115 processor. If, after replacing the fuse, the on-board computer still shows no signs of life, you can also check the connectors connected to it. We repeat that if you are not an electrician, and generally do not have much knowledge of electronics, this task should be entrusted to a professional.
Remember, any malfunction that the on-board computer shows can be eliminated, just like a breakdown of the on-board computer itself. But, as they say, it is better to prevent a problem than to solve it later. Therefore, each car should be kept in good condition, undergo technical inspection on time and replace spare parts that are out of order. Among other things, it is better not to allow spare parts to break at all, but to replace them as they wear out. Only in this case will driving the car be safe from a technical point of view, and during the trip there will be no emergency situations associated with improper operation of the car.
The serviceability of your car is a guarantee of the safety of both the driver and passengers.
Source
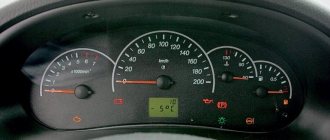
Designation of icons on the dashboard of the VAZ 2115
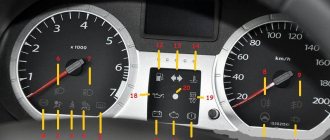
The following describes the warning lights and panel indications, which are indicated and numbered in the photo above.
| Number in order | Decoding |
| 3/4 | Turn signal indicators. They light up at the same time when the alarm is activated. |
| 7 | Minimum fuel level light. Lights up when the gas tank is empty. |
| 8 | Indicator for turning on external lighting. |
| 9 | The brake system is faulty. The brake fluid level and pad wear should be checked. |
| 10 | The high beam headlights are activated. |
| 12/15 | Information displays, basic information about the daily time and mileage is displayed here. |
| 13 | Emergency light activation key. |
| 14 | Check engine light. If it lights up, further movement is not recommended. |
| 16 | The battery is low. The operation of the generator should be checked. |
| 17 | The indication indicates that the handbrake lever is raised. |
| 18 | The warning light means that the engine oil pressure has dropped below normal. |
| 19 | This indicator is used exclusively on carburetor cars. The light indicates that the throttle valve is in the open position. |
Tidy 2115: description and purpose of buttons and knobs
If everything is simple with the levers on the steering rack, there is a headlight position switch and a turn signal switch on the left. Buttons are more difficult.
Lada 2115: the oil light on the center panel is on
If an icon in the shape of a watering can appears on the console, this indicates that there are problems in the engine lubrication system. This is caused by a drop in the oil level in the crankcase or a pump malfunction. If the engine is old, the problem may be caused by clogged oil lines.
What does the exclamation mark on the Lada 2115 tidy mean?
On the "tag" the symbol is used in only one form - a red indicator in a circle. The icon indicates a malfunction in the vehicle's brake system. If this symbol lights up while driving, stop and find the cause of the breakdown. Usually it is enough to add fluid to the expansion tank or replace worn pads.
The battery light on the dash is on 2115
A red battery icon indicates that the battery is not charging properly. A complete diagnosis of on-board systems associated with the generator set and its wiring is required.
What do the tidy indicators do?
Diagram of the VAZ 2115 dashboard The control panel on the VAZ 2115 is located in the center console directly in front of the driver.
Descriptions of instrument cluster symbols are given below:
- Coolant temperature sensor, if the controller arrow moves into the red zone, this indicates that the power unit is overheating.
- A tachometer informs the driver about the crankshaft rotation speed; if the arrow falls into the red zone, it is necessary to reduce the engine speed.
- Left turn signal.
- Right turn signal.
- A speedometer that tells you how fast a vehicle is moving.
- Fuel level sensor in the tank.
- The light indicator, made in the form of a gas pump on the instrument panel of a VAZ, usually lights up if no more than 7 liters of fuel remain in the gas tank.
- Optics indicator, activated when the side lights are turned on.
- In accordance with the instructions, an indicator in the form of an exclamation mark lights up on the instrument panel if the brake fluid level has dropped and reached a minimum.
- High beam activation indicator light.
- This is a button designed to reset the daily mileage on the odometer and set the clock.
- An odometer that records the mileage of a vehicle.
- Light alarm, when turned on, this indicator will blink.
- On the VAZ 2115, the icon scheme includes one important indicator - Check Engine. This symbol always flashes when the engine starts, but disappears after it starts. The indicator may appear if the control unit detects certain problems in the operation of the power unit.
- The display showing the outside temperature and time is switched using button 11.
- The battery icon appears when the ignition is turned on; if it is constantly on, then most likely the on-board computer has detected problems related to the battery charge. But if it occurs, the problem may also be caused by a malfunction of the generator, loosening of the strap, or breakdown of the unit.
- The letter P in a circle - the indicator appears when the car is setting the parking brake.
- This symbol lights up when the engine fluid pressure is too low.
- Reserve indicator (the author of the video about tuning the control panel at home is the Studio Pandora channel).
Description of faults
| Serial number | Decoding |
| 1 | There are problems with the ECU. |
| 2 | The fuel level sensor is providing incorrect data. |
| 4/8 | There are problems with the machine's power supply. |
| 12 | The error lamp circuit is faulty. |
| 13 | Lambda probe – power supply circuit open. |
| 14/15 | Temperature sensor incorrect signal. |
| 16/17 | There is a short circuit in the on-board network. |
| 19 | DPKV incorrect data. At the same time, the car often does not start. |
| 21/22 | Typical TPS errors. Cleaning the damper is usually sufficient. |
| 23/25 | The intake air temperature meter has failed or is stuck. |
| 24 | Speed sensor is broken. |
| 27/28 | DC is faulty. |
| 33/34 | The air flow meter is not working properly. |
| 35 | The idle speed control sensor is faulty. |
| 42 | The ignition system circuits are broken or not working correctly. |
| 43 | The knock sensor is damaged. |
| 44/45 | The composition of the fuel mixture is incorrect. |
| 51/52 | ECU memory module errors, |
| 53 | CO2 setting sensor error. |
| 54 | The octane corrector is faulty. |
| 55 | The composition of the fuel mixture is incorrect. |
| 61 | The oxygen sensor has failed. |
Tidy 2115 stopped working
Occurs after power surges or moisture getting under the panel (condensation). If the device has completely failed, but other elements of the car are working, check the fuse and wiring of the element.
When only part of the panel does not show or the board lighting has failed, perform diagnostics of the illuminators and their contact groups.
Tidy does not light up
If the backlight does not function, as well as the dimensions on the left side of the car, check the corresponding fuse. When the insert is working properly, you will need to diagnose the mounting block for voltage.
Panel 2115 blinks
It happens when the device does not work correctly. The backlight blinks and the elements constantly jump. There are problems with contacts here. The pads may become loose or oxidized.
The solution to the problem is to clean the contacts from oxidation and tighten/replace the pads.
The temperature sensor on the device 2115 does not work
The solution lies in diagnosing the system and correcting breakdowns.
The arrows on the dashboard 2115 do not work
The fault lies with the blown fuse F3. Before replacing it, be sure to diagnose the wiring and eliminate problems and possible short circuits.
Sensors, their purposes and malfunctions
Let's now talk in more detail about each of the sensors, let's look at where they are and what they look like.
Idle speed (IAC)
The device is located in the throttle assembly. It is a small induction coil with a needle inside. Depending on the controller readings, one or another voltage is applied to the coil winding and the needle extends a certain distance into the throttle pipe, regulating the air supply. With this, the idle speed is adjusted.
There is no indicator responsible for this sensor. Therefore, if this node fails, then this can be understood by the following “symptoms”:
- The engine stalls at idle or when changing speed;
- “Floating”, unstable idle speed;
- When turning on a cold engine, there is no increased speed.
To replace the sensor, you must turn off the power to the machine's wiring, completely disconnect the throttle assembly, and then remove the sensor from it, after first disconnecting the terminals that supply electricity to it. In place of the old sensor, you need to install a new device and place the throttle assembly in place.
Detonation (DD)
The knock sensor is located between the cylinders on a car engine and reacts when the fuel detonates inside the cylinder. In essence, it is a piezoelectric element. When gasoline detonates, the sensor converts the resulting vibrations into electricity. Current is supplied to the on-board computer and signals a fuel explosion. After this, the ignition timing is automatically adjusted.
If this type of sensor breaks down, the fuel begins to detonate in the engine. To check the device for functionality, you need to disconnect it using a key from its mounting location, connect it to a voltmeter and knock on it. If voltage was applied to the voltmeter, then the unit is working; if not, it is faulty.
To replace a device, you need to unscrew it from the seat using a key, disconnect the terminals from it and install a new device.
Oxygen (Lambda probe)
The oxygen sensor, also known as a lambda probe, is installed on the exhaust pipe close to the cylinders. It measures the amount of oxygen contained in exhaust gases and the environment. It only works when the engine is on, as it must be heated to function. When oxygen molecules hit the sensor, electricity is generated, which is supplied to the control unit. The on-board computer, based on sensor readings, regulates the supply of oxygen to the engine cylinders.
If the sensor fails, the following consequences occur:
- Unstable gasoline consumption: sometimes more, sometimes less;
- “Walking” speed at idle;
- A sharp drop in power when accelerating.
In order to replace this sensor, you need to turn off the power to the car, disconnect the wires going to the device, unscrew it with a key, and then put a new one in its place.
Crankshaft position (CPCV)
This sensor regulates the ignition of the combustible mixture in the cylinders depending on the position of the crankshaft. This position is determined by reading electromagnetic pulses from the toothed pulley of the electric generator. The sensor itself is located in close proximity to it.
Crankshaft position sensor
Symptoms of device failure may include:
- Idle speed instability;
- “Floating” speed;
- Power drop;
- Problems when turning on the engine.
At home, the performance of the sensor can be tested using a multimeter in ohmmeter mode. The resistance at the device contacts should be from 500 to 700 Ohms. If it differs greatly from these values, the sensor is faulty.
To replace the sensor, you need to turn off the power to the car's wiring, disconnect the battery, disconnect the electrical contacts from the device, and then unscrew the mounting bolt, remove the sensor and install a new one.
Camshaft position (CPRV)
This sensor, called DPRV for short, reads data from the camshaft. This happens with the help of a special gear installed on the shaft, on which two teeth are missing. This sensor is needed to adjust the ignition angle by the car’s on-board computer.
Camshaft position sensor
If this device breaks down, idling becomes unstable and the engine's fuel consumption increases.
Purpose of VAZ 2114 devices and interpretation of the symbols on them
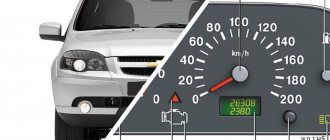
Located on the left side of the dashboard, directly in front of the driver's seat, the VAZ 2114 instrument cluster plays an important role in driving. It contains pointer instruments, VAZ 2114 indicators with electronic digital windows and signal lights for various purposes.
The numbers on the scale indicate:
The graphic symbol of a gas station at the top of the device indicates a fully filled tank. At the bottom right, an indicator in the form of a gas pump lights up in orange, indicating that the remainder in the tank is less than six liters.
Designation of light bulbs and indicators on the instrument panel of the VAZ 2114
The dashboard, by definition, is designed to contain instruments, indicators and switches that could inform the driver about the current state of various vehicle systems, signal an emergency during the operation of the car or the failure of any units, as well as using buttons and switches control individual equipment or mechanisms.
The designation of icons on the instrument panel of the VAZ 2114 is made in accordance with all requirements and standards that call for the unification of symbols so that they are absolutely clear to every driver. The symbols on the instrument panel of a VAZ 2114 with the latest injection engine are located mainly in the lower part of the instrument cluster:
Indicators VAZ 2114
1 - the icon of the light indicating that the oil level in the engine crankcase has dropped below the minimum level, lights up in red;
2 - this light indicates an insufficient level of washer fluid; it lights up orange when the remainder in the tank is less than one liter;
3 - this icon, lighting up in orange, indicates a decrease in the coolant level in the expansion tank with a cold engine below the permissible level;
4 — warning light icon for unlocked doors, lights up red;
5 — fault indicator for “brake lights” or dimensions;
6 - this is a warning light for a malfunction in the brake system, indicating that the brake pads are worn out;
7 - light bulb icon that indicates unfastened seat belts.
On earlier versions of the car, the designation of the light bulbs on the dashboard of the VAZ 2114 in the lower part is slightly different, when viewed from left to right:
Designation of icons on the instrument panel of the VAZ 2114
In addition, car enthusiasts should know what the lights on the VAZ 2114 instrument panel mean, indicating the performance of the lighting equipment or the condition of the engine:
Car diagnostics
The appearance of a lit “Check Engine” lamp on the instrument cluster signals the driver that a problem has arisen in the vehicle’s electrical system. You need to understand that checking the vehicle yourself and at a service station can give different results. Special equipment available to professionals will allow more accurate detection of faults.
Self-diagnosis
On a VAZ 2115, the owner can do independent diagnostics and find out what errors are stored in the memory of the engine control unit. The procedure is carried out by calling up fault codes on the dashboard or using a diagnostic adapter.
To carry out diagnostics on the electronic instrument panel, you must perform a certain sequence of actions:
- Sit in the driver's seat of the car, insert the key into the ignition and press the daily mileage reset button located on the instrument cluster.
- Turn the lock key to the ignition switch position.
- Release the key, starting the self-diagnosis process. Visually, this will look like turning on the backlight, all signal lamps, possible symbols on the LCD screens and testing the instruments (the arrows will move across the entire scale in both directions).
- Press the key again and release. The second press displays the software version of the instrument cluster on the screen located under the speedometer (inscription like Uer x. x).
- Press the key again, after which the errors in the memory will be displayed on the screen.
Instrument cluster VAZ 2115, the button is located on the right side of the speedometer
We recommend: Lifan X60
The driver can perform self-diagnosis on the electromechanical panel and the “January-4” control unit according to the following sequence:
- Turn off the ignition.
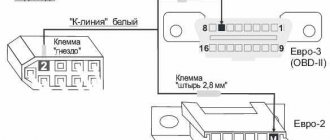
- Open the diagnostic connector cover located on the center console.
- Connect contact B to the negative terminal of the battery (to the body). Contact A, connected to the engine crankcase, is suitable for this.
- Turn on the ignition. The “Check Engine” lamp will flash code 12, which means the diagnosis has begun. The light signals are given as follows - a long flash, then a pause (about 2 seconds), two short flashes, a long pause (about 3 seconds). Signal 12 is sent three times. If there is no signal, the diagnostic system is inactive or faulty. After this, the Check Engine light will flash and list the errors in memory. Each code is repeated three times. If there are no errors in the memory, code 12 will continue to be transmitted.
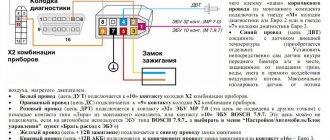
Electromechanical instrument cluster Pinout of diagnostic connector
To read controller errors, a special K-Line adapter is used, which is connected to the diagnostic connector using a connector. This connector is located on the center console behind a plastic plug (below the cigarette lighter and ashtray). The adapter has a cord with a USB connector at the end that connects to any laptop. A special program for reading and resetting errors must be installed on the device (OpenDiagFree version 1.4 or 1.6).
The procedure for reading errors is quite simple, you need to:
- Check the level of process fluids.
- Open the connector cover and turn on the ignition.
- Connect the adapter or scanner to the diagnostic socket.
- Launch the software on the laptop.
- View available errors in the program dialog box.
- Decrypt the codes using the program interface or decryption table.
- Eliminate the causes of malfunctions and re-diagnostics.
Identification of buttons
It is also important to know the designation of the buttons on the VAZ 2114 panel. On the instrument cluster on the right side there is a button (11), with which the time and temperature on the digital indicator are switched, and when pressed for 5 seconds or more, the current mileage is reset, if pressed this button on a stationary car.
In the central part of the dashboard are located in a row:
Double headlight switch. Button 1 turns on the dimensions, button 2 turns on the low beam;
Buttons on VAZ 2114
Key switch block. The first 1 turns on the front fog lights, the second 2 turns on the rear fog lights and the third 3 turns on the heated rear window.
Source
Instrument panel VAZ 2114, 2115
It is not surprising that absolutely every modern car is equipped with a dashboard, because it is thanks to it that the driver can monitor the main features of the car. And the instrument panel of the VAZ 2114, 2115 is no exception. Simply put, such a panel plays the role of a link between a person and a vehicle.
As it developed, the dashboard was equipped with additional sensors and indicators that make driving a car more convenient and safe. If you want to know what elements are on the dashboard of the VAZ 2114, 2115, then be sure to read this article.
Removal and modification guide
Instrument panel VAZ 2114: description of symbols
If indicators appear while driving, this does not always indicate a malfunction of the components. Perhaps the problem is simply a malfunction of the sensor responsible for the operation of the unit. Or the problem may be a broken wiring or bad connector contacts. Therefore, there is no need to panic right away. The video below shows the result of tuning the “tens” control panel. The author of the video, proVAZ-2110, planned to make the tuning in such a way that the color of the speedometer and other sensors would be white, but he did not take into account that the plastic on the dashboard was originally yellow. Accordingly, the author of the video was not pleased with the end result.
https://youtube.com/watch?v=S8vaatJ0Ugk
Often car enthusiasts decide to do this to improve the appearance of the car's interior. To do this, you can simply remove the panel trim and simply remove the regular bulbs. By installing LEDs instead. Such a control panel will enhance the brightness of the indicators. If necessary, you can install a more modern europanel, which will transform the interior of the “tens”. If you just want to tune the control panel, you can install a new trim on it.
To do this you will need:
- First, turn off the power to the vehicle's on-board network. To do this, disconnect the negative cable from the battery.
- Next, it is dismantled; for this, all the necessary bolts are unscrewed.
- The next step is to remove the control panel fastenings to the trim. Having done this, you can remove the control panel itself from the socket. After these steps, you can dismantle the glass mask.
- Then all the pads that lead to the panel are turned off.
- Now install a new trim on 2110. If necessary, install LEDs instead of conventional light bulbs. Further assembly is carried out in reverse order.
You should always be careful when working with electricity. If you damage even one wire when removing or installing the dashboard, this can lead to dire consequences, including non-functioning devices on the dashboard. For example, owners of “ten” cars are often faced with the problem of the speedometer not working, which is usually associated with the wiring. Therefore, always be careful when working with the dashboard. In addition, after disassembling the instrument panel, or rather removing the arrows, there is a possibility of displaying distorted readings.
Loading …
Designations of light bulbs, indicators, icons and buttons on the instrument panel of VAZ 2114, 2115
First, let's look at the descriptions and meaning of the panel icons and buttons, regardless of whether the car is equipped with an injector or a carburetor.
1 — A control sensor that measures the temperature of the coolant in the engine cooling system. During normal operation of the power unit, the antifreeze temperature should not exceed 90 degrees. But minimal deviations are sometimes acceptable. If you notice that the engine begins to overheat frequently, be sure to contact a car service center for help. Sometimes the sensor itself may give incorrect results.
2 — A device such as a tachometer processes information that comes from the crankshaft and displays it on the panel. The tachometer readings indicate the number of engine revolutions.
3,4 — Turn indicators. If the indicators flash simultaneously, but slowly, this may indicate a possible problem with the bulbs themselves or in the electrical wiring network.
Basic panel elements
The main place on the dashboard is reserved for the tachometer and speedometer, the fuel quantity sensor and the current fluid temperature in the cooling system. Let's look at the main symbols on the VAZ 2114 panel in more detail.
The VAZ 2114 tachometer is a pointer device, the signal to which is sent by the on-board computer of the fourteenth. The tachometer displays data on the number of revolutions of the crankshaft at the current time. The tachometer is divided by scales into 5 units, every second of which is digitized. The maximum numerical value of revolutions is 80.
To find out the actual engine speed when the car is moving, the tachometer indicator must be multiplied by 100. For example, if the arrow is located at 40, then the crankshaft is performing 4000 revolutions per minute.
The manufacturer has indicated a critical speed value, upon reaching which the engine of the fourteenth may fail due to excessive load. It is highlighted on the device with red shading; this value ranges from 6000 to 8000 rpm.
Under the tachometer there is an electronic window, which displays data about the current time and ambient air temperature.
The fourteenth has an induction dial speedometer, which is located on the right side of the dashboard. The speedometer is also divided into sectors, the division size is 10 kilometers. The maximum mark is 200 km.
Instrument panel lighting for VAZ 2114, 2115. Diagnostics, repair.
The instrument panel is a rather complex unit, and accordingly it can fail, like any other part of the car. The panel often does not work or stops lighting.
What are the main problems that can be observed with a faulty dashboard of the VAZ 2114, 2115:
1. The main illumination of the PP has disappeared, but the remaining sensors continue to work or vice versa. Most often, this problem occurs when the panel fuses fail. They are marked F16. In addition to illuminating the panel, such a fuse is also responsible for the turn signals, as well as the hazard warning lights, and the reversing lights. If the hazard lights and turn signals work normally, then most likely the problem is in the electrical circuit, or a short circuit may have occurred.
The video below shows how to fix the dashboard backlight:
2. The speedometer and tachometer are not working properly. In this case, it is first recommended to check the crankshaft position sensors, as well as speed sensors. If these sensors work correctly, then the problem may be poor electrical contact or damage to the wiring itself.
3. If some sensors do not work, but other elements work correctly, then the light bulbs may have failed. In this case, you just need to replace them with new ones.
4. If the arrow indicating the fuel level in the tank or the coolant level has dropped to the very bottom, or vice versa is always in the upper position, then most likely the problem is in the sensors or electrical circuit. There is no need to rush to replace sensors. First check the wiring to see if it is working properly and if there is any short circuit. In this case, it is best to turn to professionals.
5. It often happens that in general the dashboard works normally, but from time to time there are interruptions in the operation of some sensors. Often the cause is in the electrical circuit. The reason may also be due to incorrect operation of the processor.
Why do light bulbs fail?
How to remove the instrument panel on a VAZ 2114
The main reason for the relatively quick burnout is rather difficult operating conditions. Reduce resource:
- voltage fluctuations;
- vibration;
- overheating (in a closed space of the instrument panel this is normal).
In addition, filaments have a short service life of only 1500 hours.
In addition, lamps may stop working due to:
- wiring damage;
- destruction of board tracks;
- contact oxidation;
- blown fuses due to short circuit, etc.
For this reason, before replacing a light bulb in a Lada 2114, it is advisable to find out why it stopped working. Until the root cause is identified, the situation cannot be corrected.