Types of ignition systems VAZ 2107
The evolution of the VAZ 2107 has transformed the ignition system of this car from an unreliable mechanical design into a modern computer-controlled electronic system. Changes occurred in three main stages.
Contact ignition of carburetor engines
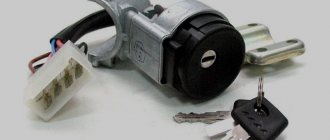
The first modifications of the VAZ 2107 were equipped with a contact-type ignition system. This system worked as follows. The voltage from the battery was supplied through the ignition switch to a transformer (coil), where it increased several thousand times, and then to a distributor, which distributed it among the spark plugs. Since voltage was pulsed to the spark plugs, a mechanical breaker located in the distributor housing was used to close and open the circuit. The breaker was subjected to constant mechanical and electrical stress, and it often had to be adjusted by setting the gaps between the contacts. The contact group of the device had a short resource, so it had to be changed every 20–30 thousand kilometers. However, despite the unreliability of the design, cars with this type of ignition can still be found today.
Contactless ignition of carburetor engines
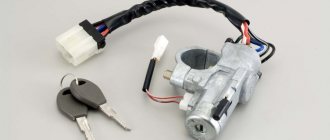
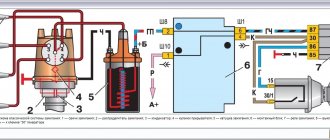
Since the beginning of the 90s, a contactless ignition system was installed on carburetor VAZ 2107, where the breaker was replaced with a Hall sensor and an electronic switch. The sensor is located inside the ignition distributor housing. It reacts to the rotation of the crankshaft and sends a corresponding signal to the switching unit. The latter, based on the data received, supplies (interrupts the supply) voltage from the battery to the coil. Then the voltage returns to the distributor, is distributed and goes to the spark plugs.
Contactless ignition of injection engines
The latest VAZ 2107 models are equipped with electronically controlled injection engines. The ignition system in this case does not provide any mechanical devices at all, not even a distributor. In addition, there is no coil or commutator as such. The functions of all these components are performed by one device - the ignition module.
The operation of the module, as well as the operation of the entire engine, is controlled by the controller. The principle of operation of such an ignition system is as follows: the controller supplies voltage to the module. The latter converts the voltage and distributes it among the cylinders.
Instructions for installing a contactless system on the seven
Manipulations for converting the ignition system on a VAZ 2107 from contact to contactless are carried out according to the following principle:
- First, you should turn off the power to the car by disconnecting the minus terminal from the battery.
- Disconnect the armor wires from the spark plugs.
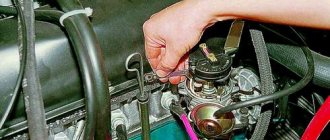
- The spark plugs are unscrewed, after which the crankshaft should be turned with a key set to “36”. This is done in order to set the piston of the 1st cylinder to TDC. To determine that the piston has reached top dead center, use a screwdriver. The notch on the crankshaft pulley must be on the cylinder block.
- The steel latches of the switchgear cover must be snapped off and then removed along with the wires.
- A mark must be placed on the engine valve cover next to the moving contact of the slider.
- All wires are disconnected from the distributor along with a thin tube connecting the device to the carburetor fitting.
- Using a wrench, you need to loosen and unscrew the nut, which is used to press the distributor skirt to the BC.
- The old distributor must be removed, and at the same time pay attention to the gasket so as not to lose it.
- The wires from the coil are disconnected, remembering their locations. The coil mount is unscrewed and the device is dismantled.
- The next step is to install the mounting block.
- Make holes to secure the switch.
- The cover is removed from the new distributor and the gasket is installed. The distributor must be placed in the mounting hole of the cylinder block, and this should be done so that the moving contact is located at the level with the top dead center, which is drawn on the valve cover (the slider should point in the same direction as on the old distributor).
- The distributor skirt is fixed.
- The coil is placed in place of the old device, and terminals with wires from the ignition switch, as well as the tachometer and switch are connected to it.
- The wire from the EB of the first contact must be connected to the coil terminal marked “K”.
- The wire from the fourth contact is connected to terminal “B”.
- The spark plugs are screwed into place, after which the armored wires and the wire suitable for the coil can be connected.
- At the final stage, all that remains is to attach the vacuum tube and proceed to the stage of adjusting the ignition.
This is interesting: Typical thermostat malfunctions and replacement on a 406 divigator
At this point, the installation of electronic ignition on the VAZ 2107 is completed, and before testing the device, you will need to make preliminary adjustments.
Distributor
The sequence of work that must be performed in order to install a set of new parts on a VAZ 2107 does not make much difference. Therefore, we can start by replacing the distributor. Remove the distributor cover to access the slider. To simplify the task of further adjusting the BSZ, you should immediately perform some preparatory measures: installing the distributor slider in a position that will be easy to repeat when installing a new distributor; mark on the block opposite the middle mark on the distributor scale, which is used to adjust the ignition.
Using a 13mm wrench, completely unscrew the nut securing the distributor and then remove it. Disconnect the high voltage wire connecting the ignition coil and the distributor. We install a new non-contact sensor distributor, and you need to set the slider so that it matches the position of the old one. The body of the new distributor needs to be aligned according to the marks, the middle one opposite the one previously left on the engine body. We put on the distributor cover and a set of high voltage wires.
Coil
Next, you need to replace the ignition coil. Using a size 8 wrench, unscrew the nuts securing the wires to the coil contacts. Using a 10mm wrench, unscrew the mount of the coil to the body. Installing a new coil requires special attention - you should take into account the possible discrepancy between the locations of contacts “B” and “K”. For convenience, you can rotate the new electronic coil relative to the fastener, thereby placing the contacts in the same way as on the old one.
Having secured the coil, we connect old wires to its contacts (usually one blue, the other brown), and new ones, with connectors for connecting to the distributor and switch. They usually have the same colors as the standard ones. Typically, in a VAZ 2107, brown wires are connected to contact “K”, and blue wires are connected to “B”. It remains to connect the high-voltage wire that connects the coil and the distributor.
Switch
The last element in the circuit, the presence of which is required by a contactless electronic ignition system, is a switch. The ideal place in which it can be installed in a VAZ 2107 is between the washer reservoir and the left headlight. There is a flat area on which we will install the switch, with the radiator facing the body. Having leaned the switch, we mark the places for drilling holes in the body, through which we fasten it with self-tapping screws; in this case, you need to screw the black (neutral) wire from the connection block under one of the screws.
After completing all the work described above, you should once again carefully check the connection of the wires according to the circuit diagram. If everything is done correctly, you can try to start the engine. Usually there are no problems with this; all that remains is to adjust the ignition to ensure the most efficient operation of the engine.
Checking correct ignition
After completing the steps, it is necessary to check the operation of the ignition system.
To do this you need:
- start the car and drive off;
- Accelerate the car to 50 kilometers per hour, engage fourth gear and sharply press the accelerator pedal. Then, engine detonation will appear, which will decrease (and then disappear altogether) as the speed of the car increases.
There can be two types of problems:
- Engine detonation occurred, but did not disappear as the vehicle speed increased (it is assumed that the ignition was turned on earlier ). In this situation, the switchgear must be turned half or one division to the right.
- Detonation did not occur at all - ignition was delayed . To eliminate this problem, you need to turn the switchgear half or one division to the left .
As you can see, setting the ignition on the VAZ 2101 is quite simple. However, if difficulties or additional questions arise, it is better to contact certified car services for advice.
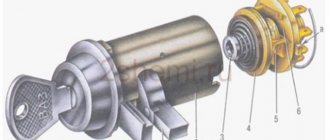
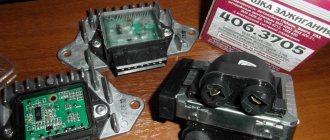
Ignition module
The ignition module is a device designed to convert DC voltage from the on-board network into electronic high-voltage pulses with their subsequent distribution among the cylinders in a certain order.
Design and operating principle
The design of the device includes two two-terminal ignition coils (transformers) and two high-voltage switches. The voltage supply to the primary windings of the transformer is controlled by the controller based on the information received from the sensors.
In the ignition system of an injection engine, voltage distribution is carried out according to the idle spark principle, which provides for the pairwise division of cylinders (1–4 and 2–3). A spark is formed simultaneously in two cylinders - in the cylinder in which the compression stroke is coming to an end (working spark), and in the cylinder where the exhaust stroke begins (idle spark). In the first cylinder, the fuel-air mixture ignites, but in the fourth, where the gases burn out, nothing happens. After turning the crankshaft half a turn (180 0), the second pair of cylinders enters the process. Since the controller receives information about the exact position of the crankshaft from a special sensor, problems with sparking and its order do not arise.
Location of the ignition module VAZ 2107
The ignition module is located on the front side of the cylinder block above the oil filter. It is secured to a specially designed metal bracket using four screws. It can be identified by the high-voltage wires coming out of the housing.
Factory designations and characteristics
VAZ 2107 ignition modules have catalog number 2111–3705010. As an alternative, consider products numbered 2112–3705010, 55.3705, 042.3705, 46.01. 3705, 21.12370–5010. They all have approximately the same characteristics, but when purchasing a module you should pay attention to the engine size for which it is intended.
Table: technical characteristics of the ignition module 2111–3705010
| Name | Index |
| Length, mm | 110 |
| Width, mm | 117 |
| Height, mm | 70 |
| Weight, g | 1320 |
| Rated voltage, V | 12 |
| Primary winding current, A | 6,4 |
| Secondary winding voltage, V | 28000 |
| Duration of spark discharge, ms (not less) | 1,5 |
| Spark discharge energy, MJ (not less) | 50 |
| Operating temperature range, 0 C | from -40 to + 130 |
| Approximate price, rub. (depending on manufacturer) | 600–1000 |
How to set the seven on a carburetor
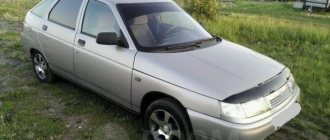
The VAZ 2107 traces its origins to the Fiat 124 and was produced in Russia until 2012
Installation Tools
For all work carried out we will need:
- key to 38;
- open-end or socket wrench 13;
- a 12 V control light with two wires attached to it (each wire is approximately 20 cm long).
The key for turning the crankshaft is designed for more careful alignment of the marks
How to work with tags correctly
There are three marks on the engine block next to the crankshaft pulley, each with its own length. You can feel these marks from the driver's side, but only strictly with the engine not running, since the pulley rotates at high speed when the engine is running! The shortest of them will mean that the ignition is advanced by 10 degrees or 10 degrees to the top dead center of the piston in the cylinder, the middle mark by 5 degrees and short - 0 degrees. You can also feel the slot on the pulley, and even on a VAZ 2107 (carburetor) this mark is sometimes implemented differently, but the main task is to find it.
Ignition timing marks
Step-by-step description with photos and diagrams
- If during the work you accidentally messed up the ignition setting, then do not rush to remove the valve covers to understand when the compression stroke begins. Do the following: remove the spark plug in the first cylinder and plug the hole with a small, tight plug made from a rag soaked in water. Having made sure that no one is standing nearby and will not be harmed by the impromptu plug flying out, in short series we turn the crankshaft with the starter for literally a split second, turning the starter on and off, and at the moment when the plug flies out with a characteristic sound from the spark plug hole, we stop turning the starter.
- Now, turning the crankshaft a little at a time by the pulley nut with a 38 wrench, we ensure that the marks on the pulley and the cylinder block coincide with the middle mark, which means 5 degrees.
- We unhook the latches from the distributor cover and look at the direction of the slider: when it is positioned as in the photo, then half the job is already done. If not, then use an open-end wrench or a 13-socket wrench to unscrew the nut, remove the distributor and put everything back in the required position.
- We make a mark with a marker on the cylinder block to further optimize the ignition settings.
- Now we connect our light bulb with one wire to the positive terminal of the ignition coil, and the second wire to ground. We remove the central wire of the coil from the distributor cover and fix it at a distance of approximately 1-5 mm from ground. This is done in order to prevent breakdown of the ignition coil to ground.
- Having turned on the ignition, slowly turn the ignition distributor housing (distributor) in the direction of movement clockwise and watch when the light goes out. If it didn’t burn, then we leave everything as is.
- Slowly rotate the distributor housing in the opposite direction, until the light comes on and use a 13 key to secure the housing.
- Turn off the ignition, return the distributor cap and the central wire to their place. Unhook the wires of the control lamp.
Diagnostics of malfunctions of the ignition module of injection VAZ 2107
The ignition of the injection VAZ 2107 is completely electronic and is considered quite reliable. However, problems can arise with it too. The module plays an important role in this.
Signs of a malfunctioning ignition module
Symptoms of a faulty module include:
- the Check engine warning light on the dashboard lights up;
- floating idle speed;
- engine tripping;
- dips and jerks during acceleration;
- change in sound and color of exhaust;
- increased fuel consumption.
Replacing the ignition module of a VAZ 2107
In case of malfunction, it is better to replace the ignition module with a new one. Repair is possible only if the breakdown is not a break or short circuit of the windings, but a visible violation of any connection. Since all the conductors in the module are aluminum, you will need special solder and flux, as well as certain knowledge from the field of electrical engineering. However, no one can guarantee that the device will work flawlessly. Therefore, it is better to buy a new product that costs about a thousand rubles and be sure that the problem with the ignition module has been solved.
Even an inexperienced car enthusiast can replace the module independently. The only tools you will need is a 5mm hex wrench. The work is performed in the following order:
- Open the hood and disconnect the negative terminal from the battery.
- Remove the air filter housing, find the ignition module and disconnect the high voltage wires and the wiring harness block from it.
- Use a 5mm hex to unscrew the four screws securing the module to its bracket and remove the faulty module.
- We install the new module and secure it with screws. We connect the high-voltage wires and the wire block.
- We connect the terminal to the battery and start the engine. We look at the instrument panel and listen to the sound of the engine. If the Check engine light goes out and the engine runs stably, everything is done correctly.
Video: replacing the ignition module of a VAZ 2107
Thus, it is quite simple to determine the malfunction and replace the failed ignition module with a new one with your own hands. To do this, you only need a new module, a 5-point hexagon and step-by-step implementation of the instructions from specialists.
VAZ 2107 injector, also known as the “seven”, is the latest model from the line of VAZ cars with rear wheel drive. “Seven” was created on the basis of the VAZ 2105 with significant differences: engine power, appearance of lighting devices, interior design, and seat shape. In this article we will look at the main parameters, functions, malfunctions, pros and cons of the injection VAZ 2107, in particular the ignition system.
Photo VAZ 2107
How to check the distributor
The most common manifestations of an ignition malfunction will be as follows:
- floating idle;
- engine that won't start;
- engine stalling while driving.
Most often, the cause of this may be the distributor. The easiest way to check the performance of the ignition, including the distributor, is as follows. To do this, unscrew the spark plug, bring it to the engine and start it, observing the appearance of a spark. If it is not there, then you need to check the functionality of the high voltage wires. If there is no spark again, then the diagnosis is clear - the distributor has failed.
In this case, you need to visually check the condition of the slider, the condition of the contacts and the distributor cover. Burnt contacts are cleaned and dust and debris are removed from the internal surfaces of the distributor. In a workshop or garage, you can check the performance of the ignition and distributor using measuring instruments and indicators.
The distributor appeared on the car almost simultaneously with the gasoline engine, and for many years remained almost unchanged, including on domestic cars of the 2109, 2106, 2107, 2108 family. And only after the advent of a modern element base, which includes the Hall sensor, gave way to contactless and then microprocessor ignition systems. » alt=»»>
The principle of operation of the VAZ 2107 injection engine
The injection system's operating methods are fundamentally different from the operating principles of the carburetor system, in which the air-fuel mixture is prepared in the carburetor chamber. In the VAZ 2107 injection engine, the fuel mixture is injected directly into the cylinders. For this, it received the name “distributed injection system”.
Injection systems are characterized by their operating principle and the presence of different numbers of injectors. The “seven” is equipped with a separate injection system with 4 nozzles. That is, injection occurs in each cylinder, which is controlled by a microcontroller of the electronic engine control unit. Using special-purpose sensors, information about the operating mode, gas pedal position and other important parameters is read. Based on this, there is a controlled flow of fuel into the cylinders.
How to set up contactless ignition using tags?
This method is not much different from the previous one, but this time the first cylinder is used. There are marks on the large crankshaft oil seal cap and the pulley itself is dangerous. It is necessary to turn the mechanism so that the danger on the crankshaft coincides with the central mark and does not move to the side.
The further procedure is similar to the previous one: install the distributor and assemble the elements.
After complete assembly, you need to check the operation of the system. Otherwise the installation will not work properly.
What are the advantages of VAZ 2107 injection models?
• The VAZ 2107 injection engine consumes less fuel. At the same time, it is more powerful than a carburetor engine with the same volume. This is achieved through the optimal formation of the qualitative and quantitative composition of the fuel mixture. Accordingly, the efficiency of an injection engine is higher than that of a carburetor.
• Thanks to electronic speed control, the engine runs more reliably at idle, stalls less when starting, and starts well at low ambient temperatures.
• Compared to a carburetor engine, an injection engine does not require frequent adjustments to the ignition and fuel supply systems.
• The air-fuel mixture that enters the cylinders has the most favorable composition. And the existing catalyst controls the minimum amount of harmful exhaust gases. This plays a big role in preserving the environment and taking care of health.
• There is no need to manually adjust the mechanism, since this is done by the hydraulic chain tensioner and hydraulic valve clearance compensators. They also guarantee less noise (noise insulation) when the engine is running.
• Torque graphics are “smooth”, a larger rpm range allows high torque to be achieved.
WORTH NOTICE! On an engine with an injection system, it is possible to install gas-cylinder equipment not only of the 2nd, but also of the 4th generation. This is a more modern and attractive option, since the installation of the 4th generation of gas equipment provides greater savings and reduces the occurrence of “pops” in the engine to zero.
Disadvantages of injection models of the VAZ 2107 engine
Of course, as usual, in addition to the advantages of the injection “seven”, there are also negative aspects, which consist in the following situations:
• Problematic access to some components due to the location of the engine and other mechanisms under the hood in the same format as in older models. Although at the same time, the system providing fuel injection is reliable and does not require frequent maintenance during operation.
Photo of VAZ 2107 under the hood
• The injection VAZ 2107 is equipped with a catalyst, which is very easy to damage when driving on a bad road with large bumps and obstacles. In such cases, of course, you need to be careful when driving on problematic roads.
Photo of VAZ 2107 catalyst
• The presence of an injection engine increases the requirements for fuel quality, in contrast to the carburetor version. If you use low-quality gasoline, you cannot avoid clogging the fuel system. This leads to unplanned vehicle maintenance.
• If the injection system breaks down, it is not possible to repair it yourself in a garage. Here you only need to contact professionals at a specialized service station.
Is there a difference between contact and electronic ignition?
Both an electronic device and a contact device were installed on the VAZ 2107 carburetor. The setup process is the same. The only difference may be that before installing the labels, you need to clean the contacts on the contact switch and check the gap so that the system is more accurately adjusted.
By the way, many people mistakenly call the switch the ignition relay. This relay serves only to reduce the inrush current and is intended to extend the life of the contacts. This relay is located in the engine compartment. The ignition setting does not apply to it.
This is how you can adjust the ignition on a carburetor VAZ 2107. Good luck on the roads!
Malfunctions of VAZ 2107 injection engines
Malfunctions of the VAZ 2107 injection engine make themselves felt by the manifestation of the following problems:
• Engine operation becomes unstable and unstable; • Fuel consumption increases significantly; • The quantitative content of carbon dioxide in the exhaust increases; • When you press the gas pedal, dips appear; • Engine power decreases, the engine stops “pulling”.
Troubleshooting the injection system requires special equipment. For example, to determine the correct operation of sensors and engine ECUs and determine error codes, special software with a computer, a tester, is required. For this reason, diagnostics and repair of the “seven” injector should be carried out at professionally equipped service stations. A common cause of injector malfunctions is clogged injectors themselves.
Causes of clogging of the VAZ 2107 injector
Poor quality gasoline mainly causes problems with the injection system. This gasoline contains a high amount of heavy paraffins. They leave deposits on the walls of the fuel system, clogging it and making it difficult to supply fuel. When producing high-quality gasoline, special additives (detergents) are added that destroy such deposits. Low-quality gasoline contains a very high amount of paraffins that detergents do not have time to cope with their deposits.
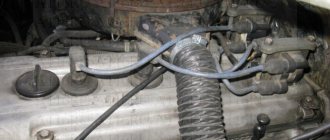
Checking the ignition system elements
Misfires in engine operation, especially in wet weather, are a consequence of breakdown of the insulation of high-voltage wires. There should be no cracks or damage in the wire insulation. You can check the insulation for breakdown using a wire connected to ground. If you run it along the insulation while the engine is running, a spark will be observed in places with damaged insulation. Another clear sign of poor insulation is noticeable electric shocks when touching high-voltage wires while the motor is running.
A broken high-voltage wire can be easily determined with an ohmmeter. The resistance should be between 3-10 kOhm. The spread of indicators between the wires should be no more than 1-2 kOhm.
Repair of VAZ 2108 distributor (replacement of the vacuum regulator)
In distributors of VAZ 2108-09-099 cars, the VROZH quite often fails. Its performance can be checked without removing the PR from the engine - we suck in air through the hose, and if a vacuum is not created, the regulator should be changed.
The ignition timing regulator can be replaced on site without removing the distributor:
- unscrew the two screws of the distributor cover, and together with the high-voltage wires, move the cover to the side, disconnecting only the central wire;
- we pull out the slider, it can be removed by hand;
- Using a thin screwdriver, pull out the latch that secures the VROZH rod; you need to remove the fastening element carefully so as not to lose it;
- unscrew the 2 screws securing the “vacuum unit” and remove the device;
- We install the new part in place and put everything back together.
Replacing the VROZH can also be done by removing the distributor, which will even be more convenient. Remove the distributor as follows:
- disconnect the high-voltage wires from the PR cover;
- use a thin screwdriver to hook the retaining springy wire on the connector and remove the plug going to the distributor from the bottom left;
- we pull off the hose from the VROZH, make a mark on the PR body or notice how it stood;
- unscrew the three nuts that secure the distributor itself, and then remove the breaker - distributor.
It’s easy to install the distributor back - the camshaft spline has a groove shifted to one side, and therefore the PR is installed in only one position, it’s impossible to make a mistake here
During installation, you need to pay attention to the rubber O-ring - if the rubber has hardened, the part must be replaced. And in any case, the seal should be coated with an oil-resistant sealant, in which case oil leakage will be almost 100% avoided
Signs of breakdown
When the ignition is turned on, the engine ECU malfunction indicator light comes on, and after the engine is started, it should go out. A burning warning light is the first sign of problems with the ignition system. Other prerequisites for diagnosing the ignition module are “floating” engine speed and problems with starting. The cause of such failures may be faulty high-voltage wires or spark plugs, so you need to make sure they are working before you start diagnosing the ignition of the VAZ 2107 (injector). Often, cylinder misfires occur due to compression problems or damage to the intake manifold gasket. This must be taken into account when searching for the causes of engine failure.
Checking the ignition coil
The coil is checked based on two indicators: the presence of a short circuit and an open circuit. Before diagnostics, the ignition coil must be disconnected. After this, one probe of the device is connected to the central contact of the coil, the second to the body (ground). If the display shows resistance equal to infinity, there is no short circuit.
The primary winding of the coil for a break occurs differently. The probes of the device must be connected to the right and left contacts. The resistance between them should be within 3-3.5 Ohms.
If the resistance of the primary winding does not correspond to the norm or there is a short circuit in the coil to the housing, it must be replaced.
Contactless distributor
The contactless ignition system is a modernized KSZ. Its main difference is the absence of a contact group, instead of which a Hall sensor is used. The advantages of such a distributor are:
- no need for periodic adjustment;
- more reliable engine starting;
- reduction in fuel consumption;
- increase in power.
A non-contact distributor is considered a more modern and reliable device.
The Hall sensor is mounted on the distributor shaft. Structurally, it consists of a permanent magnet, which has a special screen with slots. The number of slots usually corresponds to the number of cylinders. As the shaft rotates, the screen holes pass past the magnet, causing changes in its field. During operation of the ignition distributor, the sensor reads the shaft revolutions, and the received data is fed to a switch, through which the signal is converted into current.
Examination
Checking the contactless mechanism repeats the same steps as with the contact system, excluding the contact group. In addition to the cover and slider, problems may arise with the switch. The main sign indicating problems with it is the absence of a spark on the candles. Sometimes a spark may be present, but very weak or disappear periodically. At the same time, the engine runs intermittently, stalls at idle, and power decreases. The same problems can occur if the Hall sensor malfunctions.
Switch
The easiest way to test a switch is to replace it with a known good one. Since this possibility is not always available, another diagnostic option is also possible.
One of the reasons for the lack of spark on the spark plugs may be a faulty switch
Before starting the test, you must make sure that power is supplied to the ignition coil and that the Hall sensor is in working condition. The tools you will need are a test lamp and a standard set of keys. We check the switch in the following sequence:
- Turn off the ignition.
- Unscrew the nut on the coil contact “K” and disconnect the brown wire.
- We connect the control unit into the gap between the removed wire and the coil contact.
- Turn on the ignition and crank the starter. The light indicator will indicate that the switch is working properly. If there is no light, the switch will need to be replaced.
Hall Sensor
The sensor is located inside the distributor, so to access it you will have to remove the cover.
The Hall sensor does not fail very often, and if this happens, the fault can be identified by the absence of a spark
You can check the part in several ways:
- replace the sensor with a known good one;
- use a multimeter to check the voltage at the output of the element, which should be 0.4–11 V;
- assemble a circuit that simulates the operation of the sensor by connecting contacts 3 and 6 going to the device being diagnosed (the appearance of a spark will indicate a faulty part).
Ignition adjustment
The injection modification of the VAZ 2107 does not require adjustment of the ignition timing. The electronic control unit, using a sensor, determines the optimal ignition timing. The participation of the car owner in adjusting the operation is limited to setting the engine timing belt to the marks.
To check the performance of the ECU and the functionality of the sensors, it is necessary to connect a computer with specialized software. In this way, the cause of most electronic ignition system malfunctions can be determined.
It is also worth checking the operation of the throttle position sensor yourself. When the throttle is closed, the voltage on the sensor should be no higher than 0.55 volts, and when fully open - 4.5 volts. Measurements must be made with a voltmeter with the ignition on.