Cars admin26.02.2020
If you look at the recommendations of official publishing houses for repair and operation, then on the VAZ 2107 spark plugs must be replaced at least after 30,000 km. Of course, sticking to this mileage is advisable, but not necessary. After all, you yourself will agree that you will never know how high-quality the candles were purchased and what their actual service life is.
Some copies can travel 100,000 km, and the engine will still work quite well for them. And others, on the contrary, even after the first thousand they will begin to have breakdowns in the ignition, which is not good! Therefore, it is necessary to monitor the spark plugs on your VAZ 2107 and change them not only at a strictly defined interval, but also according to their condition.
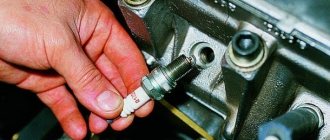
The replacement procedure itself is very simple and even a beginner who has never looked under the hood of his car can handle it. To carry out this repair, we will need a spark plug wrench or a special socket with a wrench. Personally, I use the second option from my Jonnesway set. Inside such a deep head there is a rubber insert that fixes the spark plug and when unscrewing it, you don’t have to worry about it falling.
So, let's get to work. First of all, open the hood of your car and remove the high-voltage wires from each spark plug:
After this, take the key or head and unscrew the spark plugs one by one:
We pay attention to the appearance of the electrodes, the formation of soot and all kinds of deposits, as well as the gap between the electrodes:
To ensure that the engine runs perfectly with new spark plugs, use the following material, which will help you set the spark plug gap correctly on the VAZ 2107. We put all the wires back on and start the engine. If the components were purchased of high quality, then everything should be fine and for at least another 30-40 thousand you don’t have to look under the hood about this.
Key size for spark plugs VAZ 2107
A spark plug wrench is a hand tool designed to remove spark plugs and rims.
Spark plug wrench sizes are measured by thread diameter.
A modern spark plug wrench is a tube with a special rubberized T-shaped handle and a hex head at the end, which are connected by hinges.
The head size (medium, normal or reduced) is selected depending on the type of candle being screwed on. Some sockets may have a fixed torque.
Spark plug wrenches are made of carbon or chrome-vanadium steel; to increase protection against corrosion, the tool is chrome-plated or phosphated.
The key parameter of these keys is the head diameter (D), which is:
- 16 (mm) and 14 (mm): used for modern internal combustion engines with 3 or 4 valves per cylinder;
- 19 (mm): for motorcycle engines;
- 20.8 (mm): old European standard;
- 22 (mm): for spark plugs of old-style ZIL and ZIS cars;
- 24 (mm): for M8 spark plugs with M18x1.5 (mm) thread.
Important: the length of spark plug keys (L) varies on average from 220 (mm) to 500 (mm), width (B) - from 93 (mm) to 260 (mm).
The 21st key is the standard 20.8 (mm) spark plug key, which is used on engines with two valves per cylinder. This key is considered the main one for almost all Soviet passenger cars.
| General view General characteristics of spark plug keys | L (mm) Key length in (mm) |
| L (mm) Key length in (mm) |
Disclaimer: The above data are official figures, however please note that the information is for reference only and is not guaranteed to be completely accurate.
Comments. Have questions? We will answer everything.
Source
Spark plug malfunctions and their diagnosis
The main parameter is the gap between the spark plug and the electrodes, so you need to know what is acceptable. This parameter differs depending on whether an injector or a carburetor is used in the power system. In addition, the manufacturer sets its own standards for various types of engines. Usually the gap is in the range of 0.5-1 mm and, if it differs from the norm, it must be adjusted.
We removed the carburetor from a VAZ 2107, ran through the entire fuel system, and the engine still does not pull? Oddly enough, the symptoms of ignition problems are very similar to fuel system problems. You can even sin on the injector, its pump is installed in the tank, if the engine does not pick up speed. And the reason will not be in the pump, but in the high-voltage wires, which have dried out over time, and the current leakage has increased many times over.
What is a spark plug wrench?
Experienced drivers can easily cope with minor repairs, for example, replacing car spark plugs, but beginners do not always know how to do this. To quickly and efficiently remove and then install spark plugs, use a device such as a spark plug wrench - this is the most convenient and reliable tool. Its special design is specifically designed to work in confined spaces under the hood of a car. Such a tool is made from vanadium or carbon steel, subjected to hardening and chrome plating.
What does a spark plug key look like?
This device is a long metal key. On one side, the tool for replacing spark plugs has a handle, and on the other, a multifaceted tubular cylinder, inside of which there is a spark plug retainer. This design ensures unhindered rotation of the part. There are three types of clamps:
- Rubber
. This is a round insert with a hole inside, which, when working under pressure, captures the spark plug and holds it inside the key. However, when exposed to high temperatures, rubber quickly becomes unusable. - Magnetic
. It has increased wear resistance. A spark plug wrench with a magnet is not afraid of high temperatures. - Spring
. This retainer plays the role of a shock absorber, protecting the spark plug from damage. It is durable and easy to put on and take off the candle.
Why iridium?
Such a wide selection of candles pampers car enthusiasts only for 20-25 years. Before this, the choice was much poorer.
Platinum candles were already on sale, but one could only dream of decent quality or reliability.
The best manufacturers in the world did everything possible to improve the quality of the product and achieve their goals, namely ensuring maximum reliability, long service life and reducing energy consumption.
In 1994, NGK specialists finally managed to create high-quality spark plugs using a special material - iridium.
What are its advantages? — It has a maximum melting point (in this indicator, iridium surpasses even platinum), excellent anti-corrosion properties and high quality.
The developers managed to make the thickness of the electrode minimal. Moreover, it was the tip that was made of rare metal.
In terms of its hardness, iridium occupies one of the leading positions. Many believe that the metal is based on the material of a meteorite that arrived on our planet many millions of years ago. Hence its hardness indicators.
Another advantage of iridium is its ability to withstand high temperatures. Metal can only be melted when heated to 2,500 degrees Celsius.
Iridium has been actively used in the industrial sector (since the 20s of the last century). But in practice it is not used in its pure form, but in the form of a special alloy.
POPULAR WITH READERS: Spare parts for Mazda cars, make the right purchase
This is not surprising, because without the addition of metals, iridium is extremely fragile and useless in production. That is why in practice only alloys are used.
What types of spark plug wrenches are there?
To make it easier for the master to decide which spark plug wrench is better, you need to familiarize yourself with all their varieties that are on sale:
- Articulated
. This is the most popular device, which is very convenient to use, since the movable connection of the key on hinges allows you to better adapt to the location of the candle. A tubular spark plug wrench carefully dismantles the element and helps install a new one. - T-shaped
. Its design is more rigid than the previous type. And although it also has a hinge, it is installed at a slight angle of inclination. Due to its rigidity and strength, such a spark plug wrench can transmit great forces during operation. Many models are equipped with a magnet that keeps the candle from falling. - Tubular
. This is the simplest and most budget option. There is no hinge in this way, but it is driven by a simple crank that comes with it. The advantage of this device is the presence of two heads that have different diameters. This makes the tubular spark plug wrench more functional and versatile.
Spark plug size
To tighten the candles, use wrenches that differ in thread diameter. There are long and short spark plug keys. Depending on the situation, the master may need keys of the following sizes:
- 14 and 16 mm
- they are used for repairing internal combustion engines of modern brands. - 19 mm
– used for motorcycle engines. - 20.8 (21 mm)
- standard key of the old European standard. Used in the repair of engines with two valves per cylinder. This model is useful for any Soviet passenger cars. - 22 mm
- used to replace old spark plugs on ZIS and ZIL vehicles. - 24 mm
- keys intended for spark plugs of the M8 brand.
How to use a spark plug wrench?
The need to replace spark plugs can arise at any time and anywhere, and neither expensive nor cheap cars are immune from this. It should be remembered that spark plugs can only be changed when the engine is cool. Otherwise, you can break the thread that is in the spark plug hole. Replacement using a key occurs in the following order:
- We select a car spark plug wrench that matches the size of the spark plugs.
- We put the head of the key on the spark plug, making sure that it fits tightly (this is especially true for devices with a rubber retainer).
- Holding the key handle, we make 2-3 turns counterclockwise with smooth, leisurely movements and without excessive effort. If a slight grinding noise is heard, it means the spark plug is moving.
- Manually unscrew the spark plug all the way.
- When installing spark plugs into the cylinder block, we carry out all the steps in the reverse order.
Video “Checking the gap on new SZ”
A specialist in the video (author - Nail Poroshin) will tell you more about what a modern VAZ owner needs to know about diagnosing the gap on the SZ.
After the warranty expired, I carried out the maintenance myself. Today I once again went to ALMAZ to buy spark plugs, filters, oil... I’m asking for injection 7 - NGK... - “Here’s 13″... - Why 13? -Which ones? Number 13 goes to injection 7 - Hmm... I always put 2 like the dealer... - What. dealer. here they give it)) *laughs* - I’m standing there thinking, how can this be... who to believe... the dealer or this funny one... xs - Yes, you need 13 - What’s the difference? -The difference is in the gap...your engine needs 13... -I drove the 2 just fine. -In short, take what you want, but for a 7-injector, 8-valve 13, number 13 is needed. 2 this is for carburetor...contact ignition, etc. -It’s okay...I understand...give me both packs. It’s nice. Dad’s car always ruins the candles. I’ll screw him up if anything happens)
By the way, number 13 without a V-shaped groove on the central electrode... but I liked it so much (((
What do you think about this? Which ones should I install?
Any acquaintance of a car enthusiast with a particular car system is learned mainly through a breakdown. The same applies to the ignition system when the engine malfunctions. Over time, the driver learns to solve this problem by simply replacing the spark plugs, but does not always make the right choice. Today you will find out which spark plugs are best to choose for your car.
How to unscrew a spark plug without a spark plug wrench?
Motorists often encounter a situation where the key for the spark plugs is missing. In this case, you can do this:
- Pour any universal lubricant onto the spark plug, for example WD-40. Wait 20-30 minutes.
- Gently tap the candle with a small hammer.
- Try to unscrew it, and to enhance the rotational movement, use an additional device - a wrench.
Source
Replacing spark plugs on a VAZ 2107
Replacing spark plugs on a VAZ 2107 is a fairly simple procedure. Also, these instructions are suitable for other Vases, from a penny to a seven. According to the regulations, replacement of spark plugs must be done on average after 30 thousand km... But this regulation is relative. It all depends on the nature of the car’s operation, as well as on the quality of the spark plugs themselves. There have been cases when an engine could run 90 thousand km on one set of spark plugs.
It is also worth paying attention to the spark plug contact gap, it should be:
- For injectors - 1.1 mm;
- For carburetors - 0.8 mm;
To replace spark plugs you only need: a new set of spark plugs and a special spark plug wrench.
Replacing spark plugs is necessary when: the threads are wet (gasoline, oil), the rim of the spark plug is covered with black spotted soot. Read more about faults and the design of spark plugs in our blog.
Also, if the candles have changed color: darkened, spots have appeared, this indicates a malfunction.
So, let's get to work. First of all, open the hood of your car and remove the high-voltage wires from each spark plug.
After this, take the key or head and unscrew the spark plugs one by one.
We pay attention to the appearance of the electrodes, the formation of soot and all kinds of deposits, as well as the gap between the electrodes.
We put all the wires back on and start the engine. If the components were purchased of high quality, then everything should be fine and for at least another 30-40 thousand you don’t have to look under the hood about this.
Source
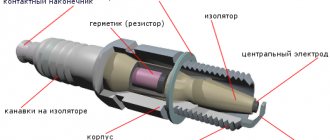
High voltage wires
High voltage wires (HVW) transmit impulses from the coil to the spark plugs. Unlike other wires, they must not only withstand high voltage, but also protect other parts of the car from it. Each wire consists of a conductor with a metal tip, rubber caps on both sides and insulation. The serviceability and reliability of the insulation is of great importance, since it:
- prevents moisture from entering the conductive element;
- reduces current leakage to a minimum.
Malfunctions of high-voltage wires
The following main malfunctions are characteristic of GDP:
- breakage of the conductive element;
- voltage leakage due to poor insulation;
- excessively high wire resistance;
- unreliable contact between the GDP and the spark plugs or its absence.
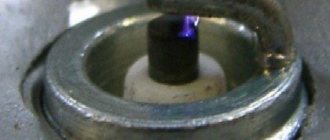
If the VV is damaged, the electrical contact is lost and a discharge occurs, leading to voltage loss. In this case, the spark plug receives not the rated voltage, but an electromagnetic pulse. Faulty wires lead to improper functioning of some sensors and interruptions in the operation of the power unit. As a result, one of the cylinders stops performing useful work and runs idle. The power unit loses power and begins to detonate. In this case, they say that the engine is “troubling.”
One of the malfunctions of high-voltage wires is a break
Diagnostics of high-voltage wires
If you suspect a malfunction of the engine (engine “troits”), they must first be carefully inspected - possible insulation damage, chips, touching hot engine elements
Particular attention should be paid to the wire contacts - there should be no traces of oxidation or soot on them. If no visible damage is found, proceed to detect a possible break and measure the resistance of the GDP using a multimeter
The wire resistance should be 3–10 kOhm. If it is zero, the wire is broken. It should also be taken into account that the resistance should not deviate from the norm by more than 2–3 kOhm. Otherwise, the wire should be replaced.
Selection of high voltage wires
When purchasing new wires, you should pay attention to the car manufacturer's recommendations. On the VAZ 2107, wires of the VPPV-40 brand (blue) with distributed resistance (2550 +/-200 Ohm/m) or PVVP-8 (red) with distributed resistance (2000 +/-200 Ohm/m) are usually installed.
An important indicator of GDP is the permissible voltage. If the actual voltage values exceed the permissible values, breakdown of the cable insulating layer may occur and the wire may fail. The voltage in a non-contact SZ reaches 20 kV, and the breakdown voltage is 50 kV.
The material from which the GDPs are made is also important. Typically the wire has polyethylene insulation in a polyvinyl chloride sheath. Silicone GDPs are considered the most reliable. They do not become rough in the cold, which prevents them from loosening in their nests, and are less prone to breakdowns. Wire manufacturers include Champion, Tesla, Horse, and others.
Tesla products are considered one of the most reliable
Stages of replacing spark plugs on a VAZ 2107
On classic Lada cars or the more familiar Zhiguli, a convenient replacement of spark plugs is provided. They are located in good accessibility on the left side of the engine in the direction of travel; they can be reached from the engine compartment.
During the production of the VAZ 2107, a large number of modifications were produced, which were equipped with various engines. Experienced drivers note good maintainability, unpretentiousness in maintenance, as well as consumables.
There are no global differences in versions with different engine sizes when replacing, all actions will be almost the same.
Before you begin replacing the ignition elements, you must take precautions. And in order to make it easier to screw in and subsequently unscrew the spark plug, you can apply a little graphite from a soft pencil to the threads or a little copper grease. But oil or regular grease will cause the spark plug to stick to the threads of the cylinder head.
Removing old ones
The procedure for replacing spark plugs on a VAZ 2107 is very simple and even a beginner who has never looked under the hood of his car can handle it. To carry out this repair, we will need a spark plug wrench or a special socket with a wrench.
- First of all, open the hood of your car and remove the high-voltage wires from each spark plug.
- After this, take a 21 key or socket and unscrew the spark plugs one by one.
- We pay attention to the appearance of the electrodes, the formation of soot and all kinds of deposits, as well as the gap between the electrodes.
In order for the engine to run perfectly with new spark plugs, it is necessary to correctly set the gap between the electrodes. How to do this is described below.
When installing new spark plugs, it is recommended not to be overzealous with the tightening force, otherwise you can strip the threads on the block, which will lead to expensive repairs.
Ideally, if you have a torque wrench, in this case the recommended tightening torque is 20-30 Nm.
Checking the gap
Most car owners do not even know that the size of the gap between the side and central electrodes of the spark plugs affects many engine parameters.
- Firstly, if the spark plug gap is set incorrectly, then the VAZ 2107 will not start as well as with optimal parameters.
- Secondly, the dynamic characteristics will become much worse, since the mixture will not ignite correctly and will not all burn out.
- And the consequence of the second point is an increase in fuel consumption, which will affect not only engine parameters but also the wallet of VAZ 2107 owners.
What should be the gap on VAZ 2107 spark plugs?
Due to the fact that “classic” models use both contact and non-contact ignition systems, the gap is set in accordance with the installed spark generation system.
- If you have a distributor with contacts installed, then the gap between the electrodes should be within 0.5-0.6 mm.
- In the case of installed electronic ignition, the spark plug gap will be 0.7-0.8 mm.
How to correctly set the gap between spark plug electrodes on a VAZ 2107
In order to adjust the gap, we need a set of feeler gauges with plates of the required thickness. The gap is measured with a flat feeler gauge; in spark plugs with several side electrodes - with a round one.
Then we select the required thickness of the probe for your ignition system and insert it between the side and central electrodes of the spark plug. The probe should fit tightly, but not with great force.
We carry out a similar operation with the remaining candles. We screw everything into place and are satisfied with the excellent operation of the engine.
Answers (2)
- On gas 0.8 this is what you need.
08.12.2020 at 14:20
- On the spark plugs for the injector, the gap is immediately set by the factory. The fact that they are new does not mean anything - check the new spark plugs with a pressure gauge
08.12.2020 at 14:25
- What I bought, there was no gap at all on one spark plug...yes, I also sin that spark plugs can be problematic, I want to buy other expensive ones and wires at the same time. And another question. Here's what's on the old ones and on the new ones, around the candles in the dark there seems to be a halo sparkling. Is this abnormal?
08.12.2020 at 14:34
- ON old spark plugs, this indicates a breakdown of the insulator, but new ones need to be checked on the device, and also check the tips and the high-voltage wires themselves
08.12.2020 at 22:03
Similar questions
When to change spark plugs, which ones to install
If you look at the recommendations of official publishers for repair and operation. Then on the VAZ 2107 the spark plugs must be replaced at least after 30,000 km.
Of course, sticking to this mileage is advisable, but not necessary. After all, you yourself will agree that you will never know how high-quality the candles were purchased and what their actual service life is.
Some copies can travel 100,000 km, and the engine will still work quite well for them. And others, on the contrary, even after the first thousand they will begin to have breakdowns in the ignition, which is not good! Therefore, it is necessary to monitor the candles and change them not only at a strictly defined interval, but also according to their condition.
Foreign and Russian markings
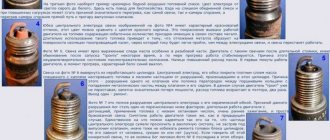
When choosing spark plugs for a VAZ 2107 car, you must be guided by the numerical value indicated on the marking. It denotes the heat value of the element, which characterizes the candle’s ability to remove heat and self-clean from carbon deposits during operation. According to the Russian classification, elements are divided into the following groups:
- Heat number from 11 to 16 are “hot” candles. They are designed for engines with low compression ratios and low power.
- The same, from 17 to 19. The most widely used spark plugs, including on VAZ 2107 cars.
- The same, from 20 to 26 - “cold” spark plugs, installed on powerful engines with a high compression ratio and temperature in the combustion chamber.
If you install too “hot” or “cold” spark plugs on a VAZ 2107 car, the engine will not be able to function in normal mode with maximum efficiency. The letter indices on the marking indicate less important parameters, but they also need to be taken into account.
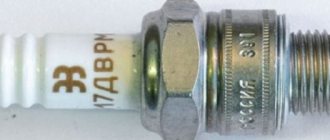
For example, a product with the designation A17DV is suitable for engines with a carburetor and an ignition system with mechanical contacts, and A17DVRM is suitable for power units with an injector.
Using the table, you can select elements from some foreign brands for our “seven”:
| Type of power and ignition system | According to Russian classification | NGK, Japan | Bosch, Germany | Beru, Germany | Brisk, Czech Republic |
| Carburetor, mechanical contacts | A17DV, A17DVM | BP6E | W7D | W7D | L15Y |
| Carburetor, electronic | A17DV-10, A17DVR | BP6E, BP6ES, BPR6E | W7D, WR7DC, WR7DP | 14-7D, 14-7DU, 14R-7DU | L15Y,L15YC, LR15Y |
| Injector, electronic | A17DVRM | BPR6ES | WR7DC | 14R7DU | LR15Y |
Original and analogues
VAZ 2107 carburetor engines with contact ignition system:
Main characteristics
- Thread type M14/1.25
- Thread length 19 mm
- Heat number 17
- Turnkey for 21
- Thermal housing protrudes beyond the spark plug insulator
- Gap between electrodes 0.5 – 0.7 mm
Installation options
- A17DV (Russia)
- A17DVM (Russia)
- AUTOLITE 14-7D (USA)
- BERU W7D (Germany)
- BOSCH W7D (Germany)
- BRISK L15Y (Czech Republic)
- CHAMPION N10Y (England)
- DENSO W20EP (Japan)
- EYQUEM 707LS (France)
- MARELLI FL7LP (Italy)
- NGK BP6E (Japan/France)
- FINVAL F501 (Germany)
- HOLA S12 (Netherlands)
- WEEN 121-1371 (Netherlands/Japan)
VAZ 2107 carburetor engines with a contactless ignition system:
Main characteristics
- Thread type M14/1.25
- Thread length 19 mm
- Heat number 17
- Turnkey for 21
- Thermal housing protrudes beyond the spark plug insulator
- Gap between electrodes 0.7 – 0.8 mm
Installation options
- A17DV-10 (Russia)
- A17DVR (Russia)
- AUTOLITE 64 (USA)
- BERU 14-7D, 14-7DU, 14R-7DU (Germany)
- BOSCH W7D, WR7DC, WR7DP (Germany)
- BRISK L15Y, L15YC, LR15Y (Czech Republic)
- CHAMPION N10Y, N9Y, N9YC, RN9Y (England)
- DENSO W20EP, W20EPU, W20EXR (Japan)
- EYQUEM 707LS, C52LS (France)
- MARELLI FL7LP, F7LC, FL7LPR (Italy)
- NGK BP6E, BP6ES, BPR6E (Japan/France)
- FINVAL F508 (Germany)
- HOLA S13 (Netherlands)
- WEEN 121-1378 (Netherlands/Japan)
Replacement time
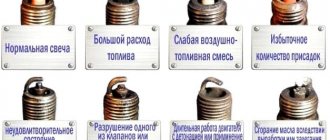
Failure of a spark plug occurs due to improper operation of the vehicle, incorrect selection of the brand, or poor fuel. As a result, defects appear on the elements, which can be used to identify engine malfunctions.
Basic faults
- The spark plug body and electrode are oily . Occurs due to wear of the piston rings. Oil between the rings and the cylinder wall penetrates the combustion chamber, flooding the electrode. A wet element does not produce a spark regularly, and the engine begins to operate intermittently, with a drop in power. There is a need to repair the engine with all the ensuing problems.
Checking and replacing the ignition coil
On rear-wheel drive cars of the classic family with a carburetor engine, the ignition coil (in automotive circles it is often called a “bobbin”) is installed in the engine compartment on the left mudguard and secured with two nuts.
On later injection versions, an ignition module is installed, mounted on the cylinder block.
Before deciding to replace the coil, you should make sure that it is not working, otherwise the repair may be useless and money will be wasted.
Verification methods
The simplest method, which does not require special equipment, but is unsafe. Remove the central high-voltage wire and crank the engine by turning the ignition key. At the same time, we lean the removed wire against ground or the car body. If there is a spark, then the coil is ok. An assistant may be needed for this operation.
The second method, which is also more accurate, is to measure the resistance of the coil windings using a multimeter measuring device or “popularly” using a tester.
Measuring ignition coil resistance
We clean the coil contacts (studs on the body). The first check is the resistance of the primary winding. To do this, connect an ohmmeter to two studs and take measurements. Depending on the type of coil being tested, the resistance should be within the following limits: coil 2101-2107 B-117A = 3-3.5 Ohm; coil 2108-099 027.3705 = 0.45-0.5 Ohm.
Then we check the resistance in the secondary winding circuit. We connect one terminal of the tester to the central terminal of the high-voltage wire, and leave the second terminal of the probe at the terminal of the primary winding. In this case, the resistance of the working coil should be as follows: B-117A = 7.4-9.2 kOhm; 027.3705 = about 5 kOhm.
Replacement with a new one
To replace the ignition coil (bobbin) of a VAZ 2107, you must do the following:
- We remove the high-voltage wire from the coil cover.
- Using a size 8 wrench, unscrew the nut from the terminal marked “B” on the coil cover and remove the ends of the green and brown wires. To avoid losing small nuts, we recommend putting them in place.
- Similarly, disconnect the blue wire with a black stripe from the terminal marked with the letter “K”.
- If the colors of the wires turn out to be different, and this is possible, mark their position before disconnecting. From terminal “B” the wire is laid in the wiring harness, from terminal “K” - one is connected to the terminal of the ignition distributor, the second goes into the harness.
- Using a 10mm wrench, unscrew the coil mounting nuts three to four turns.
- We remove it from the car.
We install the new coil in the reverse order, observing the written order of connecting the wires.
Models and manufacturers
There are several models of ignition coils on the shelves of car dealerships. For “classics” (2101-2107) - B-117A, and for VAZ cars of the eighth family (2108-21099) - 027.3705.
Basically, all reels are of domestic production, manufacturing companies: ATE-2, Citron, Stary Oskol. According to numerous reviews, coils from Stary Oskol are considered to be the highest quality.
Setting the ignition on a VAZ 2107
Before starting work, put the car on the parking brake and install wheel chocks under the rear wheels. Remember that during any repair work, these preparatory operations are mandatory from the point of view of ensuring safety precautions, which cannot be ignored.
Next, the ignition installation of the VAZ 2107 looks like this:
- Using a spark plug wrench, unscrew the spark plug of the first cylinder of the power unit, and then plug the hole with a suitable plug or finger.
- Using a special 38mm wrench, rotate the crankshaft until the compression stroke begins in the first cylinder. Evidence of this will be a plug popping out of the spark plug hole. If you closed the hole with your finger, then you should feel quite strong pressure.
- We turn the engine crankshaft until the mark on the pulley coincides with the corresponding mark on the timing cover. If you most often use AI 92 fuel, you should achieve a match with the second risk; if you use gasoline with a lower octane number, use a third (long) line.
- Carefully unfasten the latches of the plastic distributor cover and remove it.
- After cranking the crankshaft, the distributor rotor should be positioned so that its outer contact is in the direction of the first cylinder of the engine. In the event that the direction is incorrect: - unscrew the distributor mount and, gradually rotating the rotor axis, set it so that its direction is parallel to the engine; — tighten the fastening nut (do not tighten it completely).
- We connect a 12 V lamp (voltmeter): we connect one wire to the ignition coil terminal (low voltage terminal), and the second to ground.
- Turn on the ignition and gradually turn the distributor to the right. The distributor should be turned until the connected lamp stops lighting. If the lamp does not light up after turning on the ignition, then the described operation is not necessary.
- We rotate the distributor to the right side and at the moment at which the lamp begins to glow, we tighten the fastening nut completely.
- We are installing the distributor cover.