Where is
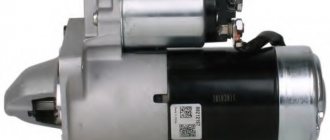
The VAZ 2110 starter is located on the gearbox housing and is mounted on two studs. It is easier to see the starter in detail on 8-valve engines, since there is more free space in the engine compartment with such an engine. In a 16-valve engine, to see the starter, you need to remove the air filter housing.
Advantages and disadvantages
Like any other device, a starter with a gearbox has not only advantages, but also disadvantages.
Pros:
- Long service life.
- Low energy consumption.
- Small dimensions and less weight.
- Low price.
Minuses:
- Repair is more difficult, if possible.
- Weakness of the design. It has a certain power limit, so it is better not to install gear starters on trucks.
Such starters with gearboxes are especially effective in areas with cold climates.
Starter relay (retractor)
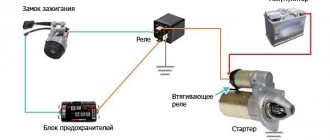
The starter retractor relay is located on the starter itself and serves to move the bendix to the flywheel, and then engage with it. This relay often fails due to poor workmanship. It is quite easy to understand that the solenoid relay has failed; with such a breakdown, the starter will spin at idle, but the engine will not rotate, since the moving part of the drive (bendix) will not engage with the flywheel.
How to recognize a starter malfunction
As you know, a new car can operate for about five years without breakdowns. Then any “spare part” can fail, including the starter.
Its malfunction is determined quite simply. You don't even have to take your car to a service center to understand this.
The car does not start, or the starter turns off spontaneously. Tapping or uncharacteristic sounds are often heard.
Many young and inexperienced motorists do not pay attention to these nuances and continue to drive. And this directly affects the starter, and even if it could have been saved, then after that it may become practically unusable.
Experienced drivers don't allow this to happen. They carefully monitor their car and when such symptoms are detected, they immediately take action.
Possible starter failures
There can be a large number of starter breakdowns, but most often they are all of the same type. Below are all the most common starter failures.
Brush wear
Starter brushes are a copper-graphite part that conducts electric current. The brushes are in direct contact with the starter armature and rub against its commutator, conducting electric current. During long-term use, brushes become unusable due to friction and must be replaced. This breakdown is not expensive or complicated; you just need to remove the starter and replace the brushes.
Bendix wedge
The Bendix is directly connected to the flywheel and quite often, wear appears inside it or on its gears due to high load, which makes it impossible to start the car from the starter. By design, Bendix is an overrunning clutch that rotates freely in one direction and is locked when rotating in the other direction. This part is sold separately and can be replaced as soon as possible.
Gearbox failure
The VAZ 2110 starter is geared. This modification allows you to reduce the load on the battery and rotate the engine crankshaft much easier and faster due to the additional ratios. Quite often, wear appears on the gears, which can lead to jamming or even breakdown of the entire gearbox.
Winding break
Since large currents flow in the starter, the winding in it is quite powerful and can withstand large currents, but sometimes a large cross-section of wires is not able to preserve the winding and it burns out, rendering the starter unusable. Such a breakdown can be repaired by replacing the rotor.
Solenoid relay
The retractor is an electromagnetic part that is retracted under the action of an electromagnetic force, driving the bendix inward and engaging it with the flywheel. Inside the relay structure there is a regular coil, which quite often burns out and damages the starter.
Almost all starter failures can be repaired by replacing the broken part with a new one.
DIY connection instructions
Removing the starter in the engine compartment
So, if you decide to install a new mechanism, then first you will need to dismantle the old one.
How to properly remove and install a new device, what its connection diagram is, read below:
- To begin, turn off the engine and turn off the ignition. Then open the engine compartment and disconnect the battery. All repair work related to the electrical part must be carried out with the vehicle's electrical network de-energized. If the battery is not disconnected during removal, this may result in voltage surges in the system, which can lead to failure of the starter mechanism or other electrical equipment.
- When the battery is disconnected, you will need to dismantle the crankcase protection of the power unit. To do this, crawl under the bottom of the car and unscrew all the bolts that secure the protection, then remove it, and put the bolts nearby so as not to lose it.
- Now you can begin dismantling the element. To do this, first find where the device is located. First of all, you need to unscrew the nut of the upper mechanism lock. Unscrew it with a wrench and set it aside.
- The next step is best done under the bottom of the car. Reach under the vehicle and disconnect the cable that connects to the traction relay terminal. If the connection is bad, there are traces of rust or oxidation on it, then at the same stage, clean the contacts; for this you can use a construction iron brush.
- After these steps are completed, you need to unscrew the nut and disconnect the cable that is connected to the contact screw of the traction relay.
- Next, all you have to do is unscrew the nut, which is located on the lower mechanism lock. Now you can dismantle the starter device and replace it with a more functional and efficient one. Further installation is carried out in reverse order, do not forget to connect all the nuts and bolts. Before connecting wires, check the quality of the contacts to prevent possible problems in the future.
The starter doesn't turn over
There are many reasons why the starter does not work, but first of all you need to check the most common reasons why the engine will not start.
Checking contacts on the battery
Often the reason when the starter does not turn is due to loose terminals on the battery or their oxidation. It is enough just to clean the oxidized terminals from chemical reactions and tighten them with a force that will ensure reliable contact.
Battery discharge
Quite often, especially in winter, after a period of inactivity, the car’s battery may discharge, and thickened oil during parking will not allow the weak battery to rotate the crankshaft with the starter. You can check the battery with a regular multimeter; in winter its voltage should not be less than 12V, in summer not less than 11V. This voltage is not an indicator of the battery charge; at such values it is better to charge the battery.
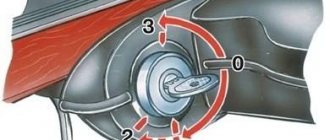
Egnition lock
In some cases, the contact part of the ignition switch may fail. This is due to aging or poor quality parts. In this case, when turning the key, the contacts will not close to turn on the starter.
Winding break
If the winding on the stator or rotor of the starter breaks, the magnetic field that rotates the armature will not appear and the starter armature will not move.
Technical characteristics of starter 57.3708:
- rated power within 1.55 kW;
- current consumption at idle 80 A;
- in a state of inhibition about 700 A;
- at a maximum power of 375 A.
4 magnets (permanent) are glued to the steel body of the VAZ 2110 starter, and from the inside they are all additionally attached with an aluminum flared sleeve. The covers and body of the structure are tightened with 2 studs. The anchor shaft rotates in 2 cermet liners, which are installed both in the cover and in the shaft support.
If you have seen a starter assembled and in action, you will have noticed that the torque directly from the armature shaft is transmitted to the drive shaft. This occurs through a planetary gearbox, which consists of a central gear, 3 planetary gears, an internal epicyclic gear and a carrier.
Replacing the VAZ 2110 starter
To remove the starter, you need to prepare a tool that will be needed during the work process.
Required tool:
- Ratchet;
- Extension;
- Head 13mm;
- Open-end wrench 10mm;
- Open-end wrench 13mm;
Step-by-step instruction
- Disconnect the negative terminal from the battery
- We dismantle the air filter box together with the mass air flow sensor
- Unscrew the wires from the starter
- Unscrew the nuts securing the starter to the gearbox
- Removing the starter
Classification of planetary gearboxes:
Based on the number of stages of the planetary gearbox, the following are distinguished:
Single-stage gearboxes are the most compact, while multi-stage gearboxes are much more complex in design and take up more space, but allow large gear ratios to be achieved.
Based on the fact of rigid fastening of one of the gearbox elements, the following are distinguished:
In the simplest planetary gearboxes, one of the links is rigidly fixed, and force is transmitted from one of the loose links to another with a fixed gear ratio. In differential gearboxes, none of the elements are fixed, which allows the gearbox to be used as a differential mechanism.
DEVICE OF PLANETARY REDUCER
The main parts of a planetary gearbox are usually elements such as the sun gear, which, as mentioned above, is located in the center of the gearbox. The same basic elements include the carrier. This part of the gearbox is designed to firmly fix the axes of the remaining gears, or as they are also called satellites. The satellites are identically sized gears that are located around the main gear. And finally, another important part of the planetary gearbox is the gear, which is called the ring gear. This gear has the appearance of a toothed wheel, which is located along the edge of all parts of the gearbox; this part has a coupling with the satellites. The operating principle of a planetary gearbox is as follows.
One of the elements of this device always remains motionless, in this case it is a ring part. The leading part in a planetary gearbox is the sun gear, and the driven parts are the satellites. As a rule, the most common use of planetary gearboxes is in such industries as mechanical engineering. However, it is often also used in the manufacture of various types of machines for cutting metal. Quite often, several planetary gearboxes are used at once; as a rule, these gearboxes are equipped with an automatic transmission.
Advantages of planetary devices
Compared to traditional gearboxes, we can highlight the following advantages that this device has: they can create huge speed ratios with a low number of gears. The gears of the mechanism are small in size due to their number. Thus, one more massive wheel distributes the load evenly across several satellites. It follows from this that the device is not very large and bulky. However, calculations and practice show that at high gear ratios, performance and efficiency are greatly reduced. And as a conclusion of all of the above, the main advantages are:
Such advantages also require appropriate manufacturing. Starting from calculation, design and ending with manufacturing - everything must be precisely accurate. These gearboxes have found a very wide range of applications in various industries: instrument making, machine tool manufacturing, mechanical engineering, etc. In this article we will dwell in more detail on the use of this device in the mechanical engineering industry.