Fuses and relays Ford Mondeo 4, 2007 - 2015
The fourth generation Ford Mondeo appeared in 2007 and was produced until 2015. The mid-size sedan shares its platform with the S-Max minivan, which debuted the same year at the Geneva auto show. The full-size Galaxy minivan also received this platform. In this material we will analyze in detail the fuse diagrams of the Ford Mondeo ( BD, BE, BG ) of the 4th generation 2007, 2008, 2009, 2010, 2011, 2012 and 2013, 2014, 2015 with gasoline and diesel engines.
Here you will find the locations and photos of the mounting blocks. Separately, we note the fuses responsible for the cigarette lighter and fuel pump.
In the trunk
Located behind the side trim on the left. Options depend on the car body.
To access it you need to remove the casing.
Photo is an example of execution (station wagon and liftback).
| Luggage block fuse diagram | ||
| Sedan | ||
| Station wagon and liftback | ||
| № | Decoding | Current, A |
| FB1 | Parking assistance module | 5 |
| FB2 | Suspension control unit | 15 |
| FB3 | Heated driver's seat | 15 |
| FB4 | Heated front passenger seat | 15 |
| FB5 | Left rear seat heating | 15 |
| FB6 | Spare | |
| FB7 | Right rear seat heating | 15 |
| FB8 | Spare | |
| FB9 | Electrically adjustable front passenger seat | 30 |
| FB10 | Anti-theft alarm | 10 |
| FB11 | Spare | |
| FB12 | Spare | |
| FC1 | Spare | |
| FC2 | Spare | |
| FC3 | Spare | |
| FC4 | Spare | |
| FC5 | CD changer, rear seat entertainment system | 7,5 |
| FC6 | Spare | 5 |
| FC7 | Front seat position memory module | 5 |
| FC8 | Keyless Entry System | 20 |
| FC9 | Spare | 5 |
| FC10 | Spare | 5 |
| FC11 | Spare | 5 |
| FC12 | Spare | 5 |
| FA1 | Left front door control unit (power windows, central locking, folding outside mirror, heated mirror) | 25 |
| FA2 | Right front door control unit (power windows, central locking, folding outside mirror, heated mirror) | 25 |
| FAZ | Left rear door control unit (window lifters) | 25 |
| FA4 | Right rear door control unit (window lifters) | 25 |
| FA5 | Locking rear door locks without door control units | 10 |
| FA6 | Sockets for connecting additional electrical consumers | 15 |
| FA7 | Relay solenoids | 5 |
| FA8 | Steering column lock | 20 |
| FA9 | Spare | |
| FA10 | Electrically adjustable driver's seat | 30 |
| FA11 | Accessories, trailer module | 20 |
| FA12 | Spare | |
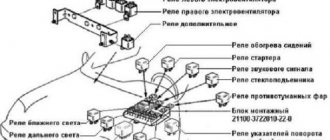
In the cabin
The mounting block is located under the front passenger's glove box. To access it, you need to turn the fixing screw and lower it down.
General form.
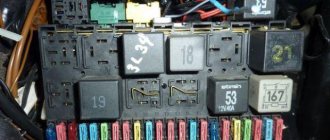
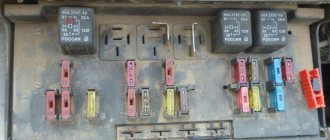
Fuses inside the cabin
The unit is located under the glove compartment, near the front passenger seat. To get to the fuses, you need to switch the latch and slide the block down.
| Serial number 1 | Purpose/color Rain sensor (dark yellow) |
| 2 | Airbags (red) |
| 3 | Steering stability (dark yellow) |
| 4 | Accelerator pedal(brown) |
| 6 | Audio (blue) |
| 7 | Steering wheel module (brown) |
| 9 | High beam headlights (blue) |
| 11 | Taillights-reversing light (brown) |
| 13 | Fog light (blue) |
| 17 | Interior light (red) |
| 19 | Cigarette lighter (blue) |
| 22 | Fuel pump (yellow) |
| 24 | Ignition fuse (dark yellow) |
| 26 | Alarm (yellow-brown) |
| 27 | Air conditioner power supply (yellow-brown) |
| 28 | brake light relay (yellow-brown) |
What to do when the cigarette lighter does not work
As already stated at the beginning, the most likely reason for a cigarette lighter failure is a blown fuse. Therefore, we take out the manual for your car, look for the fuse diagram and find the one that is responsible for powering the cigarette lighter socket. It can be either separate or combined with other systems (often it is marked in the form of a cigarette or the inscription Cigar).
“Ring” the desired fuse with a multimeter or test lamp to see if it is working. If there is no device, and the fuse itself does not have obvious signs of burnout, try replacing it with a similar one and checking the cigarette lighter. If it works, change the fuse. No - we are looking further.
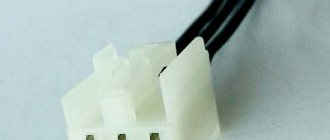
Ringing cigarette lighter contacts using a multimeter
The second place that is quite easy to check is the cigarette lighter socket. Carefully inspect it for foreign objects or burn marks on the sides. Further actions will require disassembling the panel and removing the cigarette lighter socket, as well as the presence of a multimeter or at least a test lamp. Don't forget to first remove the negative terminal of the battery!
Disconnect the chip with the cigarette lighter connector from the body and ring the contacts (if necessary, turn on the ignition). If voltage is present, carefully inspect the housing. There may be plaque or oxide on the terminals and connectors of the cigarette lighter, which can be removed with a cotton swab dipped in alcohol (wait for it to evaporate before turning on the device). If this does not help and the socket is clearly burnt out, then only replacing it will help.
The next element that needs to be carefully inspected is the fuse on the cigarette lighter housing. Most often, it has a 90-degree curved shape and connects the cigarette lighter contacts. If it burns out, the problem can be solved using a soldering iron or replacing the housing. In most cases, it is enough to solder or screw a piece of wire (aluminum with a cross-section of 1.5 mm2), which will close the contacts and act as a fuse.
If, when the fuse is working, the “ringing” of the chip with connectors indicates a lack of voltage in the network, then the problem is either in the wires or in the fuse mounting block, in which the conductive paths burn out. Moreover, in domestic cars it is most likely tracks, and in foreign cars it is wires.
To finally verify this, you can go in two ways:
- Disassemble the mounting block and inspect it for damaged tracks. Don't forget to take pictures of how it was originally. If the tracks are damaged, they need to be soldered.
- Find the electrical diagram of the car, find the connectors that come out of the mounting block to the cigarette lighter and ring them. If the voltage goes out and the cigarette lighter does not work, you will have to change the wire, which is quite difficult. If there is no voltage, the problem is in the mounting block.
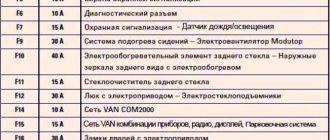
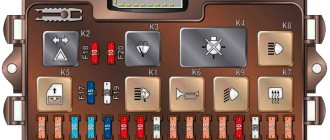
What to do if the cigarette lighter on VAZ cars does not work?
Since the cigarette lighter socket most often refuses to work for owners of domestic cars, below are some useful tips specifically for VAZs.
Start by inspecting the fuse. It is located in the mounting block in the engine compartment - the exact location can be seen in the diagram of your model:
- VAZ-2104, 2105, 2107 - F6 (8A/10A)
- VAZ-2115, 2114, 2108, 2109, 21099 - F7 (30A) or F4 (20A)
- VAZ-2101-2103 and 2106 - F1 (16A) and the entire 110 family - F6 (15A)
- Lada Kalina and Granta - F20 (15A)
- Lada Priora - F13 (15A), Lada 4x4 - F14 (16A)
- Vesta - F41 (20A)
- Largus - F19 (10A), F20 (7.5A) and F38 (15A)
- Xray (XRAY) – F33 (15A)
Ringing the cigarette lighter fuse using a homemade tester on a VAZ 2107
To determine if the cigarette lighter is faulty on a VAZ, ring the block (black - minus, red - power supply plus, white - plus when the lights are on)
If the fuse is working, also check if there is voltage in its socket.
The next step is to check if there is power at the cigarette lighter terminals. If your cigarette lighter only works when the ignition is on, turn the key in the lock. When the multimeter does not show 12 volts, then the problem is most likely in the tracks of the mounting block. Disassemble it and solder the burnt tracks. Well, if the multimeter shows that there is power, you need to change the cigarette lighter housing itself.
What to do if the cigarette lighter light does not work
As mentioned above, the cigarette lighter light has a separate fuse and a separate wire to supply current to the light bulb or LED. Therefore, first check the corresponding fuse, and if it is ok, disassemble the cigarette lighter and check the wire - most likely it just fell off. There is nothing to burn out here, so the problem can only be in these two places.
Relays and fuses of the Ford Mondeo 4 continue the evolution in the development of the filling of the model, which started with the third release.
Like its predecessors, the central mounting block is located in the cabin. The restyling of the model did not bypass it either. Car owners, when studying the diagrams, need to remember that their car may be pre-restyling and updated. These changes affected other units - in the engine compartment, where elements related to the operation of the engine and at the rear are concentrated.
Recommendations
If you are repairing the car yourself and do not go to a service station, it will be easier to print out the fuse location diagrams and store them in the car. These parts quickly fail and will have to be replaced more than once.
In this case, the good news is that the parts are not expensive, and replacing them is not difficult. For those who think ahead, it is easier to immediately purchase sets of certain fuses and store them until a certain event occurs. Nothing will happen to them and in the event of a breakdown, there will be no need to urgently look for the part. You will have everything in your hands.
It is worth choosing the right fuses and using the formula to calculate the current strength. If there is a high current in the circuit that is not suitable for the connection, the wiring can easily burn out, and there will be many more problems.
How to stop constantly running wipers?!
| <.></.> | <.></.> | <.></.>
Just the other day I had a similar problem: the wipers do not turn off in zero mode, they don’t stop in intermittent mode either, but the accelerated mode works as it should. I stopped the wipers by setting the switch between modes. The rear wiper worked fine.
then I went to Yura
We searched for the wiper relays, then I read on the drome that on some Toyotas they put a relay in the wiper switch. I took it apart, it’s not difficult, but if necessary, I’ll post a photo later.
Yura soldered this crap out of the switch for me (circled in red in the photo) to ring this crap, and I picked up the switch and tried it and decided that it would work and EVERYTHING worked. The only thing is that I didn’t check the operation of the washer glass, because... no possibility
Miniatures | <.>
Just the other day I had a similar problem: the wipers do not turn off in zero mode, they don’t stop in intermittent mode either, but the accelerated mode works as it should. I stopped the wipers by setting the switch between modes. The rear wiper worked fine.
then I went to Yura
We searched for the wiper relays, then I read on the drome that on some Toyotas they put a relay in the wiper switch. I took it apart, it’s not difficult, but if necessary, I’ll post a photo later.
Yura soldered this crap out of the switch for me (circled in red in the photo) to ring this crap, and I picked up the switch and tried it and decided that it would work and EVERYTHING worked. The only thing is that I didn’t check the operation of the washer glass, because... no possibility
| <.></.>
Just the other day I had a similar problem: the wipers do not turn off in zero mode, they don’t stop in intermittent mode either, but the accelerated mode works as it should. I stopped the wipers by setting the switch between modes. The rear wiper worked fine.
then I went to Yura
We searched for the wiper relays, then I read on the drome that on some Toyotas they put a relay in the wiper switch. I took it apart, it’s not difficult, but if necessary, I’ll post a photo later.
Yura soldered this crap out of the switch for me (circled in red in the photo) to ring this crap, and I picked up the switch and tried it and decided that it would work and EVERYTHING worked. The only thing is that I didn’t check the operation of the washer glass, because... no possibility
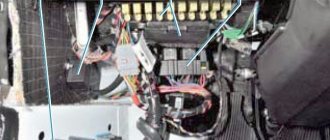
Block under the hood
It is located on the left side next to the headlight, under the protective cover.
It consists of 2 parts: a fuse section and a high power fuse section.
Photo - diagram
Target
| F1 | Transmission control module 10/15A |
| F2 | Diesel engines: glow plug monitoring, evaporator glow plug monitoring (version: 2.0 L Duratorq-TDCi Stage V and 2.2 L Duratorq-TDCi Stage V) |
| F3 | 70A 2.3L Duratec-HE and 2.2L Duratorq-TDCi with automatic transmission: Engine cooling fan - dual fan, 1.6L Duratorq-TDCi Stage V and 2.0L Duratorq-TDCi Stage V, 2, 0 l Duratorq-TDCi) |
| F4 | Glow plugs 60A |
| F5 | 60/70A Engine cooling fan (dual fan) |
| F6 | 7.5/10A HEGO 1 sensors (engine management), variable valve timing (engine management), CMS sensor, oxygen sensor 20A Evaporator glow plug |
| F7 | Relay solenoids 5A |
| F8 | 10/15/20A Powertrain control module, fuel gauge, MAF sensor, fuel rail pressure control valve (engine management system) |
| F9 | 10A MAF Sensor, Fuel Injectors, Variable Intake Valve, Variable Exhaust Valve, Ignition Coils (Engine Management System) 5A Fuel Pump Evaporator 7.5A MAF Sensor, EGR Bypass Valve, Fuel Pump Evaporator (Engine Management System) or for Cooling 1.6L valve bleed system, TMAF sensor, active radiator shutters, bypass valve, relay coil, auxiliary water pump |
| F10 | 10A Engine control unit 7.5A Additional water pump |
| F11 | 5/7.5/10A PCV Valve, VCV Valve, Water in Fuel Sensor, Purge Valve, Swirl Valve, Variable Throttle Valve, EGR Valve, IVVT (Engine Management System) Oil Control Valve, T. MAF Sensor, Variable Brake Valve, exhaust gas timing, active radiator dampers, canister purge valve, turbocharger control valve, boost pressure regulator (engine management system), evaporative emission control filter, electric wastegate |
| F12 | 10/15A coil with spark plug; Cartridge purge valve, power steering system pressure sensor (engine management system) 5A Relay coil |
| F13 | 15A Air conditioner |
| F14 | 10/15A 2.0L diesel filter heater, HEGO sensor |
| F15 | Starter relay 40A |
| F16 | 80A Additional diesel heater (PTC) |
| F17 | 60A Power supply A from central fuse box |
| F18 | 60A Power supply to central fuse box |
| F19 | 60A Powered by central fuse box |
| F20 | 60A Power D from central fuse block |
| F21 | 30A VQM/No VQM: Dashboard/Audio/A/C/FLR |
| F22 | Windshield wiper module 30A |
| F23 | Rear window heater 25/30A |
| F24 | Headlight washer 30A |
| F25 | ABS valves 30A |
| F26 | ABS pump 40A |
| F27 | Additional fuel heater 25A |
| F28 | 40A heater fan |
| F29 | Booking |
| F30 | 5A power ABS 30 |
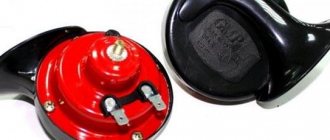
| F31 | Horn 15A |
| F32 | Fuel heater 5A - remote control |
| F33 | 5A Lighting control unit, engine compartment fuse block solenoids |
| F34 | 40A Heated windshield, left side |
| F35 | 40A Heated windshield, right side |
| F36 | 15A Power supply for rear window wiper 15 5A ABS |
| F37 | 7.5/10A Heated windshield washer nozzles/FLR+FSM KL15 |
| F38 | 10A Power supply PCM/TCM/EHPAS 15 5A Adaptive cruise control (ACC) |
| F39 | Adaptive lighting system (AFS) 15A |
| F40 | 5A Headlight range control/AFS module |
| F41 | 20A Instrument panel |
| F42 | 5A IP Shield 10A Engine Control Module, Transmission Control Module, Electro-Hydraulic Power Steering (EHPAS), 15, Power |
| F43 | 15A Audio Unit/Brake Valve Closing (BVC)/Digital Audio Broadcasting (DAB) Module |
| F44 | 5A Automatic AC System/Manual AC System |
| F45 | 5A FLR (start/stop) 15A Rear wiper |