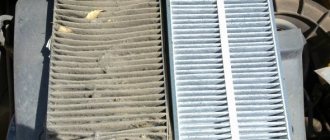
Owners of VAZ 2114 cars often complain about the carelessness and short-sightedness of the domestic manufacturer. In their opinion, some systems of the fourteenth Samara model have specific shortcomings. Take, for example, the cabin filter of a car, which receives the most complaints. It consists of a strip of filter material placed between two plastic grids. The configuration of such a flimsy filter is capable of retaining only the largest debris, allowing all other small particles of dirt and various gaseous compounds to enter the cabin.
Of course, given this state of affairs, any VAZ 2114 car owner will dream of installing a normal cleaning element. And this can be done, but first you should take care of purchasing a cabin filter adapter. This is exactly what we will talk about in our article. You will learn what functions it performs and how you can make it yourself.
How to replace the cabin filter on a VAZ 2113-VAZ 2115
Before we start, a few words about replacing the filter.
Lately, there are a lot of people who simply take and wash the old filter and, instead of buying a new one, put the old one in its place. We were even once asked the following question: “Is it possible to constantly wash the old filter and drive on it without buying a new one.” Well, in principle, it’s possible, but still, a new one doesn’t cost that much money, although there is a crisis in the country at the moment, then of course for some it will be an extra waste on the so-called replacement, so if you have money, then it’s best to buy and if no, then rinse the old filter from dirt and put it in its place, but just always remember one important detail; any thing gets tired over time, this applies to all metal fatigue, etc. Therefore, over time, the old filter becomes fragile and when washed, it can be very easily damaged, and again, it will not provide such cleanliness in the cabin, since not all particles of dirt can be cleaned from it; after all, some stubborn particles are still in it will still remain and may even remind you after installing the washed old filter in the car, due to dust getting into the cabin! 1) At the very beginning of the operation, open the hood and then take a Phillips screwdriver in your hands and use it to unscrew all the screws (unfortunately, only 1 screw is visible in the photo) that secure the filter cover.
2) Next, when all the screws securing the cover are removed, carefully grasp the cover with your hand and move it out of the engine compartment, thereby removing it from the car.
3) Next, take a brush or rag in your hands and, using them, clean the entire part where the filter is inserted (This part is indicated by an arrow), from dust, dirt and other substances harmful to human health.
When everything is cleaned, take the filter in your hands and see if it is wet or not, if it turns out to be wet, then look for the place where moisture gets on it, because moisture, as you know, deteriorates the filter much faster, as moisture seeps out Various bacteria, mold, and constant moisture in the cabin multiply in it and because of it, few people will like it, and it will most likely be accompanied by an unpleasant odor!
When all the faults have been removed, and the place where the filter is installed is cleared of dirt, then after all this, take the new filter in your hands and install it in place of the old one and tighten all the screws that secure the filter protective shield. (For more detailed filter replacement, see the video below)
Otherwise, in fact, you don’t have to remove the protective shield at all, you can directly remove the filter with the shield installed and immediately replace it with a new one, but if you do this, then some of the foliage that has accumulated under the shield will end up in the cabin, so see for yourself it’s your choice!
For more detailed instructions on how to replace the cabin filter, see the video below:
How much can you buy approximately this filter in a car store?
It all depends on where exactly you live, but still take 400 rubles with you, this should be enough, since I recently saw the price for this filter in a car store and it was about 300 rubles in my opinion!
Thanks for the detailed article! I bought this filter for 180 rubles. Saint Petersburg
Also, this black box is so big that you can’t squeeze it in or push it out. Just for the Russian people!
Installing the adapter on the car
DmitryCorsten Blog Error codes for on-board computers of the Samara-2 family VAZ 2113, VAZ 2114, VAZ 2115
Installation work, when compared with the manufacture of an adapter, is an order of magnitude simpler, however, even here there are enough nuances, ignorance of which can seriously complicate the completion of the task.
Since we have already decided that we will use a filter element from the VAZ-2110, which is larger in size than the original product, all that remains is to decide on the type of cabin filter. Recently, reusable products have appeared on sale. Even if you know a thousand and one ways to clean the old cabin filter of a VAZ-2115 stove, we do not recommend buying a reusable element: the savings here may turn out to be imaginary, since the initial service life of such products is significantly shorter, and cleaning it properly (to a new state) is all it takes it will not succeed, and re-installation will lead to even faster clogging.
Therefore, the choice remains between a cheap ten-point dust filter and its carbon version, which provides better and more effective protection. If preventing foreign odors and volatile substances from entering the cabin is not important to you, purchasing a filter with a layer of activated carbon does not make sense, but if caring about the health (yours and your passengers) is not an empty phrase for you, it is better to fork out for the carbon option. Sequence of steps to install the adapter:
- We assume that you have already removed the old SF, preparing a springboard for the subsequent set of works;
- take a car vacuum cleaner and vacuum the air ducts within reach;
- carefully clean the place where we will install the adapter so that nothing interferes with it;
- before installing the adapter, check its tightness in a bath of water (if air bubbles are detected, the gap must be sealed);
- The contact points between the adapter and the car body should also be treated with automotive sealant (we strongly do not recommend using silicone sealants for this);
- After installing the adapter, we mount a rubber seal on top, which will protect the hood trim from mechanical damage;
- install a new cabin filter in the rear part of the adapter;
- We assemble the body parts in reverse order.
Those carbon filter elements that are installed on the VAZ-2110 have a good service life, comparable to the best foreign analogues (about 20,000-30,000 kilometers), therefore, from the point of view of saving money, this option is not much more expensive than using a conventional filter (the cost of which is approximately double lower, but the service life is noticeably shorter). So the choice here is obvious - a filter with a carbon layer allows you to protect the interior from the penetration of almost all harmful factors present in the atmospheric air.
Is it possible to install a filter on a VAZ-215 from another car?
Replacing the cabin filter of Lada Vesta. Practical recommendations for choosing
This question is by no means idle, since the quality of even the original SF for this model is frankly unimportant. We can please sedan owners: this option exists, and you can install any modern filter, including carbon, which can protect the interior from dust, foreign odors, and carbon dioxide
How to do this if the product you like differs significantly in size? The cabin filter adapter for the VAZ-2115 comes to the rescue - a device that is essentially an adapter between attaching the frame to the heater and the filter element itself.
If properly executed, it will provide excellent cleaning of air coming from outside with a noticeable improvement in the filter throughput (it is frankly lame in the original one). Essentially, the adapter is a slightly modernized housing of the standard ventilation system, in which an element has been added for attaching a filter of the required geometric dimensions. To ensure that the housing and mount are airtight, they are connected with the installation of rubber gaskets
In principle, you can find an adapter for sale for a large number of filters from a wide variety of brands and models of cars, but experts recommend installing an adapter for the SF from the VAZ-2110: firstly, it is relatively cheap, and secondly, it is much easier to find or make , and thirdly, the cabin filter itself has a whole range of advantages, from a budget cost to excellent performance.
If you choose the option of purchasing a finished product, you can be sure of its high quality, but many car owners prefer to make such adapters themselves, fortunately, you do not need to purchase a specialized and expensive tool for this. The fact is that purchasing a cabin filter via the Internet is associated with certain risks, and some citizens, having made an unsuccessful purchase once, no longer want to repeat the mistake.
What does the cabin filter adapter look like and what functions does it perform?
Cabin filter adapter with a filter installed in it (new model) from VAZ-2110
The cabin filter adapter allows you to install a modern cleaning element in your car, which will retain dust and prevent it from settling on the inside of the windshield, dashboard and interior trim.
The product is a modernized casing for the cabin ventilation system with the function of integrating a cabin filter from VAZ 2110 cars. It has a detachable metal structure, consisting of two parts - front and rear, into which the filter is installed. The joints of both parts of the adapter are sealed with rubber gaskets, which improve the tightness of the structure and prevent moisture from entering the interior blower fan. The lower plane of the adapter is also treated with the same seal. The sides of the front part are responsible for keeping the filter dry when it rains or when washing the car. The location of the adapter in the car ensures that the filter is installed forward in the direction of travel of the vehicle. This orientation of this design allows the installation of a pleated cabin filter of the tenth Samara family. At the same time, removal and installation of the filter component for its periodic cleaning and replacement can be done in a few seconds. The adapter can be installed on cars with various modifications of the standard casing, and all thanks to the universal fastening of the adapter. There is no need to remove the heater fan during installation.
Step-by-step instructions for making a cabin adapter
Lada 2113 JACKAL Logbook Air filter pipe
Printed from Compass 3D V12 1:1
After this, we take the resulting stencils, metal scissors and cut out the galvanized parts.
Next, we bend the parts in a large vice, using a wooden mallet so as not to spoil them.
Then we drill holes with a drill, metal drill bit 3.
We fasten the parts with M3 bolts.
Next, you can install our craft. First, the part for the motor. Then on top is the part with the frame for the filter.
To make installation easier, the plastic grille to protect against leaves was removed.
We treat the adapter itself with glass sealant, carefully coating all the cracks and joints so as not to siphon, otherwise the whole point of the installation will be lost.
We also treat the places where the adapter comes into contact with the car body with auto sealant (silicone will not work)
The final touch is a rubber seal on the top of the adapter to protect the hood trim.
Now you can install a cabin filter of the new tenth sample.
Bottom line: if you wish, you can also paint the resulting upgrade and begin to fully enjoy the clean air of the cabin!
Making your own adapter
If you are confident that you can make an adapter yourself, this will allow you to save a lot of money, which you can spend on purchasing a good carbon filter element. First, you need to find the adapter manufacturing diagrams on the Internet (taking into account the fact that this product is designed for installation in a VAZ-2114, since there are a great many such diagrams on the Internet for a wide variety of cars).
It is advisable to first make a paper model according to the diagram with exact dimensions - this will allow you to understand which part fits to which and in what order. To make the case you will need galvanized or stainless steel sheets. Plastic is also not bad, but processing it will require a special tool, and working with polyvinyl chloride itself is much more difficult than with metal, especially if curved surfaces and bends are required.
Since you have already cut out the parts for the layout, you should have no difficulty reading the drawing. All the required bends can be made using a large vice and a rubber (or, alternatively, a wooden) mallet. To connect metal parts, you can use either rivets or bolts. Rivets are good because they do not require drilling holes, but you need to know how to work with them - otherwise there is a risk of damaging the thin-walled metal.
There is nothing complicated in replacing the cabin filter of a VAZ-2114
So, we figured out the purpose of this part, as well as its approximate service life. Now is the time to consider the replacement procedure itself. As mentioned above, there is nothing complicated here. The work is not labor-intensive, and it does not require much time. Accordingly, everything can be done with your own hands.
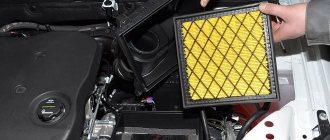
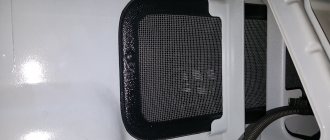
In order to replace the filter, you need to know where it is. In the “fourteenth” model, the designers placed this part under the hood. The filter is located under the air intake grilles - if you look at the windshield, it is approximately in the middle, near the windshield wiper motor. It's not difficult to find. The filter is hidden under a black plastic casing - it is also called a “jabot”.
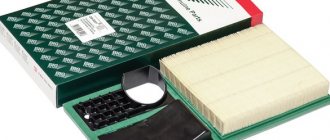
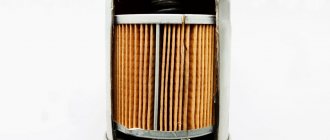
The filter device is very simple. It consists of only 3 parts:
- protective casing;
- plastic frame with a mesh structure;
- special paper and corrugation made from this material.
Currently, the choice of cabin filters in retail outlets is very large. Accordingly, you can choose the right option without much difficulty.
So, a new filter has been purchased, and the location of the old one is known. That's it - you can proceed directly to the replacement procedure. For this we will also need a rag, a Phillips screwdriver and a knife. Open the hood and remove the seal, as well as the fixing devices. Next you need to unscrew the screws. After this, you will need to remove the plastic plugs present here. It is most convenient to do this operation using a knife. At the same time, do not forget about accuracy. Firstly, the plug is easy to break. Secondly, due to sudden movement, it can fall into the engine compartment, or fly somewhere to the side. After all the plugs have been removed, you can unscrew the remaining screws.
Next, disconnect the frill and remove the plastic mesh. That's it - we've already reached the filter. We remove the old one and install a new one in its place. After that we put everything back together. It's easy to guess that this is all done in reverse order. Before installing a new filter, thoroughly wipe everything there with a previously prepared rag. When stopping the part, do not forget to press it against the body. Some car enthusiasts advise fixing the filter with mastic. Whether you need to do this or not – the choice is yours. There are no weighty arguments either for or against here.
Some particularly economical car enthusiasts, instead of installing a new filter, simply clean the old one with a vacuum cleaner. This is already an obvious overkill. Firstly, the filter itself is inexpensive, and you won’t be able to save too much here. Secondly, due to the fatigue of the material, it is very easy to damage it. As a result, your interior protection will end up with holes. So it’s better not to be so economical and just buy a new filter.
It might be worth considering an option such as an adapter. It is used, as a rule, if you often have to drive on dusty roads, and the filter simply cannot cope with its duty. Manufacturers claim that using an adapter provides several advantages. For example, it extends the life of the filter. In addition, the adapter eliminates the possibility of dirt being deposited inside the cabin. It allows you to install a filter of a more modern design, which means the air in the cabin will be a little cleaner. The adapter is inexpensive and can be purchased in many stores. Therefore, it has become quite widespread. However, whether to install such an adapter on your car or not is up to the owner himself.
https://www.youtube.com/watch?v=N3pjSq7-Xyc
Device functions
The functions of the cabin filter adapter may differ slightly from each other, depending on the modification made to it.
The main functions inherent in any adapter include:
- Purification of air coming from the street;
- Retention of dust, debris and harmful automobile exhausts;
- Providing the salon with clean, fresh air.
More expensive and high-quality filters have a number of additional functions, such as:
- Air purification from bacteria and microorganisms;
- Adding activated carbon sorbent;
- Extending service life;
- Possibility to install a filter of a more modern design into the adapter.
You can buy such a thing at any car store for about 1,500 rubles. But, let's consider the option of making an adapter yourself.
Cabin filter VAZ 2114
In the photo - VAZ 2114, on which a working cabin air purification system was installed for the first time
They began to install a more or less workable cabin air purification system only on the modification of the nine - VAZ 2114. It was not much different from homemade stocking filters, but the plant simply did not have anything to build on. There are no standards in the country, no regulatory data that relate to cabin filters, and work in this direction is not even being carried out. Except for the AvtoVAZ regulations on dust filters, which they themselves developed.
Even at the design stage 2108-2109, the designers did not include even a minimal protective element in the air supply system. The first front-wheel drive cars were released without any protection at all, and a few years later they began to install a filter that took into account the design features of the air supply system of cars 2108, 2109, 2113-2115. This means that no one was going to make any changes to the ventilation system, and they simply stuck a dust collection frame to it. This thing looks quite comical even against the background of a filter for an old vacuum cleaner - plastic frames, between which a strip of the so-called dust collector is inserted. Yes, leaves and flies could no longer get into the cabin, just like poplar fluff, but the bulk of dust microparticles, and especially chemically active pollutants, continued to enter the cabins, and drivers and passengers continued to receive a 14-fold overdose of carbon monoxide.
True, in 2003, the plant began to threaten with its intentions to install a cabin filter from 2110 on all older, but still produced models, but things did not go further than threats. The VAZ 2110, after all, has a full-fledged cabin filter that can fight not only leaves and fluff. This is already a cleaning station, which in terms of cleaning area is 6 times larger than a nine-piece cloth. Only this means that the filtration will be better, and the load on the heater motor is much less, because the throughput of the decimal filter is higher.