Main parts of the cooling system
The main function of the cooling unit is to remove excess heat from overheated engine parts. This is ensured by forced circulation of the cooling system of the VAZ 2109.
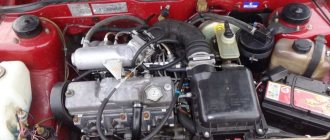
The VAZ 2109 engine cooling unit is a sealed closed-type system with forced fluid circulation. The presence of inlet/outlet valves ensures that pressure is maintained while the vehicle is moving. The VAZ 2109 cooling system diagram consists of the following main elements:
- expansion tank;
- liquid pump;
- radiator;
- electric fans;
- sensors;
- thermostat.
The operation of the VAZ 2109 cooling system begins with the expansion tank. The expansion tank is the main element in this scheme: the working fluid is poured into it. The tank contains a kind of reservoir into which excess boiled (expanded) antifreeze is supplied. After cooling, the liquid returns to the system. The total volume of the VAZ 2109 cooling system is 7.8 liters.
The expansion tank is equipped with valves whose function is to maintain a certain pressure. When the pressure increases, the exhaust valve operates, and when the pressure decreases, the inlet valve operates. The synchronized operation of the valves maintains the pressure in working condition. The expansion tank is made of a translucent substance (polyethylene), thanks to which you can observe the liquid level.
To connect the tank to the thermostat, hoses from the VAZ 2109 cooling system are used.
Expansion tank
This is one of the main components of the VAZ-2108 cooling system with an injector. Why is an expansion tank needed in a car? First of all, to maintain an optimal fluid level in the system. The problem is that when heated, any liquid, including antifreeze, expands. Therefore, all expansion tanks have two marks - minimum and maximum levels.
The tank is connected to the highest point of the system. Refilling must be carried out in such a way that the antifreeze level is clearly between the minimum and maximum levels. Therefore, when heating, the level will increase to the maximum level, and when cooling, it will drop to the minimum. Thanks to this, air pockets do not form inside the system, which affect the temperature.
Replacing assembly parts
After 15,000 km, the VAZ 2109 cooling system is diagnosed for leaks and repaired if a leak is detected at the junction of the unit with the hoses. Hoses must be replaced if they lose elasticity or damage their integrity. Before replacing hoses, it is recommended to empty the system of fluid. The VAZ 2109 cooling system pipes must be replaced when the hoses fail.
The liquid pump (pump) provides cooling of the motor. This element of the system is based on three parts:
The cooling system contains two radiators: the first is located between the headlights, the second is on the stove. Thanks to the favorable location of the main radiator, high-quality engine airflow is provided.
Another common problem in car repair is the brake system, you can read about it in this article. Read about how to tune a VAZ 2109 here.
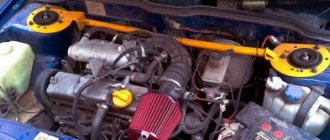
The pump housing is made of aluminum. The unit is driven from the crankshaft pulley by a toothed belt. If the VAZ 2109 cooling system malfunctions, it is recommended to replace the pump together with all elements. Check the engine and radiator plugs for leaks. If they leak, they should be tightened. The fan sensor may also leak and require a tighter seal. The radiator needs to be replaced due to an antifreeze leak.
For a more detailed introduction to the cooling system of domestic cars, we recommend watching a short video course.
Liquid pump
This is an element of the VAZ-2108 cooling system with a carburetor or injector, which allows for the best circulation of antifreeze through all pipes.
It is driven by the timing belt. Cooling system pump design:
- Aluminum alloy body.
- Axle mounted inside the housing.
- To ensure that the axle rotates normally, a bearing or bushing is installed. To prevent liquid from leaking out of the system, a seal is installed.
- On the outside of the axis there is a toothed pulley, which is driven by a timing belt.
- An impeller is installed on the inside. On cheap pumps they are made of plastic, on more expensive ones they are made of metal.
Perhaps these are all the elements of the coolant pump; you only need to mention the three mounting bolts and the paronite gasket.
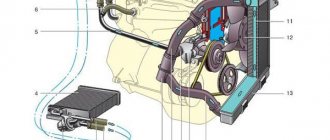
Engine cooling system VAZ-21083
1 – expansion tank; 2 – expansion tank plug; 3 – steam removal hose; 4 – hose from the expansion tank to the thermostat; 5 – radiator supply hose; 6 – radiator outlet hose; 7 – left radiator tank; 8 – aluminum radiator tubes; 9 – sensor for turning on the electric fan; 10 – right radiator tank; 11 – drain plug; 12 – radiator core; 13 – electric fan casing; 14 – electric fan impeller; 15 – electric motor; 16 – pump gear pulley; 17 – pump impeller; 18 – camshaft drive toothed belt; 19 – heater radiator outlet pipe; 20 – pump supply pipe; 21 – tap; 22 – heater radiator; 23 – hose for draining fluid from the heating of the inlet pipe to the carburetor heating block; 24 – carburetor heating block; 25 – exhaust pipe; 26 – heater supply pipe; 27 – hose for draining fluid from the heating of the inlet pipe and the carburetor heating unit; 28 – coolant temperature indicator sensor; 29 – thermostat.
Brake calipers
The brake calipers are located on the front axle of the wheel and are responsible for tightly pressing the pad and brake disc. These spare parts have a long service life and can remain suitable for use throughout the entire life of the vehicle. This unit is based on an aluminum housing, to which a pipe for supplying brake fluid is connected.
DETAILS: Replacing the backstage of a VAZ 2109 - All about Lada VAZ cars
The front circuit calipers are attached to the hub with two fixing bolts. It is worth noting that if you are repairing or replacing any parts, it is not recommended to press the brake pedal with the pads removed, as this will cause the piston to be squeezed out of the system. It will no longer be possible to insert it back and you will need to completely replace the entire assembly.
VAZ-2111 engine cooling system (with fuel injection system)
1 – expansion tank; 2 – plug; 3 – steam removal hose; 4 – hose from the expansion tank to the thermostat; 5 – coolant temperature sensor in the outlet pipe; 6 – throttle unit; 7 – radiator supply hose; 8 – radiator outlet hose; 9 – left radiator tank; 10 – right radiator tank; 11 – drain plug; 12 – radiator core; 13 – electric fan casing; 14 – electric fan impeller; 15 – electric motor; 16 – pump gear pulley; 17 – pump impeller; 18 – camshaft drive toothed belt; 19 – heater radiator outlet pipe; 20 – pump supply pipe; 21 – tap; 22 – heater radiator; 23 – coolant drain hose from the throttle pipe; 24 – coolant supply hose to the throttle pipe; 25 – coolant temperature indicator sensor; 26 – exhaust pipe; 27 – heater supply pipe; 28 – thermostat; 29 – coolant level sensor.
Cleaning
There are two ways to clean fuel nozzles, each of which has its own nuances. Choose for yourself which one you like best or is more affordable, taking into account the available funds.
Spray to the rescue
| Cleaning method | Necessary materials | Features of the event |
| First way | You will need:
|
|
| Method two | You will need:
|
|
Easy way to clean
Both operations take approximately 2-3 hours, but cost several hundred rubles. This is ten times cheaper than replacement and about the same amount more affordable than service stations.
After cleaning the injectors, check their operation. If this does not work, you will have to change it.
Loading …
Description of design
The cooling system is liquid, closed type, with forced circulation. The tightness of the system is ensured by the inlet and outlet valves in the expansion tank plug. The exhaust valve maintains pressure in the system when the engine is hot (due to this, the boiling point of the liquid increases and steam losses are reduced), it opens at a pressure of about 1.1 kgf/cm2. The intake valve opens when the pressure in the system decreases relative to atmospheric pressure by 0.03–0.13 kgf/cm2 (on a cooling engine). The thermal operating conditions of the engine are maintained by a thermostat and an electric radiator fan.
The coolant pump is a vane, centrifugal type, driven from the crankshaft pulley by a camshaft drive timing belt. The pump housing is aluminum. The roller rotates in a double-row bearing with a “lifetime” supply of lubricant. The outer ring of the bearing is locked with a screw. A toothed pulley is pressed onto the front end of the roller, and an impeller is pressed onto the rear end. The distance from the mating surface of the pump cover to the outer end of the pulley should be 52±0.5 mm, and to the outer (facing the block) end of the impeller - 39.8±0.1 mm. A thrust ring made of a graphite-containing composition is pressed to the opposite end of the impeller, under which there is an oil seal. If the pump fails, it is recommended to replace it as an assembly.
The redistribution of liquid flows is controlled by a thermostat with a solid heat-sensitive element. On a cold engine, the thermostat valve closes the pipe leading to the radiator, and the liquid circulates only in a small circle (through the thermostat bypass pipe), bypassing the radiator. On VAZ-2108, -21081, -21083 engines, the small circle includes the heater radiator, intake manifold, carburetor throttle assembly heating unit (on engines with semi-automatic starting - and the liquid chamber of the semi-automatic starting device). On the -2111 engine, fluid is supplied to the heater and the throttle assembly heating unit.
At a temperature of 87±2 °C, the thermostat valve begins to move, opening the main pipe, while part of the liquid circulates in a large circle through the radiator. At a temperature of about 102 ° C, the main valve opens completely, and the bypass valve closes, and all the liquid circulates through the engine radiator. The stroke of the main valve must be at least 8 mm.
The radiator consists of two vertical plastic tanks (the left one has a baffle) and two horizontal rows of round aluminum tubes with pressed-on cooling plates. To increase cooling efficiency, the plates are stamped with a notch. The tubes are connected to the tanks through a rubber gasket. The liquid is supplied through the upper pipe and discharged through the lower. Next to the inlet pipe there is a thin pipe for the steam pipe.
The electric radiator fan on VAZ-2108, -21081, -21083 engines is switched on by a sensor-switch screwed into the right radiator tank. Its contacts close at a temperature of 99±3 °C and open at 94±3 °C. On cars manufactured before 1998 (with an old fuse box), another sensor (TM-108) was installed that controls the fan motor through relay 113.3747 in the mounting block. On the -2111 engine, the fan is turned on by a signal from the electronic engine control unit (via a relay).
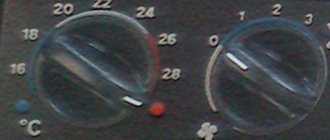
Fans and sensors
There are only two fans on the VAZ-2108 - on both radiators. Moreover, on carburetor engines, the main radiator fan is turned on using a sensor. Calling it a sensor, of course, would be a stretch, since the device is more like a thermostat, only the bimetallic plate moves not the valve, but the power contact. The element is installed in the side tank of the radiator.
As for the fan on the heater, it is turned on manually. Moreover, in order for the air to be hot, you must first open the tap with the appropriate handle. The fan power circuit uses a switch with 3 operating positions and a resistor block. A resistance is simply connected to the circuit, which allows you to lower the supply voltage. Because of this, the engine speed drops.
As you can see, there is nothing complicated in the design of the system. And all the elements that can be found on G8s are used on other machines, but in a slightly different design.
System operation
The VAZ engine cooling system injector is required to maintain normal operating conditions inside the unit. When the motor and parts located next to it overheat, there is a risk of their partial destruction; cooling prevents this. Of course, the system does not guarantee a strong decrease in the temperature inside the unit, but its resource is quite enough to maintain the operation of the “nine”. The VAZ 2109 cooling system circuit works by distilling a special liquid through tubes placed between the car parts. As the liquid passes through hot areas, it partially reduces the temperature of the parts and heats up itself. The heated liquid is then cooled, after which the operating cycle is repeated. Now in more detail about the structure of the cooling system. It looks like this:
- pipes of the VAZ 2109 cooling system, connecting the cooling fluid (coolant) storage tank, engine and radiator;
- radiator - a device in which the coolant is cooled;
- liquid storage tank;
- pump - ensures the movement of coolant inside the system;
- a thermostat that divides the system into 2 separate circuits.
In addition, there are several small tubes that connect some parts to each other, operation sensors and various valves. Here's how it all works:
- Engine cooling begins when the temperature of the unit reaches 93ºС. A sensor inside the cylinder block measures the ambient temperature and gives a signal when the indicator reaches the limit values.
- The pump starts working, forcing the liquid to move along the lines. First, the liquid leaves the cylinder block jacket and, already heated, is directed to the radiator.
- Reaching the radiator, the coolant is distributed into several flows, filling the thin radiator tubes (thanks to this design, cooling occurs faster).
- The fan turns on, and air flows cool the coolant, after which it leaves the system through another channel and again goes to the cylinder block jacket.
- The cycle repeats.
- When warming up the engine, a small circuit is used, in which a thermostat is built-in, the principle is the same, but everything happens much faster.
The volume of the system tank is 7.8 liters; if repair of any cooling element is required, the tank is emptied. Regular maintenance and fluid replacement should be carried out regularly - every 3 months. It is recommended to use antifreeze or other brands of antifreeze as a coolant.
Antifreeze or antifreeze?
Many drivers argue about what is better to fill in the cooling system of the VAZ-2108. Some people prefer foreign brands of antifreeze in red or green colors, while others try to pour exclusively blue antifreeze. But which is better and which driver is right? In fact, antifreeze is the same antifreeze, only of a domestic type. If we go deeper into the question, then literally “antifreeze” is any liquid that does not freeze. Even “Triple Cologne” can be called antifreeze.
Of course, the red and green liquids that are found on sale contain many more additives; they contribute to the normal operation of the entire system. But antifreeze also consists of a large number of additional substances that counteract the formation of scale and lubricate the pump elements and the insides of radiators. Therefore, to save money, you can safely use antifreeze in your VAZ-2108 car. It has high efficiency and fairly low cost.
When parts need to be replaced
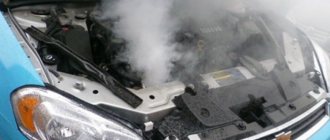
When is it necessary to replace the VAZ 2109 coolant and cooling system elements? The fluid must be changed regularly after a certain period of use. Parts are not changed periodically, but only after a breakdown. One of the causes of breakdowns is overheating due to a malfunction of some element in the cooling system. The following signs of engine overheating can be observed:
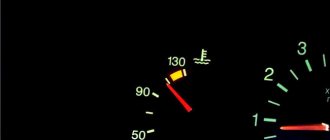
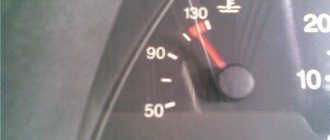
- the coolant temperature is higher than normal and can exceed 120ºС, this is indicated by a special sensor;
- there is a sharp drop in engine power;
- the sound of the engine changes, a ringing metallic knock appears;
- oil consumption increases;
- Coolant consumption increases significantly.
As a result of overheating, after you open the hood, you will see deformed parts - bent cylinder head, gasket edging, burnout of some parts. Repairing deformed parts does not make sense; they need to be replaced.
Expansion tank plug
This is one of the key elements of the VAZ-2108 engine cooling system; it is installed on the expansion tank and is necessary in order to maintain optimal pressure in it. The fact is that the boiling point of antifreeze or antifreeze is slightly higher than that of plain water. And if this liquid is still under pressure, the temperature rises another few degrees. The design of the plug consists of a body and two valves - one lets air in when the pressure decreases, and the second releases it when the pressure increases excessively. As a result, an optimal pressure value is maintained inside the system.
How to deal with cooling system malfunctions
Repair in most cases consists of replacing parts. We find the cause of the breakdown, and then replace the faulty part.
- Constant decrease in coolant level in the tank. If antifreeze is leaking, you need to check the cooling system pipes and thermostat, some of these parts are damaged, replace the faulty one with a new one.
- The temperature sensor near the cylinder block may have failed, check its contacts and reconnect. If that doesn't help, replace the sensor.
- Sometimes an air plug forms in the radiator, which prevents coolant from moving through the channels. How to remove air from the cooling system? Warm up the radiator and feel its body with a gloved hand. If it is cold in some places, it means there is a traffic jam. We will need the upper pipe (hose) that leads to the radiator. Fill the antifreeze tank full and turn on the engine. The pipe needs to be slightly bent, the air will gradually come out on its own. In order for the air lock in the cooling system to disappear, you will need to perform this procedure very carefully. The air will come out when antifreeze flows out of the pipe and the pipe itself heats up.
- If the problem is in the cylinder head gasket, you may not be able to detect the problem right away. The amount of coolant in the tank will gradually decrease, which is almost imperceptible. One of the signs of this malfunction will be the cloudy color of the oil, which occurs after the antifreeze enters the oil pan.
This type of problem can be repaired in the following way:
- find the carburetor from which the contacts and throttle cables should be disconnected;
- the choke cable is disconnected;
- the pipes are removed;
- the distributor is removed;
- unscrew the 3 bolt fastenings of the cylinder head distributor;
- the coolant is drained;
- remove everything that prevents you from getting to the gasket;
- the cover is removed after you unscrew the 2 nuts and the head;
- the old gasket is dismantled, then a new one is installed, after which it is reassembled in the reverse order.
These are the simplest options for dealing with malfunctions that lead to overheating of the VAZ 2109 engine. More complex repairs are best carried out at a service station. If you notice while driving that the coolant temperature has risen to 120ºC, the only way to cool the engine is to pull over to the side of the road and turn off the engine as soon as possible.
Diagnostics
To carry out diagnostics, arm yourself with a conventional tester with voltmeter mode.
- Connect the battery terminals to the poles of your measuring device. You will need an assistant to drive.
- After connecting the terminals to the voltmeter, look at the readings of the device. If the battery is working properly, the data will be 11-13 V.
- Turn the ignition key and at this moment measure the voltage. If the losses are only 1-2 Volts, then the starter works normally and does not show resistance.
- If the voltmeter parameters decrease by 2 times or more, the reason is in the starter. Or rather its bushings or brushes.
- Remove the starter and check the relay. Connect the battery terminals to its terminals on the body and transfer it to 12 V. If the overrunning clutch moves in the front cover, then the relay works perfectly. If not, replace it.
https://youtube.com/watch?v=mZu24DzhXns
Branches of individualization
The process of giving the salon an individual, unique appearance that will fully satisfy the owner’s needs can be divided into three branches:
- Replacement of standard elements with improved ones;
- Installation of additional components for the interior;
- Upholstery of the internal space with various materials.
Modernization is a useful event for the domestic nine. Even owners of cars in the Luxury configuration, where there are soft door panels and velor on the seats, complain about the poor build quality. What can we say about the standard gray interior.
Repair
Next, you have to check the condition one by one and take appropriate measures to eliminate problems with the following components of the starter:
- Brushes;
- Anchor;
- Overrunning clutch;
- Traction relay;
- Bushings.
Now let's talk about everything one by one.
Brushes
First, assess the current condition of the brushes. In most cases, they are the source of problems with the starter.
- Remove the pair of screws that hold the protective cover in place. The cover is now easy to remove.
- Use a screwdriver to remove the retaining ring from the shaft, and don’t forget about the adjusting washers.
- Unscrew 2 more tie rod nuts. Remove the manifold side cover.
- Use a screwdriver to press out the springs and remove the brushes from the holder.
- Measure the brushes with a caliper or ruler. If the height is less than 12 millimeters, the brushes must be replaced.
- It is also better to replace elements if there are chips, cracks and other defects on the surface.
Brushes
Anchor
If all is well with the brushes, the next suspect is the anchor.
- Remove the housing with the starter.
- At the anchor, look at the condition of the commutator, check whether the winding is intact.
- If there is carbon deposits on the collector or signs of breakdown, clean these areas with fine sandpaper.
- Check the armature and stator windings using a multimeter in ohmmeter mode.
Overrunning clutch
Parallel checking of the overrunning clutch with the armature will allow you to replace the latter at the same time.
To gain access to the clutch you will have to remove the armature from the front cover. At the same time, change it if necessary.
- Remove the retaining ring located near the overrunning clutch.
- Remove the restrictor ring.
- Remove the plastic lever stop, which will allow you to reach the anchor.
- Remove the intermediate support from the shaft.
- Check the condition of the gear teeth. If there are defects, the unit is replaced with a new one.
Bendix or overrunning clutch
Traction relay
Replacing the traction relay is necessary if, when voltage is applied to its terminals, the overrunning clutch does not extend. Sometimes the VAZ 2109 is equipped with collapsible relays. But it’s still better not to repair it, but to replace it with a new relay.
- To remove the relay, unscrew the two screws located on the front;
- Lift the relay, disconnect the armature from the lever;
- Remove the relay from the housing, grabbing the spring and armature. All elements are changed if necessary.
Relay
Thermostat
This element of the system also plays almost the main role. Although in fact, of course, the system can work without it. The cooling system of the VAZ 2109 engine is designed in such a way that the engine first warms up to operating temperature - about 90 degrees. After this, it is necessary to further cool the liquid. But the fact is that at first the antifreeze moves in a small circle - it passes through the cooling jacket, enters the heater radiator, and the excess goes into the expansion tank.
But when it warms up to operating temperature, the thermostat directs a flow of liquid into the radiator. How it works will be discussed a little below. A thermostat is a kind of mechanical valve. But it has a small modification that allows you to automate the cooling operation. A simple bimetallic strip that deforms when exposed to hot liquid. With its help, the antifreeze supply valve to the radiator opens/closes.
Disassembly
Having removed the gearbox, you can proceed directly to the main thing - disassembly. This will allow you to change damaged elements as you work, identify existing faults and solve problems on your own.
- Clean and thoroughly wash all external surfaces of the gearbox.
- Place the box in a vertical position and remove the back cover.
- Remove the clutch cable bracket, then use a rubber hammer to knock the rear cover off the gearbox.
- Remove the old gasket. She will be replaced.
- Engage any of the two gears - 3 or 4.
- Unscrew the bolt that holds 5th gear, then turn it on.
- Simultaneously turning on the indicated speeds will allow you to fix the shaft and prevent it from turning.
- Unscrew the nut on the secondary shaft, and then on the primary one.
- Remove the 5th speed synchronizer along with the fork.
- Remove the fork from the coupling. Remove the synchronizer as carefully as possible. If you allow the clutch to move away from the hub, the spring-loaded balls that secure the synchronizer will simply fall apart.
- Remove the 5th speed synchronizer locking ring.
- Remove the 5th speed driven gear from the output shaft.
- Remove the thrust ring located on the needle bearing.
- Remove the needle bearing itself from the 5th speed gear.
- Remove the drive gear from the drive shaft and remove the bearing plate.
- Now the needle bearing bushings should be removed from the secondary shaft, and the thrust washer should also be removed.
Jewelry work
- Take out the ring that secures the input shaft bearing, and then a similar ring for the secondary shaft.
- Unscrew the locking plug and remove the ball and locking spring. Next you can get a couple more clamps.
- Remove the rear engine mount.
- Unscrew the reverse gear lock plug, tilt the box and thus remove the lock ball and spring.
- Remove the clutch housing and gearbox housing mounting bolts.
- Acting as carefully as possible, separate the two units. To do this, there are grooves in the crankcases into which the ends of a screwdriver are inserted. By shaking, you can disconnect the elements without any problems.
- Remove the gearbox housing.
- Unscrew the bolt securing the 1st and 2nd speed shift fork.
- Remove the fork and stem.
- Unscrew the bolt securing the 3rd and 4th speed forks.
- Separate the rod head from engagement with the lever, remove it along with the fork from your gearbox.
When disassembling the box into parts, be sure to pay attention to the condition of the elements. If you detect faults in time and replace gearbox components, you can get by with inexpensive but very effective self-repair
Disassembled gearbox
What to pay attention to
So, following the instructions, we disassemble the gearbox of your VAZ 2109
Along the way, we pay attention to the following points:
- Bearings. When they wear out, a noise from the box occurs. Plus, worn bearings negatively affect the condition of other gearbox elements;
- Synchronizers and sealing washers. If their condition leaves much to be desired, then the gears shifted poorly precisely because of them. Replace them;
- Clutch system, cotters, coupling hub clamps. All this must be replaced separately if there are signs of wear or defects;
- Blocking rings, synchronizers. If there are chips or nicks, don’t even think about alternative solutions, replace them immediately;
- Bearing tracks. Over time they wear out. If signs of wear are found, perform a complete replacement. In this state, they were only a short time away from breaking;
- Gap between gears and locking rings. Normally it is no less than 0.6 mm. In case of deviations, there is only one solution - replacing the rings;
- Retaining rings. If elasticity is lost, these elements must be changed, since they will no longer be able to perform their functions.
When assembling the gearbox, do not forget to lubricate the new gaskets with a layer of lithol. And when pressing the oil seals, do it with the working edge inward. The metal clip should be located on the outside.
https://youtube.com/watch?v=cgCFhYP17
During the process of reassembling the gearbox, all rubbing components should be treated with oil, and do not forget about the sealant for connecting the clutch housings and gearbox. Doing everything yourself is quite possible.
Loading …